Published Date : 2019年6月15日17:03
Deep Manzai Part 6 〜 アプリ編 〜
前回の簡単なあらすじ
前回は
再度漫才台本の整形を行い、
seq2seqの 改良版Attentionを使って、 漫才師全体の応答文 生成をChainerの コードにて行いました。
コードはこちらの方のブログを そっくり使わせていただきました。 Attention Seq2Seqで対話モデルを実装してみた
改めて最高級のEnjoy感謝です!
seq2seqの 改良版Attentionを使って、 漫才師全体の応答文 生成をChainerの コードにて行いました。
コードはこちらの方のブログを そっくり使わせていただきました。 Attention Seq2Seqで対話モデルを実装してみた
改めて最高級のEnjoy感謝です!
DjangoさんDESU
さて、今度こそ
前回のモデルを使って
WEBアプリを作ってみましょうか。
Start Project
# 適当にプロジェクトを作る
django-admin startproject manzaiapp

# プロジェクト内へ移動
ce manzaiapp

# アプリを作る。
python manage.py startapp manzai
manzai/views.py
# manzai/views.pyを先に作っていきます。

from django.shortcuts import render

# 入力をするだけのページを表示する。
def gen_manzai(request):
    return render(request, 'manzai/input.html', {})
urls.py
# manzai/urls.py
# アプリケーションのほうのurls.pyを編集します。
from django.conf.urls import url
from django.urls import path

from . import views

urlpatterns = [
  path('manzai/', views.gen_manzai, name="gen_manzai"),
  path('manzai/output', views.output),
]


# manzaiapp/urls.py
# プロジェクトのほうのurls.pyを編集します。
from django.contrib import admin
from django.urls import path
from django.conf.urls.static import static
from django.conf.urls import include
from django.conf import settings

urlpatterns = [
    path('admin/', admin.site.urls),
    path('manzai/', include('manzai.urls')),
    ] + static(settings.STATIC_URL, document_root=settings.STATIC_ROOT)
manzaiapp/settings.py
# manzaiapp/settings.pyに追加。
INSTALLED_APPS = [
    'manzai.apps.ManzaiConfig',
    ...............,
    ................
]

.....................
.....................

LANGUAGE_CODE = 'ja'

TIME_ZONE = 'Asia/Tokyo'
manzai/static/manzai/input.html
# manzaiフォルダにstaticフォルダを作る。
# manzaiさらにフォルダを作る(アプリfolderと同じ名前)
# さらにそこにinput.htmlを作る。
# 中身を以下にする。
# スタイルにはBootstrapを使用しています。

<!DOCTYPE html>
<html lang="ja-jp">
<head>
    <meta charset="UTF-8">
    <meta name="viewport" content="width=device-width, initial-scale=1.0">
    <meta http-equiv="X-UA-Compatible" content="ie=edge">
    <title>manzai generator</title>
    <link rel="stylesheet" href="https://stackpath.bootstrapcdn.com/bootstrap/4.3.0/css/bootstrap.min.css" integrity="sha384-PDle/QlgIONtM1aqA2Qemk5gPOE7wFq8+Em+G/hmo5Iq0CCmYZLv3fVRDJ4MMwEA" crossorigin="anonymous">

</head>
<body>
    <div class="container text-center">
    <form method="post" action="output">
    <div class="form-group" style="padding:3rem 3rem 0 3rem;">
        {% csrf_token %}
        <input type="text" name="query">
        <br>
        <input type="submit" class="btn btn-primary" value="意味不明な会話を作る" style="margin: 2rem 0 0 0;">
    </div>
    </form>


    <div class="container text-cneter" style="padding: 1rem 0 1rem 0;">
    <h3>意味不明な会話スタート</h3>
    </div>


    <div class="container text-left border border-primary" style="padding:1rem;">
        {% block content %}
        {% endblock  %}
    </div>

    </div>
    <script src="https://code.jquery.com/jquery-3.3.1.slim.min.js" integrity="sha384-q8i/X+965DzO0rT7abK41JStQIAqVgRVzpbzo5smXKp4YfRvH+8abtTE1Pi6jizo" crossorigin="anonymous"></script>
    <script src="https://cdnjs.cloudflare.com/ajax/libs/popper.js/1.14.7/umd/popper.min.js" integrity="sha384-UO2eT0CpHqdSJQ6hJty5KVphtPhzWj9WO1clHTMGa3JDZwrnQq4sF86dIHNDz0W1" crossorigin="anonymous"></script>
    <script src="https://stackpath.bootstrapcdn.com/bootstrap/4.3.0/js/bootstrap.min.js" integrity="sha384-7aThvCh9TypR7fIc2HV4O/nFMVCBwyIUKL8XCtKE+8xgCgl/PQGuFsvShjr74PBp" crossorigin="anonymous"></script>
</body>
</html>
manzai/static/manzai/output.html
# input.htmlと同じ階層に応答文ようのoutput.htmlを作る。
{% extends 'manzai/input.html' %}


{% block content %}
<p style="line-break:strict; font-size:1.5rem;">あなた「{{ input_data }}」</p>
<p style="line-break:strict; font-size:1.5rem;">変態「{{ manzai_response }}」</p>
{% endblock  %}
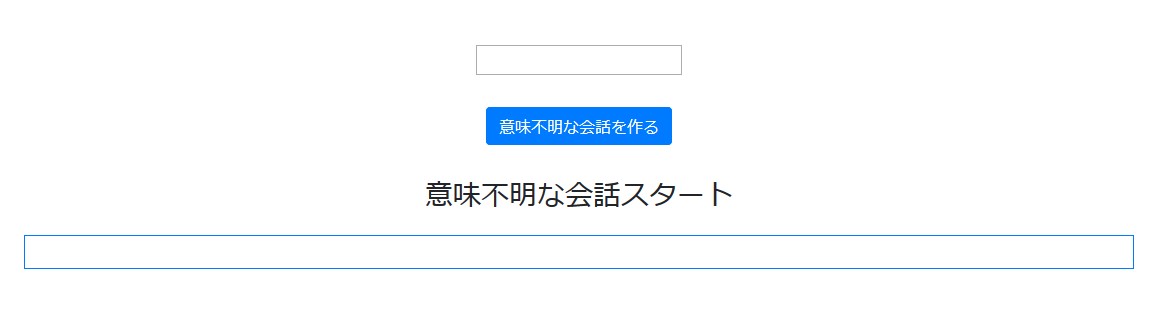
一回確認
# manage.pyがある階層で以下を実行。
python manage.py runserver

# 検索窓に以下を入力
localhost:8000/manzai/
以下が表示されれば成功。
manzaiapp/manzai_model.py
# 続いて、プロジェクト直下にSeq2Seqモデルを作るためのmanzai_model.pyを作成。
from copy import deepcopy
import numpy as np
from chainer import Chain, Variable, cuda, optimizer, optimizers, serializers
import chainer.functions as F
import chainer.links as L

# 他のサーバーでは知りませんが、
# CORESERVERはGPUが使えませんので
# 始めからxp=npを np に変えてもいいかもです。
if cuda.available and cuda.cudnn_enabled:
    xp = cuda.cupy
else:
    xp = np

# ここで、DataConverterからPredictに必要な部分のみ抽出して
# PredictManzaiクラスを作成。
class PredictManzai:
    def __init__(self,data_vocab):
        self.vocab = data_vocab # 単語辞書

    def sentence2words(self,sentence):
        sentence_words = deepcopy(sentence)
        sentence_words.append("<eos>")
        return sentence_words

    def sentence2ids(self,sentence):
        ids = []
        sentence_words = self.sentence2words(sentence)
        for word in sentence_words:
            if word in self.vocab:
                ids.append(self.vocab[word])
            else:
                ids.append(self.vocab["<unknown>"])
        ids = xp.array([ids], dtype="int32")
        return ids

    def ids2words(self,ids):
        words = []
        for i in ids:
            words.append(list(self.vocab.keys())[list(self.vocab.values()).index(i)])
        return words

# 以下学習に使ったときと同じコード
class LSTMEncoder(Chain):
    def __init__(self, vocab_size, embed_size, hidden_size):
        # Encoderのインスタンス化
        # :param vocab_size: 使われる単語の種類数
        # :param embed_size: 単語をベクトル表現した際のサイズ
        # :param hidden_size: 隠れ層のサイズ
        super(LSTMEncoder, self).__init__(
            xe = L.EmbedID(vocab_size, embed_size, ignore_label=-1),
            eh = L.Linear(embed_size, 4 * hidden_size),
            hh = L.Linear(hidden_size, 4 * hidden_size)
        )

    def __call__(self, x, c, h):
        # Encoderの計算
        # :param x: one-hotな単語
        # :param c: 内部メモリ
        # :param h: 隠れ層
        # :return: 次の内部メモリ、次の隠れ層
        e = F.tanh(self.xe(x))
        return F.lstm(c, self.eh(e) + self.hh(h))

# Attention Model + LSTMデコーダークラス
class AttLSTMDecoder(Chain):
    def __init__(self, vocab_size, embed_size, hidden_size):
        # Attention ModelのためのDecoderのインスタンス化
        # :param vocab_size: 語彙数
        # :param embed_size: 単語ベクトルのサイズ
        # :param hidden_size: 隠れ層のサイズ
        super(AttLSTMDecoder, self).__init__(
            ye = L.EmbedID(vocab_size, embed_size, ignore_label=-1), # 単語を単語ベクトルに変換する層
            eh = L.Linear(embed_size, 4 * hidden_size), # 単語ベクトルを隠れ層の4倍のサイズのベクトルに変換する層
            hh = L.Linear(hidden_size, 4 * hidden_size), # Decoderの中間ベクトルを隠れ層の4倍のサイズのベクトルに変換する層
            fh = L.Linear(hidden_size, 4 * hidden_size), # 順向きEncoderの中間ベクトルの加重平均を隠れ層の4倍のサイズのベクトルに変換する層
            bh = L.Linear(hidden_size, 4 * hidden_size), # 順向きEncoderの中間ベクトルの加重平均を隠れ層の4倍のサイズのベクトルに変換する層
            he = L.Linear(hidden_size, embed_size), # 隠れ層サイズのベクトルを単語ベクトルのサイズに変換する層
            ey = L.Linear(embed_size, vocab_size) # 単語ベクトルを語彙数サイズのベクトルに変換する層
        )

    def __call__(self, y, c, h, f, b):
        # Decoderの計算
        # :param y: Decoderに入力する単語
        # :param c: 内部メモリ
        # :param h: Decoderの中間ベクトル
        # :param f: Attention Modelで計算された順向きEncoderの加重平均
        # :param b: Attention Modelで計算された逆向きEncoderの加重平均
        # :return: 語彙数サイズのベクトル、更新された内部メモリ、更新された中間ベクトル
        e = F.tanh(self.ye(y)) # 単語を単語ベクトルに変換
        c, h = F.lstm(c, self.eh(e) + self.hh(h) + self.fh(f) + self.bh(b)) # 単語ベクトル、Decoderの中間ベクトル、順向きEncoderのAttention、逆向きEncoderのAttentionを使ってLSTM
        t = self.ey(F.tanh(self.he(h))) # LSTMから出力された中間ベクトルを語彙数サイズのベクトルに変換する
        return t, c, h

# Attentionモデルクラス
class Attention(Chain):
    def __init__(self, hidden_size):
        # Attentionのインスタンス化
        # :param hidden_size: 隠れ層のサイズ
        super(Attention, self).__init__(
            fh = L.Linear(hidden_size, hidden_size), # 順向きのEncoderの中間ベクトルを隠れ層サイズのベクトルに変換する線形結合層
            bh = L.Linear(hidden_size, hidden_size), # 逆向きのEncoderの中間ベクトルを隠れ層サイズのベクトルに変換する線形結合層
            hh = L.Linear(hidden_size, hidden_size), # Decoderの中間ベクトルを隠れ層サイズのベクトルに変換する線形結合層
            hw = L.Linear(hidden_size, 1), # 隠れ層サイズのベクトルをスカラーに変換するための線形結合層
        )
        self.hidden_size = hidden_size # 隠れ層のサイズを記憶

    def __call__(self, fs, bs, h):
        # Attentionの計算
        # :param fs: 順向きのEncoderの中間ベクトルが記録されたリスト
        # :param bs: 逆向きのEncoderの中間ベクトルが記録されたリスト
        # :param h: Decoderで出力された中間ベクトル
        # :return: 順向きのEncoderの中間ベクトルの加重平均と逆向きのEncoderの中間ベクトルの加重平均
        batch_size = h.data.shape[0] # ミニバッチのサイズを記憶
        ws = [] # ウェイトを記録するためのリストの初期化
        sum_w = Variable(xp.zeros((batch_size, 1), dtype='float32')) # ウェイトの合計値を計算するための値を初期化
        # Encoderの中間ベクトルとDecoderの中間ベクトルを使ってウェイトの計算
        for f, b in zip(fs, bs):
            w = F.tanh(self.fh(f)+self.bh(b)+self.hh(h)) # 順向きEncoderの中間ベクトル、逆向きEncoderの中間ベクトル、Decoderの中間ベクトルを使ってウェイトの計算
            w = F.exp(self.hw(w)) # softmax関数を使って正規化する
            ws.append(w) # 計算したウェイトを記録
            sum_w += w
        # 出力する加重平均ベクトルの初期化
        att_f = Variable(xp.zeros((batch_size, self.hidden_size), dtype='float32'))
        att_b = Variable(xp.zeros((batch_size, self.hidden_size), dtype='float32'))
        for f, b, w in zip(fs, bs, ws):
            w /= sum_w # ウェイトの和が1になるように正規化
            # ウェイト * Encoderの中間ベクトルを出力するベクトルに足していく
            att_f += F.reshape(F.batch_matmul(f, w), (batch_size, self.hidden_size))
            att_b += F.reshape(F.batch_matmul(b, w), (batch_size, self.hidden_size))
        return att_f, att_b

# Attention Sequence to Sequence Modelクラス
class AttSeq2Seq(Chain):
    def __init__(self, vocab_size, embed_size, hidden_size, batch_col_size):
        # Attention + Seq2Seqのインスタンス化
        # :param vocab_size: 語彙数のサイズ
        # :param embed_size: 単語ベクトルのサイズ
        # :param hidden_size: 隠れ層のサイズ
        super(AttSeq2Seq, self).__init__(
            f_encoder = LSTMEncoder(vocab_size, embed_size, hidden_size), # 順向きのEncoder
            b_encoder = LSTMEncoder(vocab_size, embed_size, hidden_size), # 逆向きのEncoder
            attention = Attention(hidden_size), # Attention Model
            decoder = AttLSTMDecoder(vocab_size, embed_size, hidden_size) # Decoder
        )
        self.vocab_size = vocab_size
        self.embed_size = embed_size
        self.hidden_size = hidden_size
        self.decode_max_size = batch_col_size # デコードはEOSが出力されれば終了する、出力されない場合の最大出力語彙数
        # 順向きのEncoderの中間ベクトル、逆向きのEncoderの中間ベクトルを保存するためのリストを初期化
        self.fs = []
        self.bs = []

    def encode(self, words, batch_size):
        # Encoderの計算
        # :param words: 入力で使用する単語記録されたリスト
        # :param batch_size: ミニバッチのサイズ
        # :return:
        # 内部メモリ、中間ベクトルの初期化
        c = Variable(xp.zeros((batch_size, self.hidden_size), dtype='float32'))
        h = Variable(xp.zeros((batch_size, self.hidden_size), dtype='float32'))
        # 順向きのEncoderの計算
        for w in words:
            c, h = self.f_encoder(w, c, h)
            self.fs.append(h) # 計算された中間ベクトルを記録
        # 内部メモリ、中間ベクトルの初期化
        c = Variable(xp.zeros((batch_size, self.hidden_size), dtype='float32'))
        h = Variable(xp.zeros((batch_size, self.hidden_size), dtype='float32'))
        # 逆向きのEncoderの計算
        for w in reversed(words):
            c, h = self.b_encoder(w, c, h)
            self.bs.insert(0, h) # 計算された中間ベクトルを記録
        # 内部メモリ、中間ベクトルの初期化
        self.c = Variable(xp.zeros((batch_size, self.hidden_size), dtype='float32'))
        self.h = Variable(xp.zeros((batch_size, self.hidden_size), dtype='float32'))

    def decode(self, w):
        # Decoderの計算
        # :param w: Decoderで入力する単語
        # :return: 予測単語
        att_f, att_b = self.attention(self.fs, self.bs, self.h)
        t, self.c, self.h = self.decoder(w, self.c, self.h, att_f, att_b)
        return t

    def reset(self):
        # インスタンス変数を初期化する
        # Encoderの中間ベクトルを記録するリストの初期化
        self.fs = []
        self.bs = []
        # 勾配の初期化
        self.zerograds()

    def __call__(self, enc_words, dec_words=None, train=True):
        # 順伝播の計算を行う関数
        # :param enc_words: 発話文の単語を記録したリスト
        # :param dec_words: 応答文の単語を記録したリスト
        # :param train: 学習か予測か
        # :return: 計算した損失の合計 or 予測したデコード文字列
        enc_words = enc_words.T
        if train:
            dec_words = dec_words.T
        batch_size = len(enc_words[0]) # バッチサイズを記録
        self.reset() # model内に保存されている勾配をリセット
        enc_words = [Variable(xp.array(row, dtype='int32')) for row in enc_words] # 発話リスト内の単語をVariable型に変更
        self.encode(enc_words, batch_size) # エンコードの計算
        t = Variable(xp.array([0 for _ in range(batch_size)], dtype='int32')) # をデコーダーに読み込ませる
        loss = Variable(xp.zeros((), dtype='float32')) # 損失の初期化
        ys = [] # デコーダーが生成する単語を記録するリスト
        # デコーダーの計算
        if train: # 学習の場合は損失を計算する
            for w in dec_words:
                y = self.decode(t) # 1単語ずつをデコードする
                t = Variable(xp.array(w, dtype='int32')) # 正解単語をVariable型に変換
                loss += F.softmax_cross_entropy(y, t) # 正解単語と予測単語を照らし合わせて損失を計算
            return loss
        else: # 予測の場合はデコード文字列を生成する
            for i in range(self.decode_max_size):
                y = self.decode(t)
                y = xp.argmax(y.data) # 確率で出力されたままなので、確率が高い予測単語を取得する
                ys.append(y)
                t = Variable(xp.array([y], dtype='int32'))
                if y == 0: # EOSを出力したならばデコードを終了する
                    break
            return ys
manzaiapp/settings.py
# DjangoがこのPythonファイルを認識できるように、
# manzaiapp/settings.pyに以下を追加。
INSTALLED_APPS = [
    'manzai_model',
    'manzai.apps.ManzaiConfig',
    ...............,
    ................
]
manzai/views.py
先に作っておいた
manzai/views.py
manzai/views.py
from django.shortcuts import render

def gen_manzai(request):
  return render(request, 'manzai/input.html', {})
の下に以下関数を追加。
import json,os,dill,sys
from copy import deepcopy
from chainer import Chain, Variable, cuda, optimizer, optimizers, serializers
from manzai_model import PredictManzai,LSTMEncoder,AttLSTMDecoder,Attention,AttSeq2Seq
import numpy as np

# SudachiぃがあるダイレクトリへPython Pathを通してあげる。
sys.path.append(os.path.join(BASE_DIR, 'data/src/sudachipy'))


def output(request):
  # システムの情報から、適切なBaseダイレクトリを取得する。
  BASE_DIR = os.path.dirname(os.path.dirname(os.path.abspath(__file__)))

  # データフォルダがあるダイレクトリのパスを取得。
  data_dir=os.path.join(BASE_DIR, 'data')

  # SudachiぃをPythonで使えるようにする設定。
  from sudachipy import config
  from sudachipy import dictionary
  from sudachipy import tokenizer
  with open(config.SETTINGFILE, 'r', encoding='utf-8') as f:
      settings = json.load(f)

  # 分かち書きしてくれるオブジェクトを作成。
  tokenizer_obj = dictionary.Dictionary(settings).create()
  # よしなに、単語を分けてくれるモードを指定。
  mode = tokenizer.Tokenizer.SplitMode.C

  # どのみちCPUだけど、一応設定。
  if cuda.available and cuda.cudnn_enabled:
      xp = cuda.cupy
  else:
      xp = np

  # パラメーターは覚えておいたほうが吉。
  EMBED_SIZE = 100
  HIDDEN_SIZE = 100
  BATCH_SIZE = 4096 # ミニバッチ学習のバッチサイズ数
  BATCH_COL_SIZE = 16
  # 特にここ
  N = 52735 # 教師データの数

  # 教師データの読み込み
  # といってもdata_vocabのみ。
  with open(data_dir+'/data_vocab.pkl','rb') as f:data_vocab=dill.load(f)

  # 予測するためのインスタント作成。
  predict_manzai = PredictManzai(data_vocab)
  # vocab_sizeを求める。
  vocab_size = len(predict_manzai.vocab)


  # モデルの宣言
  model = AttSeq2Seq(vocab_size=vocab_size, embed_size=EMBED_SIZE, hidden_size=HIDDEN_SIZE, batch_col_size=BATCH_COL_SIZE)

  # modelの読み込み。
  serializers.load_npz(data_dir+'/attention_batch4096_bc_16_manzai_model.model', model)

  # "意味不明な会話を作る"ボタンを押すとPOSTメソッドで値が送られてくる。
  input_data = request.POST["query"]

  # Sudachiぃで入力文を分かち書き。
  tokens=tokenizer_obj.tokenize(mode,input_data)
  query=[token.surface() for token in tokens]

  # 応答文を作成する。
  enc_query = predict_manzai.sentence2ids(query)
  dec_response = model(enc_words=enc_query, train=False)
  response = predict_manzai.ids2words(dec_response)
  response = ''.join(response).replace('<eos>','')

  # 出力に必要な変数を辞書型にしてテンプレート文に渡す。
  context = {"manzai_response": response,'input_data':input_data}
  return render(request, 'posts/output.html', context)
CORESERVER
ローカル作業の方は終了。
CORESEVER側の設定へチェンジ。
必要なライブラリのインストール
Chainer Install
pip install -U setuptools pip

pip install chainer

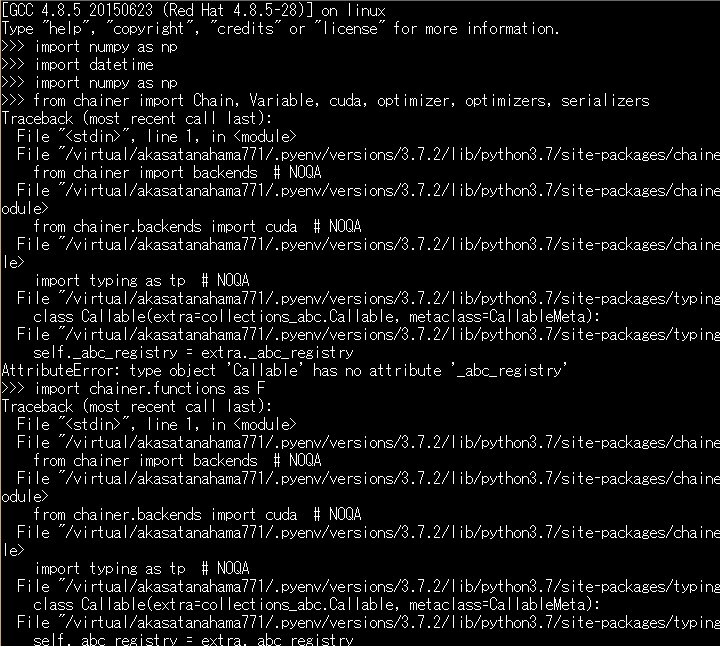
$ python
>> import chainer
Chainerインポートしようとして、
こんなエラーが出たら。
typingをアンインストールしちゃいましょう。
pip uninstall typing
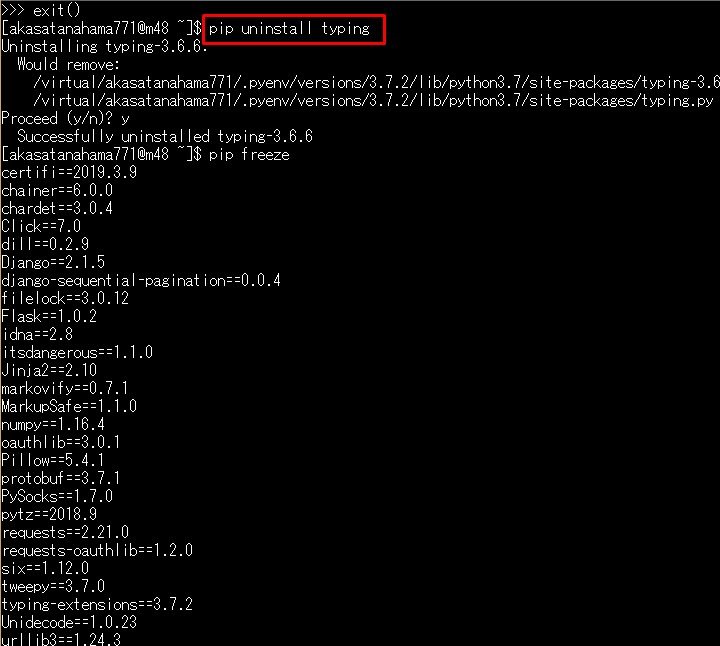
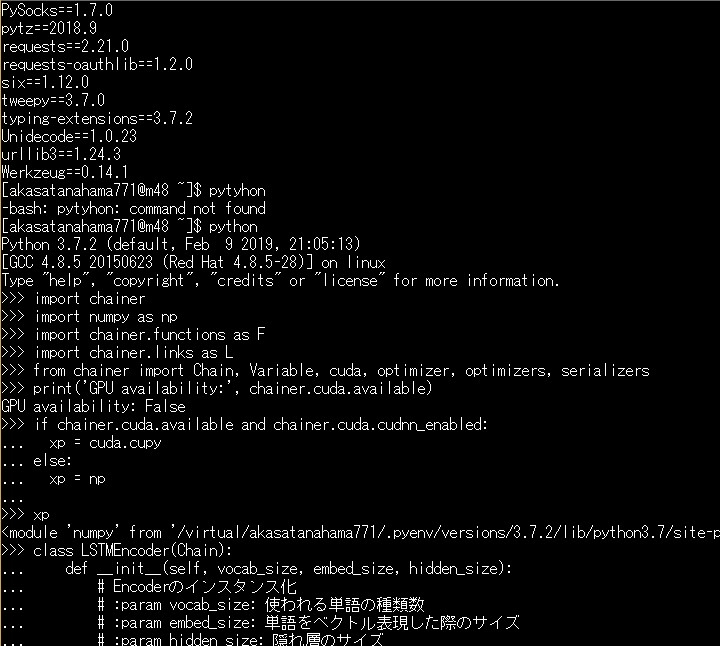
これで問題ないはずです。
$ python
>> import chainer
Sudachi Install
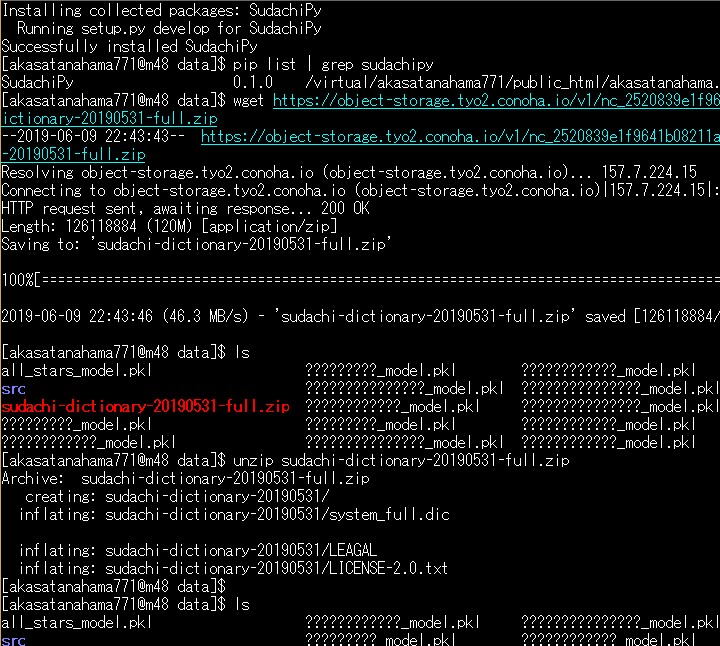
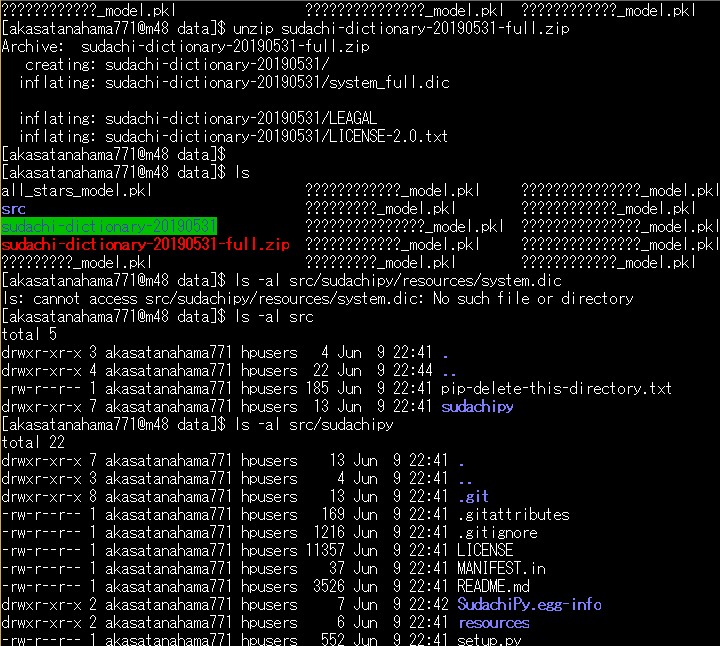
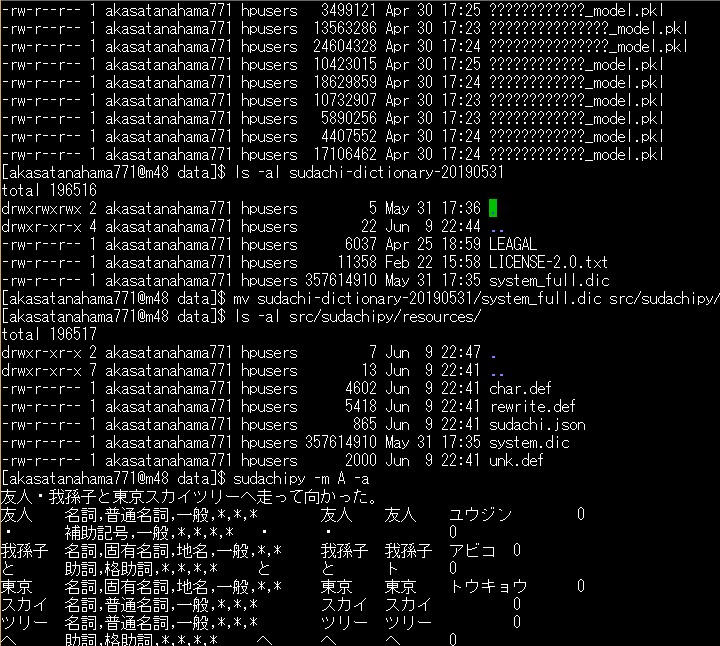
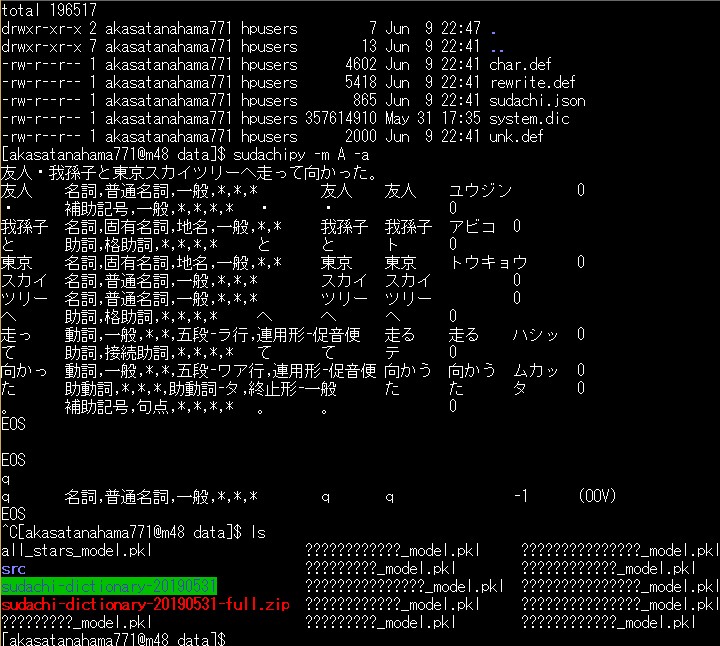
お次はSudachiぃ。
プロジェクトがあるフォルダにDataフォルダを作っておき

$ cd your django project directory

$ mkdir data

$ cd data

install sudachi and setup
$ pip install -e git+git://github.com/WorksApplications/SudachiPy@develop#egg=SudachiPy

$ pip list | grep sudachipy
SudachiPy                          0.1.0     /your/data dir/src/sudachipy

最新の辞書をダウンロード
wget https://object-storage.tyo2.conoha.io/v1/nc_2520839e1f9641b08211a5c85243124a/sudachi/sudachi-dictionary-20190531-full.zip
ZIPを解凍
unzip sudachi-dictionary-20190531-full.zip
辞書を使えるように、大本営へ移してあげる。
mv sudachi-dictionary-20190531/system_full.dic src/sudachipy/resources/system.dic

Sudachiぃが動くかどうかたしかめる。
$ sudachipy -m A -a
友人・我孫子と東京スカイツリーへ走って向かった。
デプロイ
このあたりの記事を参考に
必要なデータをサーバーの プロジェクトのDataフォルダにあげて、
1: 学習済みのモデルファイル。
2: data vocab のピックルファイル。
必要なデータをサーバーの プロジェクトのDataフォルダにあげて、
1: 学習済みのモデルファイル。
2: data vocab のピックルファイル。
$ python manage.py migrate
$ python manage.py collectstatic
これで動くかどうか見てみましょう。
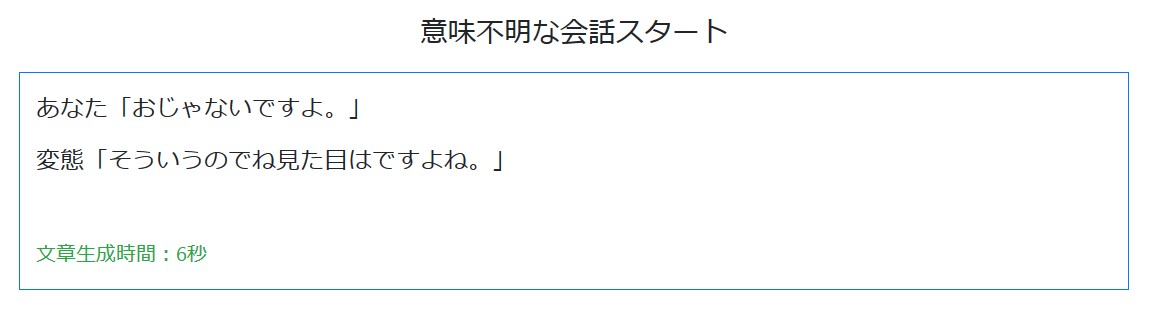
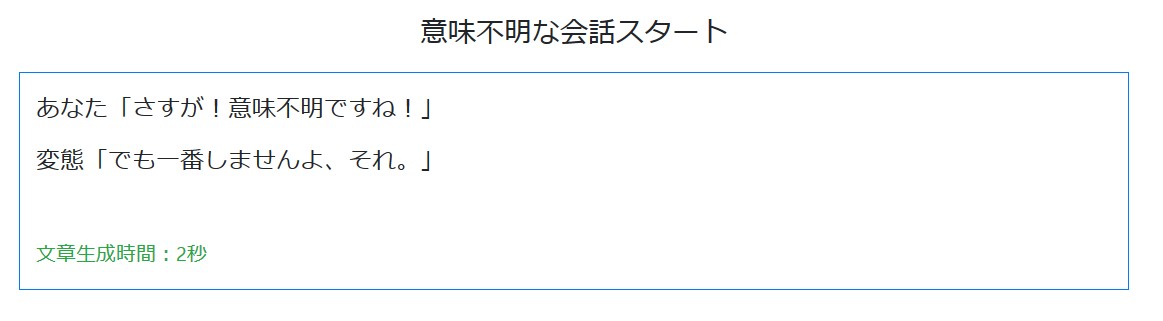
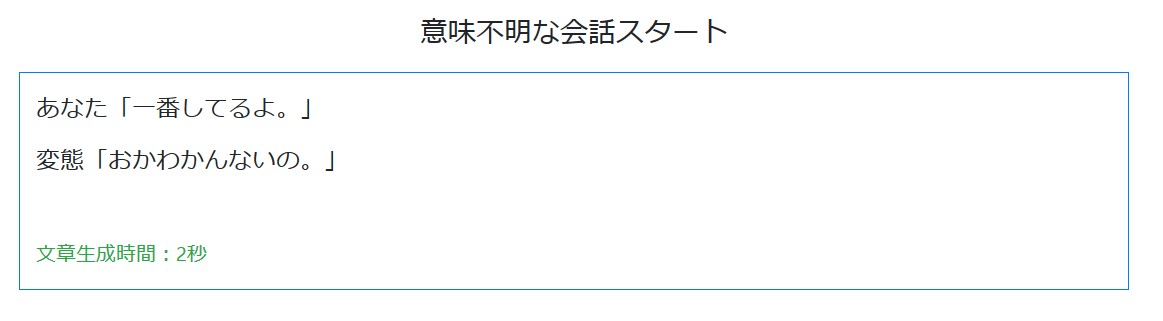
実食
ほんじゃ、まあ適当に
入力していってくだちぃ。

終了
ふう、4回でお腹一杯です。。。
このアプリは上のナビバーに 供えて置きます。
自分のサーバーは貧弱なので、 そんなに使わないでね。
あくまでデモ用なので。 って誰も使わないか!
ちなみに今丁度学習がいいところまで いったのでこちらのモデルを使います。
このアプリは上のナビバーに 供えて置きます。
自分のサーバーは貧弱なので、 そんなに使わないでね。
あくまでデモ用なので。 って誰も使わないか!
ちなみに今丁度学習がいいところまで いったのでこちらのモデルを使います。
次回へ続く
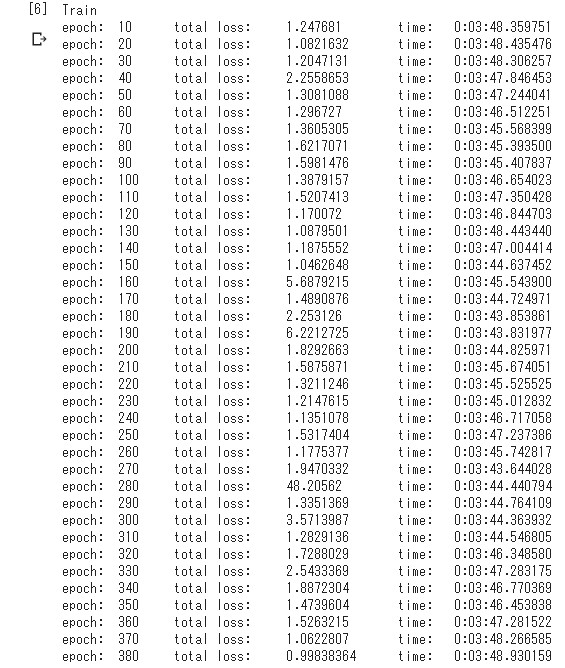
このアプリ、くそ重いです!
平気で20秒いくときがあります。
普通の会話のみならず、 漫才だったら 恐ろしい事案発生です。
本当はDjangoの FormやChanelなど使って
一覧表示をリアルタイム でやりたかったのですが
途中Redisを入れる際、 Dockerを入れる段階にて、
「そういえばapt-getが使えないんだった。。。」
「ソースコードからのビルドも Sudo権限がないんだった。。。」 となり断念。
無念。
まあ気を取り直して 次回はTransformerと ビームサーチに挑戦していきます。
また同じ話題が続いていく。。。
See You Next Page!
普通の会話のみならず、 漫才だったら 恐ろしい事案発生です。
本当はDjangoの FormやChanelなど使って
一覧表示をリアルタイム でやりたかったのですが
途中Redisを入れる際、 Dockerを入れる段階にて、
「そういえばapt-getが使えないんだった。。。」
「ソースコードからのビルドも Sudo権限がないんだった。。。」 となり断念。
無念。
まあ気を取り直して 次回はTransformerと ビームサーチに挑戦していきます。
また同じ話題が続いていく。。。
See You Next Page!