Published Date : 2019年11月7日10:47
Google Colaboratoryを利用した画像データの水増しとデータの保存
Augmentation and storing image data using Google Colaboratory
This blog has an English translation
画像認識シリーズ第4弾です。前回のブログ記事。
This is the fourth image recognition series. Last blog post.
前回は画像データ水増しの為のGoogle Colaboratoryの設定を行いました。 今回はその続きです。
Last time I set up Google Colaboratory to augumentation the image data. This time, I will start the continuation.
この手のものはやり尽くされていますが、ただ一から全部やってみたかった。それだけです。 つーことでお次はGoogle ColaboratoryとPythonを利用して画像の水増しと学習用のデータを保存していきます。
This kind of thing is done by many people, but I just wanted to do it all from scratch. That's all. The next step is to use Google Colaboratory and Python to augmentation the image and store the learning data.
目次
Table of Contents
概要 Overview |
画像データの水増しScript Python script for Augmentation of image data |
Scriptの簡単な説明 Brief description of the Script |
ページの最後へ Go to the end of the page. |
概要
Overview
まず、Google Colaboratoryの設定をする。 次にGoogle Driveへ前回集めた画像をアップロードする。
First, set up Google Colaboratory. It then uploads the images to Google Drive.
画像は−30度から30度まで6度刻みで回転させ、 さらにその画像を反転させる。 合計10枚画像を水増しする。
The images is rotated in 6 degree increments from -30 to 30 degrees. These Images are then inverted. That is, a total of 10 images are Augmentated
最後に、画像のデータをNumpyを使い数値化して保存する。
Finally, the image data is digitized and store using Numpy.
今回は実際にPythonスクリプトを書いていきます。
This time, I'm going to write a Python script.
画像データの水増しScript
Python script for Augumentation of image data
まず最初にコード全体をお見せします。
I'll show you the whole code first.
from PIL import Image
import glob
import numpy as np
from sklearn import model_selection

labels = ["dogs", "cats", "monkeys", "birds", "fish", "lizards"]
total_labels = len(labels)
image_size = 100

X = []
Y = []

for idx, label in enumerate(labels):
  dir_name = "data/" + label
  files = glob.glob(dir_name + "/" + "*.jpg")
  for idy, file in enumerate(files):

    if idy >= 69:
      break

    image = Image.open(file)
    image = image.convert('RGB')
    image = image.resize((image_size, image_size))
    data = np.asarray(image)

    for angle in range(-30,30,6):
      rotated_image = image.rotate(angle)
      data = np.asarray(rotated_image)
      X.append(data)
      Y.append(idx)

      transposed_image = image.transpose(Image.FLIP_LEFT_RIGHT)
      data = np.asarray(transposed_image)
      X.append(data)
      Y.append(idx)

X_train, x_test, Y_train, y_test = model_selection.train_test_split(X, Y)
comb = (X_train, x_test, Y_train, y_test)
np.save("data/augumented_images.npy", comb)
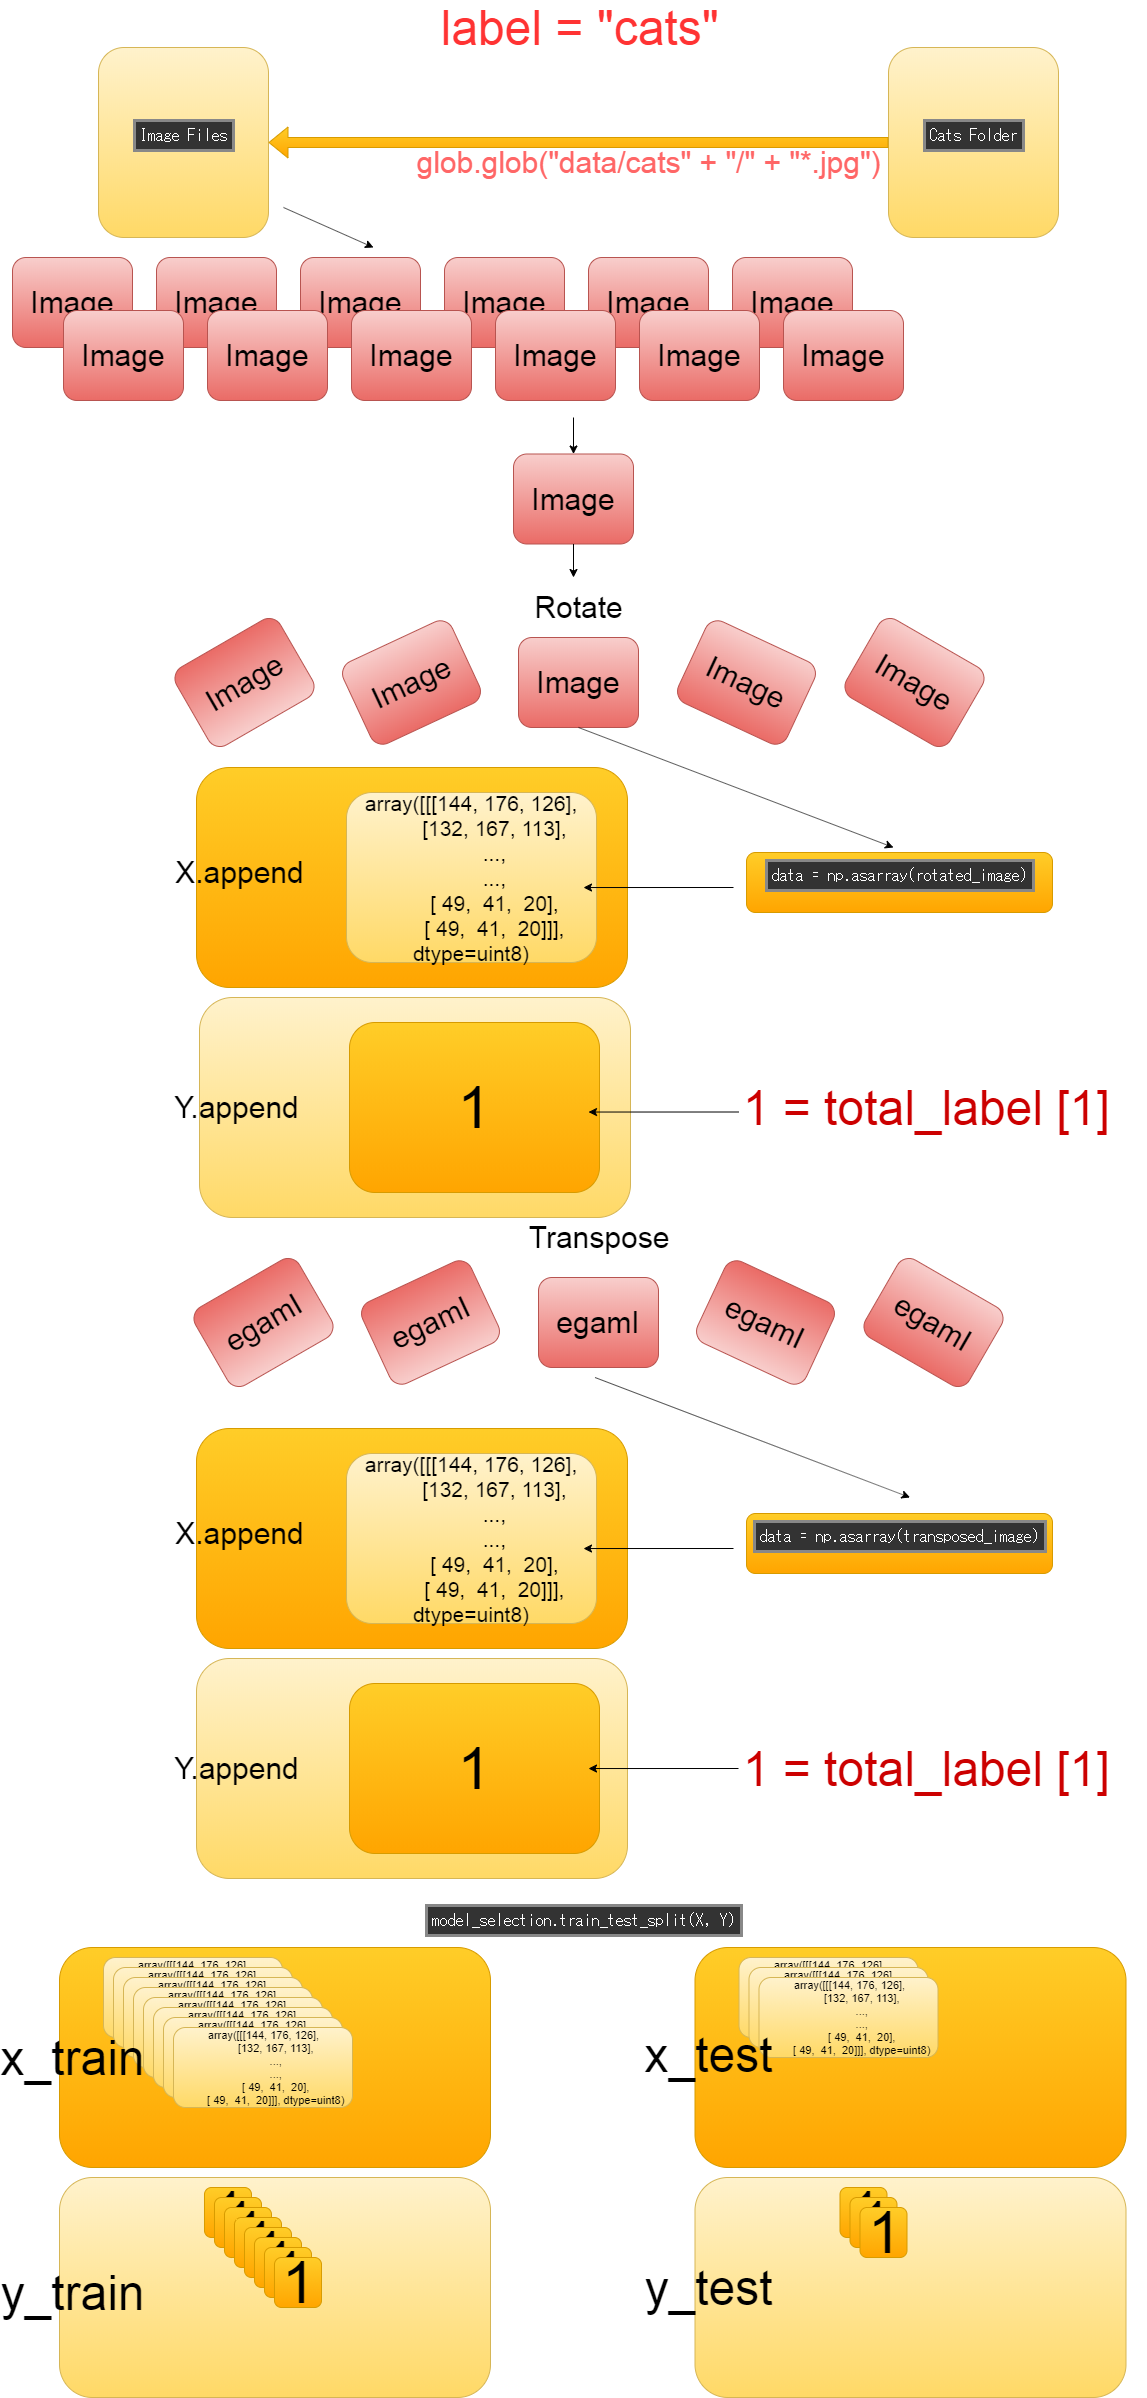
大体の流れを図にすると以下に様になると思うザマス。
The general flow shown below.
Scriptの簡単な説明
Brief description of the Script
データ水増しのスクリプトを簡単に説明していきます。
Let's take a quick look at the script of augumentation the image data.
from PIL import Image
import glob
import numpy as np
from sklearn import model_selection
画像データを取り扱うためにPillowをインポートする。 一括で画像をリスト化して取り出す為にglobをインポートする。 numpyarray形式で画像データを保存するためにnumpyをインポートする。 訓練用データとTEST用データを分ける為にscikit-learnからmodel_selectionをインポートする。
Import pillow to handle image data. Import glob to list and retrieve images in bulk. Import numpy to save image data in numpyarray format. Import model_selection from scikit-learn to separate training data and test data.
labels = ["dogs", "cats", "monkeys", "birds", "fish", "lizards"]
total_labels = len(labels)
image_size = 100

X = []
Y = []
所謂ラベル付け。
犬の画像に「これは犬の画像ですよ」とラベルを貼らなければ、
学習の為に与えられた画像が何を意味しているのか分からない。
意味(正解の基準)が分からなければ、学習が正しく進められない。
まさに今の自分状態。独学は楽しいですが、偉大なメンターの存在はデカイんDESU。
So-called labeling. If you don't label your dog image with [This is a picture of a dog]. A computer that knows nothing doesn't know what a given image means. If Computer doesn't understand the meaning (criteria for correct answers), It can't learn properly.
image_sizeは横幅と縦の長さを100pxにリサイズするために使う。 後で変更可能なように変数にしておく。 横幅と縦の長さを統一すれば学習しやすくなるため。
image_size is used to resize of the image width and height to 100px. Make it a variable that you can change later. Unifying the width and height of all images makes it easier for computers to learn.
Xには画像の数値データが入り、Yにはラベルが入ります。
X initialized as an empty array will contain the numeric data of the image, and Y will contain the label.
for idx, label in enumerate(labels):
    dir_name = "data/" + label
    files = glob.glob(dir_name + "/" + "*.jpg")
    for idy, file in enumerate(files):

      if idy >= 69:
        break
ラベルの名前毎に画像を取り出していきます。 そしてこの69という数字は各ラベルのイメージの枚数の最小単位です。 前回の画像の前処理を行った際、あまりにも学習用に適さない、またはラベルと関係無い画像が多すぎた生き物の画像フォルダが ありました。 そのせいで、一番少ない画像フォルダの総枚数が69枚になってしまった為、 69枚をリミットととして、各ラベルの画像数を統一させます。
The images is extracted for each label name. The number 69 is the smallest number of images for each label. When I preprocessed the images last time. I found there were folders of images of creatures that were too unsuitable for learning or too many images unrelated to labels. As a result, the total number of images in the smallest image folder has become 69, so we set a limit of 69 images and unify the number of images on each label.
        image = Image.open(file)
        image = image.convert('RGB')
        image = image.resize((image_size, image_size))
        data = np.asarray(image)
これは上から順番に、 「画像ファイルを開く」 「色の形式をRGBに変換」 「画像を横幅、縦の長さ100pxでリサイズ」 「np.asarrayを使い画像をNumpy配列に変換する」
This is in order from the top, "Open image file." "Convert color to RGB." "Resize image width and height by 100px." "Converting images to NumpyArrays Using np.asarray."
        for angle in range(-30,30,6):
            rotated_image = image.rotate(angle)
            data = np.asarray(rotated_image)
            X.append(data)
            Y.append(idx)

            transposed_image = image.transpose(Image.FLIP_LEFT_RIGHT)
            data = np.asarray(transposed_image)
            X.append(data)
            Y.append(idx)
画像は−30度から30度まで6度刻みで回転させ、 さらにその画像を反転させる。
The images is rotated in 6 degree increments from -30 to 30 degrees. These Images are then inverted.
X_train, x_test, Y_train, y_test = model_selection.train_test_split(X, Y)
comb = (X_train, x_test, Y_train, y_test)
np.save("data/augumented_images.npy", comb)
全ての処理が終わったら、model_selectionのtrain_test_split関数を使って訓練用データとテスト用データを 3対1の割合で分ける。
When all is done, use the train_test_split method of model_selection to split the training and test data. The data are divided into 3:1 ratios.
後は、全てのデータをTupleで纏めて、NPY形式で保存する。
All the data is then combined in tuple and stored in npy format using numpy.
それでは次回、作成した訓練用データとテスト用データを使って学習させていきましょう。
Next time, let's do DeepLearning using the created training data and test data.