Published Date : 2020年4月15日11:41
【How to】Windows Task Scheduler : Python : Slack : Google Sheets【Automation : 作業自動化 Part 4】
This blog has an English translation
YouTubeにアップした動画、「【learn quickly】【素早く学ぶ】Part 4 - Automation using the Windows Task Scheduler : Windowsタスクスケジューラーでの自動化【作業自動化】 」の補足説明の記事です。
Here's a little more about the "【learn quickly】【素早く学ぶ】Part 4 - Automation using the Windows Task Scheduler : Windowsタスクスケジューラーでの自動化【作業自動化】 " video I uploaded to YouTube.
リモートワーク、在宅ワーク、テレワーク等で活躍するであろう、チャットツールのSlack、
どこにいてもWEB上で表計算の編集の共有ができるGoogleスプレッドシート、
これらのツールをPythonを使って自動化して作業効率を上げよう。
Slack, the chat tool, and Google Spreadsheets,
the service that lets you edit spreadsheets anywhere on the web.
Automating these tools using Python will improve your efficiency.
全体の説明は動画に任せるとして、補足が必要だろうと思われる部分を説明していきます。
I'll leave the entire explanation to the video, but I'll explain the parts that I think need to be supplemented.
シリーズの第4部の内容。
The contents of the series Part 4 are as follows.
1: Part3で作成した①と②のスクリプトを統合する。③のスクリプトを単独で動かせるようにする。つまり朝の報告と夕方の報告の二つのスクリプトを用意する。
1: Integrate the scripts ① and ② created in Part3. To independently run a script ③. So you have two scripts, In other words, one for the morning report and one for the evening report.
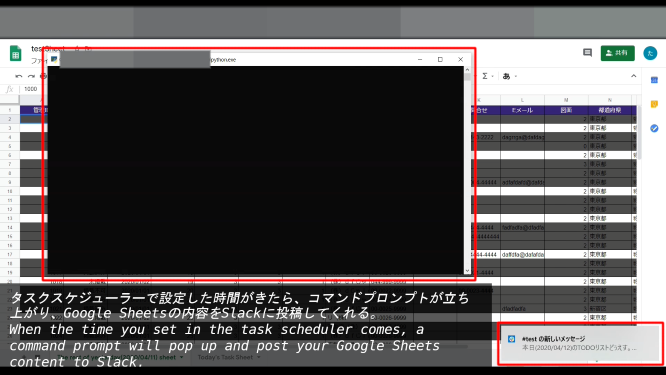
2: そして、タスクスケジューラーで時間を設定して二つのスクリプトを自動で起動させます。
2: Then set the time in the task scheduler to automatically start the two scripts.
目次
Table of Contents
① Part3で作成した①と②のスクリプトを統合する ① Integrate the scripts ① and ② created in Part3 |
② Windowsタスクスケジューラーで二つのスクリプトを起動させる ② Run two scripts in the Windows task scheduler |
ページの最後へ Go to the end of the page. |
① Part3で作成した①と②のスクリプトを統合する
① Integrate the scripts ① and ② created in Part3
それでは前回作ったスクリプトを統合して二つに分けていきましょう。
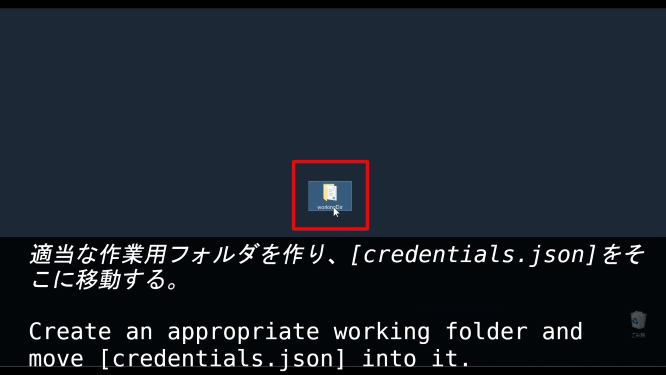
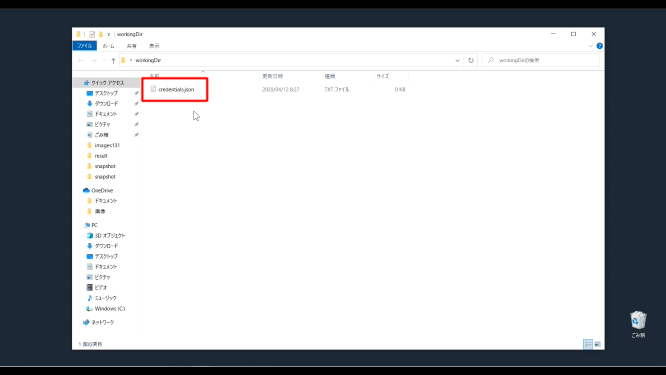
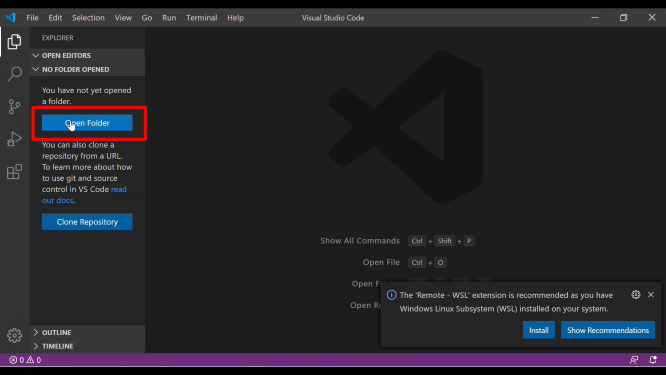
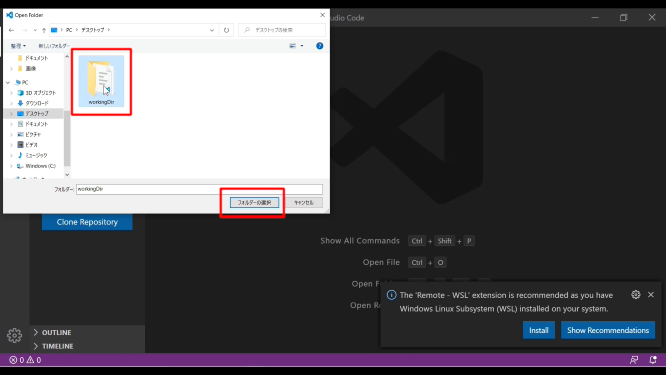
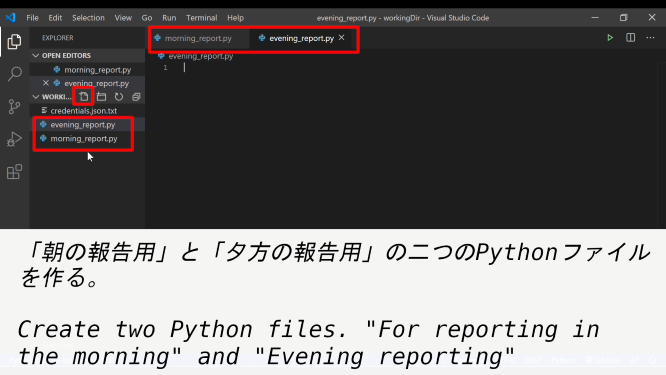
まずは作業用フォルダを作って、VS Codeからそのフォルダを開きます。
Now let's integrate the script we created last time and split it into two parts (For morning and evening reports).
First, create a working folder and open it from VS Code.
morning_report.py
朝の報告用のスクリプトです。
Here's the morning report script.
import gspread
from oauth2client.service_account import ServiceAccountCredentials
import pandas as pd
from gspread_formatting import *

import requests
import json
# line 9
from datetime import datetime as dt

scope = ['https://spreadsheets.google.com/feeds',
        'https://www.googleapis.com/auth/drive']

credentials = ServiceAccountCredentials.from_json_keyfile_name('credentials.json', scope)
gc = gspread.authorize(credentials)
workbook = gc.open_by_key('google sheets key')
wks = workbook.get_worksheet(0)

wks_records = wks.get_all_records()
columns = list(wks_records[0].keys())
rows = [list(record.values()) for record in wks_records]
df = pd.DataFrame(rows,columns=columns)

unpublished = df[df['ステータス']=='未掲載']
todo_columns = ['管理ID','ステータス','終了日','会社名','電話番号','物件名','住所']
unpublished_list = unpublished[todo_columns].to_dict(orient='records')
# line 28
_today = dt.strftime(dt.today(),'%Y/%m/%d')

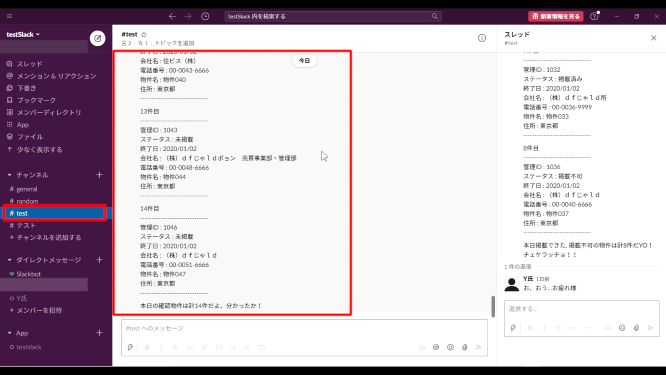
send_to_slack = f'本日({_today})のTODOリストDESU。\n'
for i,d in enumerate(unpublished_list):
    send_to_slack = send_to_slack + f'\n{i+1}件目\n'
    send_to_slack = send_to_slack + '-'*30 +'\n'
    for k,v in d.items():
        send_to_slack = send_to_slack + f'{k} : {v}\n'
    send_to_slack = send_to_slack + '-'*30+'\n'
send_to_slack = send_to_slack +  f'\n本日の確認物件は計{len(unpublished_list)}件DESU!'

url = "https://hooks.slack.com/services/xxxxxxxxxxxxxx/xxxxxxxxxxxxxxxxxxx"
requests.post(url,
            data=json.dumps(
            {"text": send_to_slack,
            "username": 'username',
            "icon_emoji": ":python:"}))

worksheet2 = workbook.add_worksheet(title="Today's Task Sheet", rows=len(unpublished.index), cols=len(unpublished.columns))

worksheet2.append_row(todo_columns)
worksheet2.add_rows(100)

b = Border('SOLID', Color(0, 0, 0, 0))
fmt = cellFormat(
    backgroundColor=color(0.20, 0.11, 0.46),
    textFormat=textFormat(foregroundColor=color(1, 1, 1)),
    horizontalAlignment='CENTER'
    )
bfmt = cellFormat(borders=Borders(top=b,bottom=b,left=b,right=b))
format_cell_range(worksheet2, 'A1:G1', fmt)
format_cell_range(worksheet2, 'A1:G50', bfmt)
# line 61
cell_range = worksheet2.range(f'A2:G{worksheet2.row_count+1}')
flattened_unpublished_list_data = []

for row in unpublished_list:
    for column in todo_columns:
        flattened_unpublished_list_data.append(row[column])

for i, cell in enumerate(cell_range):
    cell.value = flattened_unpublished_list_data[i]

worksheet2.update_cells(cell_range)
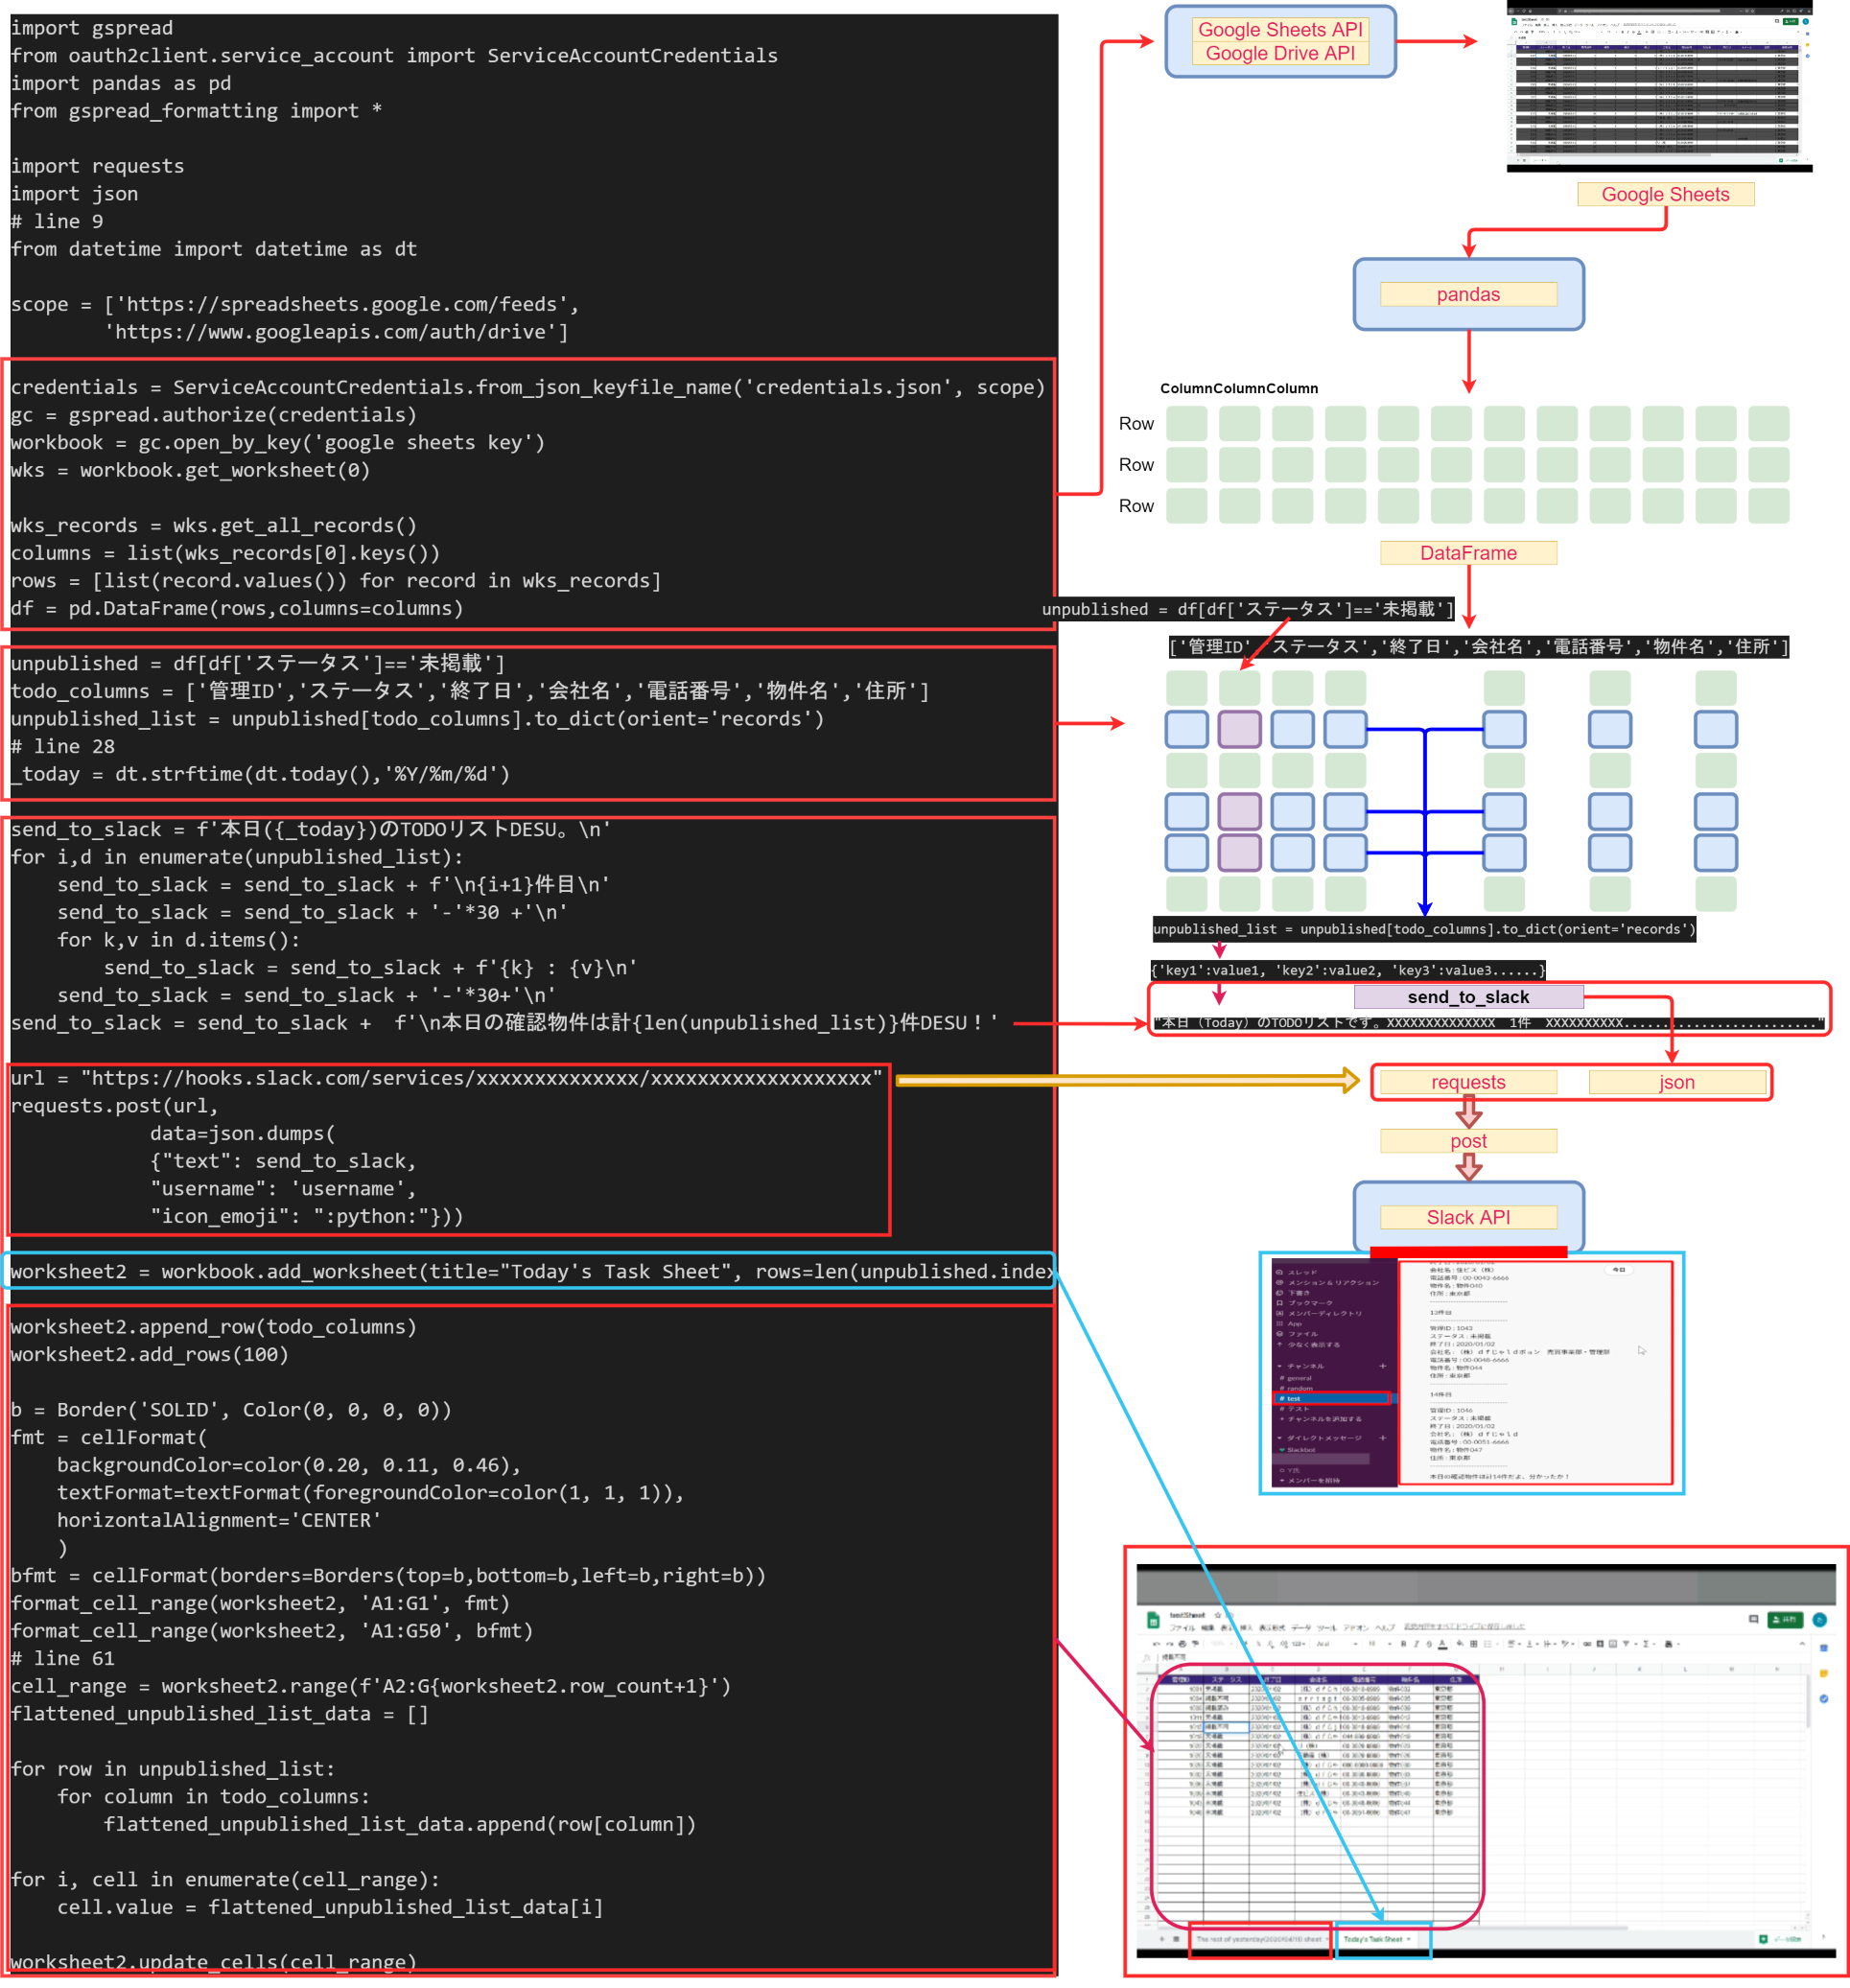
前回のスクリプトから新しく加わった部分の説明だけします。
I'll just explain the new additions from the previous script.
# line 9
from datetime import datetime as dt
9行目ですが、[datetime]という日付を扱うモジュールを別名で呼び出します。
Line 9 uses [alias] to call the [date and time] module.
# line 28
_today = dt.strftime(dt.today(),'%Y/%m/%d')
[today()メソッド]で今日の日付を獲得して、[strftime()メソッド]で第二引数に指定したフォーマットで、第一引数に渡した[datetimeオブジェクト]を文字列として出力できるようにします。
Use [today() method] to get today's date and use [strftime() method] to output the [datetime object] passed in the first argument as a string in the format specified in the second argument.
# line 61
cell_range = worksheet2.range(f'A2:G{worksheet2.row_count+1}')
新たに作るワークシートの行数は毎回変わると思うので、自動で調整できるようにします。
I think the number of rows in a new worksheet will change every time, so I'll let it adjust automatically.
[morning_report.py]の簡単な流れを以下の図にしました。
A simple flow of [morning_report.py] is shown in the following diagram.
evening_report.py
夕方の報告用のスクリプトです。
Here's the evening report script.
import gspread
from oauth2client.service_account import ServiceAccountCredentials
import pandas as pd
from gspread_formatting import *

import requests
import json

from datetime import datetime as dt

scope = ['https://spreadsheets.google.com/feeds',
        'https://www.googleapis.com/auth/drive']

credentials = ServiceAccountCredentials.from_json_keyfile_name('credentials.json', scope)
gc = gspread.authorize(credentials)
workbook = gc.open_by_key('google sheets key')

worksheet1 = workbook.get_worksheet(0)

worksheet2 = workbook.get_worksheet(1)
worksheet2_records = worksheet2.get_all_records()

fmt = cellFormat(
    backgroundColor=color(.3, .3, .3),
    )

columns2 = list(worksheet2_records[0].keys())
rows2 = [list(record.values()) for record in worksheet2_records]
df2 = pd.DataFrame(rows2,columns=columns2)

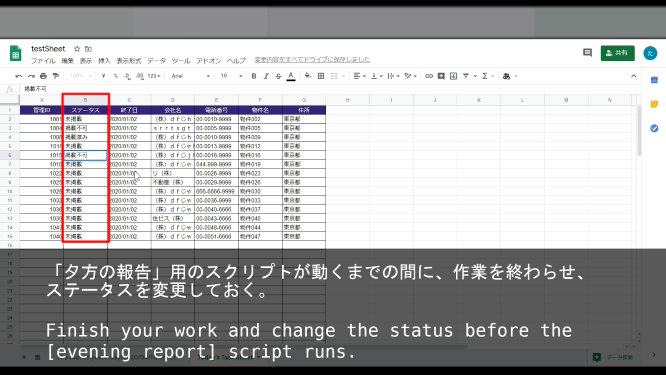
not_available2 = df2[(df2['ステータス']=='掲載不可') | (df2['ステータス']=='掲載済み')].index.values

for na2 in not_available2:
    format_cell_range(worksheet2, f'A{na2+2}:R{na2+2}', fmt)

todo_columns = ['管理ID','ステータス','終了日','会社名','電話番号','物件名','住所']
confirmed_list = df2[(df2['ステータス']=='掲載不可') | (df2['ステータス']=='掲載済み')][todo_columns].to_dict(orient='records')


_today = dt.strftime(dt.today(),'%Y/%m/%d')

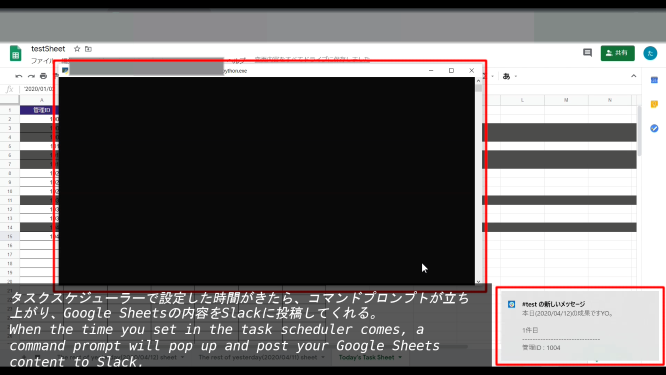
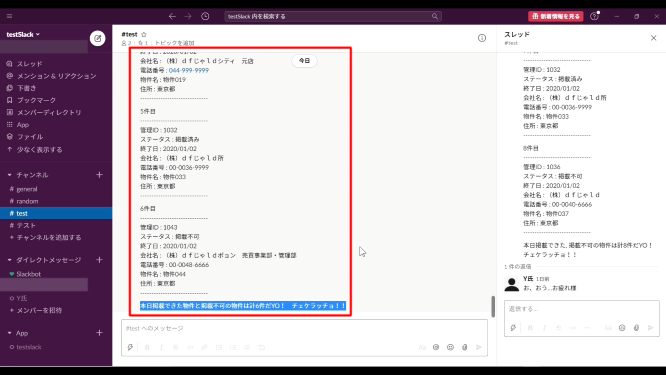
send_to_slack_comp = f'本日({_today})の成果ですYO。\n'
for i,d in enumerate(confirmed_list):
    send_to_slack_comp = send_to_slack_comp + f'\n{i+1}件目\n'
    send_to_slack_comp = send_to_slack_comp + '-'*30 +'\n'
    for k,v in d.items():
        send_to_slack_comp = send_to_slack_comp + f'{k} : {v}\n'
    send_to_slack_comp = send_to_slack_comp + '-'*30+'\n'
send_to_slack_comp = send_to_slack_comp +  f'\n本日掲載できた物件と掲載不可の物件は計{len(confirmed_list)}件だYO! チェケラッチョ!!'

url = "https://hooks.slack.com/services/xxxxxxxxxxxxxxxxxxxxxx/xxxxxxxxxxxxxxxxxxxxxxxx"

requests.post(url,
            data=json.dumps(
            {"text": send_to_slack_comp,
            "username": 'username',
            "icon_emoji": ":python:"}))


workbook.duplicate_sheet(source_sheet_id = worksheet2.id, new_sheet_name = f"The rest of yesterday({_today}) sheet")
workbook.del_worksheet(worksheet1)
workbook.del_worksheet(worksheet2)
[evening_report.py]は[morning_report.py]に三行追加して、ステータスの条件等を若干変更したぐらいです。
The [evening_report.py] script just added three lines to the [morning_report.py] script and changed the status conditions slightly.
追加した部分だけを説明します。
I will explain only the part that I added.
workbook.duplicate_sheet(source_sheet_id = worksheet2.id, new_sheet_name = f"The rest of yesterday({_today}) sheet")
明日の朝の報告で使うシートを複製します。
I will duplicate the sheet for tomorrow morning's report.
workbook.del_worksheet(worksheet1)
workbook.del_worksheet(worksheet2)
古いワークシートを削除します。
Delete the old worksheet.
② Windowsタスクスケジューラーで二つのスクリプトを起動させる
② Run two scripts in the Windows task scheduler
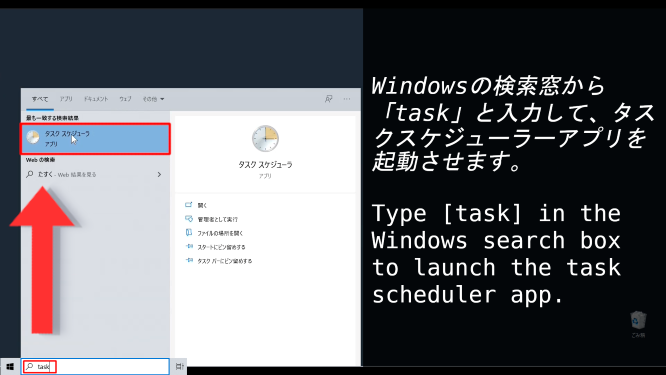
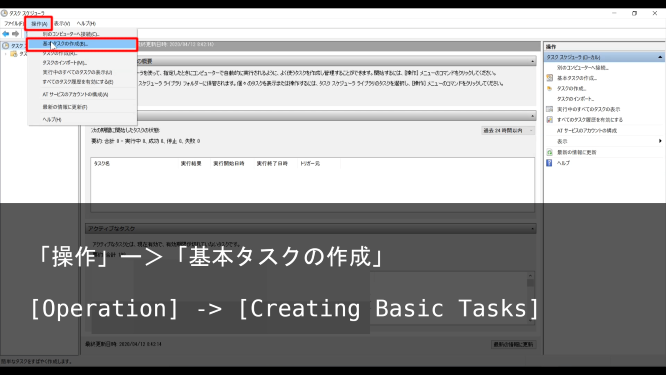
スクリプトが用意できたら、最後に自動化のためにタスクスケジューラーで、
毎日定期的に決められた時間にSlackに投稿できるようにしましょう。
Once you've created a script, you can finally use the task scheduler
to post it to Slack at a fixed time every day for automation.
Windows Task Scheduler Configuration
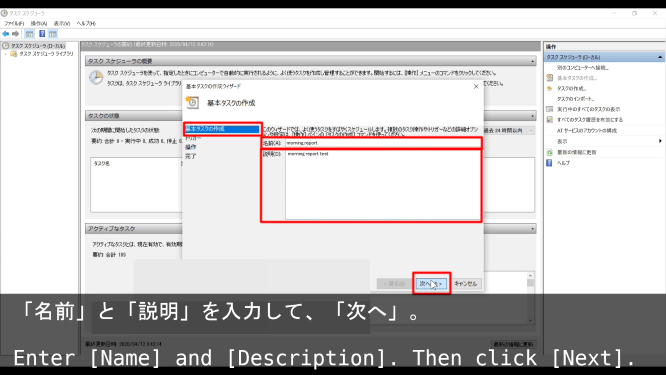
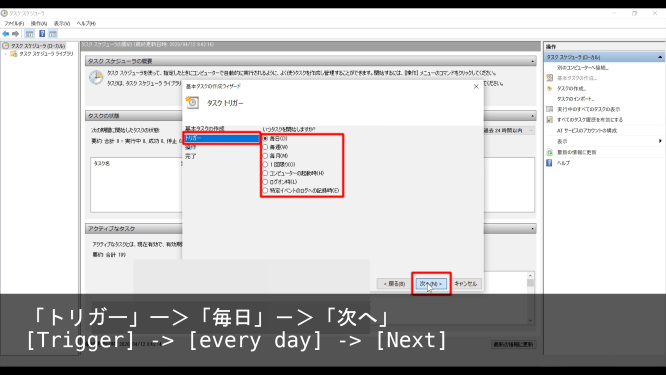
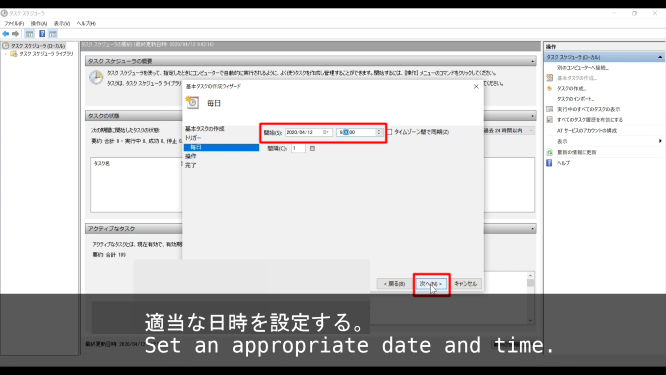
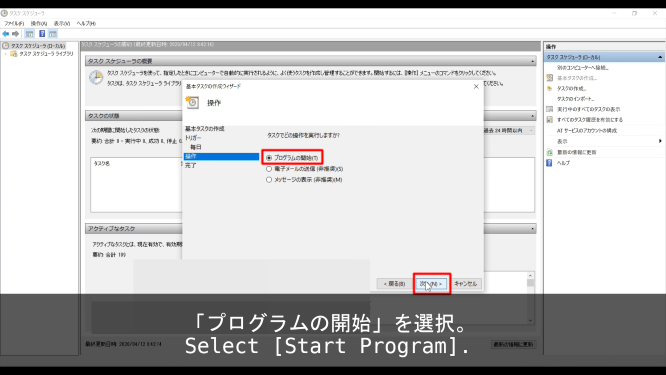
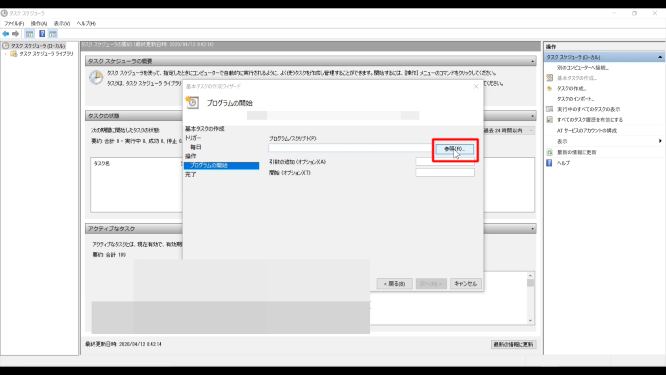
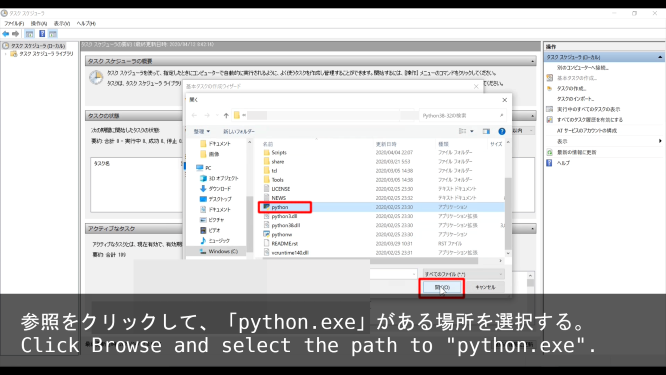
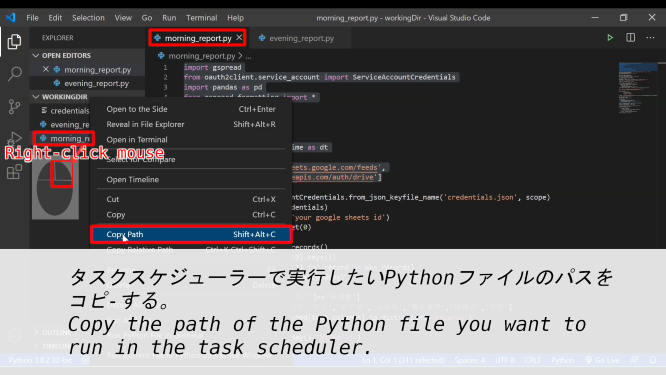
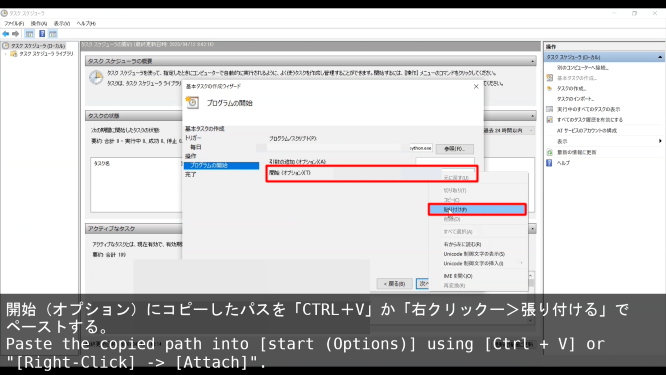
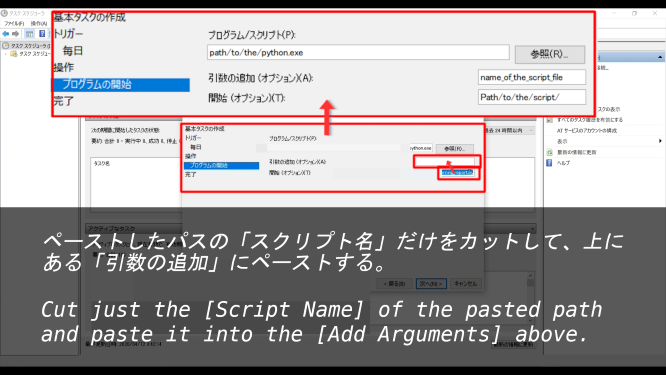
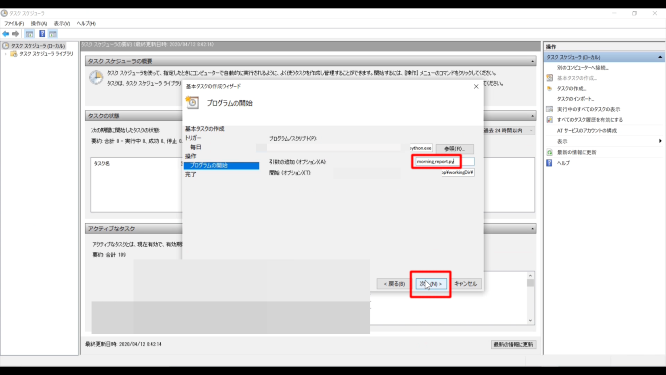
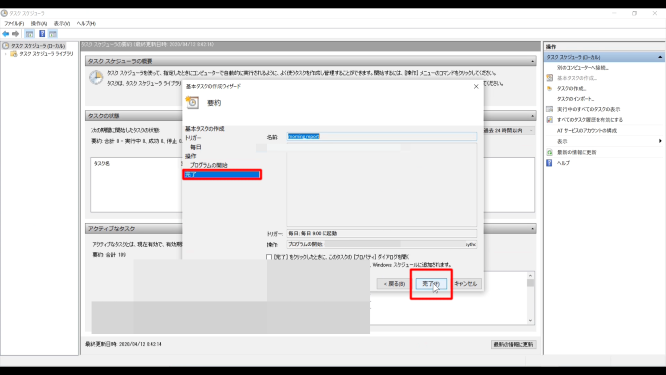
同じ作業を「夕方の報告」用のスクリプトに対しても行っていきます。
Do the same for the [evening report] script.
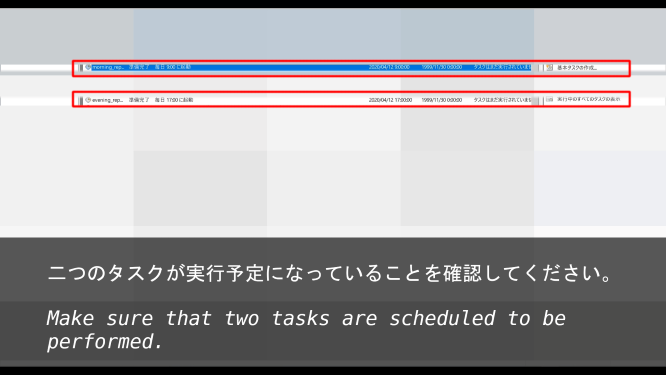
以上です。macで自動化したいなら、teminalから「crontab -e」等で設定してください。
自分のPCの電源が入っていない、ネットに繋がっていない時でも自動投稿したいなら、
Heroku等のクラウドサービスを利用するといいでしょう。
Herokuの設定方法は過去のブログ記事(https://akasatanahama.com/posts/40/)を参考にしてくだちぃ。
That's all. If you want to automate with mac, enter [crontab -e] from the terminal and set.
If you want to automatically post even when your PC is turned off or not connected to the Internet,
you can use cloud services like Heroku.
For more on setting up Heroku, check out my previous post (https://akasatanahama.com/posts/40/).