Published Date : 2019年12月6日11:09
Pythonと図で理解するCNN(Convolutional Neural Networks)の仕組み おさらい
How CNN (Convolutional Neural Networks) Works with Python and Diagrams ~ review ~
This blog has an English translation
画像認識シリーズ第19弾です。前回のブログ記事。
This is the 18th image recognition series. Last blog post.
前回はPythonと図による最適化の説明をおこないました。
In a previous my blog post, I briefly explained how optimization works using Python and diagrams.
今回は、シリーズが長くなってしまったので、軽く今までのおさらいをしていきMASU。
This time, the series has become long, so I will briefly review the past articles.
目次
Table of Contents
おさらいする全体のコード
The entire Python script to check
おさらいに使うコードと、その内容が書かれた記事を示します。
In this section, you will see a list of the python scripts described so far. There is also a link to blog post detailing the script.
まず画像を収集する。 PythonとPexels APIを使用した画像の収集
First of all, we need to collect training images for learning. Collecting images using Python and the Pexels API
image_acquisition.py
from pexels_api import API
import os
import urllib.request
import time

PEXELS_API_KEY = 'YOUR-PEXELS-API-KEY'

api = API(PEXELS_API_KEY)

headers = {
    "User-Agent": "Mozilla/5.0 (X11; Ubuntu; Linux x86_64; rv:47.0) Gecko/20100101 Firefox/47.0"
    }

creatures_list = ['cat','dog','bird','monkey','fish','lizard']
dir_names = ['cats','dogs','birds','monkeys','fish','lizards']

for idx, name in enumerate(creatures_list):
    api.search(name)

    print("Total results: ", api.total_results)

    dir_name = dirs[idx]

    if not os.path.exists(dir_name):
        os.mkdir(dir_name)

    total = 0
    while True:
        if total >= 300:
            print('next')
            break

        photos = api.get_entries()

        for photo in photos:

            file_name = f'{dir_name}/{total+1:03d}.jpg'

            res = urllib.request.Request(photo.medium, headers=headers)
            img = urllib.request.urlopen(res).read()

            try:
                with open(file_name, mode="wb") as f:
                    f.write(img)
            except PermissionError:
                print(f'Permission denied. The image of {total+1:03d} could not be saved.')

            total += 1

            if total >= 195:
                time.sleep(60 * 60)
            if total >= 300:
                time.sleep(60 * 60)
                break

        api.search_next_page()
続いて、訓練用データの加工です。Google Colaboratoryを利用した画像データの水増しとデータの保存
Next, we need to increase the number of training image data and save it as a numpy array in the file.Augmentation and storing image data using Google Colaboratory
aug_and_storing_image.py
from PIL import Image
import glob
import numpy as np
from sklearn import model_selection

labels = ["dogs", "cats", "monkeys", "birds", "fish", "lizards"]
total_labels = len(labels)
image_size = 100

X = []
Y = []

for idx, label in enumerate(labels):
  dir_name = "data/" + label
  files = glob.glob(dir_name + "/" + "*.jpg")
  for idy, file in enumerate(files):

    if idy >= 69:
      break

    image = Image.open(file)
    image = image.convert('RGB')
    image = image.resize((image_size, image_size))
    data = np.asarray(image)

    for angle in range(-30,30,6):
      rotated_image = image.rotate(angle)
      data = np.asarray(rotated_image)
      X.append(data)
      Y.append(idx)

      transposed_image = image.transpose(Image.FLIP_LEFT_RIGHT)
      data = np.asarray(transposed_image)
      X.append(data)
      Y.append(idx)

X_train, x_test, Y_train, y_test = model_selection.train_test_split(X, Y)
comb = (X_train, x_test, Y_train, y_test)
np.save("data/augumented_images.npy", comb)
最後に用意したデータを使って学習を開始します。Keras公式のcifar10_cnnを利用した画像認識学習スクリプト
Finally, we start learning with the processed data.Python script for Learning Image Recognition with Keras cifar10_cnn
imp_ver_cf10cnn.py
import keras
from keras.models import Sequential
from keras.layers import Dense, Dropout, Activation, Flatten
from keras.layers import Conv2D, MaxPooling2D
from keras.utils import np_utils
import numpy as np


labels = ["dogs", "cats", "monkeys", "birds", "fish", "lizards"]
total_num = len(labels)
image_size = 100

batch_size = 32
epochs = 100

def main():
    X_train, x_test, Y_train, y_test = np.load("data/augumented_images.npy")
    X_train = X_train.astype("float") / 256
    x_test = x_test.astype("float") / 256
    Y_train = np_utils.to_categorical(Y_train, total_num)
    y_test = np_utils.to_categorical(y_test, total_num)

    model = model_train(X_train, Y_train)
    model_eval(model, x_test, y_test)

def model_train(X, y):
    model = Sequential()
    model.add(Conv2D(32, (3, 3), padding='same',
                    input_shape=X.shape[1:]))
    model.add(Activation('relu'))
    model.add(Conv2D(32, (3, 3)))
    model.add(Activation('relu'))
    model.add(MaxPooling2D(pool_size=(2, 2)))
    model.add(Dropout(0.25))

    model.add(Conv2D(64, (3, 3), padding='same'))
    model.add(Activation('relu'))
    model.add(Conv2D(64, (3, 3)))
    model.add(Activation('relu'))
    model.add(MaxPooling2D(pool_size=(2, 2)))
    model.add(Dropout(0.25))

    model.add(Flatten())
    model.add(Dense(512))
    model.add(Activation('relu'))
    model.add(Dropout(0.5))
    model.add(Dense(total_num))
    model.add(Activation('softmax'))

    opt = keras.optimizers.adam()

    model.compile(loss='categorical_crossentropy',
                optimizer=opt,
                metrics=['accuracy'])

    model.fit(X,y,batch_size=batch_size, epochs=epochs)

    model.save("data/creatures_cnn.h5")

    return model

def model_eval(model, X, y):
    scores = model.evaluate(X, y, verbose=1)
    print('Test Loss', scores[0])
    print('Test Accuracy', scores[1])

if __name__=="__main__":
    main()
訓練用画像データの収集
Acquisition of training image data
おさらいですので、主に図を使用して、解説していきます。
As it is a simple review, so I'll explain mainly using diagrams.
Pexels APIを使って、Pexelsから画像を取得していきます。
Use the Pexels API to retrieve images from Pexels.
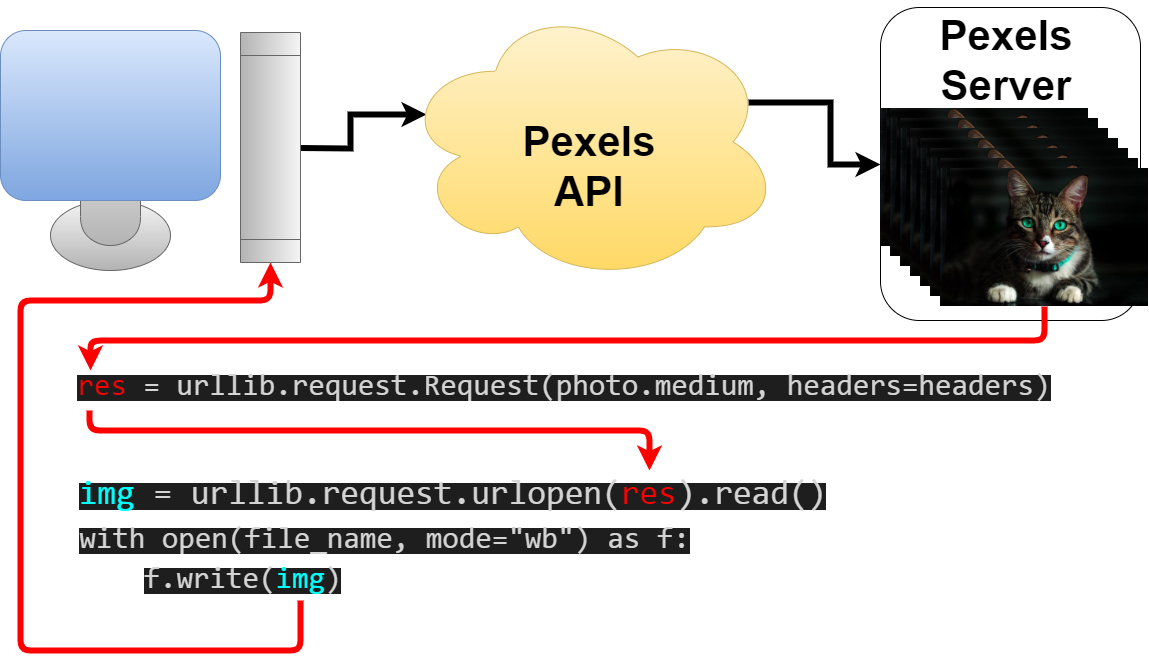
res = urllib.request.Request(photo.medium, headers=headers)
img = urllib.request.urlopen(res).read()

try:
    with open(file_name, mode="wb") as f:
        f.write(img)
except PermissionError:
    print(f'Permission denied. The image of {total+1:03d} could not be saved.')
訓練用画像データをNumpy配列に変換
Convert training image data to numpy array
おさらいですので、主に図を使用して、解説していきます。
As it is a simple review, so I'll explain mainly using diagrams.
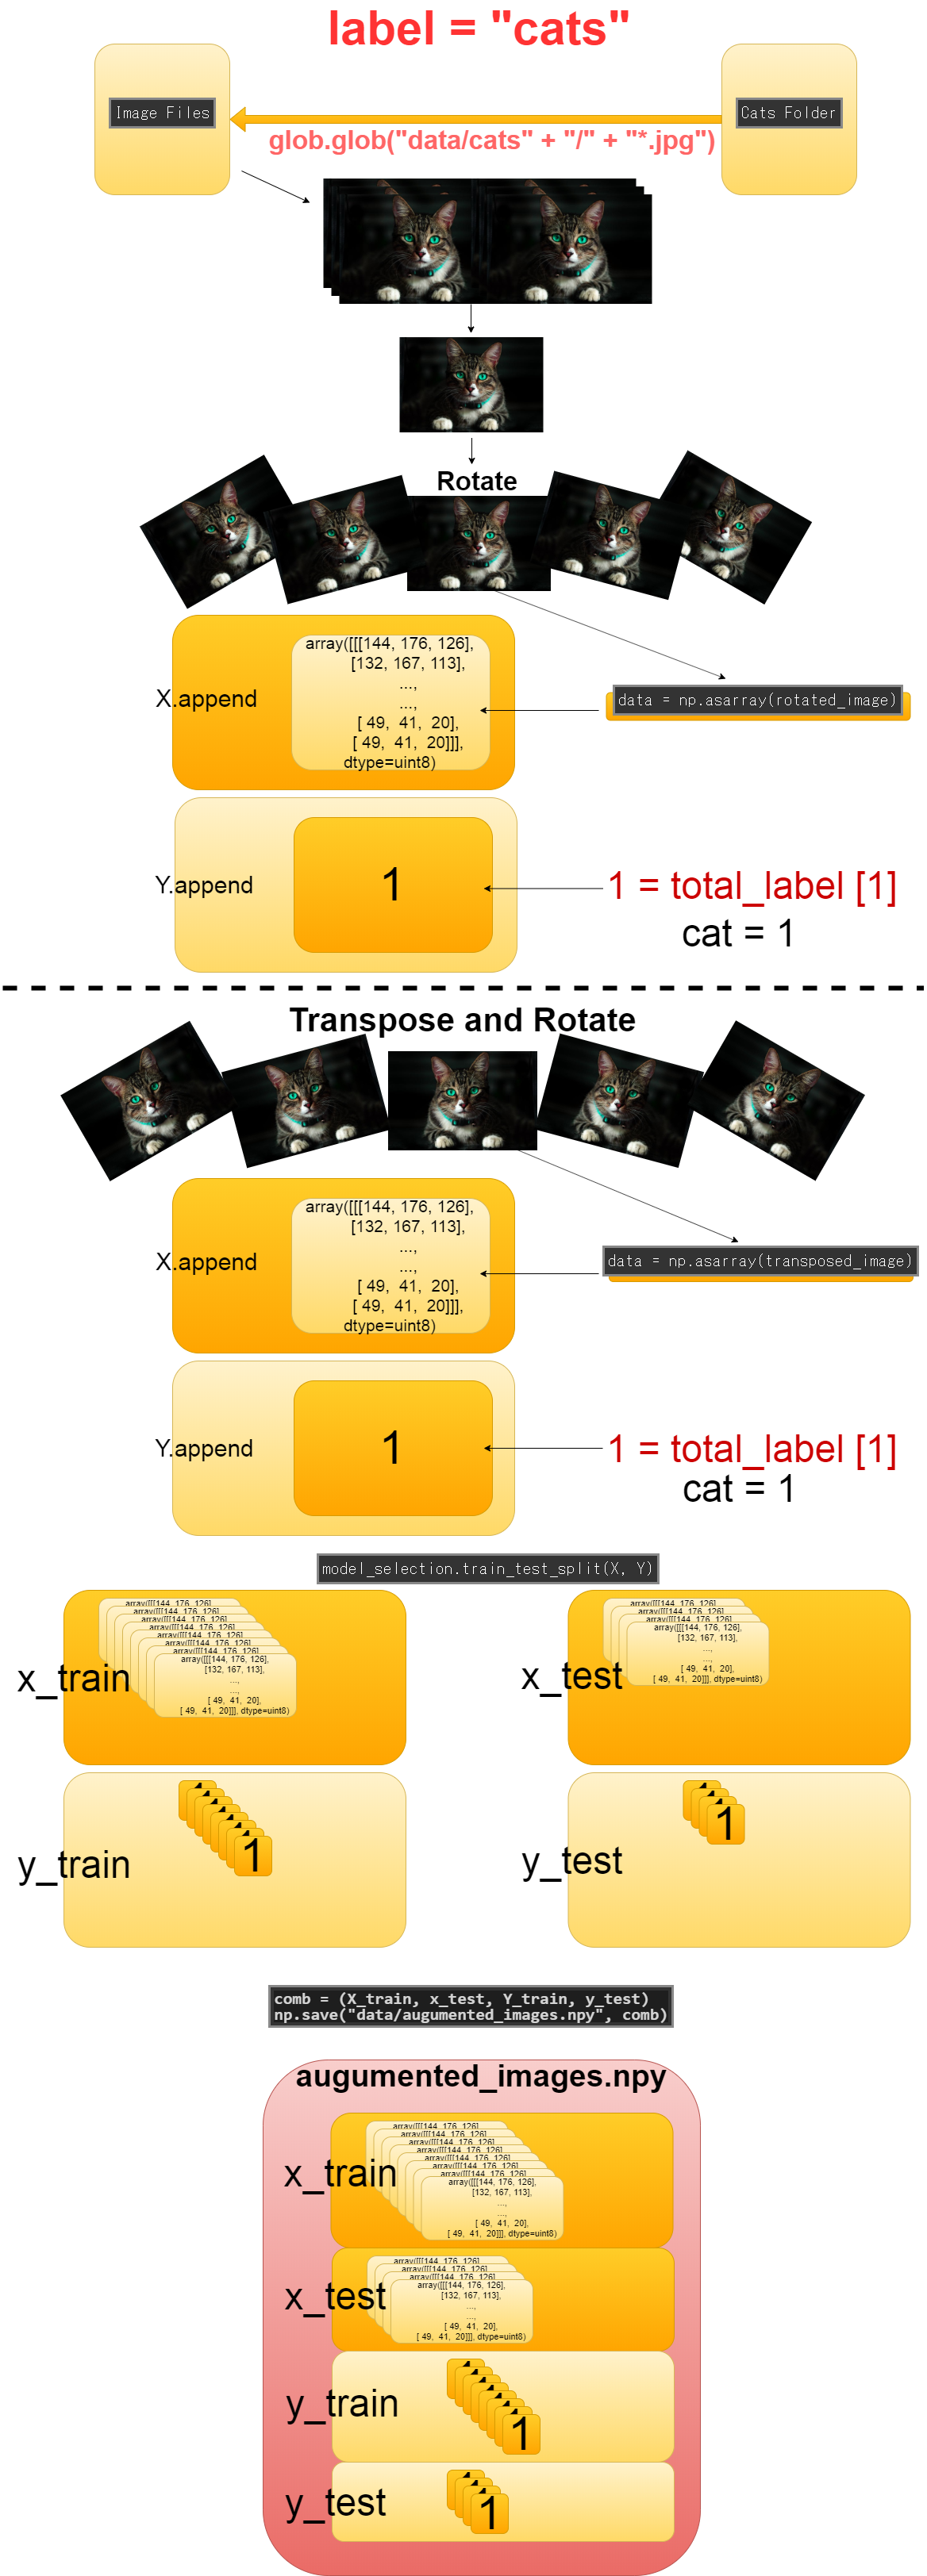
画像を集め終わったら、画像データ(実際は数値の塊)をNumpy配列にしてコンピュータが学習しやすくします。 その際、訓練データが少ないとあまり良く学習できないので、画像の水増しを同時にしていきます。
Once you have collected the images, make the image data (actually a chunk of numbers) into a Numpy array to make it easer for python to process. At that time, if there is not enough training data, Deep learning model cannot work very well, so we will increase the number of images at the same time.
-----------------------------------------------------------------
labels = ["dogs", "cats", "monkeys", "birds", "fish", "lizards"]
total_labels = len(labels)
-----------------------------------------------------------------
files = glob.glob(dir_name + "/" + "*.jpg")
-----------------------------------------------------------------
for angle in range(-30,30,6):
    rotated_image = image.rotate(angle)
    data = np.asarray(rotated_image)
    X.append(data)
    Y.append(idx)
-----------------------------------------------------------------
    transposed_image = image.transpose(Image.FLIP_LEFT_RIGHT)
    data = np.asarray(transposed_image)
    X.append(data)
    Y.append(idx)
-----------------------------------------------------------------
X_train, x_test, Y_train, y_test = model_selection.train_test_split(X, Y)
comb = (X_train, x_test, Y_train, y_test)
np.save("data/augumented_images.npy", comb)
畳み込み層の構築
Build Convolutional Layers
おさらいですので、主に図を使用して、解説していきます。
As it is a simple review, so I'll explain mainly using diagrams.
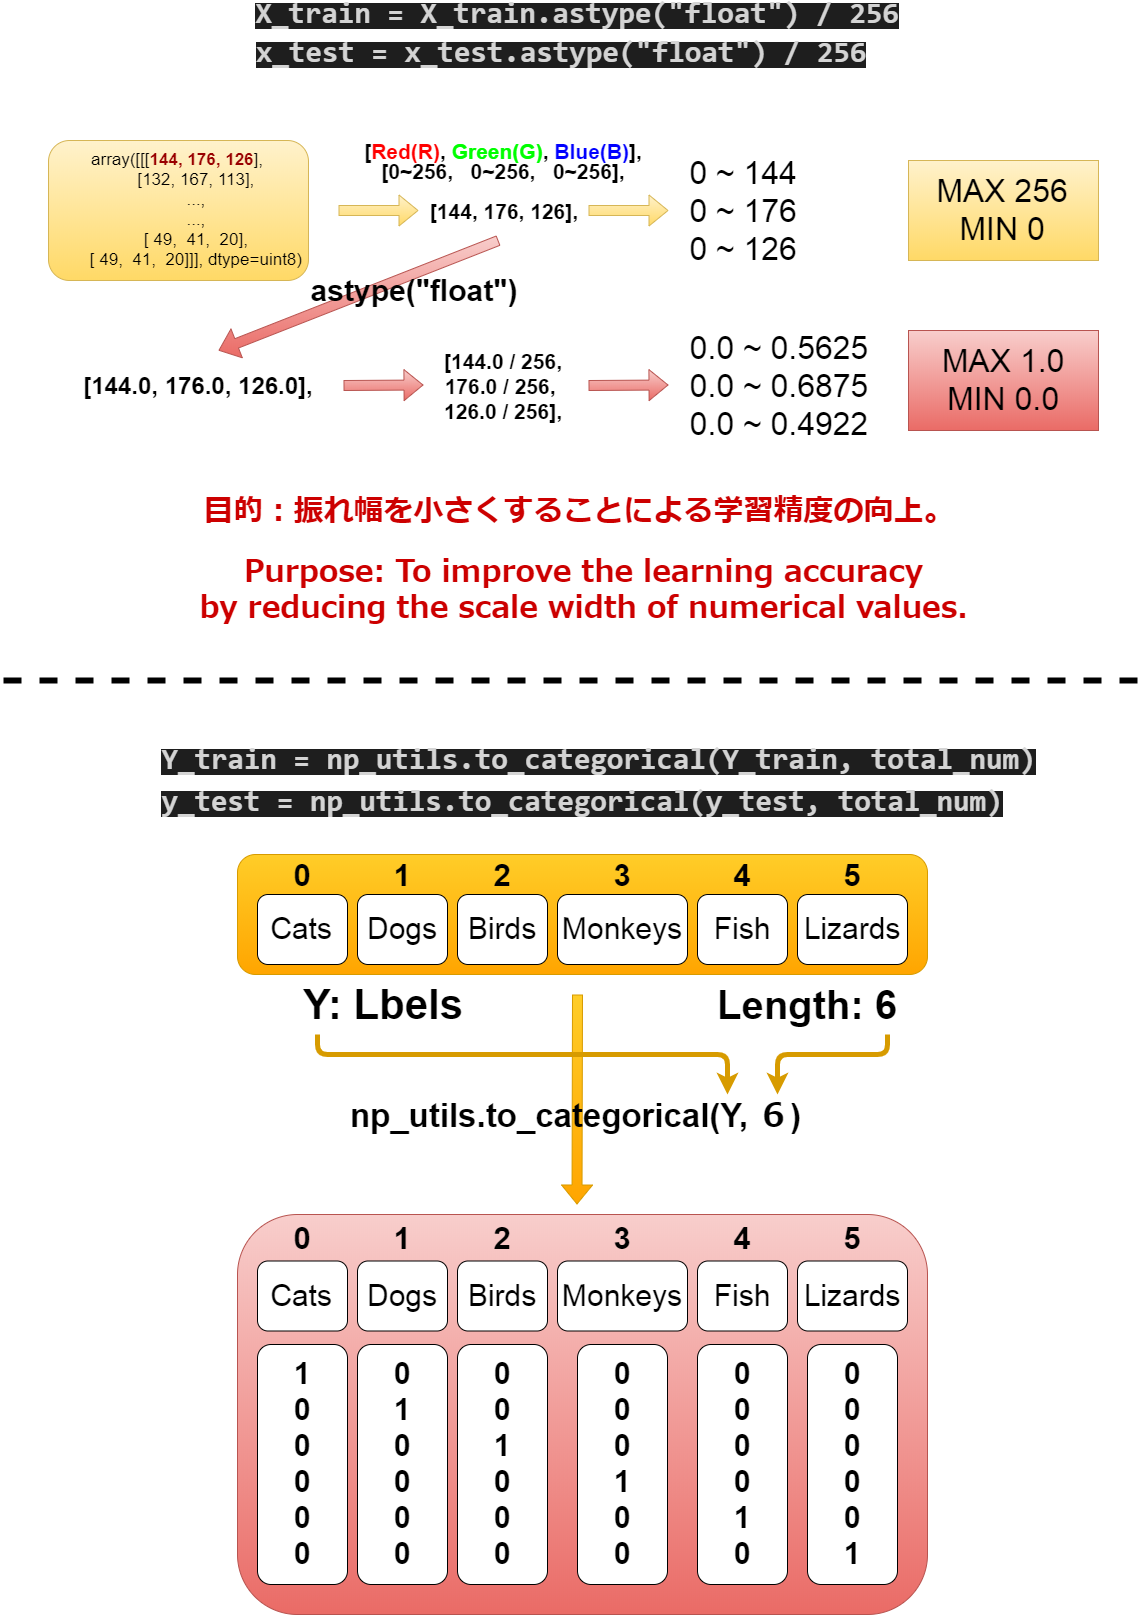
まずmain()の中でデータの前処理を行います。
Preprocess the data in main function.
def main():
    X_train, x_test, Y_train, y_test = np.load("data/augumented_images.npy")
    X_train = X_train.astype("float") / 256
    x_test = x_test.astype("float") / 256
    Y_train = np_utils.to_categorical(Y_train, total_num)
    y_test = np_utils.to_categorical(y_test, total_num)
そして画像の「特徴」を強調するため、フィルタリングを行います。 これはConv2Dで行われます。
In then filters the image to emphasize its "Characteristics". This is done in Conv2D()
def model_train(X, y):
    model = Sequential()
    model.add(Conv2D(32, (3, 3), padding='same',
    input_shape=X.shape[1:]))
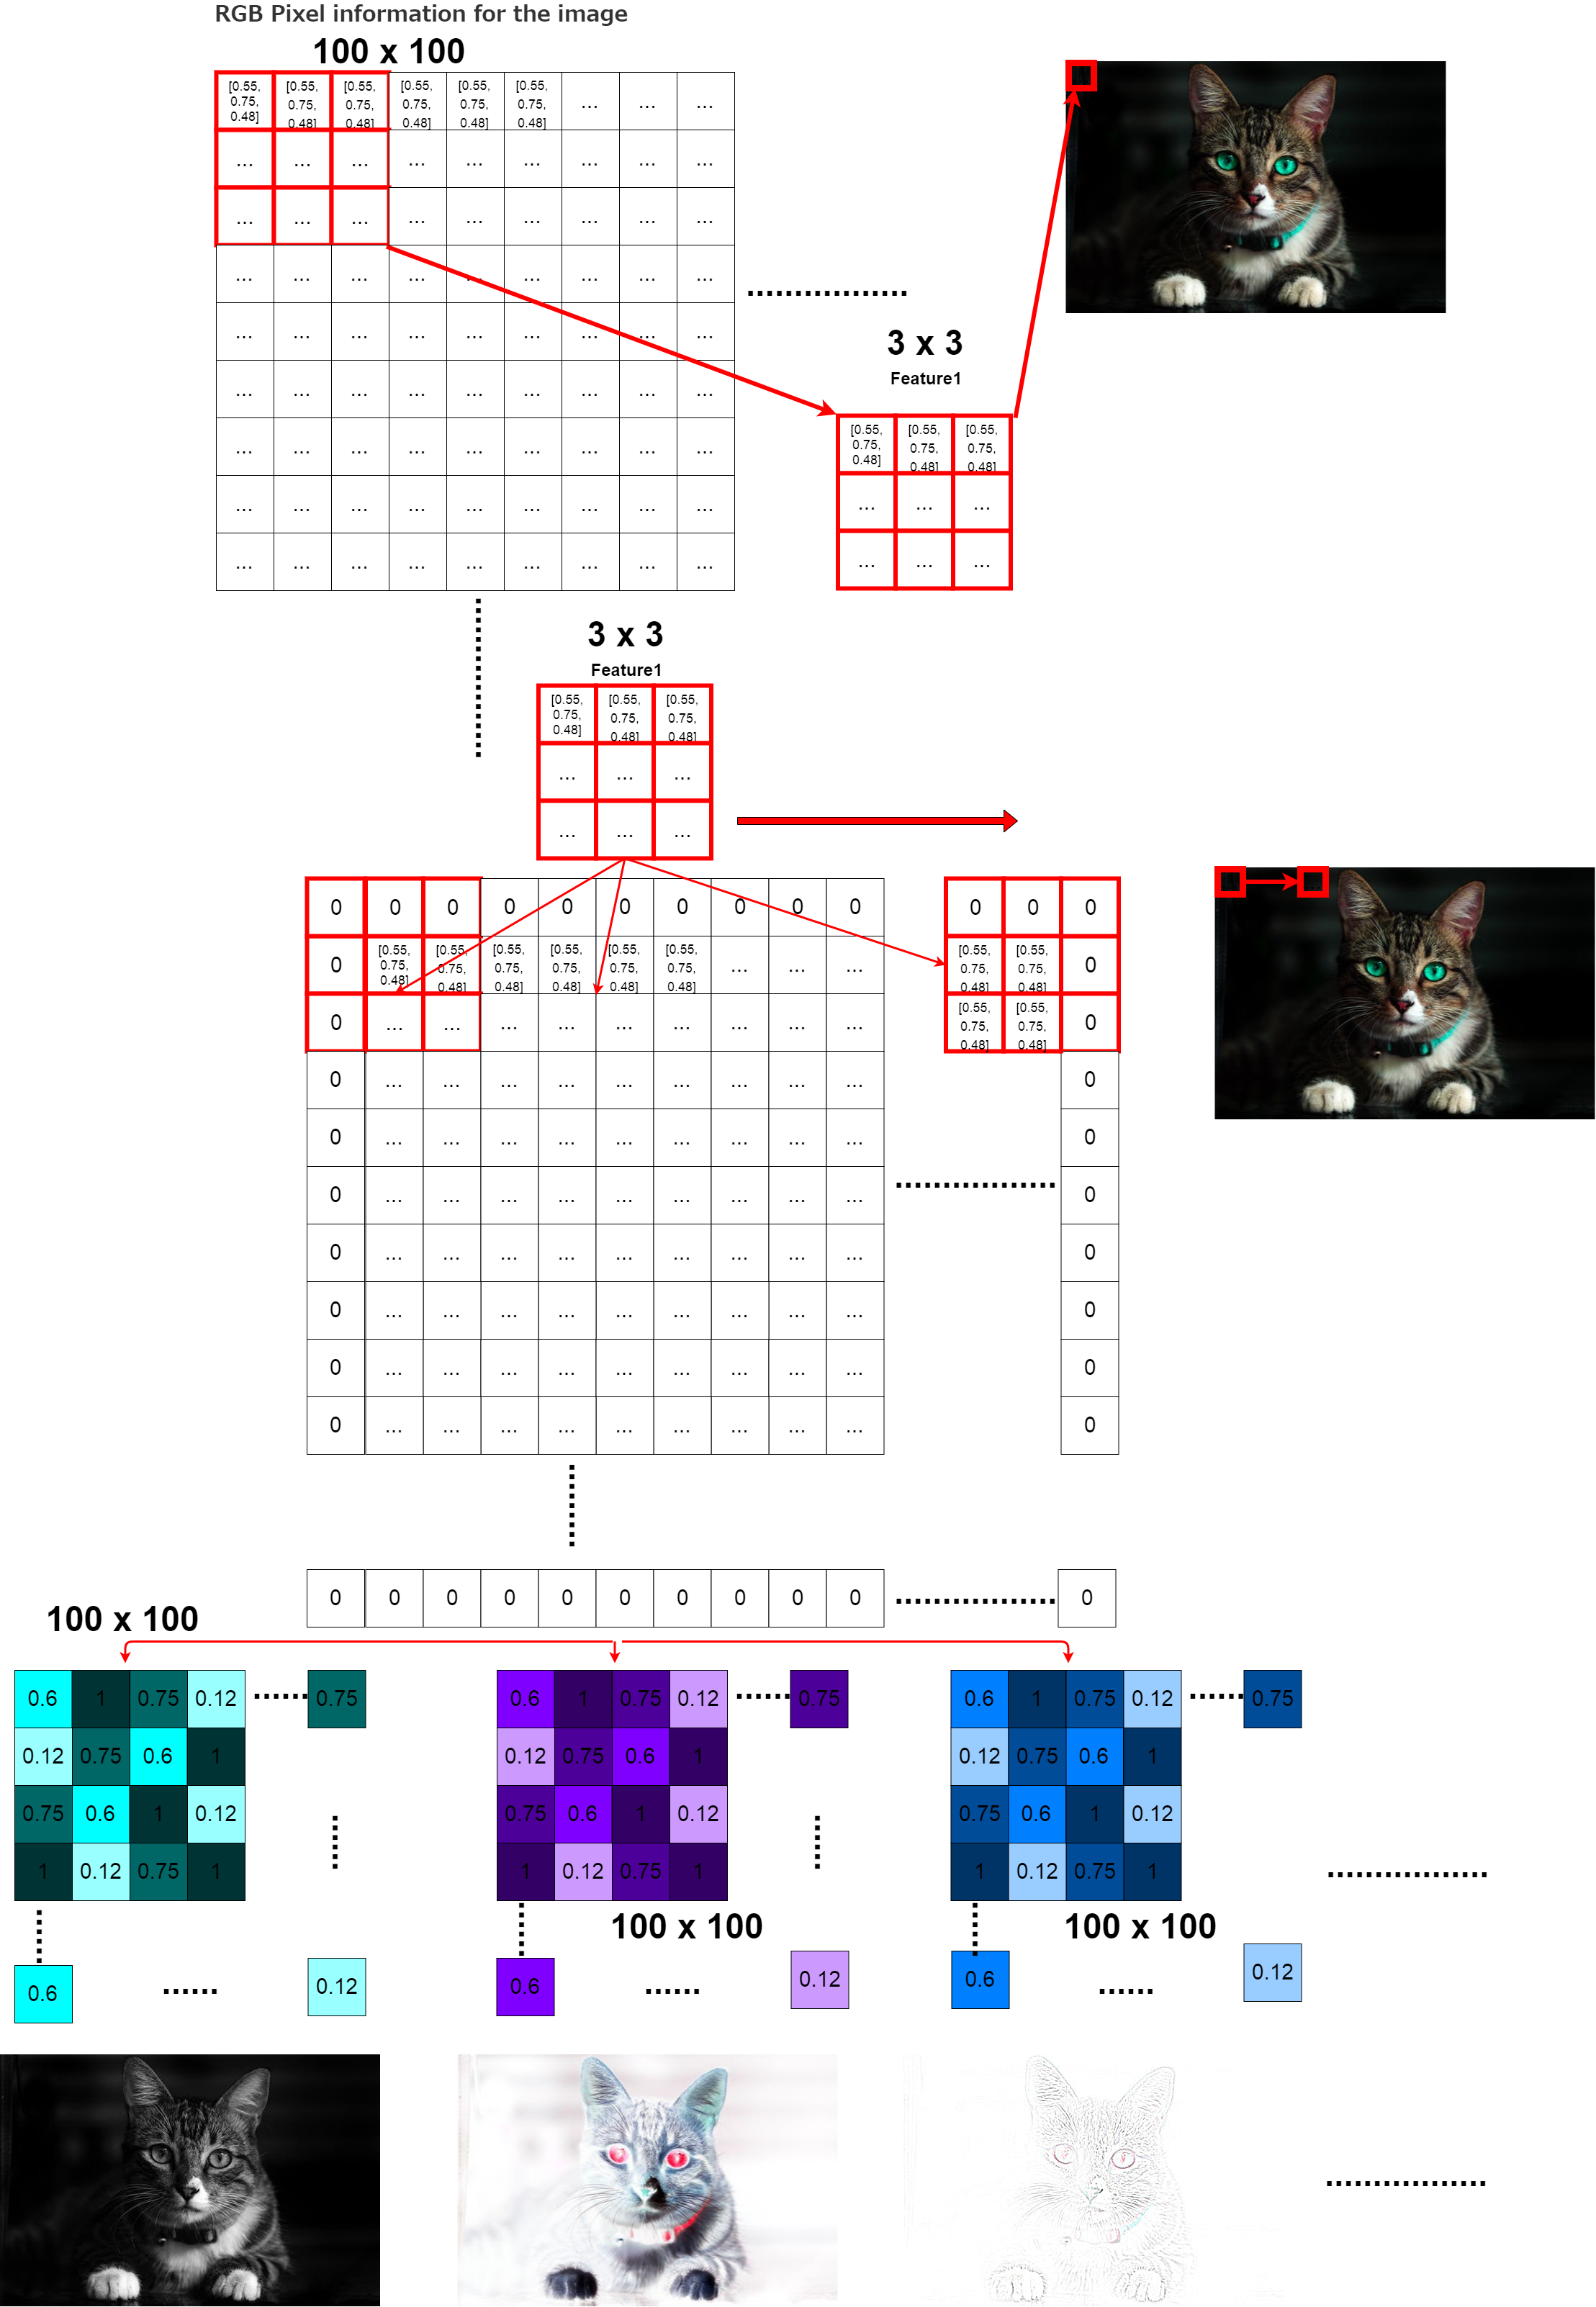
そして、活性化関数を使い、さらに特徴を強調させます。
The activation function is then used to further emphasize the feature.
model.add(Activation('relu'))

そしてMaxPoolingを使いさらに特徴を抽出していきます。 これはちょうど実際の人物を特徴だけ強調させた漫画のキャラのようにすると想像すれば分かりやすいかもしれません。
It then uses MaxPooling to extract more features. It may be easy to understand if you imagine that this is just like a cartoon character that emphasizes only the characteristics of a real person.
model.add(MaxPooling2D(pool_size=(2, 2)))
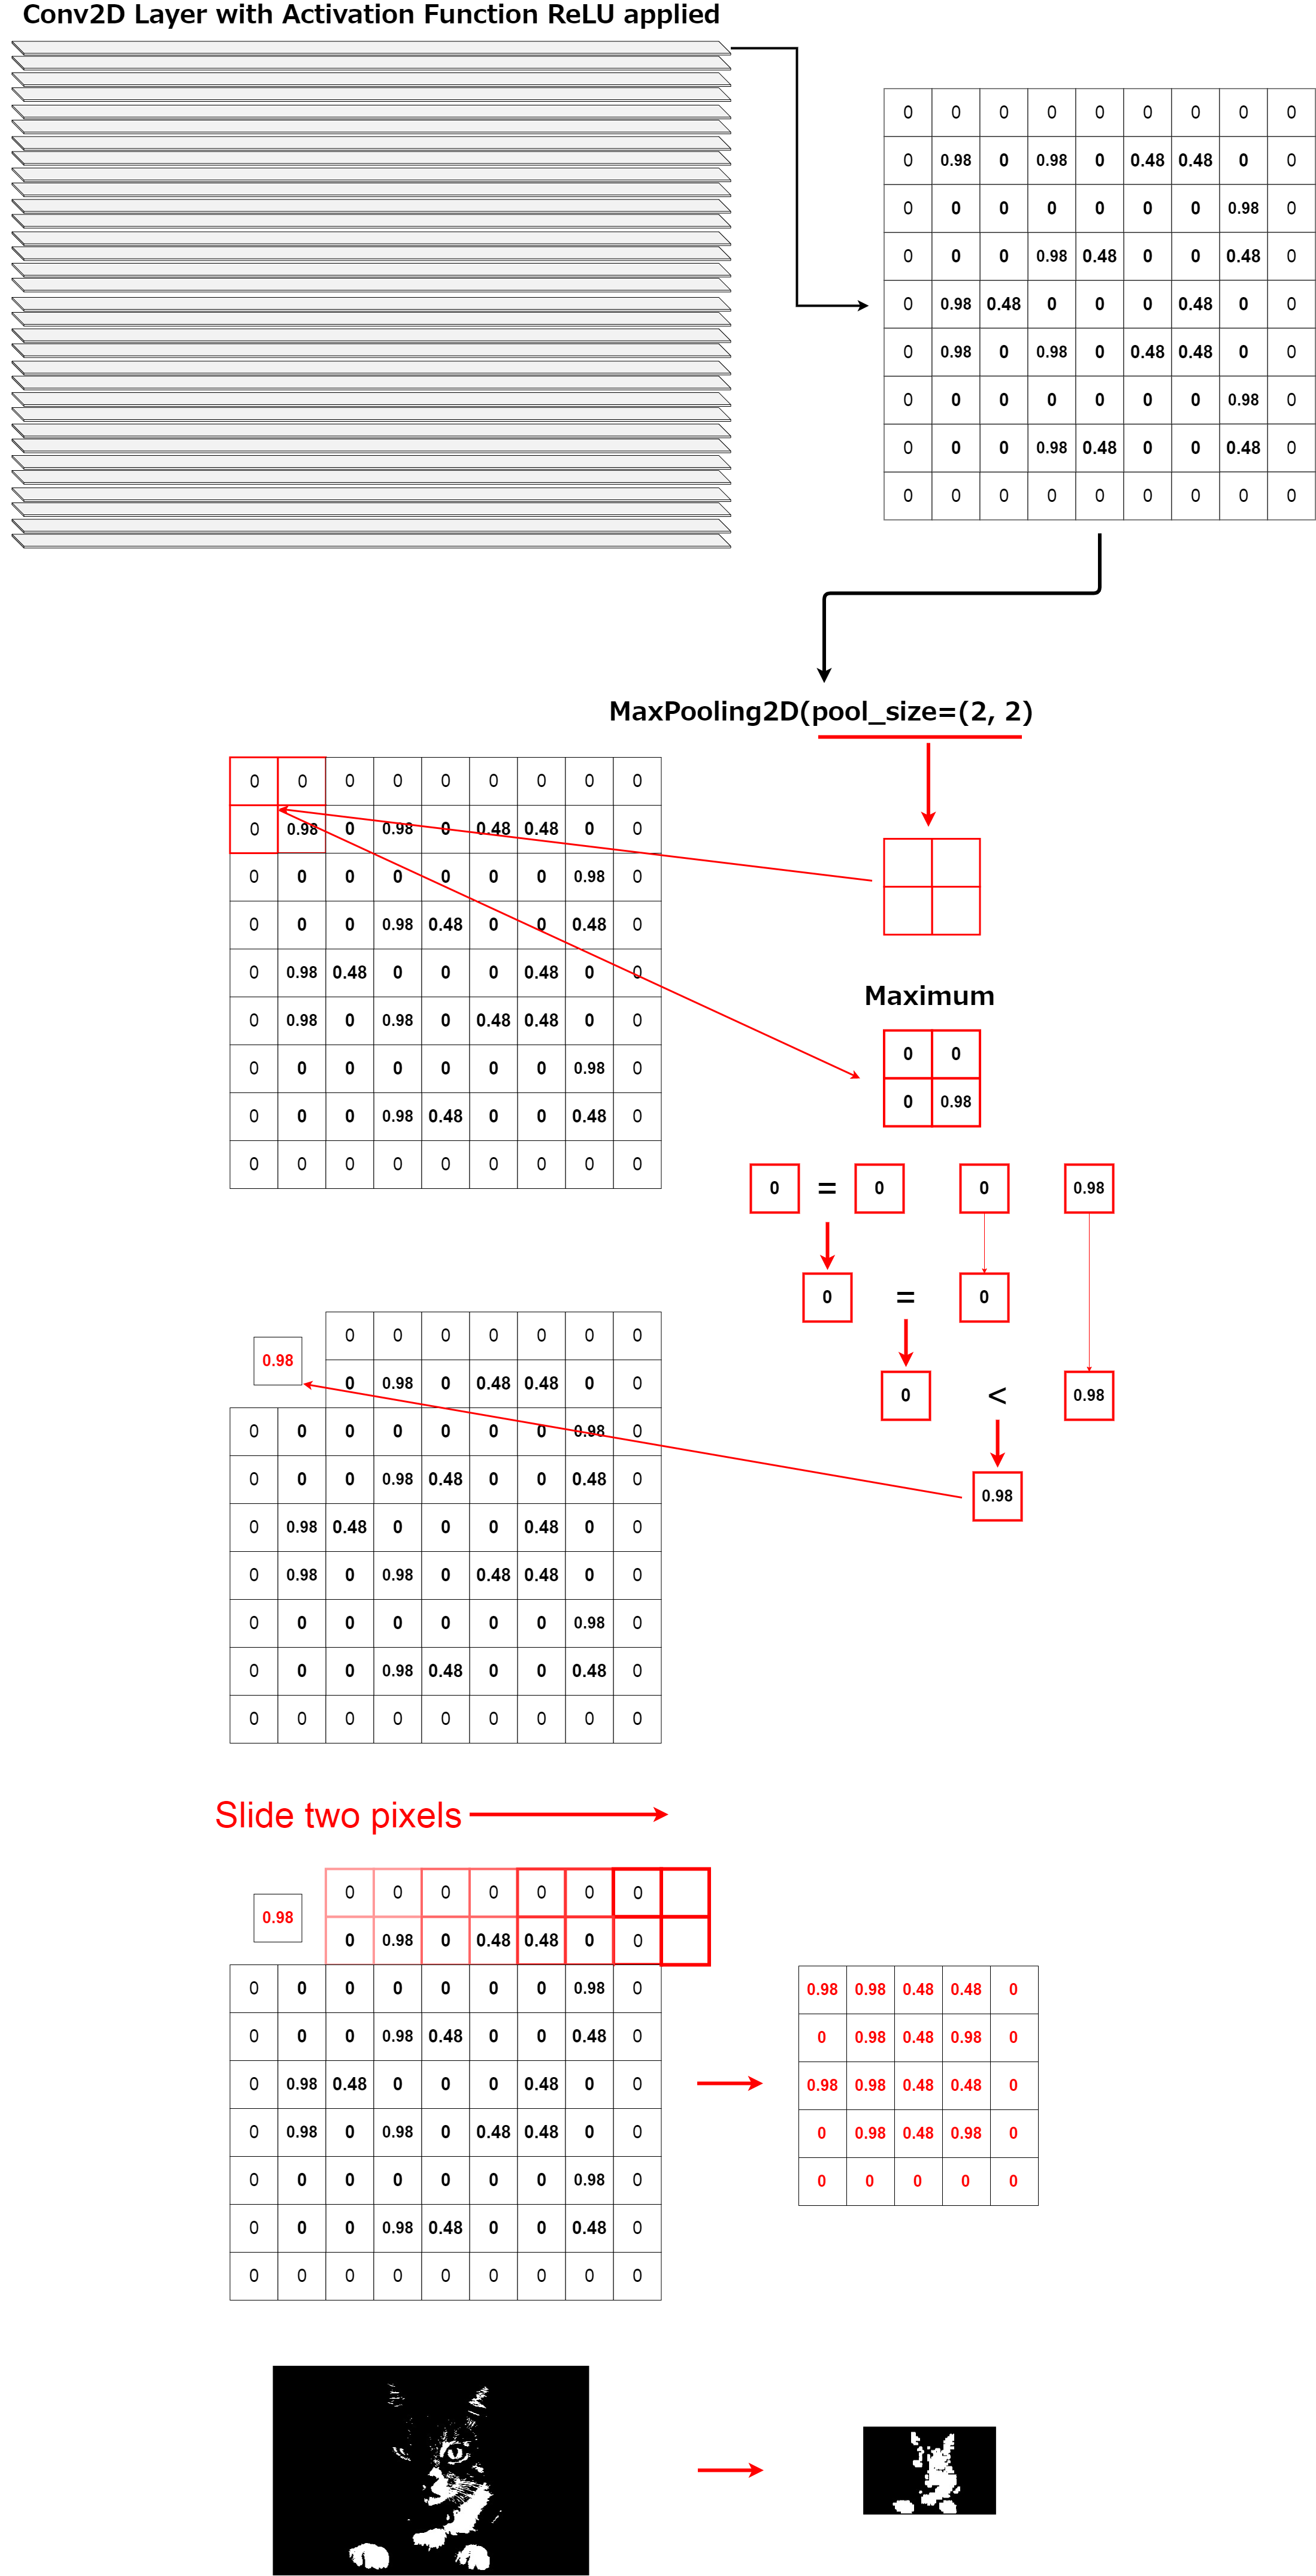
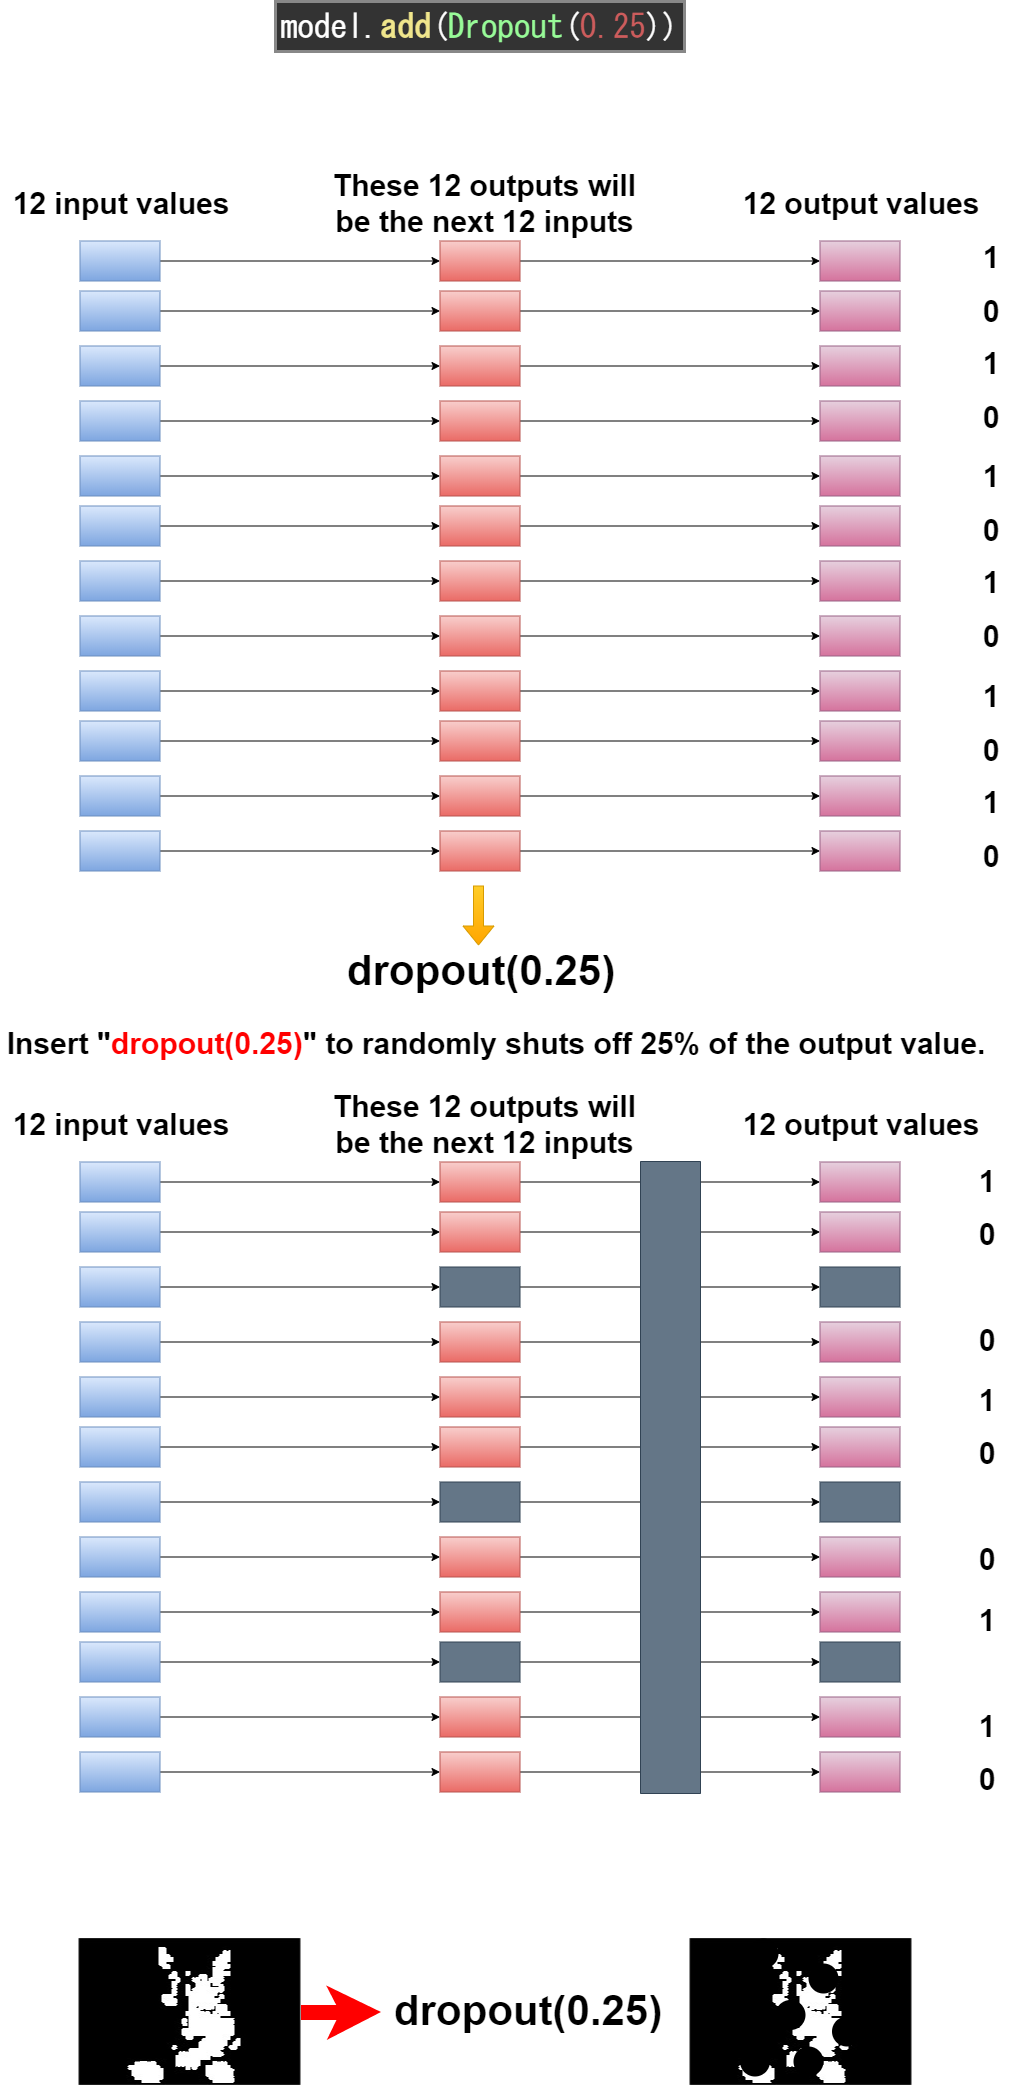
そしてDropoutでランダムにデータの情報をカットします。これは過学習を防ぐ効果があります。
It then uses Dropout to randomly cuts the data. This has the effect of preventing over-fitting.
model.add(MaxPooling2D(pool_size=(2, 2)))
全結合層の構築
Build Fully Connected Layers
おさらいですので、主に図を使用して、解説していきます。
As it is a simple review, so I'll explain mainly using diagrams.
考え方は単純です。 畳み込み層によって、特徴が抜き出された画像は、最終的にベクトル配列になります。
The idea is simple. The convolution layer extracts the features from the image, and finally the image becomes a vector.
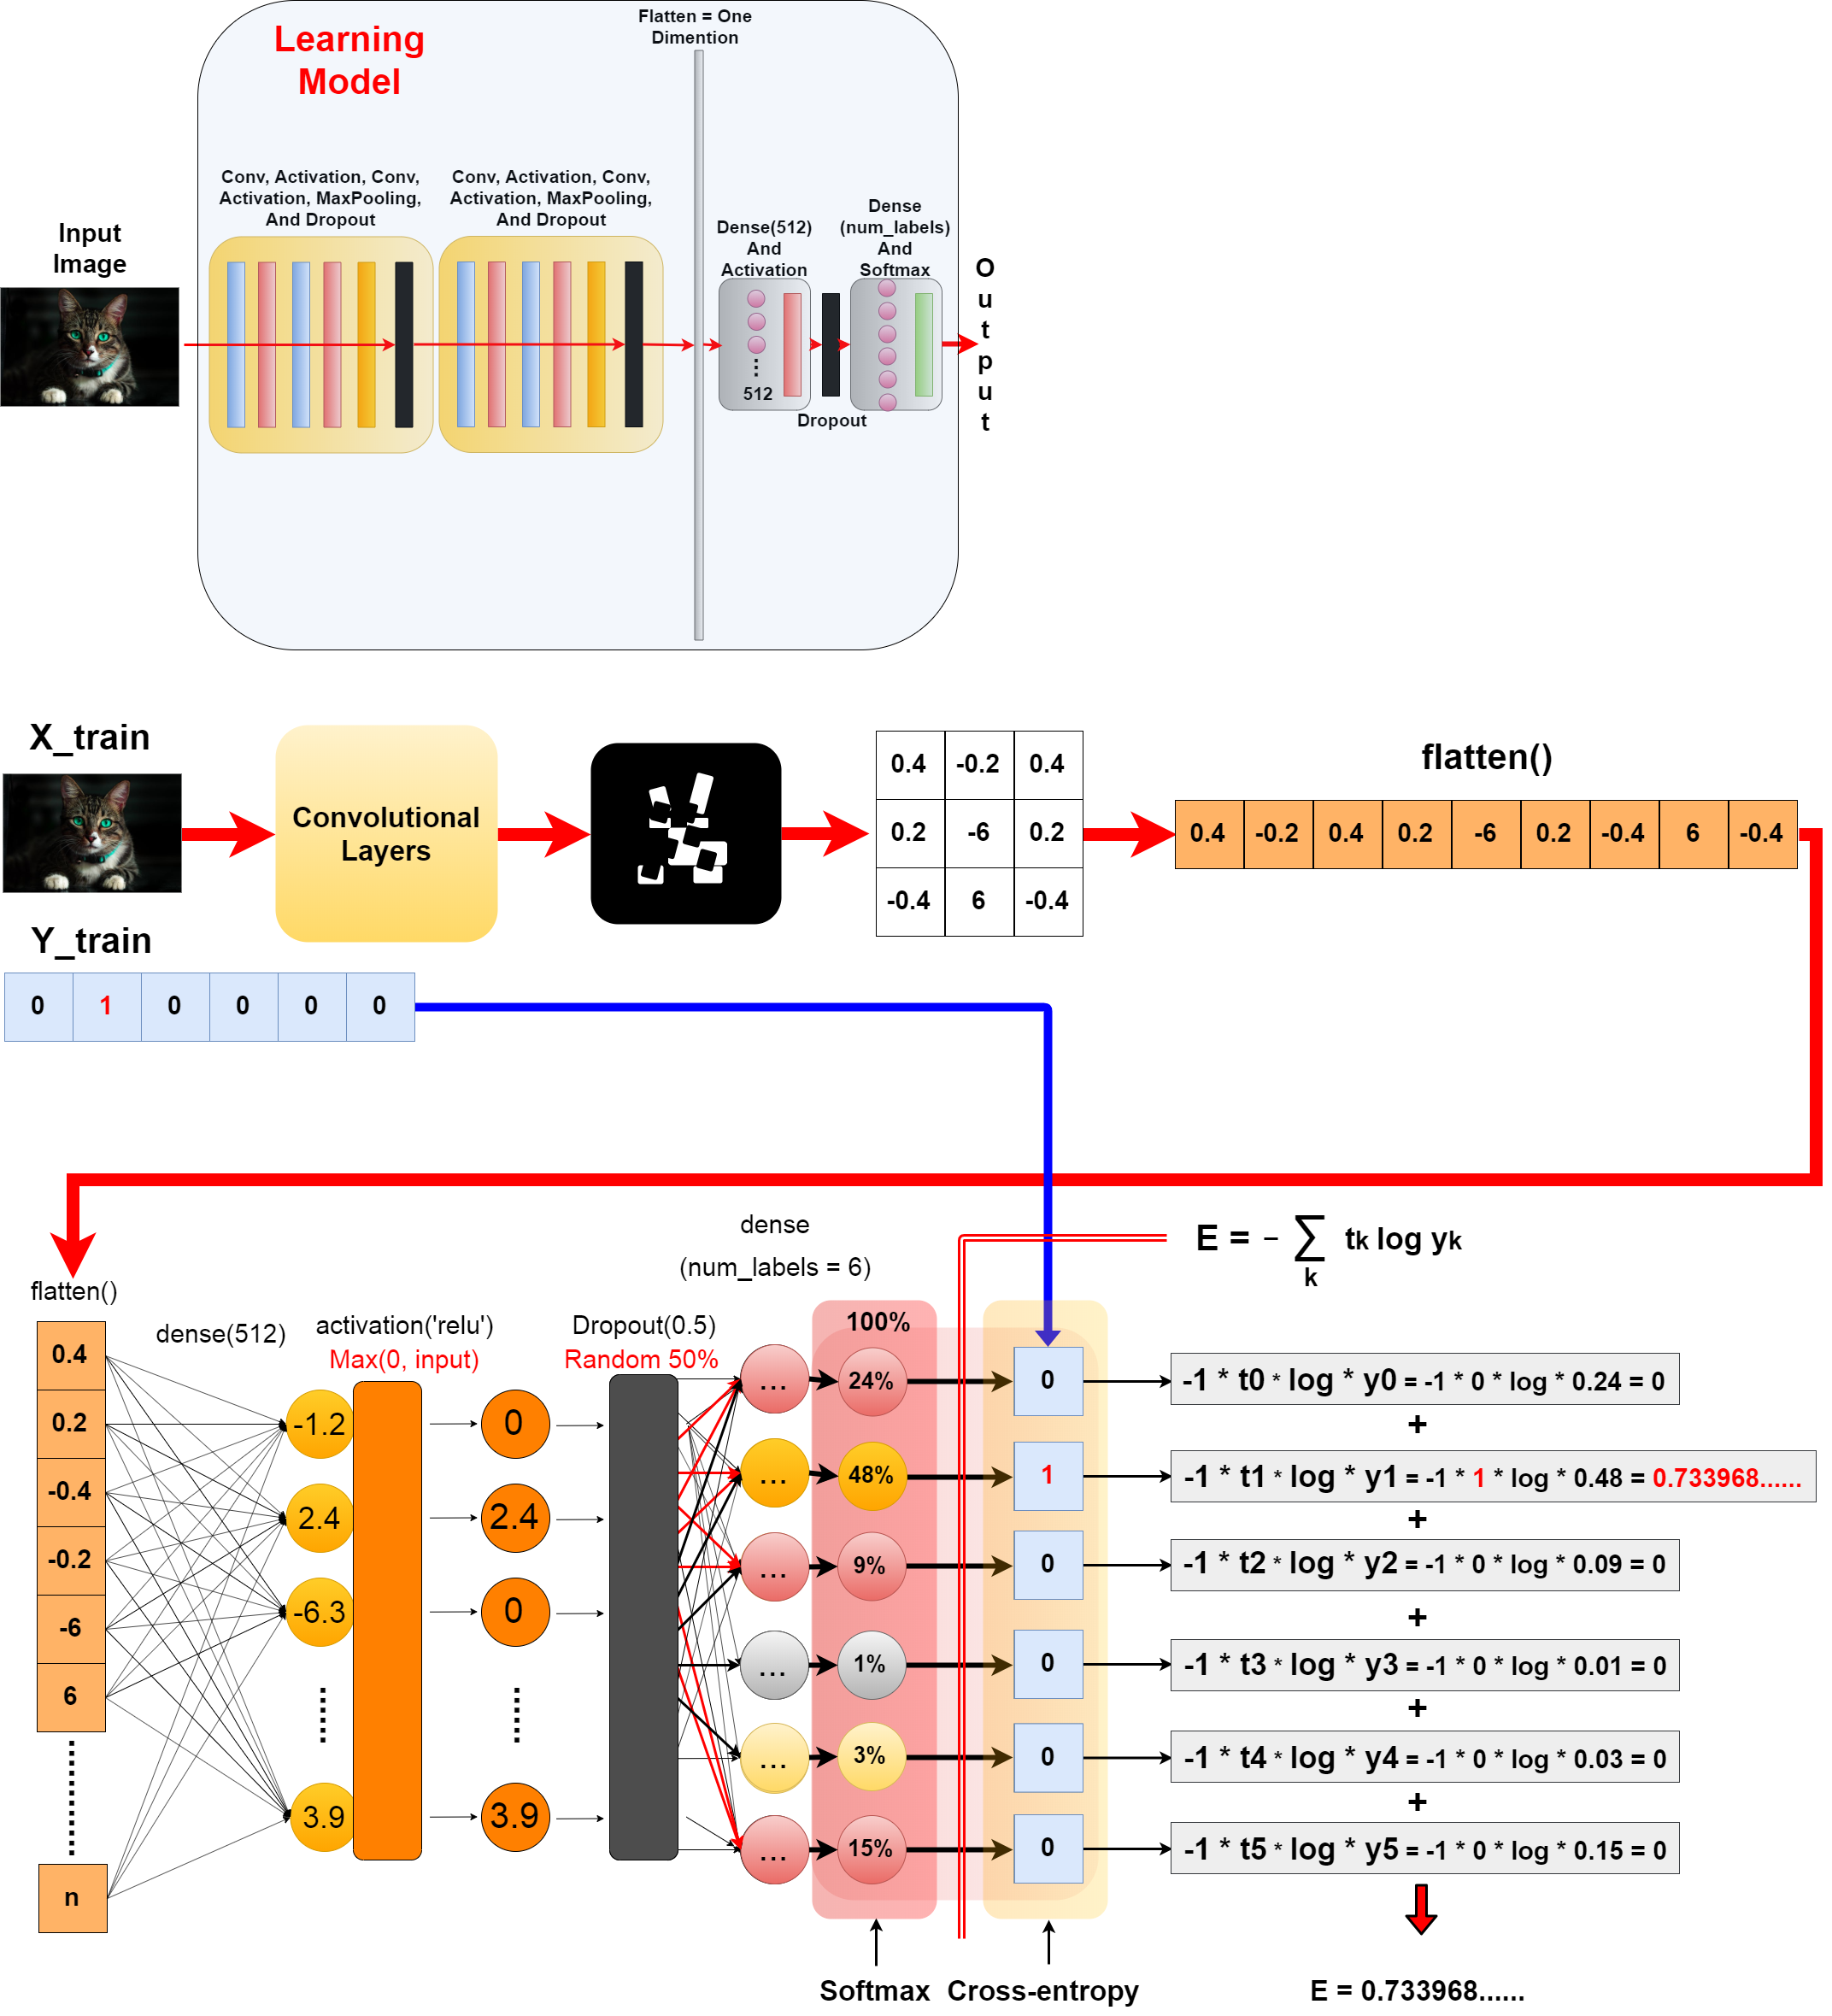
ベクトルの数値一つ一つは「Dense(512)」で512個のノードに連結される。 1024個の数値からなるベクトルだとすると、一つのノードに1024個の重みが掛けられることになる。
Each value of the vector is concatenated into 512 nodes using by "Dense(512)". Example, If for a vector of 1024 numbers, each node is multiplied by 1024 weights.
つまり、このニューロン間の重みは全部で1024X512の524288もある。
Thus, the weights among the neural networks total 1024 x 512, 524288.
この重みパラメータ(バイアスも)を調整するという作業がニューラルネットワークにおいての学習です。
The task of adjusting these weight parameters (also Bias) is the learning in the neural networks.
活性化関数とDropoutを使い入力値の重みを制限します。
Use the activation function and Dropout to limit the weight of the input value.
ラベルの数だけのノードを用意して、全結合させます。 その出力をSoftmax関数に通すことで、確率的数値(認識精度)として出力できます。
Create as many nodes as there are labels, and join them all together. you can pass that output through the softmax function to produce a probabilistic value (recognition accuracy).
そして、Cross-Entropyを使って損失値を算出できるようにします。
You can then use cross-entropy to calculate the loss value.
model.add(Flatten())
model.add(Dense(512))
model.add(Activation('relu'))
model.add(Dropout(0.5))
model.add(Dense(total_num))
model.add(Activation('softmax'))

model.compile(loss='categorical_crossentropy',
                optimizer=opt,
                metrics=['accuracy'])
クロスエントロピーを簡単な例で試してみましょう。
Try cross-entropy in a simple example.
import numpy as np

# The correct label is 1.
t = [0, 1, 0, 0, 0, 0]
y = [0.24, 0.48, 0.09, 0.01, 0.03, 0.15]

E = 0

delta = 1e-7
for k in range(len(y)):
    print("k", k)
    print("t[k] ", t[k], "y[k] ", y[k])
    print("-t[k] * np.log(y[k] + delta)", -t[k] * np.log(y[k] + delta))
    E += -t[k] * np.log(y[k] + delta)
    print("E", E)
学習とテスト
Learn and test your model
おさらいですので、主に図を使用して、解説していきます。
As it is a simple review, so I'll explain mainly using diagrams.
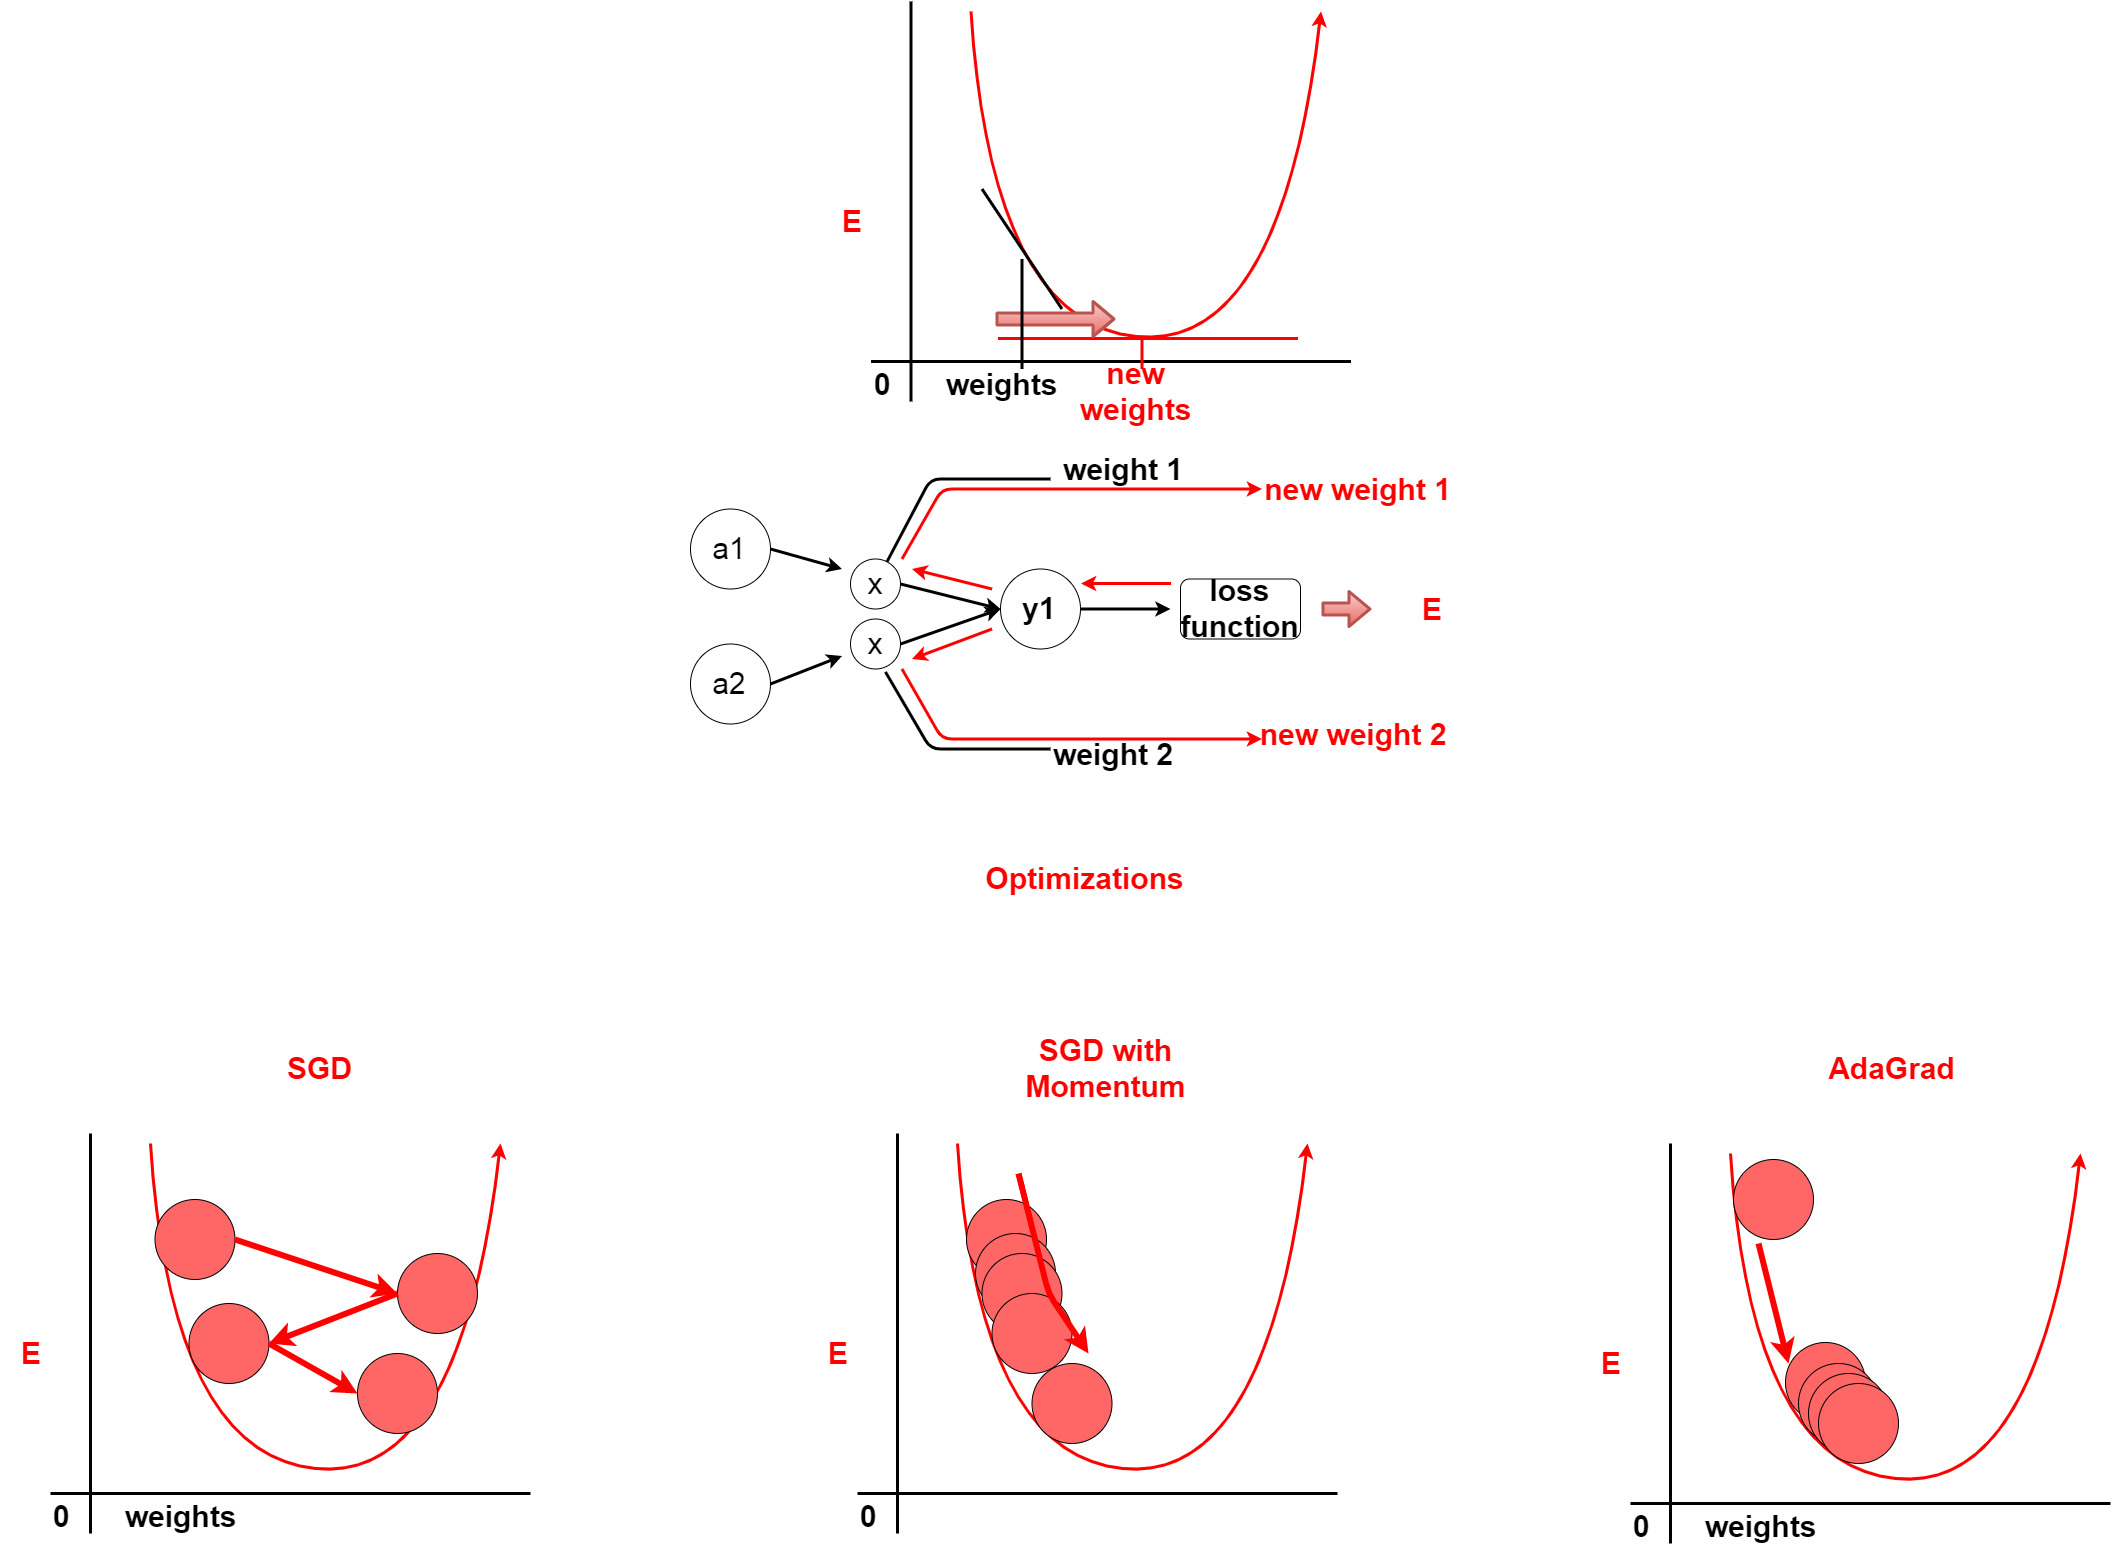
DeepLearningの肝は誤差逆伝播法です。 誤差逆伝播法とは、簡単にいうと損失値から逆算(微分)して、 ニューラルネットワーク間の重みやバイアスなどのパラメータを調整することです。 これが所謂「学習」になります。
The core part of DeepLearning is Backpropagation. Backpropagation back-calculats the loss value (differential) to adjust parameters such as weight and bias among the neural networks. This is the so-called "learning".
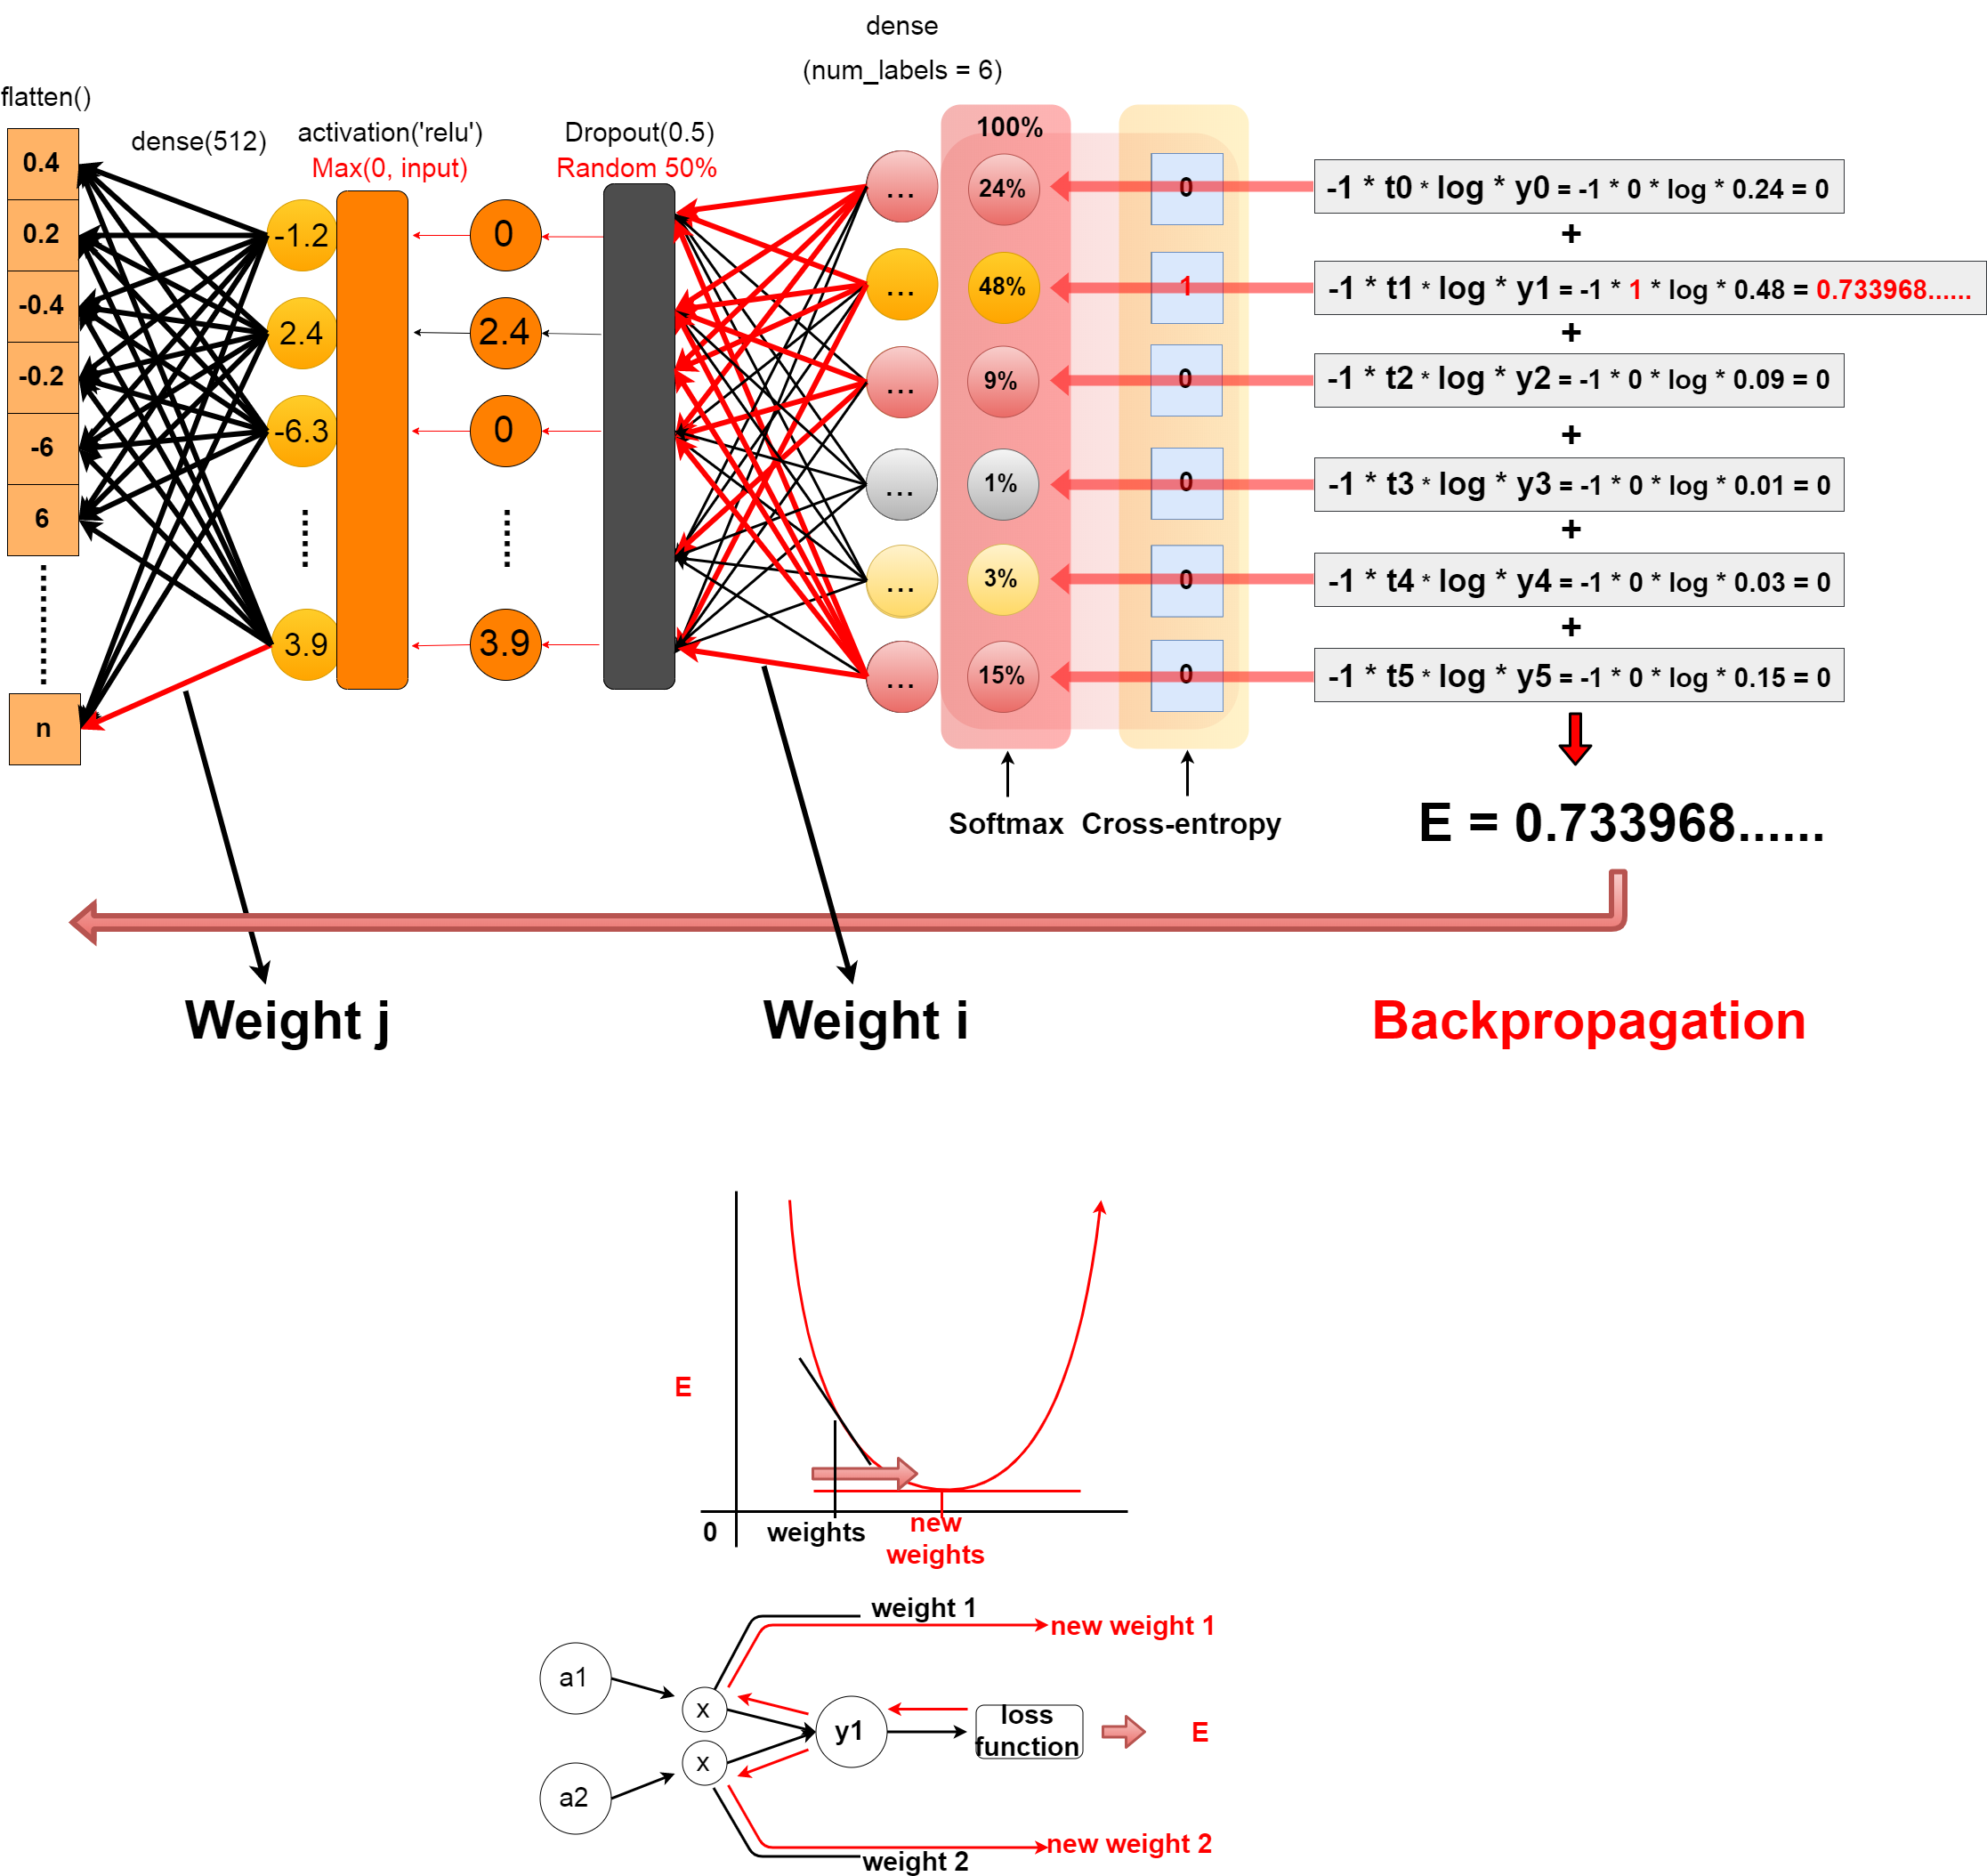
どのようにパラメータを更新していくかを計算するのがOptimizerです。 Optimizerには色々と種類があります。 おさらいですので、詳しい説明は過去の記事を見てください。
Optimizer calculates how to update the parameters. There are many different types of Optimization. For a review, see my previous blog post for more details.
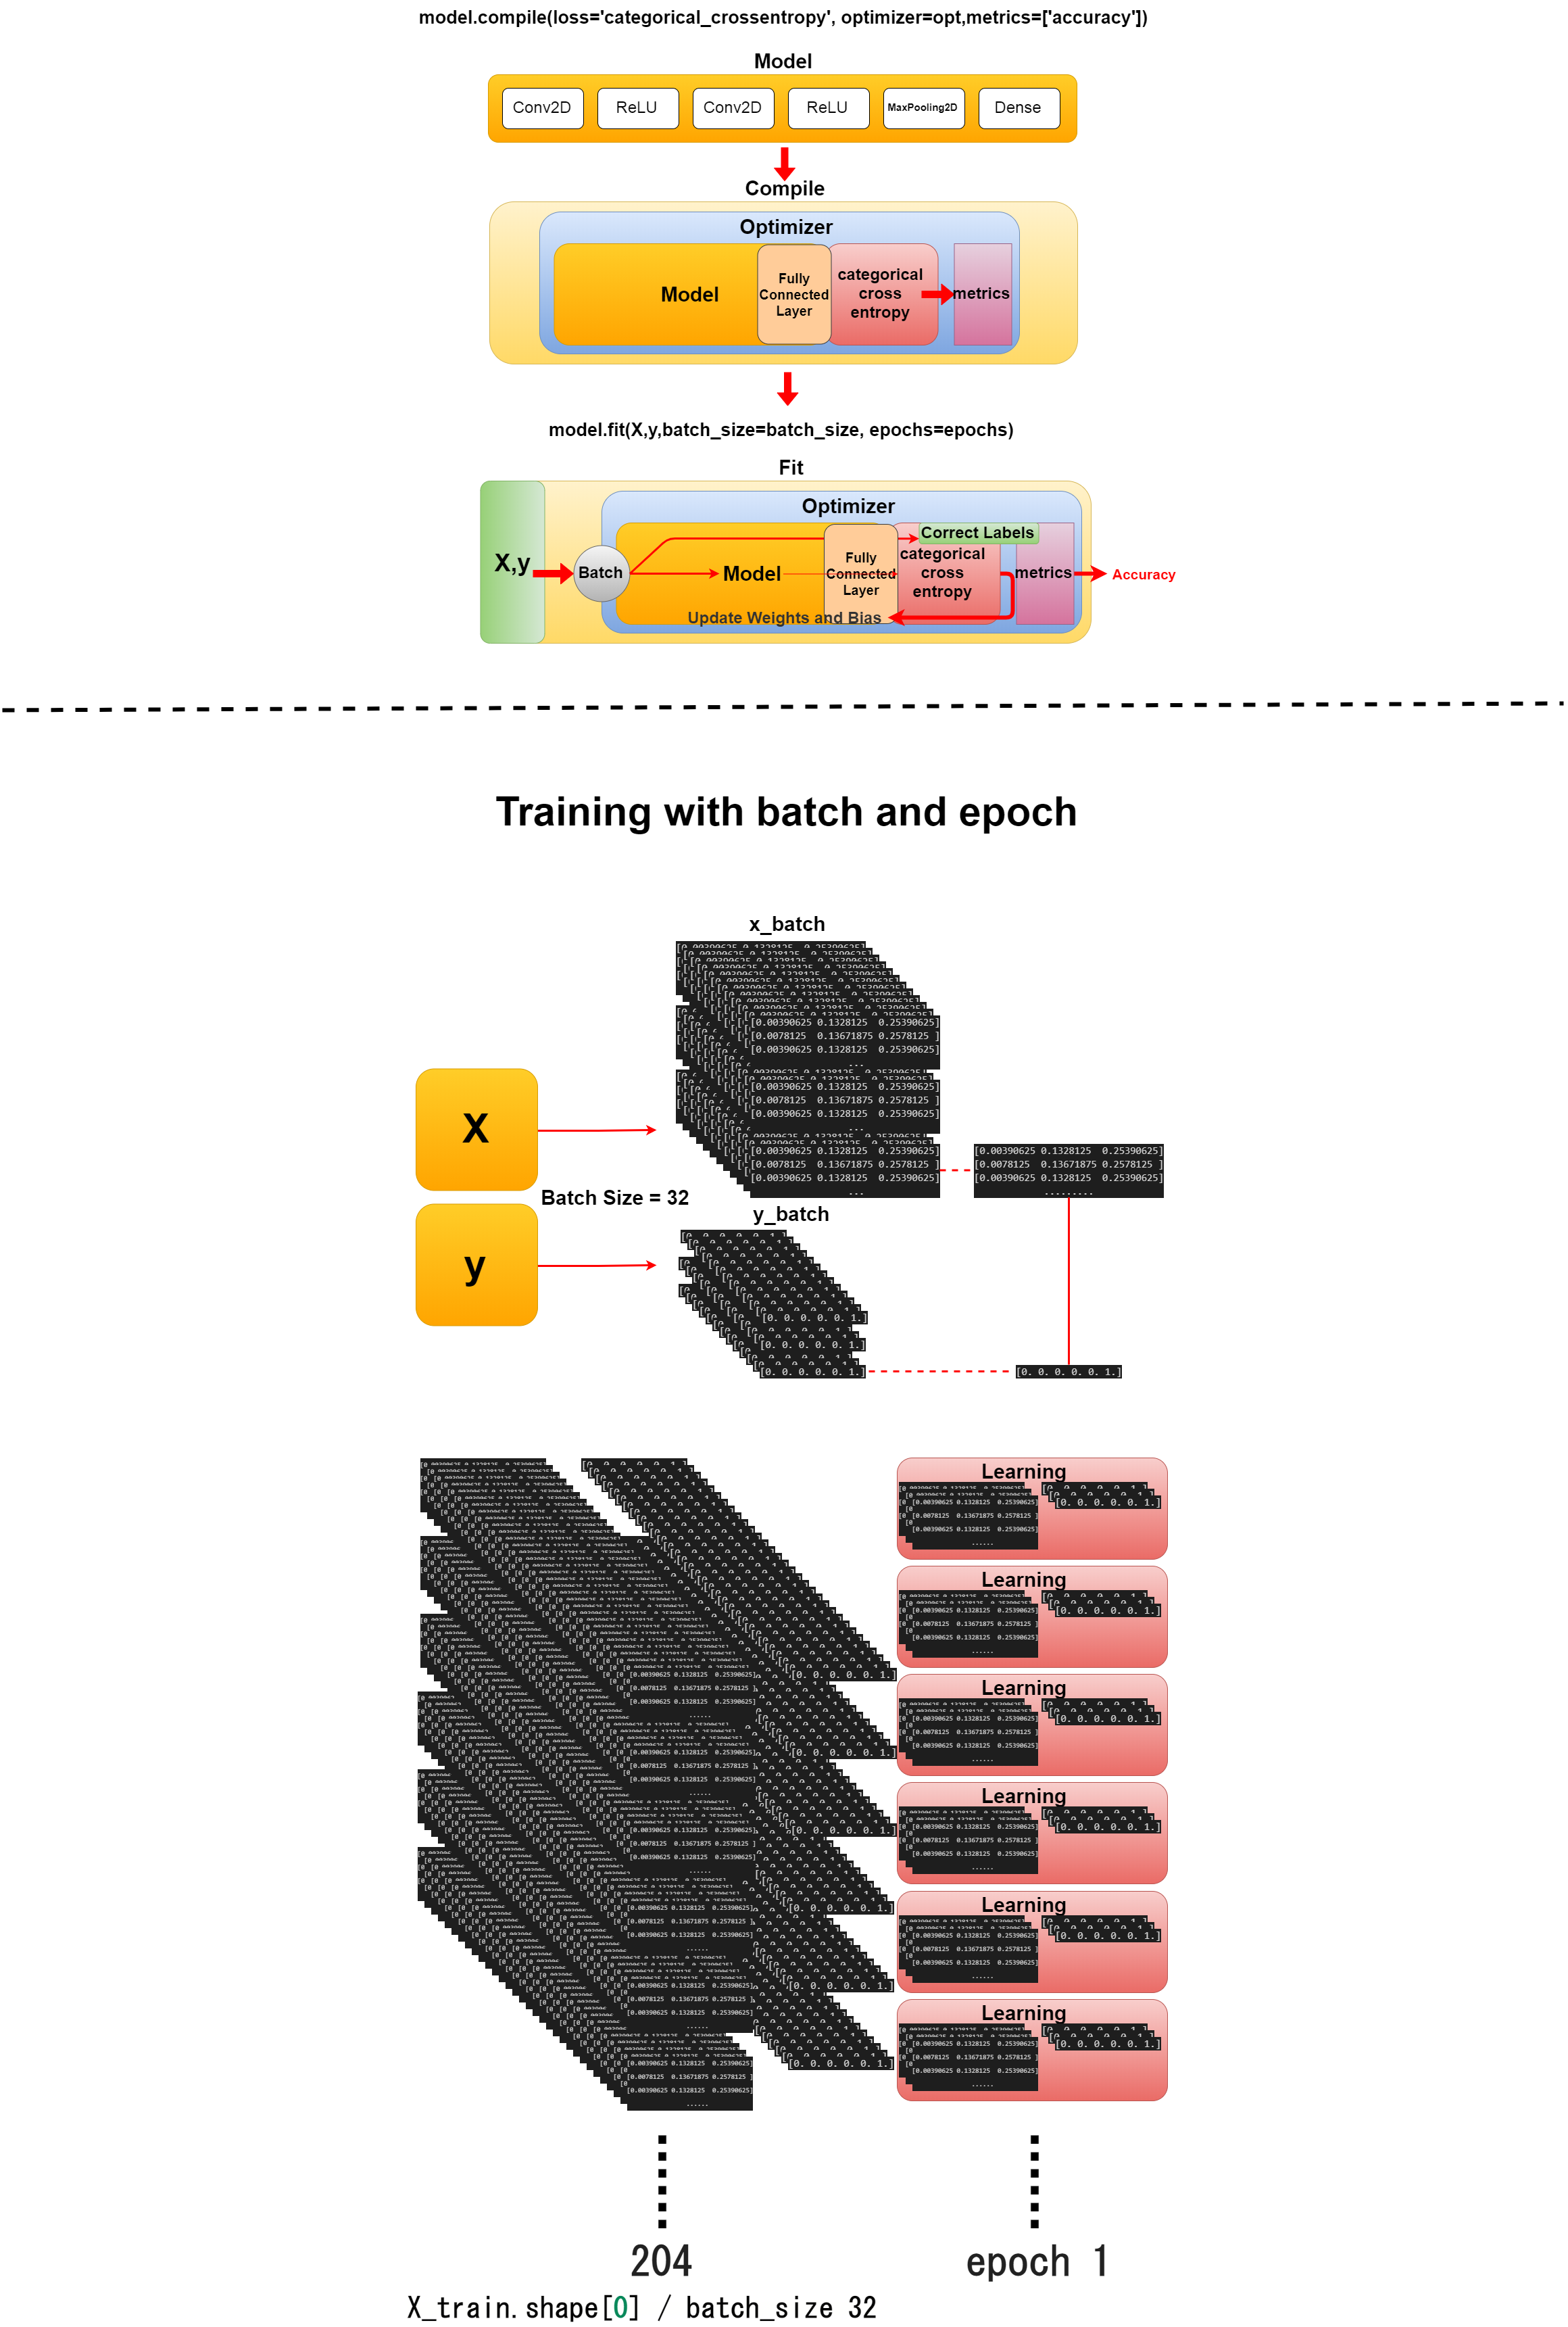
opt = keras.optimizers.adam()

model.compile(loss='categorical_crossentropy',
            optimizer=opt,
            metrics=['accuracy'])
model.fit(X,y,batch_size=batch_size, epochs=epochs)
そして、学習データを小分けして学習を開始します。
Then you start learning by subdividing the training data.
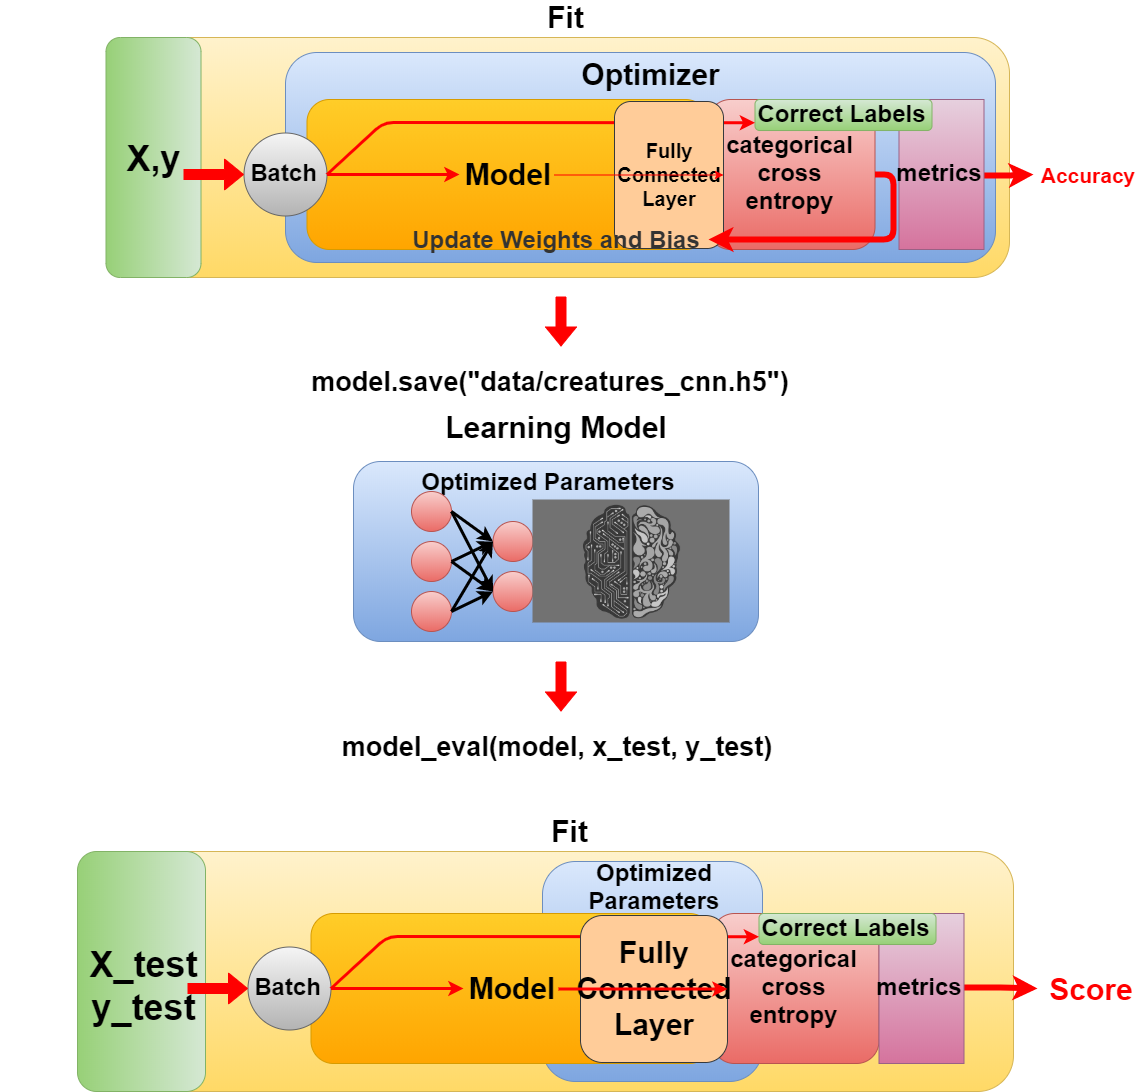
学習が終わったら、学習モデルを保存して、テストをします。
When you are finished, save the learning model and test it.
    model.save("data/creatures_cnn.h5")

----------------------------------------------------------

def model_eval(model, X, y):
    scores = model.evaluate(X, y, verbose=1)
    print('Test Loss', scores[0])
    print('Test Accuracy', scores[1])

----------------------------------------------------------

model_eval(model, x_test, y_test)
ということで、お次は作ったモデルに画像を推定させるプログラムを作りMASU。
In my next blog post, I'll create a program that infers images from the learning model we've created.