Published Date : 2019年11月13日8:30
Python Scriptと一緒に理解するCNN(Convolutional Neural Networks)の仕組み MaxPooling2D編
How CNN (Convolutional Neural Networks) Works with Python Scripts ~ MaxPooling2D ~
This blog has an English translation
画像認識シリーズ第9弾です。前回のブログ記事。
This is the ninth image recognition series. Last blog post.
前回はmodel_train関数内の活性化関数ReLUの図による説明をおこないました。
In a previous my blog post, I explained Activation function ReLU, along with diagrams.
この手のものはやり尽くされていますが、ただ一から全部やってみたかった。それだけです。 つーことで今回はMaxPooling2Dを解説していきたいと思いMASU。
This kind of thing is done by many people, but I just wanted to do it all from scratch. That's all. Anyway, I would like to explain MaxPooling2D this time.
目次
Table of Contents
概要 Overview |
Pythonスクリプトと一緒に理解するMaxPooling2D Understanding MaxPooling2D with Python and diagrams |
ページの最後へ Go to the end of the page. |
概要
Overview
MaxPooling2Dの中身を図を使用して説明.
I would like to explain what's inside [MaxPooling2D] along with diagrams.
Pythonスクリプトと一緒に理解するMaxPooling2D
Understanding MaxPooling2D with diagrams and Python
取り敢えず全体のコードは以下になります。
For now, the whole script is as follows.
Improved version of cifar10_cnn.py
imp_ver_cf10cnn.py
import keras
from keras.models import Sequential
from keras.layers import Dense, Dropout, Activation, Flatten
from keras.layers import Conv2D, MaxPooling2D
from keras.utils import np_utils
import numpy as np


labels = ["dogs", "cats", "monkeys", "birds", "fish", "lizards"]
total_num = len(labels)
image_size = 100

batch_size = 32
epochs = 100

def main():
  X_train, x_test, Y_train, y_test = np.load("data/augumented_images.npy")
  X_train = X_train.astype("float") / 256
  x_test = x_test.astype("float") / 256
  Y_train = np_utils.to_categorical(Y_train, total_num)
  y_test = np_utils.to_categorical(y_test, total_num)

  model = model_train(X_train, Y_train)
  model_eval(model, x_test, y_test)

def model_train(X, y):
  model = Sequential()
  model.add(Conv2D(32, (3, 3), padding='same',
                  input_shape=X.shape[1:]))
  model.add(Activation('relu'))
  model.add(Conv2D(32, (3, 3)))
  model.add(Activation('relu'))
  model.add(MaxPooling2D(pool_size=(2, 2)))
  model.add(Dropout(0.25))

  model.add(Conv2D(64, (3, 3), padding='same'))
  model.add(Activation('relu'))
  model.add(Conv2D(64, (3, 3)))
  model.add(Activation('relu'))
  model.add(MaxPooling2D(pool_size=(2, 2)))
  model.add(Dropout(0.25))

  model.add(Flatten())
  model.add(Dense(512))
  model.add(Activation('relu'))
  model.add(Dropout(0.5))
  model.add(Dense(total_num))
  model.add(Activation('softmax'))

  opt = keras.optimizers.adam()

  model.compile(loss='categorical_crossentropy',
              optimizer=opt,
              metrics=['accuracy'])

  model.fit(X,y,batch_size=batch_size, epochs=epochs)

  model.save("data/creatures_cnn.h5")

  return model

def model_eval(model, X, y):
  scores = model.evaluate(X, y, verbose=1)
  print('Test Loss', scores[0])
  print('Test Accuracy', scores[1])

if __name__=="__main__":
  main()
前回はmodel_train(X, y)内部の、
Last time we covered,
model.add(Conv2D(32, (3, 3)))
model.add(Activation('relu'))
Activation('relu')を説明しました。
Activation('relu').
次にその直ぐ下にある
Let's look at
model.add(MaxPooling2D(pool_size=(2, 2)))
MaxPooling2Dを説明します。
MaxPooling2D just below it.
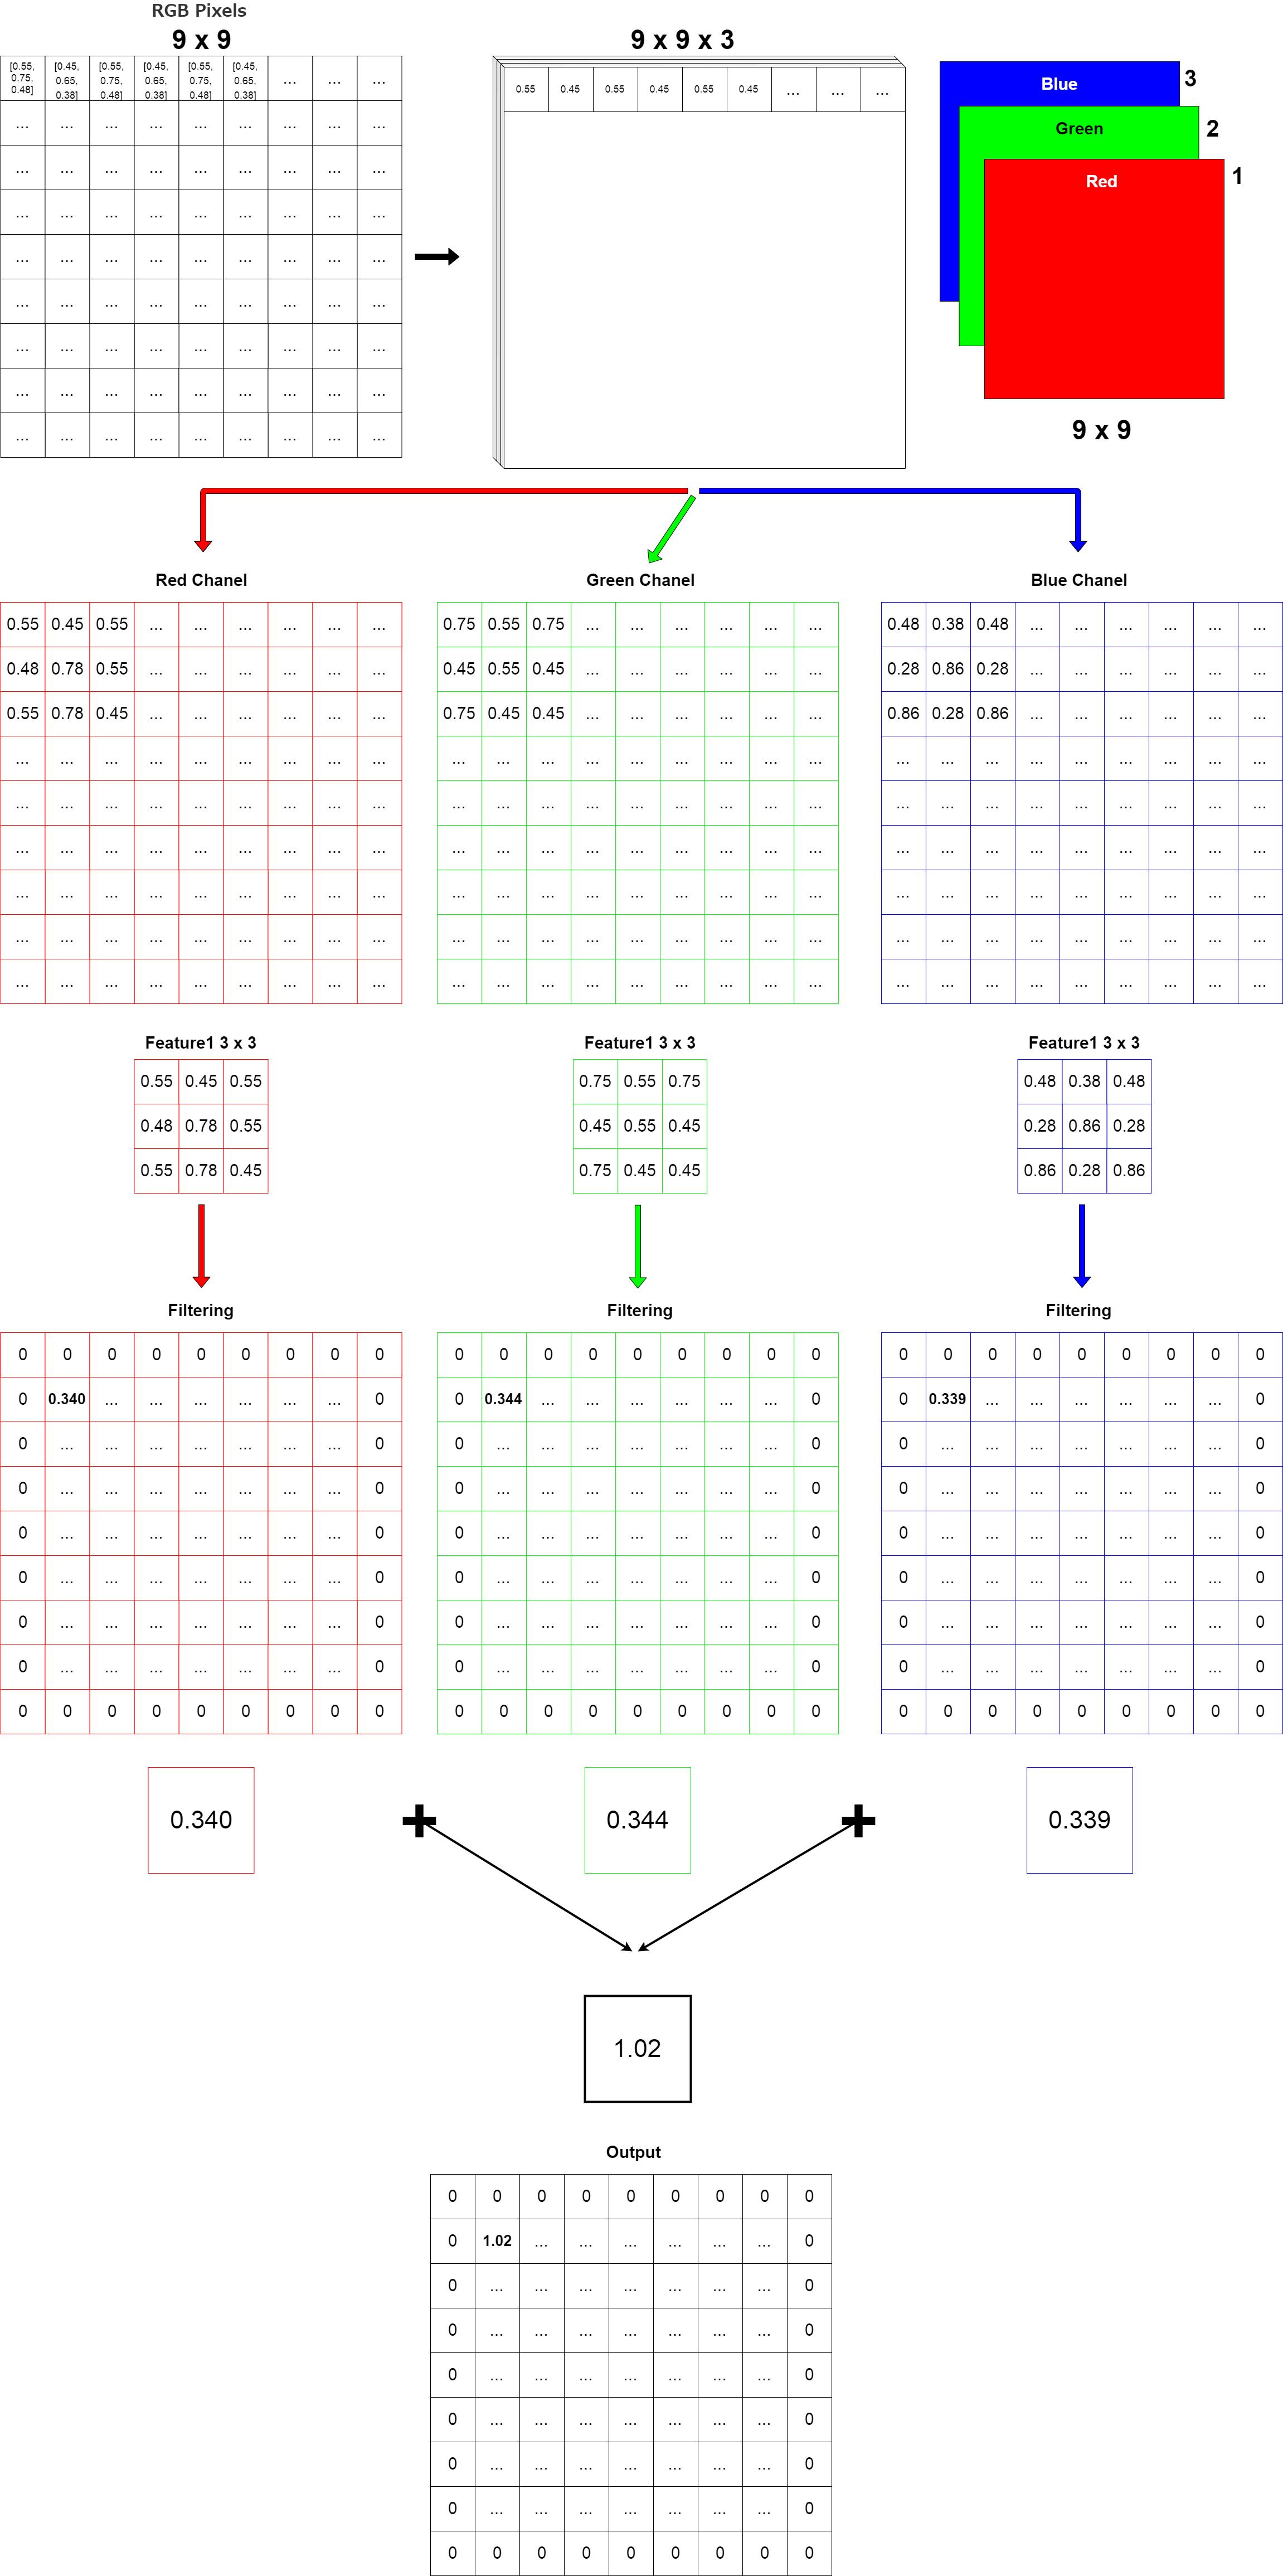
上に示した図は、9X9のRGB画像に3X3のフィルタリングを行った場合の模式図です。
The illustration above showns a 9 by 9 pixels RGB image with 3 by 3 pixels filtering.
RGBが3つの層に別れて、それぞれにフィルタリングを行い、最後にその全ての数値を足し合わせます。 これにより、アウトプットは約1.02となります。 最終的に前回説明したようなフィルターの数だけ重なったConvレイヤーができます。
RGB breaks up into three layers, filters each, and finaly adds all the numbers together. This results in an output of approximately 1.02. The result is a Conv layer with the same number of filters as described previously my blog post.
さらに前回の活性化関数ReLUが適用されていきます。
The activation function ReLU is then applied that I explained in previous my blog post.
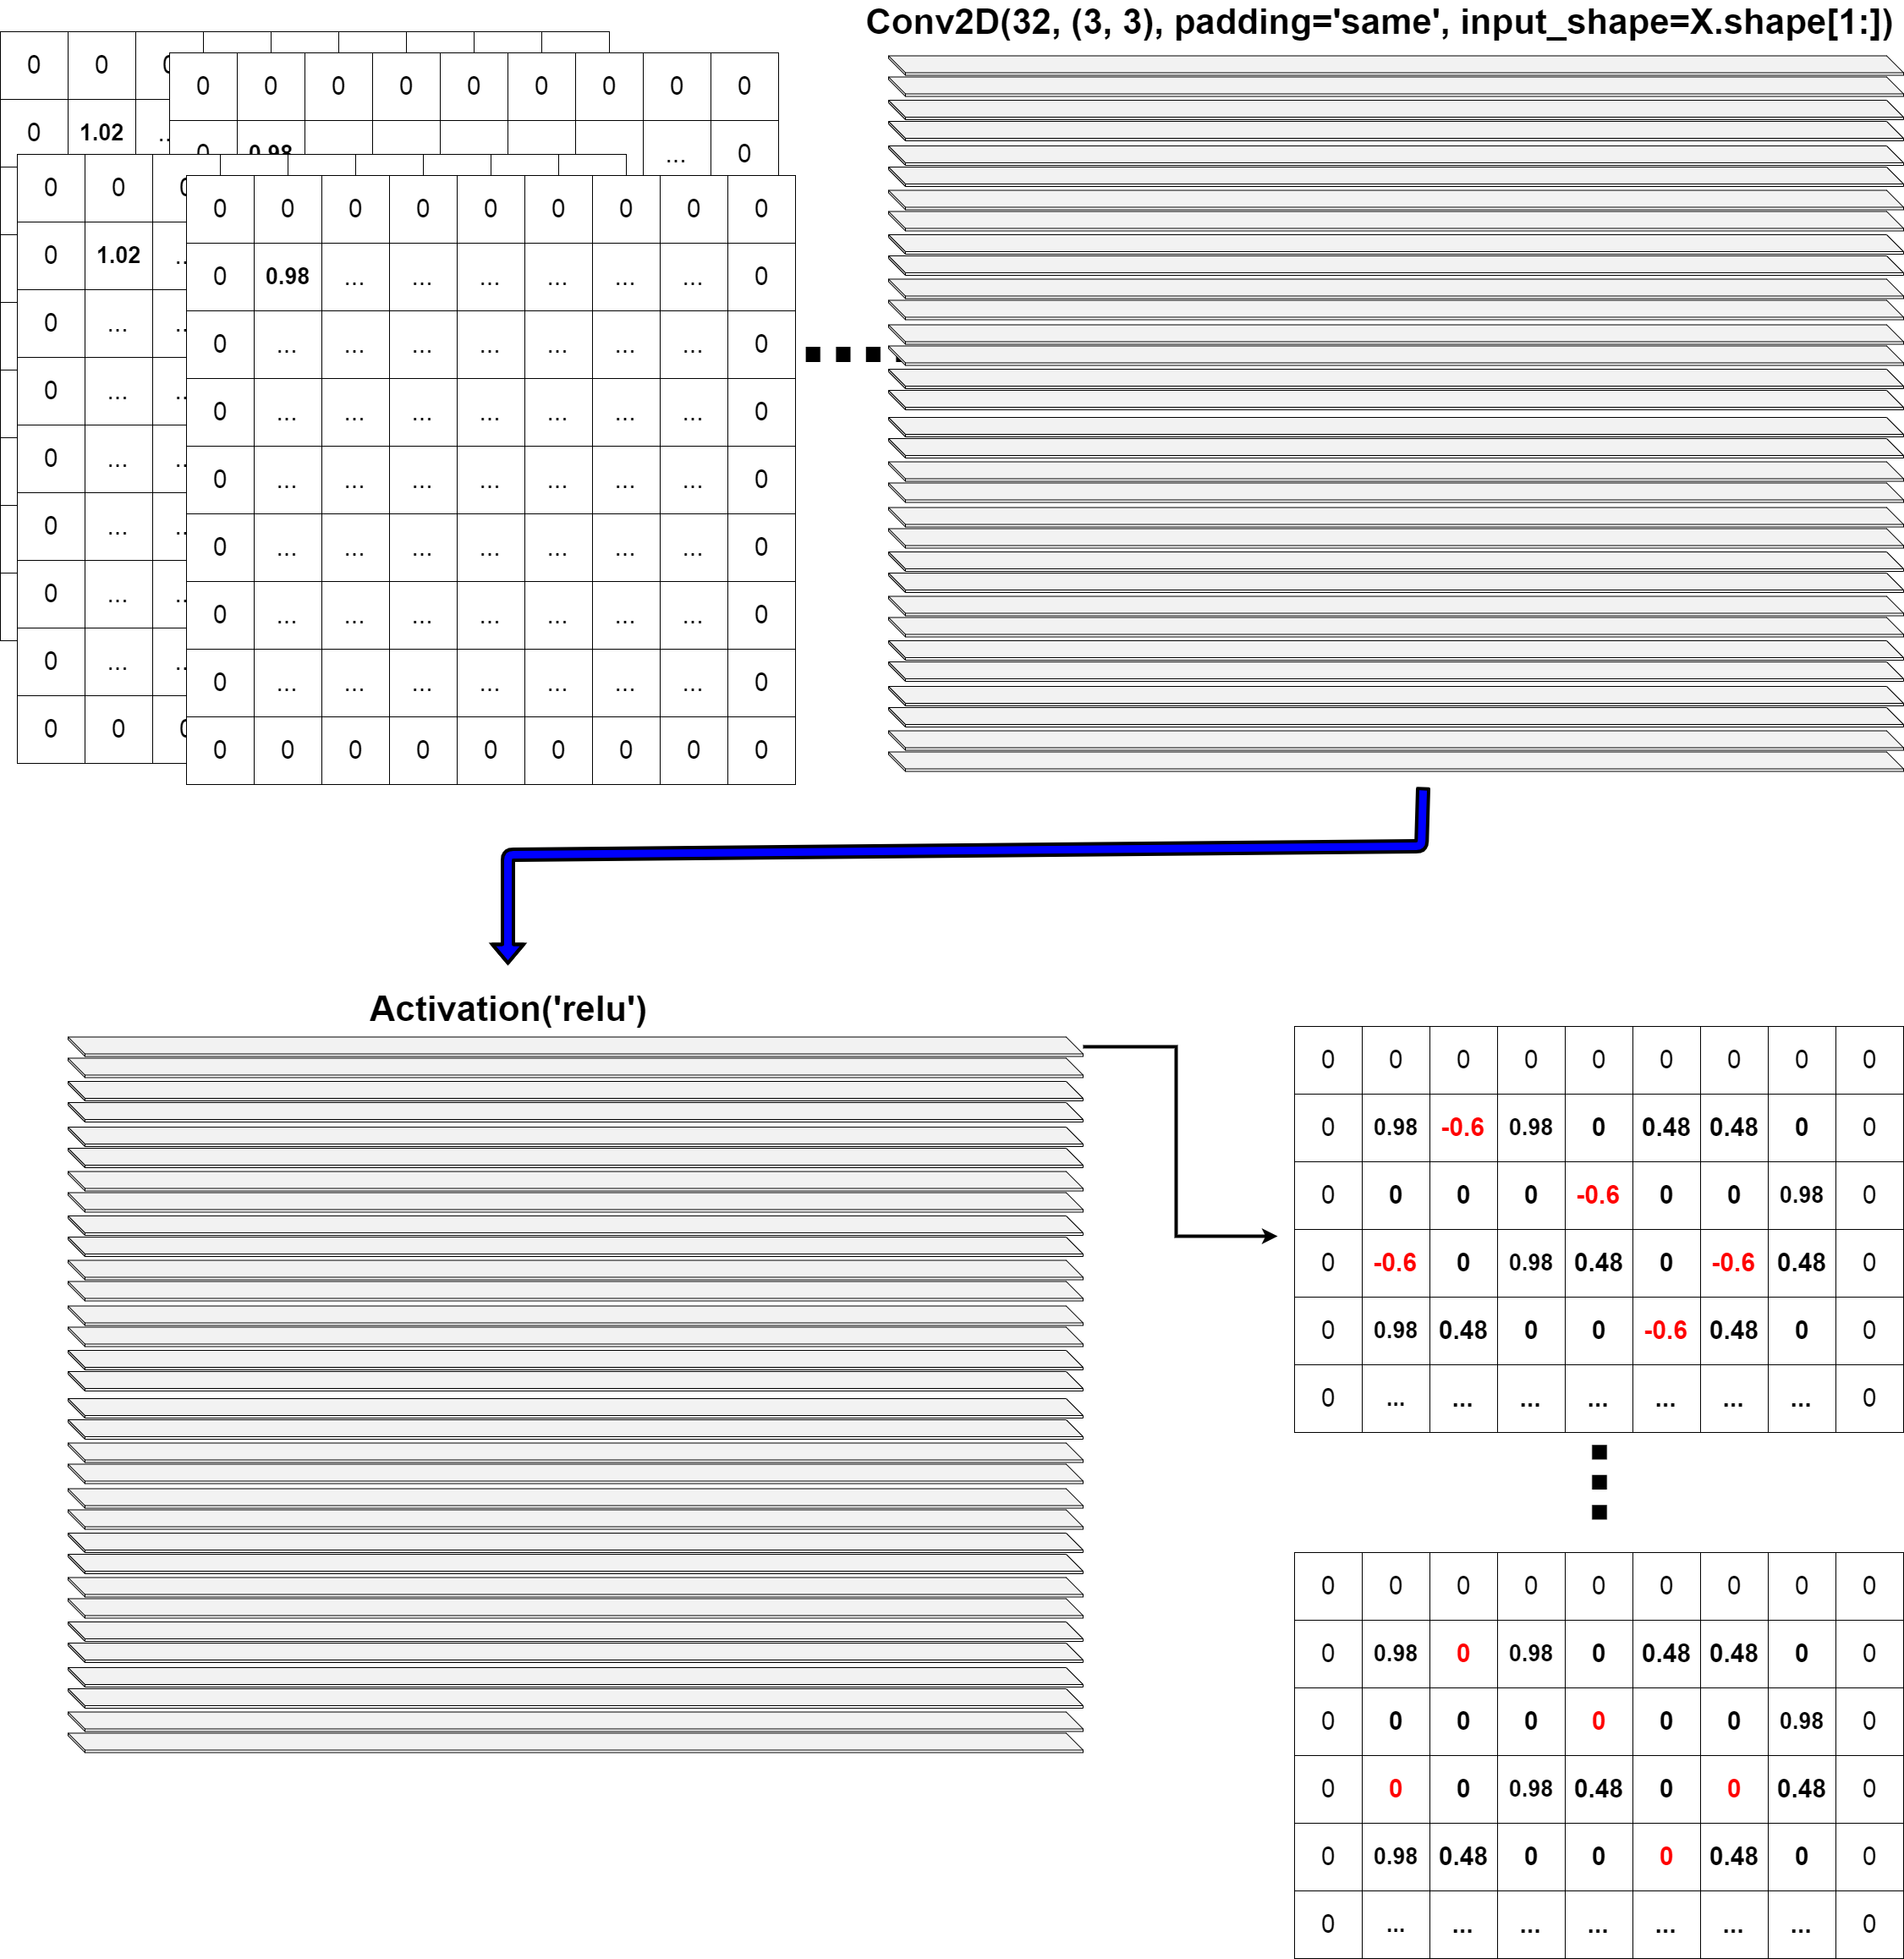
そしてレイヤーの一つ一つにMaxPooling2Dが適用されまつ。
MaxPooling2D is then applied to each layer.
model.add(MaxPooling2D(pool_size=(2, 2))
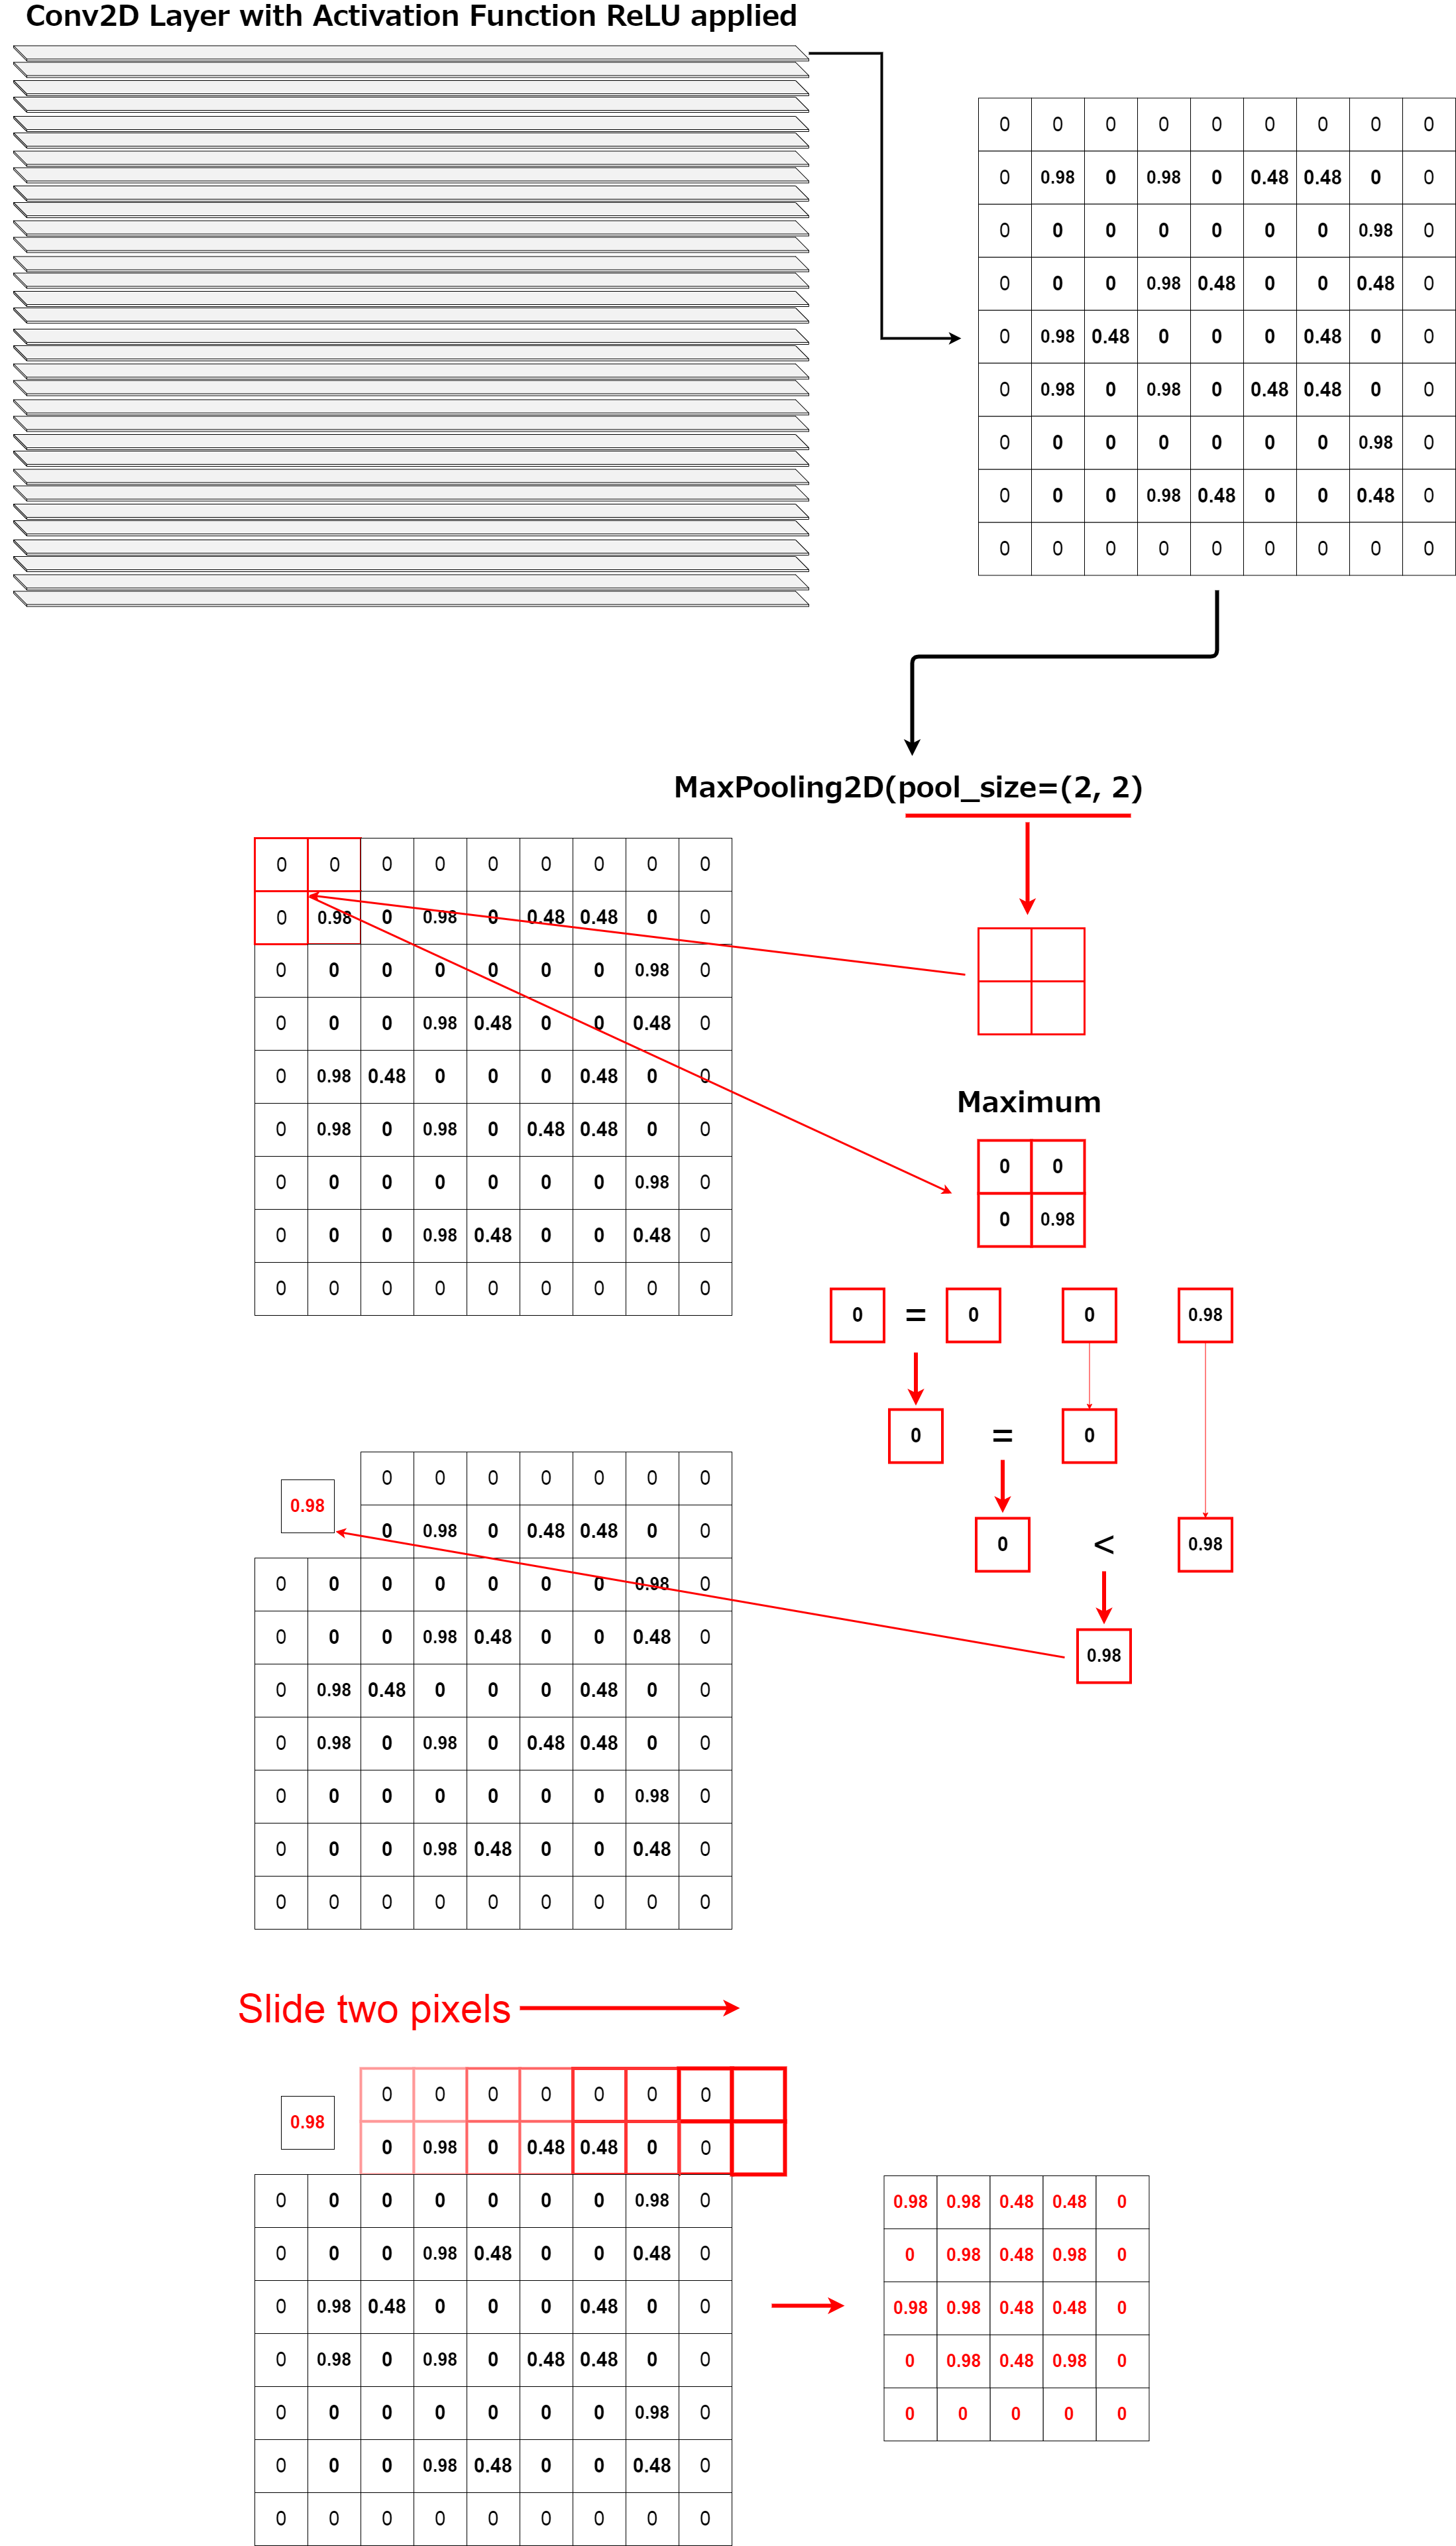
このように、Max PoolingはConvolutionレイヤーの次元数を削減しています。 直感的には「これは計算量を減らすんじゃないかな...あとは過学習を防止するんだな」と思えますが、かの有名なAndrew Ng先生ですら、 「この手法は上手く働くが、実のところその理由はまだよく分かっていない」と言っています。stackexchange.com
Thus, Max Pooling reduces the number of dimensions int he Convolution layer. We intuitively think "Hum.. This method might be reduce the amount of compute or It's to prevent over fitting..." But even Andrew Ng says in his Deep Learning Lecture [Quote] -> "But I have to admit, I think the main reason people use max pooling is because it's been found in a lot of experiments to work well, ... I don't know of anyone fully knows if that is the real underlying reason." stackexchange.com
とにかく、このConv2DからMaxPooling2Dまでが適用された図をみて全体の流れをおさらいしまそう。
Anyway, let's take a look at this diagram with Conv2D to MaxPooling2D applied and review the entire flow.
def model_train(X, y):
    model = Sequential()
    model.add(Conv2D(32, (3, 3), padding='same',
                    input_shape=X.shape[1:]))
    model.add(Activation('relu'))
    model.add(Conv2D(32, (3, 3)))
    model.add(Activation('relu'))
    model.add(MaxPooling2D(pool_size=(2, 2)))

残りの説明は次回に持ち越します。お次はDropout()からです。
I will carry over the rest of the explanation next time. Next comes the Dropout().