Published Date : 2019年11月12日7:22
Python Scriptと一緒に理解するCNN(Convolutional Neural Networks)の仕組み ReLU編
How CNN (Convolutional Neural Networks) Works with Python Scripts ~ ReLU ~
This blog has an English translation
画像認識シリーズ第8弾です。前回のブログ記事。
This is the 8th image recognition series. Last blog post.
前回はmodel_train関数内のConv2Dの図による説明をおこないました。
In a previous my blog post, I explained Conv2D, along with diagrams.
この手のものはやり尽くされていますが、ただ一から全部やってみたかった。それだけです。 つーことで前回のPythonスクリプトが実際にどのようにCNNを構築しているのかを解説していきたいと思いMASU。
This kind of thing is done by many people, but I just wanted to do it all from scratch. That's all. Anyway, I'll show you how the previous Python script actually built CNN, and how it works.
目次
Table of Contents
概要 Overview |
Pythonスクリプトと一緒に理解する基本的なCNN ~ ReLU ~ Basic CNN to understand with Python Scripts ~ ReLU ~ |
ページの最後へ Go to the end of the page. |
概要
Overview
Activation('relu')の中身を図を使用して説明.
I would like to explain what's inside [Activation('relu')] along with diagrams.
Pythonスクリプトと一緒に理解するActivation('relu')
Activation('relu') to understand with Python Scripts
取り敢えず全体のコードは以下になります。
For now, the whole script is as follows.
Improved version of cifar10_cnn.py
imp_ver_cf10cnn.py
import keras
from keras.models import Sequential
from keras.layers import Dense, Dropout, Activation, Flatten
from keras.layers import Conv2D, MaxPooling2D
from keras.utils import np_utils
import numpy as np


labels = ["dogs", "cats", "monkeys", "birds", "fish", "lizards"]
total_num = len(labels)
image_size = 100

batch_size = 32
epochs = 100

def main():
  X_train, x_test, Y_train, y_test = np.load("data/augumented_images.npy")
  X_train = X_train.astype("float") / 256
  x_test = x_test.astype("float") / 256
  Y_train = np_utils.to_categorical(Y_train, total_num)
  y_test = np_utils.to_categorical(y_test, total_num)

  model = model_train(X_train, Y_train)
  model_eval(model, x_test, y_test)

def model_train(X, y):
  model = Sequential()
  model.add(Conv2D(32, (3, 3), padding='same',
                  input_shape=X.shape[1:]))
  model.add(Activation('relu'))
  model.add(Conv2D(32, (3, 3)))
  model.add(Activation('relu'))
  model.add(MaxPooling2D(pool_size=(2, 2)))
  model.add(Dropout(0.25))

  model.add(Conv2D(64, (3, 3), padding='same'))
  model.add(Activation('relu'))
  model.add(Conv2D(64, (3, 3)))
  model.add(Activation('relu'))
  model.add(MaxPooling2D(pool_size=(2, 2)))
  model.add(Dropout(0.25))

  model.add(Flatten())
  model.add(Dense(512))
  model.add(Activation('relu'))
  model.add(Dropout(0.5))
  model.add(Dense(total_num))
  model.add(Activation('softmax'))

  opt = keras.optimizers.adam()

  model.compile(loss='categorical_crossentropy',
              optimizer=opt,
              metrics=['accuracy'])

  model.fit(X,y,batch_size=batch_size, epochs=epochs)

  model.save("data/creatures_cnn.h5")

  return model

def model_eval(model, X, y):
  scores = model.evaluate(X, y, verbose=1)
  print('Test Loss', scores[0])
  print('Test Accuracy', scores[1])

if __name__=="__main__":
  main()
前回はmodel_train(X, y)内部の、
Last time we covered,
model = Sequential()
model.add(Conv2D(32, (3, 3), padding='same', input_shape=X.shape[1:]))
Conv2D構築までを説明しました。
the Conv2D build inside model_train(X, y).
次にその直ぐ下にある
Let's look at
model.add(Activation('relu'))
ReLUを説明します。
the ReLU just below it.
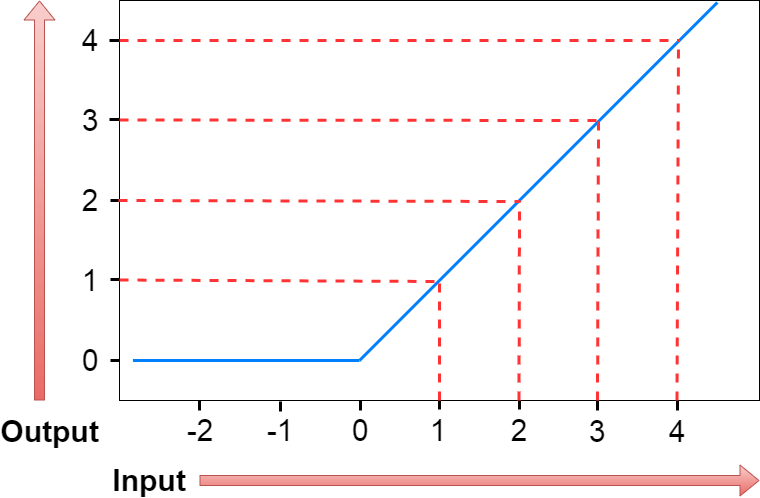
ReLUは図の用に入力された数値が0以下なら0を出力して、0より大きければ、その数値をそのまま出力しまつ。
Look at the diagram avobe, ReLU outputs 0 if the number entered is less than or equal to zero, and outputs the number as it is if it is greater than zero.
数式だと単純にこうなる。
The ReLU formula is simple.
f = max(0, x)
つまり、0と入力値を比較して、0より大きければ入力された値を出力。 そうで無いなら0を出力。
That is, the input value is compared with zero, and if greater than zero, the input value is output. If not, output zero.
単純だから計算が速いという利点がある。
The advantage is that the calculation is fast because it is simple.
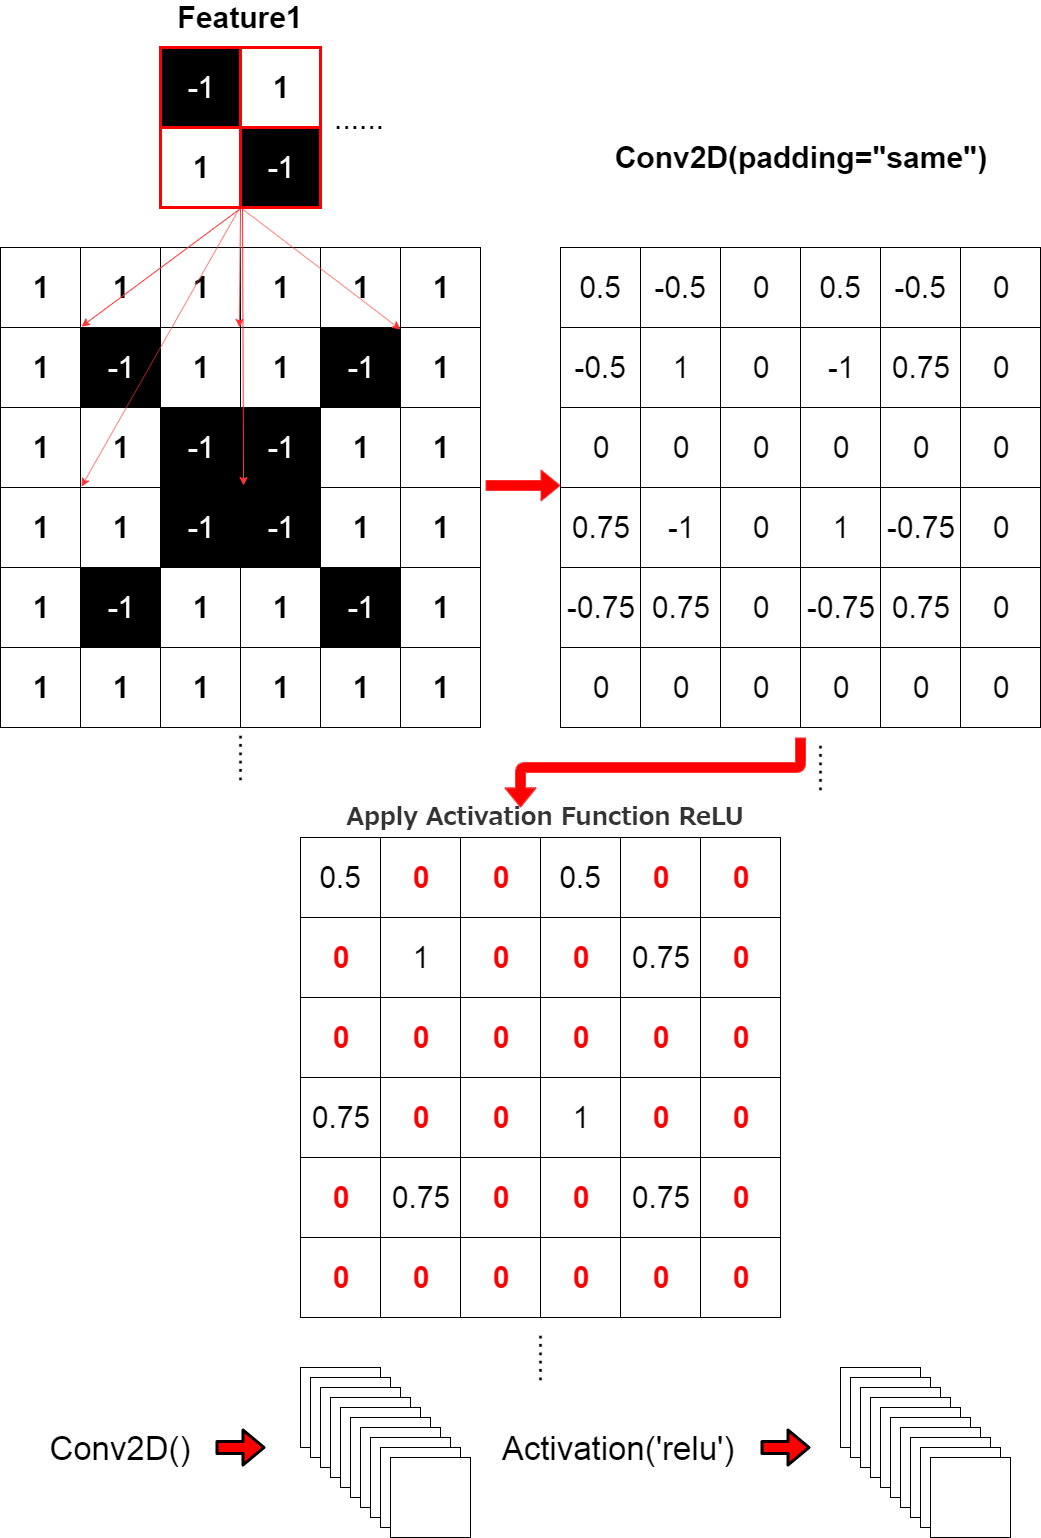
ここで前回のConv2Dの図を見て欲しい。
See the previous Conv2D diagram here.
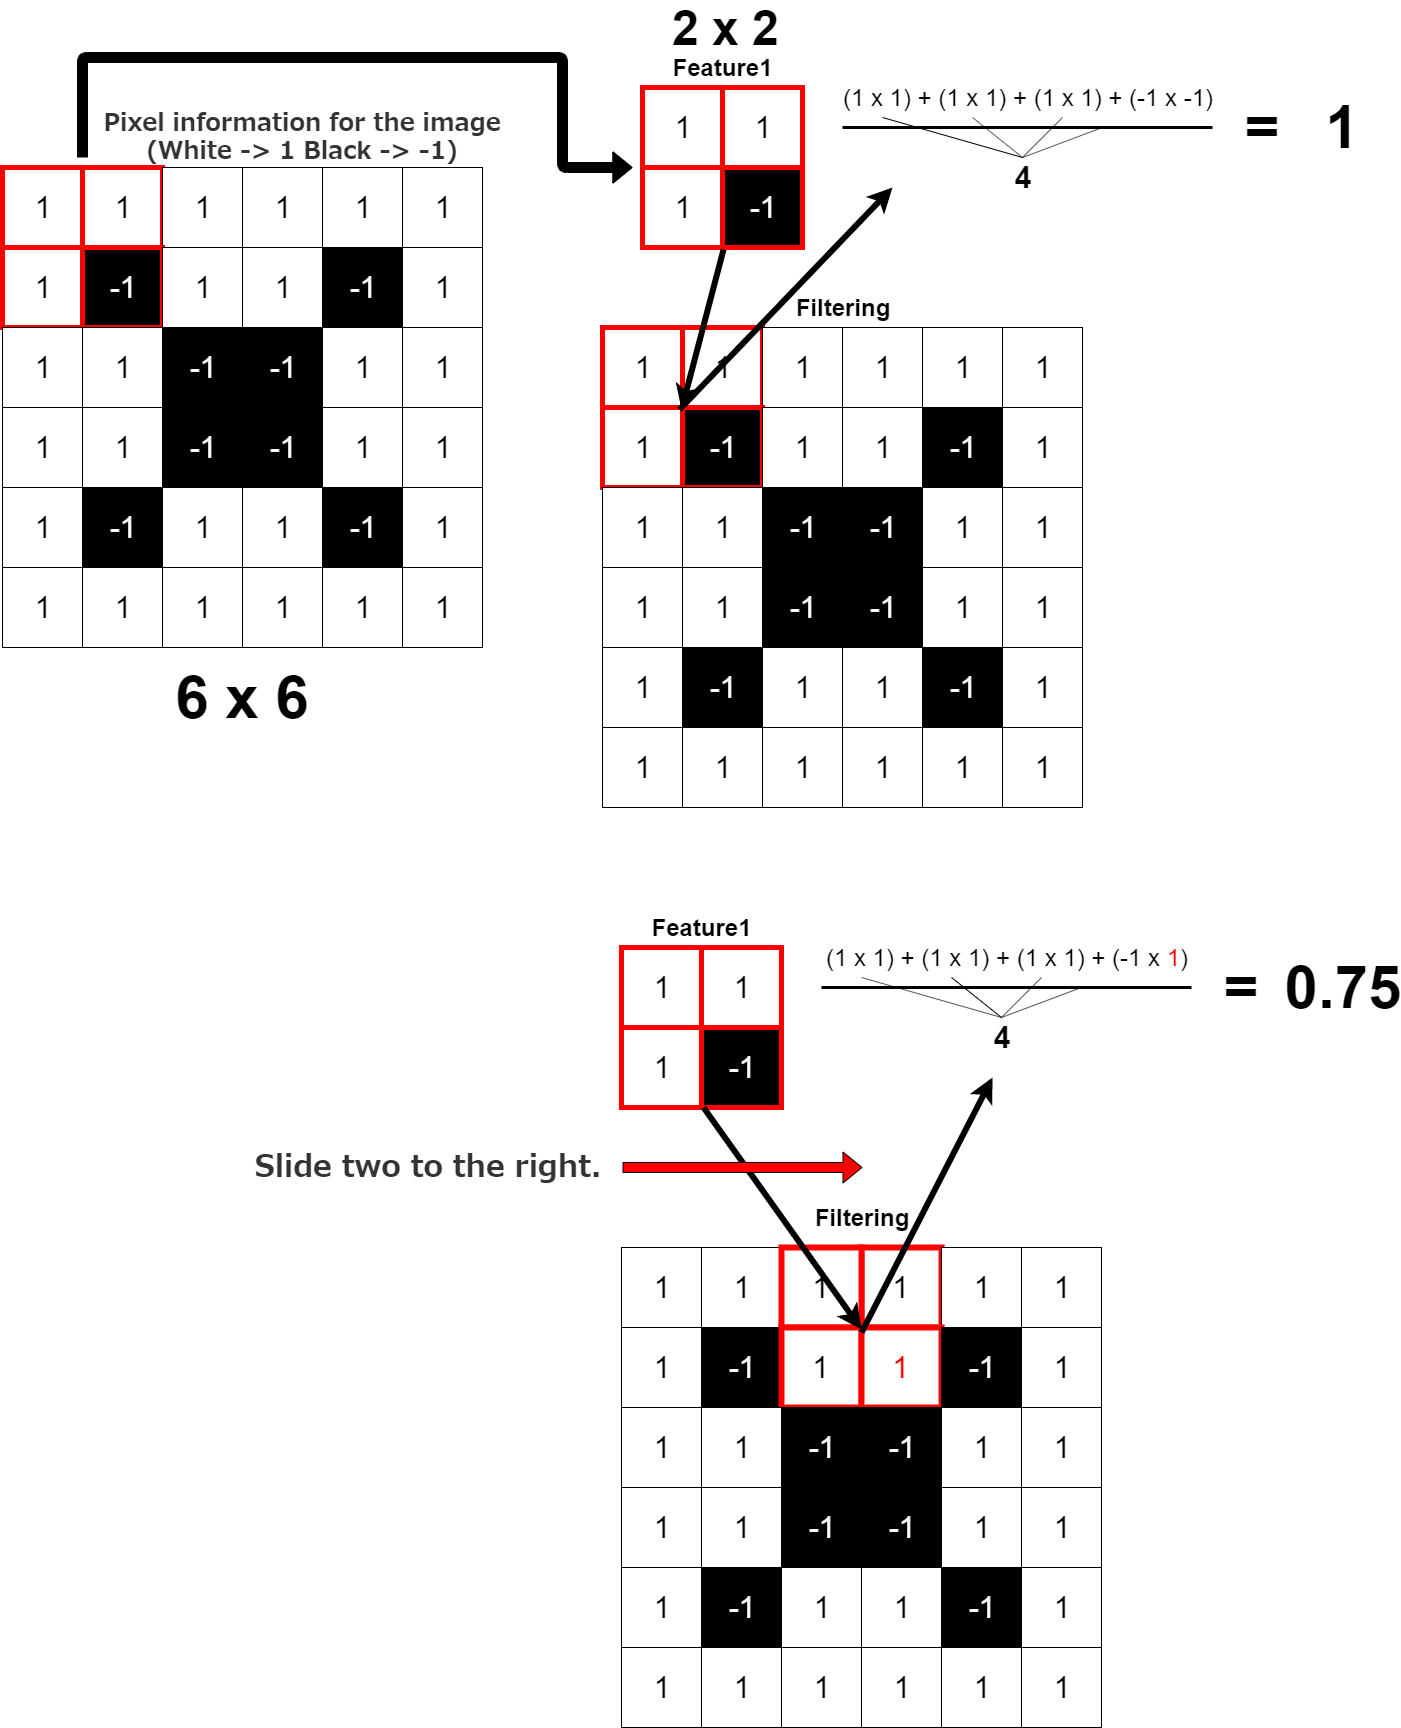
このConv2DのレイヤーにそれぞれActivation('relu')を適用するイメージでつ。
This is an image that applies Activation('relu') to these Conv2D leyers.
これがこのスクリプト2行の流れです。
This is the two-line flow of the script.
model.add(Conv2D(32, (3, 3), padding='same', input_shape=X.shape[1:]))
model.add(Activation('relu'))
残りの説明は次回に持ち越します。お次はMaxPooling2Dからです。
I will carry over the rest of the explanation next time. Next comes the MaxPooling2D.