Published Date : 2019年11月9日10:51
図と一緒に理解するPython Script
Python Script to understand with diagrams
This blog has an English translation
画像認識シリーズ第6弾です。前回のブログ記事。
This is the sixth image recognition series. Last blog post.
前回はGoogle ColaboratoryとPythonとKeras公式ページのcifar10_cnn.pyを使い、画像認識の学習用スクリプト作りました。
Last time I used Google Colaboratory, Python and the official Keras site's cifar10_cnn.py to create a script for learning image recognition.
この手のものはやり尽くされていますが、ただ一から全部やってみたかった。それだけです。 つーことでお次は前回のPythonスクリプトが実際にどのようにCNNを構築しているのかを図を用いて解説していきたいと思いMASU。
This kind of thing is done by many people, but I just wanted to do it all from scratch. That's all. Next, I'll show you using diagrams how the previous Python script actually built CNN.
目次
Table of Contents
概要
Overview
前回のスクリプトでNumpyのヴァージョンエラーが起こる場合があるので、それの対処をする。
I'll explain to you what to do if the script in the previous blog post caused in numpy's version erros occurred.
図を用いてPythonスクリプトとCNNの関係性、仕組みを解説していきます。
I'll show you using some diagram how Python scripts relate to CNN and how they work.
前回のPythonスクリプトで発生するNumpyエラーの対処方法
Hangling numpy errors from previous Python Scripts
さて前回のスクリプトをGoogle Colaboratoryで実行すると、以下のような文言にエンカウンターします(脳内変換:FFの戦闘音)。
Now, if you execute the previous script in the Google Colaboratory, you may get an error statement similar to the following.
ValueError: Object arrays cannot be loaded when allow_pickle=False
調べてみたら、これは使用しているnumpyのバージョンが違うことによるエラーだそうです。
I checked and found out that this error was caused by using a different version of numpy.
なので、Google ColaboratoryにインストールされているNumpyをアンインストールして(現時点で1.17.3)、 古いバージョン(1.16.2)をインストールし直します。
So, uninstall numpy which is installed in Google Colaboratory (So far at 1.17.3) and Reinstall the older version(1.16.2).
!pip3 uninstall numpy -y
Uninstalling numpy-1.17.3:
    Successfully uninstalled numpy-1.17.3
!pip3 install numpy==1.16.2
Installing collected packages: numpy
Successfully installed numpy-1.16.2
このインストールはGoogle Colaboratoryへのセッションが切れると、 またリセットされるので、 セッションが切れる度にやり直す必要があります。 ですが、このような設定のおかげで、 バージョンダウンによって他の依存関係に影響が出た時、 すぐにリカバリーできるので安心してくだちぃ。
This installation will be reset again when your session to Google Colaboratory expires, so you will have to redo it each time your session expires. However, you can rest assured that this configuration allows you to recover quickly when a version down affects other dependencies.
これで、無事スクリプトが動くはずです。
Now, the script should be work.
図と一緒に理解するCNNのPython Script
CNN Python Script to Understand with the Diagram
取り敢えず全体のコードは以下になります。
For now, the whole script is as follows.
Improved version of cifar10_cnn.py
imp_ver_cf10cnn.py
import keras
from keras.models import Sequential
from keras.layers import Dense, Dropout, Activation, Flatten
from keras.layers import Conv2D, MaxPooling2D
from keras.utils import np_utils
import numpy as np


labels = ["dogs", "cats", "monkeys", "birds", "fish", "lizards"]
total_num = len(labels)
image_size = 100

batch_size = 32
epochs = 100

def main():
  X_train, x_test, Y_train, y_test = np.load("data/augumented_images.npy")
  X_train = X_train.astype("float") / 256
  x_test = x_test.astype("float") / 256
  Y_train = np_utils.to_categorical(Y_train, total_num)
  y_test = np_utils.to_categorical(y_test, total_num)

  model = model_train(X_train, Y_train)
  model_eval(model, x_test, y_test)

def model_train(X, y):
  model = Sequential()
  model.add(Conv2D(32, (3, 3), padding='same',
                  input_shape=X.shape[1:]))
  model.add(Activation('relu'))
  model.add(Conv2D(32, (3, 3)))
  model.add(Activation('relu'))
  model.add(MaxPooling2D(pool_size=(2, 2)))
  model.add(Dropout(0.25))

  model.add(Conv2D(64, (3, 3), padding='same'))
  model.add(Activation('relu'))
  model.add(Conv2D(64, (3, 3)))
  model.add(Activation('relu'))
  model.add(MaxPooling2D(pool_size=(2, 2)))
  model.add(Dropout(0.25))

  model.add(Flatten())
  model.add(Dense(512))
  model.add(Activation('relu'))
  model.add(Dropout(0.5))
  model.add(Dense(total_num))
  model.add(Activation('softmax'))

  opt = keras.optimizers.adam()

  model.compile(loss='categorical_crossentropy',
              optimizer=opt,
              metrics=['accuracy'])

  model.fit(X,y,batch_size=batch_size, epochs=epochs)

  model.save("data/creatures_cnn.h5")

  return model

def model_eval(model, X, y):
  scores = model.evaluate(X, y, verbose=1)
  print('Test Loss', scores[0])
  print('Test Accuracy', scores[1])

if __name__=="__main__":
  main()
まずmain()内を見ていきましょう。
Let's start by looking inside main()
X_train, x_test, Y_train, y_test = np.load("data/augumented_images.npy")
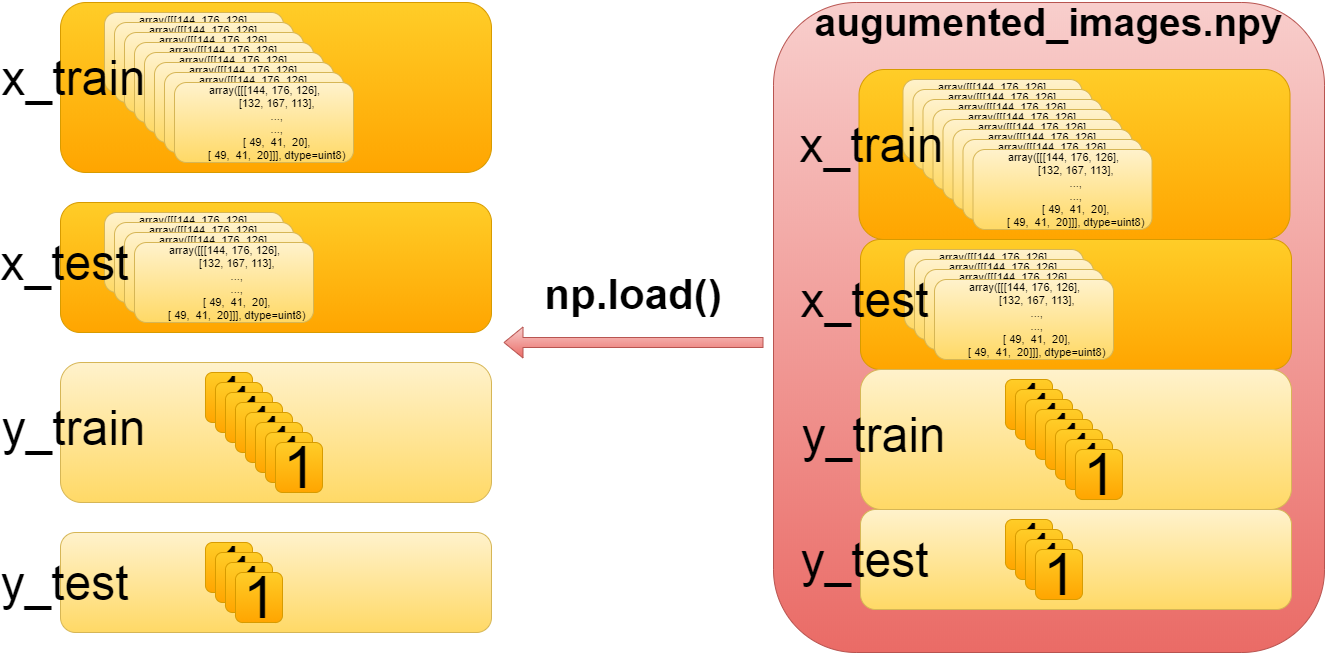
これは単純に前々回セーブした訓練用データとテスト用データを取り出しているだけです。
It simply retrieves the training and test data we saved previously.
続いてこちらのコード。
Next, I'll explain the following code.
X_train = X_train.astype("float") / 256
x_test = x_test.astype("float") / 256
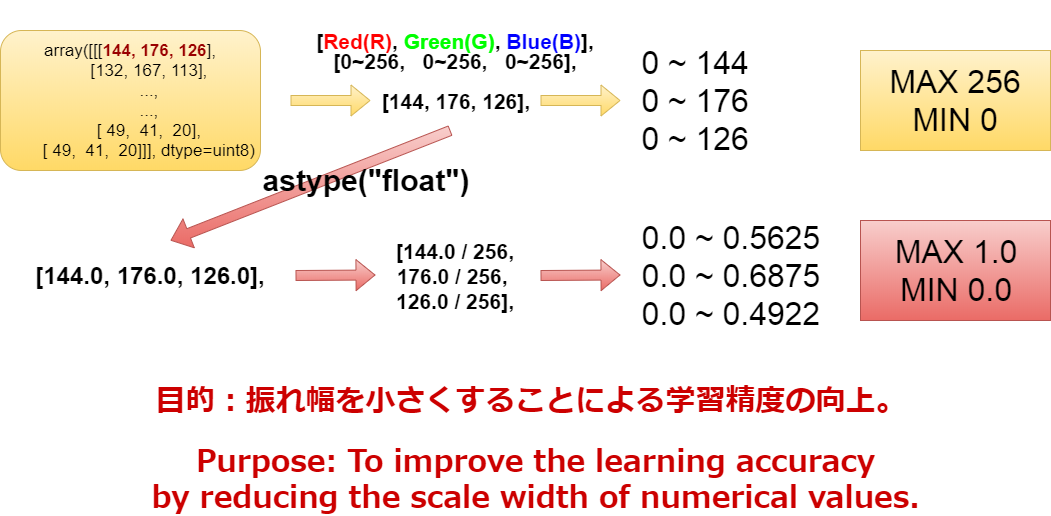
まずRGBは0〜256(255)までの値を取ります。 0、0、0なら黒。 255、255、255は白。 255、0、0は赤。 といった具合に0から256までの値で様々な色を表現できます。 コンピューターはこの1ピクセルに入っている微妙な数値の変化を見て、その画像の特徴を理解するのにゃー。 ただ、0から256までの数字の幅の比率はそれを最大値で割った数の幅の比率と変わりません。 0から256までを0から1までに変換すると、学習の効率が上がるので、ややこしいですが、変換作業を行っています。 その際データ型を合わせる必要があるので、astype("float")でint型(整数)からflot型(小数)に変換してから計算を行います。
RGB values can be up to 0 ~ 256 (255). Black for 0,0,0. 255, 255, 255 are white. 255, 0, 0 is red. Thus, Computer Display can represent different colors with values between 0 and 256. Computers can see subtle changes in the numbers in a pixel and understand the characteristics of the image. However, the ratio of the width of the numbers between 0 and 256 is the same as the ratio of the width of the number divided by the maximum value. Converting 0 to 256 from 0 to 1 increases learning efficiency. It's confusing. But this conversion is important. Since we need to match the data types, we use the astype ("float") to convert from Int to Float before performing the calculation.
続いてこちらのコード。
Next, I'll explain the following code.
Y_train = np_utils.to_categorical(Y_train, total_num)
y_test = np_utils.to_categorical(y_test, total_num)
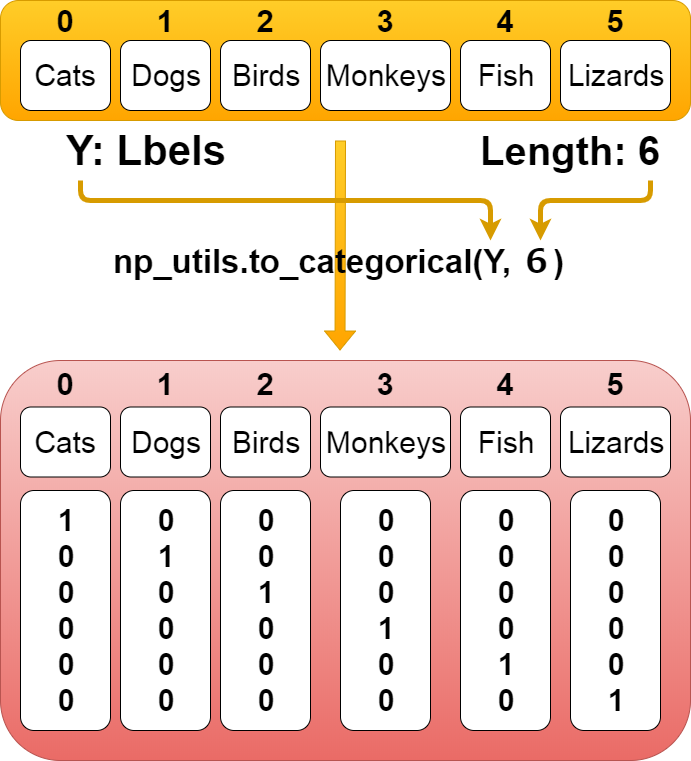
Kerasはラベル(「”猫”、”犬”、”鳥”、”猿”、”魚”、”トカゲ”」ー>「0、1、2、3、4、5」)を ワンホットベクトルというベクトル表現で認識している。 「0、1、2、3、4、5」ー>「「1、0、0、0、0、0」、「0、1、0、0、0、0」、「0、0、1、0、0、0」、「0、0、0、1、0、0」、「0、0、0、0、1、0」、「0、0、0、0、0、1」」 これは、全て0か1で表現されている。 まずラベルの数の分の0ベクトルを作る。ー>「0、0、0、0、0、0」 次に対応しているラベルの場所に「1」を付ける。 「0」なら「1、0、0、0、0、0」 「1」なら「0、1、0、0、0、0」といった具合に。
Keras recognizes labels ("Cats," "dogs," "birds," "monkeys," "fish,", "lizards.") ー> [0, 1, 2, 3, 4, 5] as vector representations called one-hot vectors. 「0、1、2、3、4、5」ー>「「1、0、0、0、0、0」、「0、1、0、0、0、0」、「0、0、1、0、0、0」、「0、0、0、1、0、0」、「0、0、0、0、1、0」、「0、0、0、0、0、1」」. These are all expressed as 0 or 1. First, we create a zero vector for the number of labels. ー> [0, 0, 0, 0, 0, 0]. Add [1] to the next corresponding label location. If it's 0, [1, 0, 0, 0, 0, 0], If it's 1, [0, 1, 0, 0, 0, 0], If it's 2, [0, 0, 1, 0, 0, 0], so on.
続いてこちらのコード。
Next, I'll explain the following code.
model = model_train(X_train, Y_train)
model_eval(model, x_test, y_test)
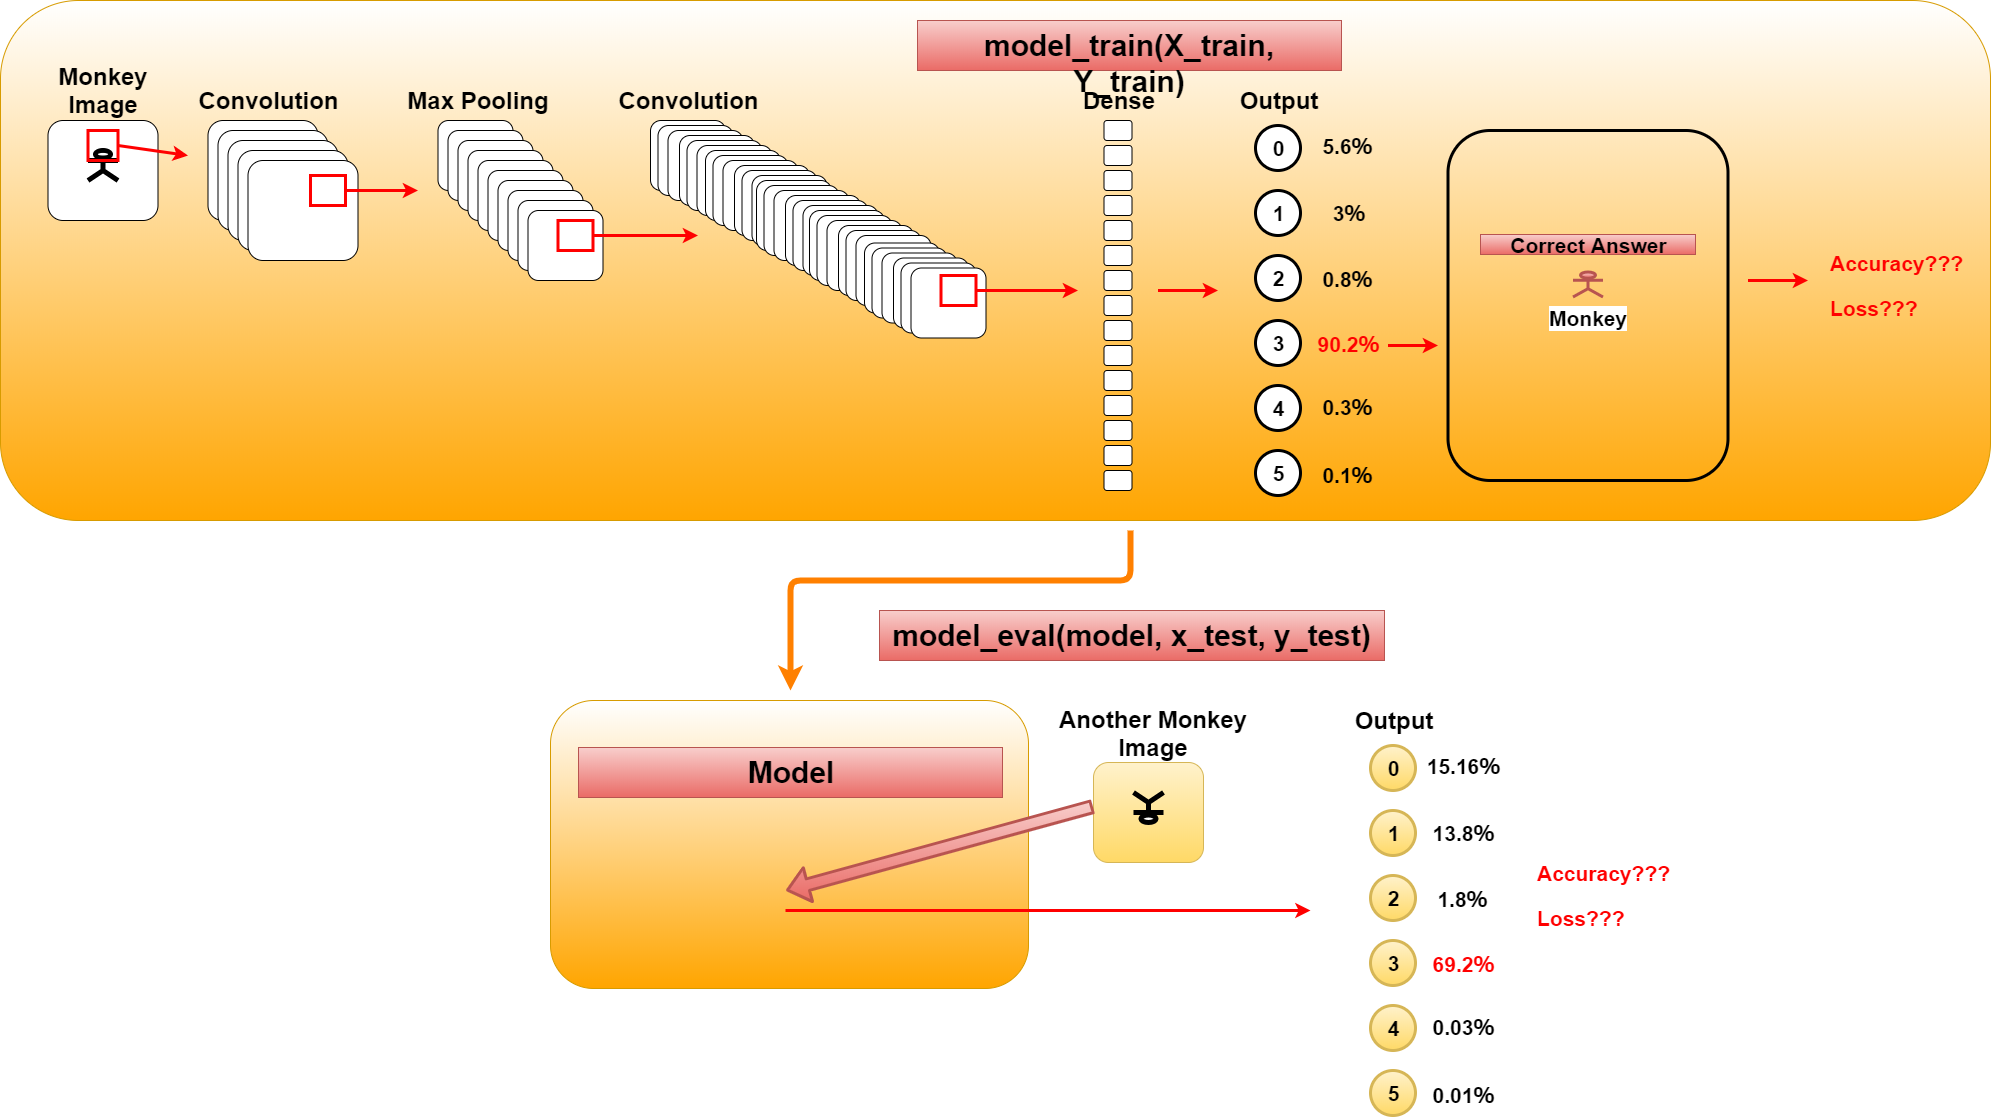
長くなってしまったので、model_train関数の説明とmodel_eval関数の説明は次回に持ち越します。 簡単に説明すると、図の通りmodel_train関数は画像を基に訓練を行い学習モデルを生成します。 model_eval関数はそのモデルを基に学習結果と違うパターンの正解データを用いてモデルの評価を行います。
The description of the model_train function and the model_eval function are carried forward to the next time. In short, as you can see, the model_train function learns from images and generates a learning model. The model_eval function evaluates the accuracy of model using the correct data of different pattern from the learning result.
次回は関数のスクリプトと併せてのCNNの詳細な説明です。
Next time, I'll look at CNN in more detail, along with Python Scripts for both function of model_train and model_eval.