Published Date : 2019年9月29日17:03
FlaskとBootstrapとJQueryを使用して簡単なWEBアプリケーションを作ってみる
Create a simple web application using Flask, Bootstrap and JQuery
This blog has an English translation
前回の続きです。FlaskとBootstrapとJQueryを使用してサクッとWEBアプリを作りませう。
Continued from last time. Use Flask, Bootstrap, and JQuery to create a quick web app.
Flaskサイド
Flask Code
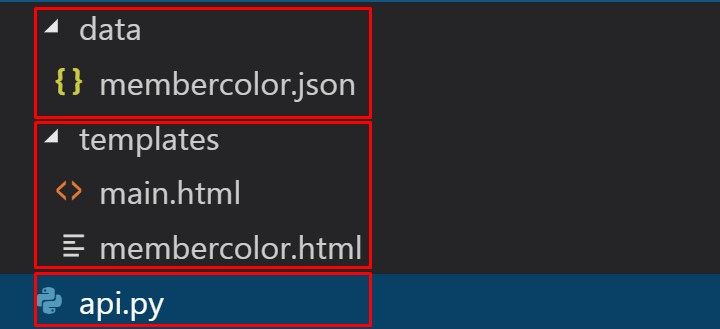
適当なフォルダを作り、以下の様な構造にして、前回作ったJSONファイルを格納してくだちぃ。
Create an appropriate folder and store the JSON file you created previously in the following structure.
まずapi.pyを作りマウス。
必要そうな情報だけコメントしていきマス。
Make api.py first.
Just comment on the information you need.
api.py
# 必要なライブラリをインポート
# Import required libraries
from flask import Flask, render_template, request, url_for, jsonify
import os, json

app = Flask(__name__)

# 日本語が文字化けするのを防ぐYO!
# The process required to display Japanese correctly.
app.config['JSON_AS_ASCII'] = False

SITE_ROOT = os.path.realpath(os.path.dirname(__file__))

json_url = os.path.join(SITE_ROOT, "data", "membercolor.json")

# ダミーページ。各自好きなようにメンバーカラーのページに飛べるようにカスタムしてくだちぃ。
# Dummy page. You can customize it so that you can go to the member color page as you like.
@app.route("/")
def main_page():
    return render_template("main.html")

# 本体ページ。
# This is the desired page.
@app.route("/membercolor")
def membercolor():
    with open(json_url) as f:
        output = json.load(f)

    groups = list(output.keys())
    color_system = list([v.keys() for k,v in output.items()][0])

    member_list = [output[g] for g in groups]

    members = []
    for ml in member_list:
        group = []
        for j, m in enumerate(ml.values()):
            if list(m.keys())[0] != '':
                for name, color_info in m.items():
                    temp = {}
                    temp["name"] = name

                    temp["color_hex"] = color_info[1]

                    # おふざけで、口上っぽい言葉を付け加えてます。
                    # I'm adding words as a joke.
                    if color_system[j] == "白系統":
                        temp["color_name"] = "やまきぃ、<br>ちぃが読むんだよ!<br>ホワイト!"
                        temp["text-color"] = "#999"
                    elif color_system[j] == "黄系統":
                        temp["color_name"] = "ムードメーカー!<br>" + color_info[0] + "!"
                        temp["text_color"] = "#000"
                    elif color_system[j] == "緑系統":
                        temp["color_name"] = "縁の下の力持ち!<br>" + color_info[0] + "!"
                        temp["text_color"] = "#111"
                    else:
                        if color_system[j] == "赤系統":
                            temp["color_name"] = "熱血の超特急!<br>" + color_info[0] + "!"
                        if color_system[j] == "ピンク系統":
                            temp["color_name"] = "魅惑のヒロイン!<br>" + color_info[0] + "!"
                        if color_system[j] == "青系統":
                            temp["color_name"] = "冷静なる司令塔!<br>" + color_info[0] + "!"
                        if color_system[j] == "橙系統":
                            temp["color_name"] = "太陽の輝き!<br>" + color_info[0] + "!"
                        if color_system[j] == "紫系統":
                            temp["color_name"] = "妖艶な歌姫!<br>" + color_info[0] + "!"

                        temp["text_color"] = "#eee"
                    group.append(temp)
            else:
                group.append(False)
        members.append(group)

    return render_template("membercolor.html", members=members, groups=groups, color_system=color_system)


if __name__ == "__main__":
    app.run(debug=True, port=5678, threaded=True)
続いて2つのHTMLファイルを作りマウス。
Next, create two HTML files.
templates/main.html
<!DOCTYPE html>
<html lang="ja-jp">
<head>
    <meta charset="UTF-8">
    <meta name="viewport" content="width=device-width, initial-scale=1.0">
    <meta http-equiv="X-UA-Compatible" content="ie=edge">
    <title>Document</title>
</head>
<body>
    main page
</body>
</html>
templates/membercolor.html
<!DOCTYPE html>
<html lang="ja-jp">
<head>
    <meta charset="UTF-8">
    <meta name="viewport" content="width=device-width, initial-scale=1.0">
    <meta http-equiv="X-UA-Compatible" content="ie=edge">
    <title>Document</title>

    <!-- BootstrapのCDNのCSSファイル -->
    <!-- Latest compiled and minified CSS -->
    <link rel="stylesheet" href="https://maxcdn.bootstrapcdn.com/bootstrap/4.3.1/css/bootstrap.min.css">

    <!-- google font -->
    <link href="https://fonts.googleapis.com/css?family=M+PLUS+1p&display=swap" rel="stylesheet">

    <!-- フォントを適当に決めて、キャンバスの高さを画面全体の20%にする。 -->
    <!-- Set the font appropriately so that the canvas is 20% of the screen height. -->
    <style>
        body{
            font-family: 'M PLUS 1p', sans-serif;
        }
        #mycanvas{
            width: 100%;
            height: 20vh;
        }
        .g{
            padding: 10px;
        }
    </style>

</head>
<body>

        <!-- 色を表示する場所。画面の上に固定して、スクロールしても消えないようにする。 -->
        <!-- Where to display colors. Hold it on top of the screen so it doesn't disappear when you scroll. -->
        <div class="sticky-top" style="height:25%;" id="canvasholder">
            <h2></h2>
            <h1></h1>
            <canvas id="mycanvas"></canvas>
        </div>

        <!-- メンバーの名前を表示させる場所。
        BootstrapのGridを使用して、できるだけ均等に表示させる。 -->
        <!-- Where to display the member's name.
        Use Bootstrap's Grid to display as evenly as possible. -->
        <div class="container-fluid" style="padding:1rem; 0">
            {% for group in members %}
                <br>
                <h3>{{ groups[loop.index0] }}</h3>
                <br>
                <div class="row">
                {% for member in group %}

                        {% if member != False %}

                            <div class="col-auto">
                                <div class="g">
                                    <button type="submit" class="btn" name="{{ member.color_name }}" style="background:{{ member.color_hex }}; color:{{ member.text_color }};">{{ member.name }}</button>
                                </div>
                            </div>
                        {% endif %}

                {% endfor %}
                </div>
            {% endfor %}
        </div>

    <!-- JQueryのライブラリ -->
    <!-- jQuery library -->
    <script src="https://ajax.googleapis.com/ajax/libs/jquery/3.4.1/jquery.min.js"></script>

    <!-- BootstrapのCDNのJavascriptライブラリ -->
    <!-- Latest compiled JavaScript -->
    <script src="https://maxcdn.bootstrapcdn.com/bootstrap/4.3.1/js/bootstrap.min.js"></script>

    <!-- Jqueryを使って、ボタンが押された時に各メンバーの色を、キャンバスに表示させる処理を行う。 -->
    <!-- Use Jquery to display each member's color on the canvas when the button is pressed. -->
    <script>
        $(function()
            {

                // ボタンをクリックすると、それぞれのボタンが持っているカラー情報と名前等を取得して、キャンバスに反映させる処理。
                // When a button is clicked, the color information and the name of each button are acquired and reflected on the canvas.
                $('button').on('click', function()
                {
                    $("#canvasholder h2").remove();
                    $("#canvasholder h1").remove();

                    var bgc = $(this).css('background');
                    var txc = $(this).css('color');
                    var cname = $(this).attr('name');
                    var txt = $(this).text();

                    $("#mycanvas").css('background', bgc);

                    $("#canvasholder").append("<h2>" + cname + "</h2>");
                    $("#canvasholder h2").css('color', txc);

                    $("#canvasholder").append("<h1>" + txt + "</h1>");
                    $("#canvasholder h1").css('color', txc);

                    $("#canvasholder").css('background', bgc);
                });
            });
    </script>
</body>
</html>
すべてのファイルの準備ができましたので、サーバーを立ち上げ挙動を確認してみましょう。
Now that all the files are ready, let's start the server and see how it works.
python api.py
サーバーが無事立ち上がったら、URLをブラウザの検索窓に打ち込みましょう。
Once the server is up and running, type the URL into the browser's search box.
http://127.0.0.1:5678
こんな感じ。
Like this.

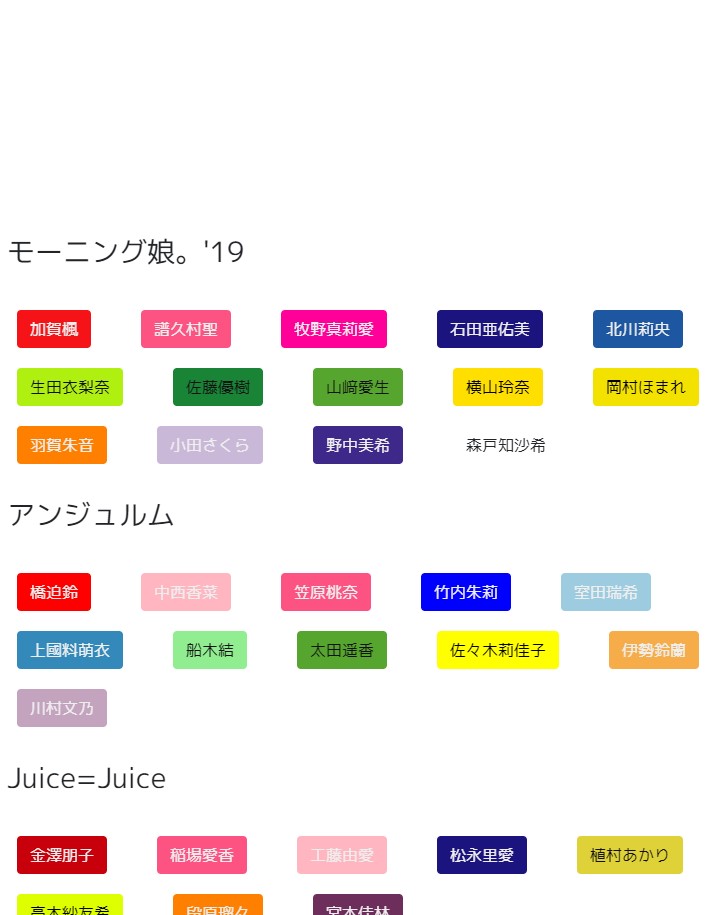
お次はURLの後ろにmebercolorと入力してみましょう。
Next, try typing mebercolor after the URL.
http://127.0.0.1:5678/membercolor
こんな感じ。
Like this.
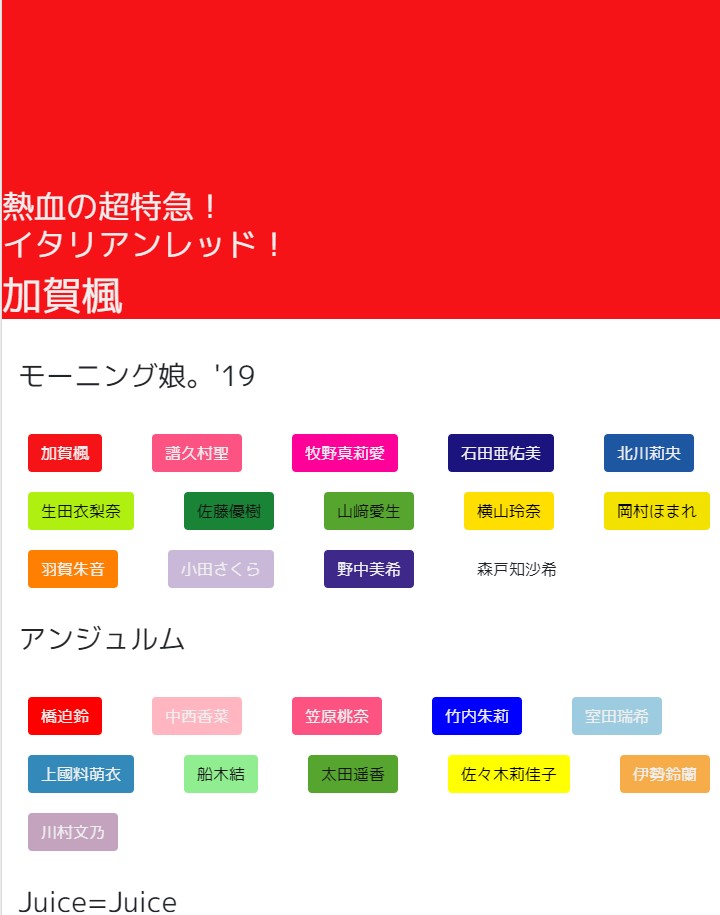
こんな感じ。
Like this.
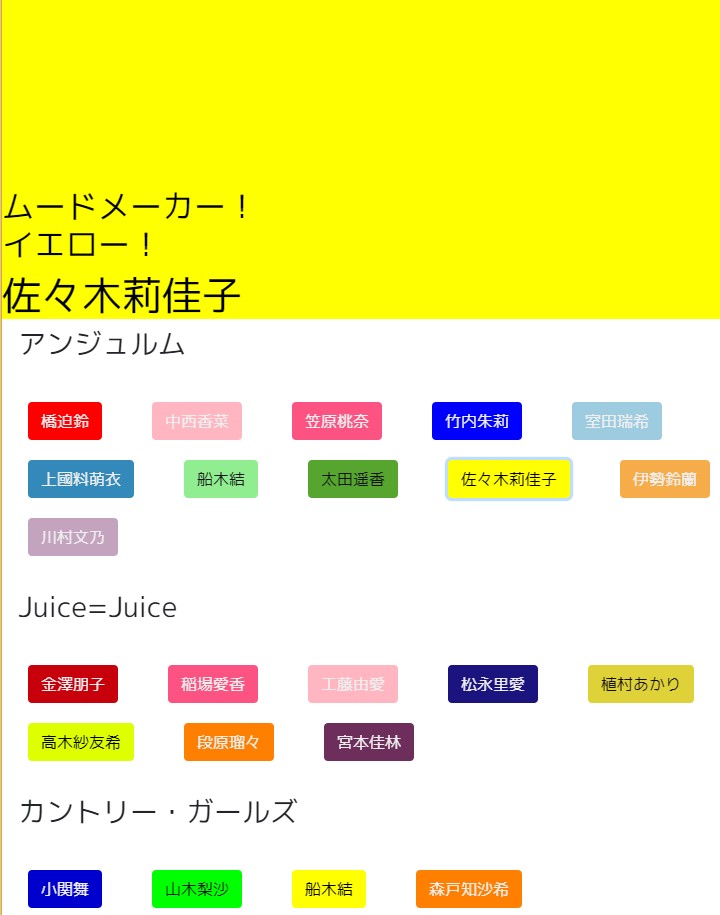
こんな感じ。
Like this.
結論
Conclusion
とっても簡単ですね。各自見た目を綺麗に整えたり、機能を付け加えたりしてしてくだちぃ。
It's very easy. You can adjust the appearance and add functions.
このページはメニューバーに置いておきました。このURLです。ではまた今度。
I put this page on the menu bar. This is the URL.
See You Next Page!