Published Date : 2019年9月26日15:32
Nim言語で簡単なスクレイピング
Simple scraping in Nim language
This blog has an English translation
Nim言語を簡単な実践方法から勉強するシリーズ第四回目です。シリーズ一回目はこちら、Python学習者のためのNim Part 1
This is the fourth in a series to learn the Nim language from a simple practice. The first series is here, Learning Nim for Python Users Part 1
暫くNimを触っていなかった為、1から勉強し直すためにこの記事を書きました。
I haven't touched Nim for a while, so I wrote this article to relearn from the beginning.
Nimでスクレイピングしようぜ!
Let's scrape with Nim!
1からと書いてしまいましたが、実践的なものでないとつまらない性格なので、 簡単にできて面白そうなこと、スクレイピングをNimでやっていきたいと思います。
I wrote from beginning, but it is boring if it is not practical. I want to do scraping with Nim which is easy and interesting.
いきなりコード全体
First, show the entire code.
import httpclient
import htmlparser
import streams
import xmltree
import nimquery
import strutils
import csvtools

let url = "https://ja.wikipedia.org/wiki/%E3%83%8F%E3%83%AD%E3%83%BC!%E3%83%97%E3%83%AD%E3%82%B8%E3%82%A7%E3%82%AF%E3%83%88"

let client = newHttpClient()

let response = client.get(url)

let html = response.body.newStringStream().parseHtml()

let tables = html.querySelectorAll("[class=\"wikitable\"]")

let trs = tables[2].querySelectorAll("tr")

var f = open("memberscolor.csv", fmWrite)
for i,tr in trs:
    case i
    of 0:
        let ths = tr.querySelectorAll("th")
        for j,th in ths:
            if j == len(ths)-1:
                f.write(th.innerText)
            else:
                f.write(strip(th.innerText, chars={'\n'}) & ",")
    else:
        let c = tr.querySelector("th")
        f.write(strip(c.innerText, chars={'\n'}) & ",")
        let tds = tr.querySelectorAll("td")
        for j,td in tds:
            if j == len(tds)-1:
                f.write(td.innerText)
            else:
                f.write(strip(td.innerText, chars={'\n'}) & ",")
f.close()
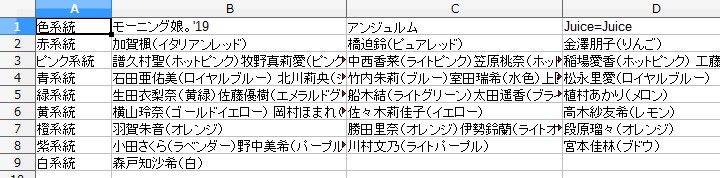
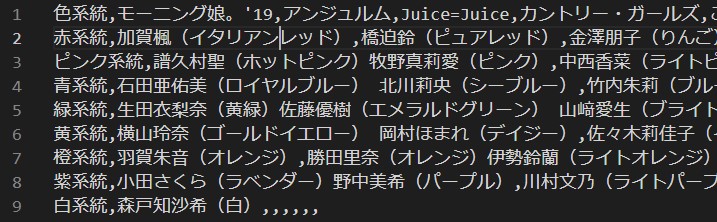
出力結果
Output Result
memberscolor.csv

日本にはアップフロントという芸能事務所が運営している、 女性アイドルグループの団体、ハロープロジェクトというものがあります。
In Japan, there is an entertainment agency called Upfront. There is a group of female idol groups called Hello Project.
その中の各個人にそれぞれ担当のカラーが存在していて、 今回はそれをWikipediaからスクレイピングしてCSVファイルにまとめた形になります。
Each person has his or her own color. This time, we will scrape it from Wikipedia and put it in a CSV file.
なぜハロープロジェクトのメンバーカラーかというと単純に私が好きだから、あと、 メンバーカラーというのは後でビジュアル的にもアレンジしやすいかなと思ったからです。
The member color of Hello Project is simply because I like it. Also, I thought the member color would be easy to arrange visually later.
コードの説明とスクレイピング手法
Code description and scraping techniques
# HTTP通信にてURLからHTMLを取得し、NIMで操作できるようにする為のライブラリ郡
# Library group to obtain HTML from URL by HTTP communication and to operate by NIM
import httpclient
import htmlparser
import xmltree
import nimquery
import streams

# 文字列の操作をする為に必要
# Required for string manipulation
import strutils

# CSVファイルを扱う為に必要
# Required for working with CSV files
import csvtools
# HTMLを取得したいURL
# URL where you want to get the HTML
let url = "https://ja.wikipedia.org/wiki/%E3%83%8F%E3%83%AD%E3%83%BC!%E3%83%97%E3%83%AD%E3%82%B8%E3%82%A7%E3%82%AF%E3%83%88"

# HTTPコネクションに必要なオブジェクト作成
# Creating Objects Required for HTTP Connections
let client = newHttpClient()

# URLからHTMLを取得
# Get HTML from URL
let response = client.get(url)

# マークアップ言語を取り扱えるようにする。
# Allows you to work with markup languages.
let html = response.body.newStringStream().parseHtml()

# CSSセレクターを使用して、テーブル要素を取得する
# Use CSS selectors to retrieve table elements
let tables = html.querySelectorAll("[class=\"wikitable\"]")

# テーブル要素は全部で3つ。
# その内、目的のテーブル要素(メンバーカラーの項目)は3番目。
# There are three table elements in all.
# The desired table element (Member Color Item) is 3rd.
let trs = tables[2].querySelectorAll("tr")
ここで、目的のWikipediaのテーブル要素を説明。
Here is a description of the desired Wikipedia table element.
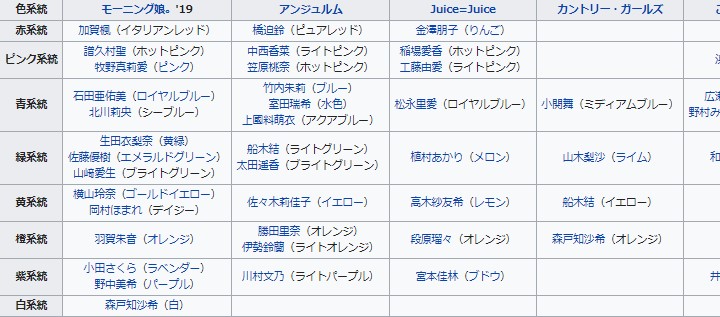
このように表組みになっている箇所がテーブル要素です。
The part of the table like this is the table element.
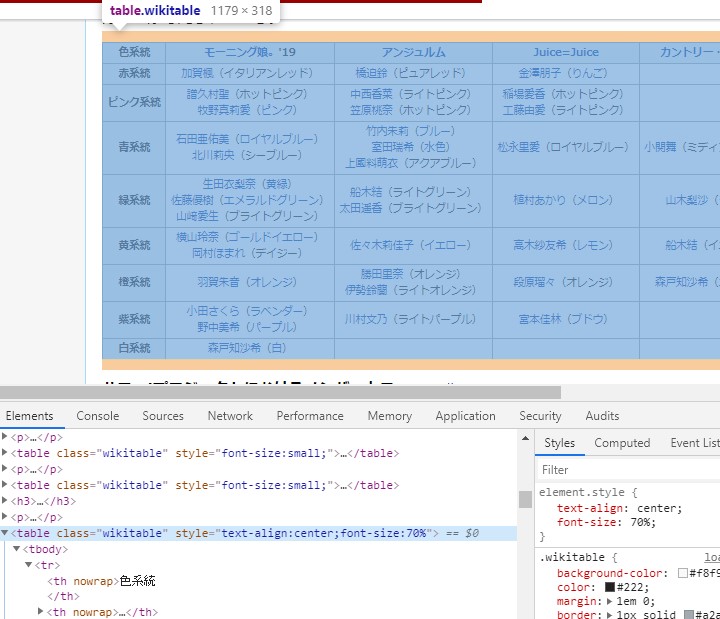
Classは「Wikitable」となっています。Chromeを使っているなら、「Ctrl+Shift+J」でHTML要素を確認できます。
Class is "Wikitable". If you're using Chrome, you can see the HTML elements in "Ctrl + Shift + J".
あとは「右クリック」して、「検証」や「ページのソースを表示」でも見れます。 FIrefoxなら「右クリック」ー>「要素を調査」
You can also "Right-Click", "Validate" and "Show Page Source". FIrefox "Right-Click" - > "Explore Elements"
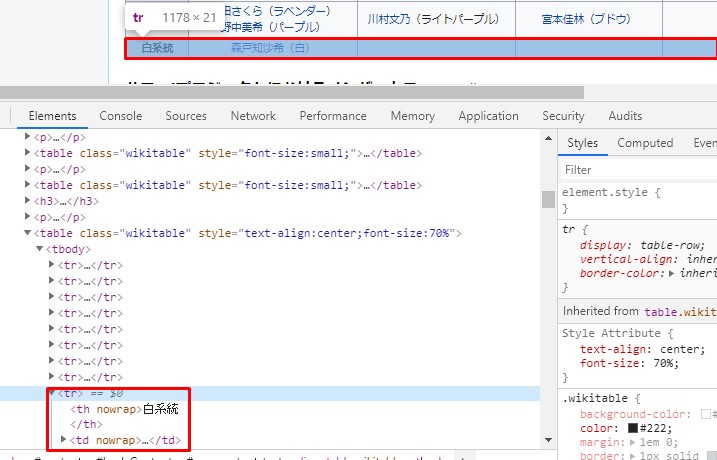
このように、どの要素を指定すれば目的の値が得られるか、ひと目で分かるので便利です。 スクレイピングやクローリングをする際に基本的かつ重要な作業です。
This is useful because you can see at a glance which element you need to specify to get the desired value. It is a basic and important task when scraping and crawling.
では、またコードの説明に戻ります。
Let's return to the code description.
# CSVファイルとして、取得したデータを保存する為の準備をする
# Prepare to save the obtained data as a CSV file.
var f = open("memberscolor.csv", fmWrite)

# Nimの場合、配列(シーケンス)をループする時、
# インデックス番号と一緒に配列の要素を取り出したい時は、
# 「for インデックス番号、要素 in 配列(シーケンス)」と書く。
# For Nim, when looping through an array (Sequence),
# If you want to retrieve the elements of an array along with the index number,
# It is written as "for index number, element in array (Sequence)".
for i,tr in trs:
    # 判定したい値のパターンが少ない時は、Case文の代わりにIf文のほうがいいかも。
    # Case文は判定したい値を「Case 値」で指定し、
    #「of その値がどんな時に」どんな処理を行うかを書きます。
    # If there are few patterns of values you want to test, you might want to use an If statement instead of a Case statement.
    # The Case statement specifies the value to be tested in "Case value".
    # "of When the specified value is" Write down what you want to do.
    case i
    of 0:
        # tr要素は表でいう「行全体」に相当していて、
        # その一番目(インデックス番号は0)にはCSVでいう、ヘッダーに相当する値が入っていると仮定する。
        # The tr element corresponds to the "Entire row" in the table.
        # Assume that the first (Index number is 0) contains a value corresponding to the CSV header.

        # 最初の行はすべて「thタグ」になっているので、「thタグ」だけCSSセレクターで指定して値を取得する。
        # The first line is all "th tag", so you only need to specify "th tag" in the CSS selector to get the value.
        let ths = tr.querySelectorAll("th")

        # querySelectorAllは指定したタグ全てを取得して、配列になっているので、For文で回して全ての値を取得する。
        # querySelectorAll takes all the specified tags and is an array, so you can use the For statement to get all the values.
        for j,th in ths:

            # もし、配列の一番最後に到達したら、そのまま値をCSVファイルに書き込む。
            # このテーブル要素の値には最後に「改行マーク(¥n)」がついているので、自動的に改行してくれる。
            # If it reaches the end of the array, it simply writes the value to the CSV file.
            # The value of this table element ends with "New Line Mark ( \n)" so it will automatically start a new line.
            if j == len(ths)-1:
                f.write(th.innerText)

            # 配列の最後以外なら、改行マークを取り除いて、代わりにCSVのセパレーターでもあるカンマを値の間に挿入する。
            # If not at the end of the array, remove the newline mark and insert a comma between the values instead, which is also a CSV separator.
            else:
                f.write(strip(th.innerText, chars={'\n'}) & ",")

    # 以下、ヘッダー以外の値の取得は同じような処理を行う。
    # 少しだけ違うのは、「thタグ」と「tdタグ」があるので、
    # それぞれに対する処理を行うようにすること。
    # In the following, the same processing is performed to obtain values other than the header.
    # There is a slight difference between "td tag" and "th tag".
    # Each of them should be processed.
    else:
        let c = tr.querySelector("th")
        f.write(strip(c.innerText, chars={'\n'}) & ",")
        let tds = tr.querySelectorAll("td")
        for j,td in tds:
            if j == len(tds)-1:
                f.write(td.innerText)
            else:
                f.write(strip(td.innerText, chars={'\n'}) & ",")

# 最後にファイルを閉じて終了。
# Finally, close the file and exit.
f.close()
処理が終わると同じダイレクトリにCSVファイルが作られています。こんな感じ。
After processing, a CSV file is created in the same directory. Like this.
実行方法
How to run this file
nim c -r -d:ssl parse.nim
-d:sslは「HTTPS通信」をするのに必要なオプション。 URLに「https」がついている場合、これがないとエラーになる。
-d: ssl is the option required to "HTTPS communication". If the URL has "https" it will cause an error.
nim c -r -d:ssl scrayping.nim
今回は日本語を扱うので、「UTF-8」の問題で悩まされたら、 「-d:ustringPythonic」をつけるといいよ。
I will be dealing with Japanese this time, so if you are bothered by the problem of "UTF -8", You should add "-d: ustringPythonic".
nim c -r -d:ssl -d:ustringPythonic scrayping.nim
結論
Conclusion
Nimは素晴らしい言語ですが、正直スクレイピングはPythonでやったほうが簡単です。
Nim is a great language, but to be honest, scraping is easier in Python.
あと、次回にやろうとしていた、API化、HTML作成、簡単なブラウザー上での可視化作業には向かないです。
Also, it's not for the API creation, HTML creation, or simple browser visualization you're going to do next time.
Jester(サーバサイド)やKarax(クライアントサイド)等ありますが、Documentが丁寧でないこと、GUIを作るライブラリの「Nimx」同様に 開発のイシューが野放しにされていて、改善されていないです。
There are Jester(server-side), Karax(client-side), etc., but the Document is not polite, just like the "Nimx" of the GUI library. The issue of development is left unaddressed and not improved.
ですが、Nimは好きになってしまったので、これからも細々と勉強を続けていきます。
But now that I like Nim, I will continue to study little by little.
では次回は同じことをPythonでやって、簡単なブラウザー上での可視化作業でもやってみたいと思います。
Next time, I'll do the same in Python and do a simple visualization in the browser.
See You Next Page!