Published Date : 2021年6月3日20:10
Part 6 - ドルと円の為替レートを使った簡単な計算アプリのアンドロイドバージョン
Part 6 - Android version of a simple calculation
app that uses the dollar-yen exchange rate
This blog has an English translation
ニコニコ動画にアップした動画のまとめ記事です。
This is a summary blog post about a video I uploaded to NicoNico.
細かい部分は動画を参考にしてください。
Please refer to the video for details.
目次
Table of Contents
① 動画の説明
① Video
Description
警告:
このアプリは大雑把に大体の見積りを計算して楽しむ為のツールです。
計算の詳細や、端数の処理等は各金融機関等によって異なります。
このアプリを使って何かしらの損害が発生したとしても、私は一切の責任を負いません。
Warning:
This application is used to calculate rough estimates and enjoy them.
The details of calculations and the treatment of fractions differ depending on the financial institution.
I will not be liable for any damage caused by using this app.
ドルと円の為替レートを使った簡単な計算アプリのアンドロイドバージョンPart 6
Android version of a simple calculation app that uses the dollar-yen exchange rate Part 6
前回の続きです。
Continued from last time.
ではMainActivity.javaにコードを書いていきましょう。
Let's write the code in MainActivity.java.
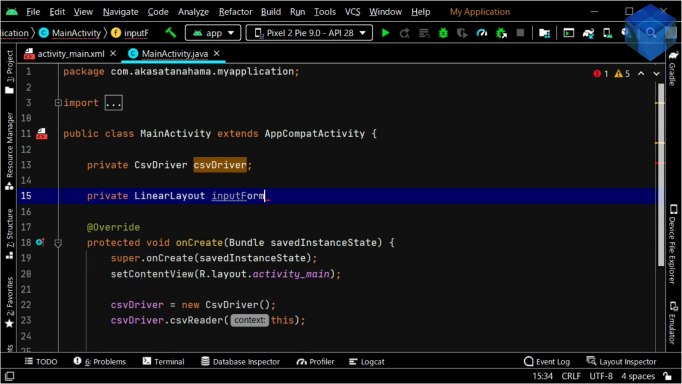
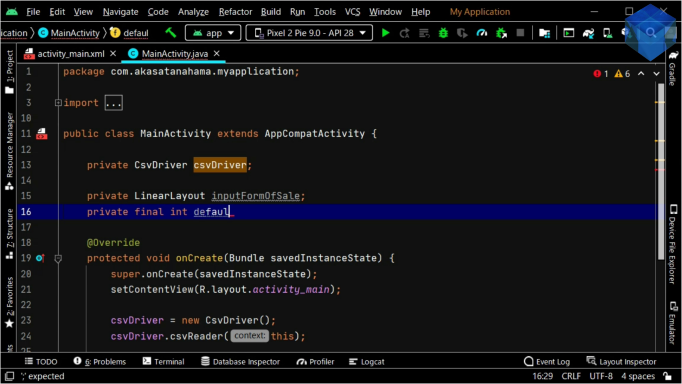
後はいつものように、インスタンスとなる変数をそれぞれの型で宣言していきます。
Then, as usual, you declare the variables to be instances in their respective types.
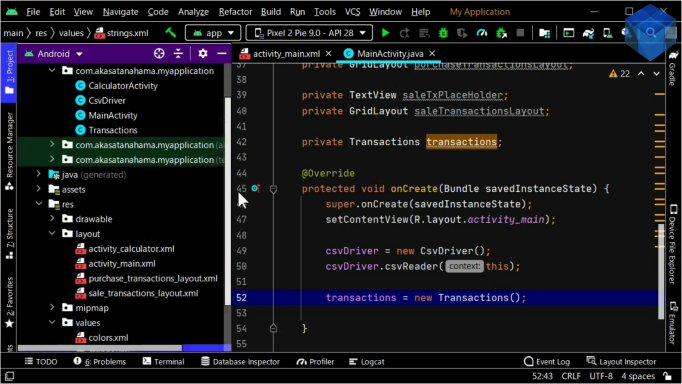
購入と売却の取引を計算するクラスファイルを作成しましょう。
Create a class file that calculates purchase and sale transactions.
購入入力フォームを作成するメソッドを作成しましょう。
Let's create a method to create an input form for the purchase.
public void createPurchaseInputForm() {
    ArrayAdapter<String> yearOfPurchaseListAdapter = new ArrayAdapter<>(this, android.R.layout.simple_spinner_item);
    yearOfPurchaseListAdapter.setDropDownViewResource(android.R.layout.simple_spinner_dropdown_item);

    for (int year = 2002; year < 2021; year++) {
        yearOfPurchaseListAdapter.add(year + "年");
    }

    yearOfPurchaseSpinner = findViewById(R.id.yearOfPurchase);
    yearOfP
いつものようにArrayAdapterを作成して、Spinnerに設定していきましょう。
As always, create an ArrayAdapter and set it to Spinner.
入力用のEditTextも作成します。
It also creates an EditText for input.
売却入力用のレイアウトのIDを設定しましょう。
Let's set the ID of the layout for sale input.
プレイスホルダーと結果表示用のレイアウトをインスタンス化していきます。
Instance the placeholder and the layout for the result display.
購入入力フォームをリセットするメソッドを作成しましょう。
Let's create a method to reset the purchase input form.
Spinnerの選択アイテムをデフォルトに戻し、EditTextに空文字を挿入します。
Resets the Spinner selection to the default and inserts a blank character in the EditText.
そして結果表示のレイアウトを非表示にして、プレイスホルダーを表示させます。
You then hide the result display layout to show the place holder.
では購入ボタンが押された時に購入の計算をするメソッドを作成しましょう。
Let's create a method that calculates the purchase when the buy button is pressed.
選択された年月と、入力された購入量等を取り出していきます。
The selected year and month and the amount of purchase entered are extracted.
取り出した年月の文字列に余分な文字があるので、replaceメソッドを使ってその文字を削除するようにします。
There are extra characters in the fetched year and month string, so we'll use the replace method to remove them.
equalsメソッドやif文等を使用して、入力金額の小数点以下を2桁までにします。
Use the equals method, if statement, and so on, to limit the decimal places of the input amount to two.
エラーメッセージや注意文等をトーストを使って表示させるメソッドを作成します。
Create a method that uses toast to display error messages, notes, etc.
public void restrictInput(String message) {
    Toast toast = Toast.makeText(getApplicationContext(), message, Toast.LENGTH_LONG);
    toast.setGravity(Gravity.CENTER_VERTICAL,0,0);
    toast.show();
}
では空文字が入力された場合や、桁数が大きい場合、もしくは小さい時等の条件の時に合わせて注意文を表示させていきましょう。
Then, let's display a caution statement when empty characters are entered, when the number of digits is large, or when it is small, etc.
パート7へ続く。
Continue to Part 7.
以上です。お疲れ様です。
That's all. Thank you for your hard work.