Published Date : 2020年5月25日12:28
Part 2 - Djangoを使って簡単なオンラインショップを作ってみよう
Part 2 - Create a Simple Online Shop with Django
This blog has an English translation
YouTubeにアップした動画、「【Django】Part 2 - Create a Simple Online Shop with Django:Djangoを使って簡単なオンラインショップを作ってみよう」の補足説明の記事です。
Here's a little more about the 「【Django】Part 2 - Create a Simple Online Shop with Django:Djangoを使って簡単なオンラインショップを作ってみよう」 video I uploaded to YouTube.
Djangoを使って簡単なログイン機能を持ったオンラインショップのようなサイトを作ってみましょう。 Part2となる今回の動画シリーズでは、Djangoのモデルとヴューとテンプレートと管理者画面を用いて、ブラウザにデータベースの中身と簡単な見出しを表示させてみよう。
Use Django to create a site that looks like an online store with a simple login feature. In this video series, Part 2, we'll use Django's model, view, template, and admin screens to display the contents of the database and a simple headline in the browser.
無駄な説明を省いて、忙しい時でも短時間で理解できるような動画です。
It's a video that can be understood in a short period of time even when you're busy, without any unnecessary explanation.
目次
Table of Contents
① urlsとviewsを使いブラウザにサイトの内容を表示させる
① Display the contents of the site in the browser using urls and views
[(あなたのプロジェクト)/urls.py]を開いて[urlpatterns]に[path('', include('demoshop.urls'))]を追加します。
Open [(Your Project)/urls.py] and add [path('', include('demoshop.urls'))] to [urlpatterns].
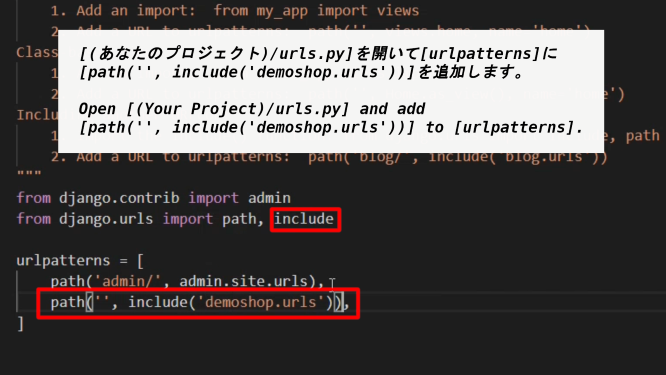
補足説明:[path('', include('demoshop.urls'))]はURLの末尾に何も指定が無かった時、つまり[http://127.0.0.1:8000/'']でアクセスされた時に、[include('demoshop.urls')]を使って[demoshopのurls.py]にURLの指定があるかどうかを見ている。
これをディスパッチングといい日本の工場現場等でよく使われる言葉で、ディスパッチングとは、「”何か”を送り出す」という意味が含まれている。Djangoの場合は「url」ですね。
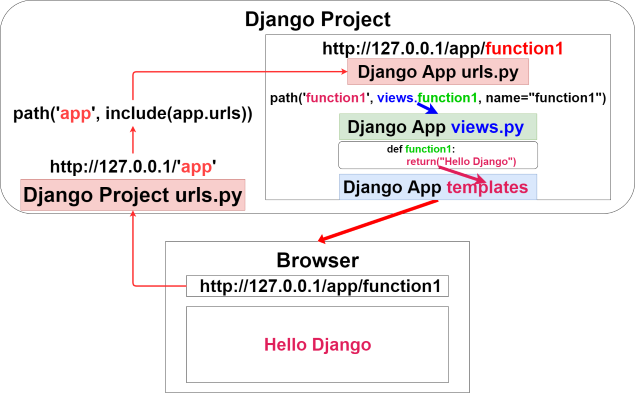
最初”プロジェクト”の[urls.py]に"127.0.0.1:8000/(例えばアプリを表すURLの言葉)"までの処理をさせる。
その後、include()メソッドを使って”アプリ”の[urls.py]に”127.0.0.1/app”までを”ディスパッチング”させて、アプリの[urls.py]に"127.0.0.1:8000/(例えばアプリを表すURLの言葉)/"から先のURL、"(例えばアプリにある機能の名前)"で細かくアプリが提供する機能を処理させる。
このようにすることで、プロジェクトはアプリ毎に命令でき、アプリはアプリの機能毎に命令できる。プログラミング側の表示が分かりやすく、”管理”しやすくなる利点がある。
Note: [path ('', include('demoshop.urls'))] uses [include('demoshop.urls')] to see if there is a URL specified in [urls.py of demoshop] when there is no specification at the end of the URL, that is, when accessed with [http://127.0.0.1:8000/''].
This system is called dispatching, which is a term often used at japanese factories, Dispatching includes the meaning of "send out something". In the case of Django, it's "url".
First, [urls.py] of the project is made to process up to "127.0.0.1:8000/(For example, a word for a URL that represents an application)".
Then use the include() method to "dispatching" up to [127.0.0.1/app] in [urls.py] of "Apps". Then let [urls.py] of the app specify the URL beyond "127.0.0.1/app/" and let "app/(For example, the name of a function in an application)" handle the detailed functions provided by the app.
In this way, projects can be commanded on an app-by-app basis, and apps can be commanded on an app-by-function basis. The advantage is that the display on the programming side is easy to understand and manage.
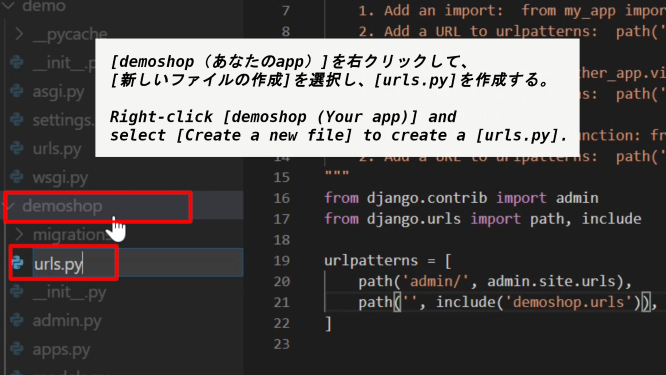
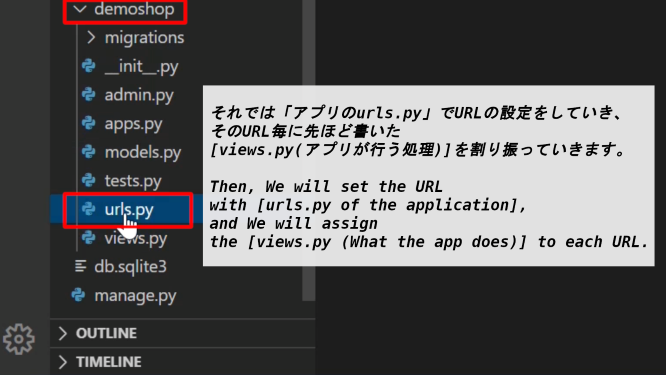
[demoshop(あなたのapp)]を右クリックして、[新しいファイルの作成]を選択し、[urls.py]を作成する。
Right-click [demoshop (Your app)] and select [Create a new file] to create a [urls.py].
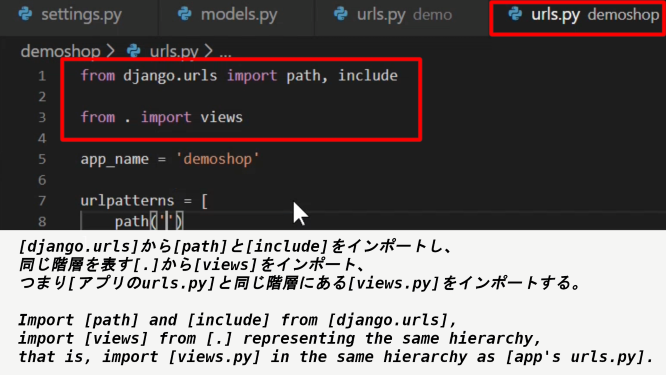
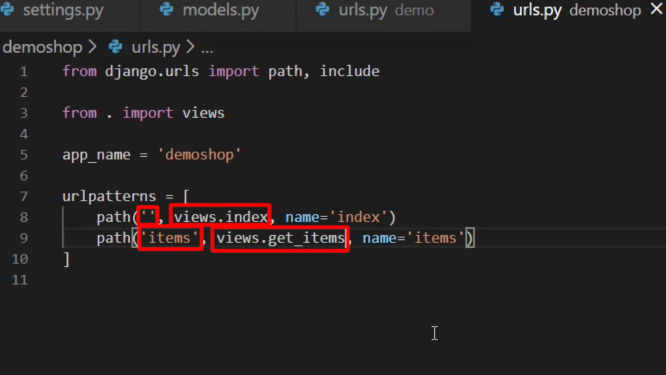
[django.urls]から[path]と[include]をインポートし、同じ階層を表す[.]から[views]をインポート、つまり[アプリのurls.py]と同じ階層にある[views.py]をインポートする。
Import [path] and [include] from [django.urls], import [views] from [.] representing the same hierarchy, that is, import [views.py] in the same hierarchy as [app's urls.py].
path('URLのパターン', (views.pyにある関数名), name='URLパターンに付ける名前')
path('URL Pattern', (name of the function in views.py), name='Name for URL Pattern')
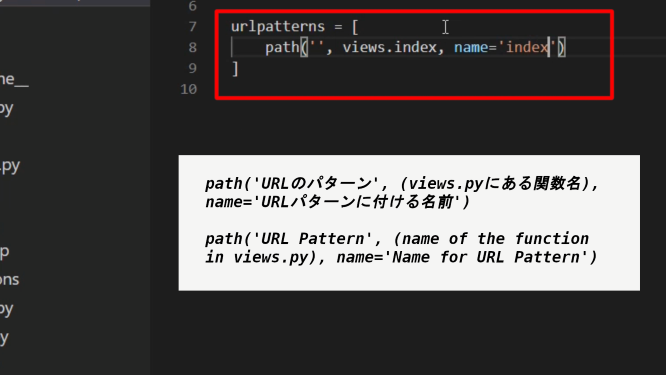
補足説明:name='URLパターンに付ける名前'の設定をするのは簡単にいうと、後々URLが変更になった場合に修正が容易になるからです。
そして「app_name='アプリのurls.pyで指定する名前空間'」と組み合わせることで管理がしやすくなります。
例に出すと、この「app_name」と「name」は主にHTML内で使われることが多いです。
下記のHTML内のフォームに直接URLを書き込むと、後々URLが変更になってしまった場合に全て修正しなければなりません。
ですが、「app_name」と「name」を設定しておけば、「アプリのapp_nameとname」の名前を変更するだけで済みます。
supplementary explanation:The reason for setting "Name to assign to URL pattern" is, in short, It will be easier to fix if the URL changes in the future.
And when combined with the 「app_name='namespace specified by the app's urlspy'」, it's easier to manage.
For example, these "app_name" and "name" are mostly used in HTML.
If you write the URL directly into the form in the HTML below, you will have to fix everything if the URL changes later.
But if you set "app_name" and "name", you only need to rename "app_name and name of the app".
例:Example
demoshop/templates/post_test.html
<!DOCTYPE html>
<html lang="en">
<head>
    <meta charset="UTF-8">
    <meta name="viewport" content="width=device-width, initial-scale=1.0">
    <title>Document</title>
</head>
<body>
    <form action="{% url 'demoshop:posttest' %}" method="post">
        {% csrf_token %}
        <div>
        <label for="you_say">You said </label>
        <input name="YouSay" id="you_say" value="{{ you_say }}">
        </div>
        <div>
        <label for="i_say">And I say </label>
        <input name="ISay" id="i_say" value="{{ i_say }}">
        </div>
        <div>
        <button>Send</button>
        </div>
    </form>
    <p>you said {{ you_say }} and i say {{ i_say }}</p>
</body>
</html>
上の「action="{% url 'demoshop:posttest' %}"」の「demoshop:」の部分が「app_name」で、「:posttest」の部分が「name」です。
The 「demoshop:」 part of 「action="{% url 'demoshop:posttest' %}"」 above is "app_name" and the 「:posttest」 part is "name".
demoshop/urls.py
from django.urls import path, include
from . import views

app_name = 'demoshop'

urlpatterns = [
    path('', views.index, name='index'),
    # post test
    path('post_test', views.post_test, name='posttest'),
]
demoshop/views.py
from django.shortcuts import render

def post_test(request):

    context = {
        'you_say': request.POST.get('YouSay', ''),
        'i_say': request.POST.get('ISay', ''),
    }

    return render(request, 'demoshop/posttest.html', context)

ではURLを変えてみましょう。
Let's change the URL.
demoshop/urls.py
from django.urls import path, include
from . import views

app_name = 'demoshop'

urlpatterns = [
    path('', views.index, name='index'),
    # post test
    path(--->'post_form', views.post_test, name='posttest'),
]
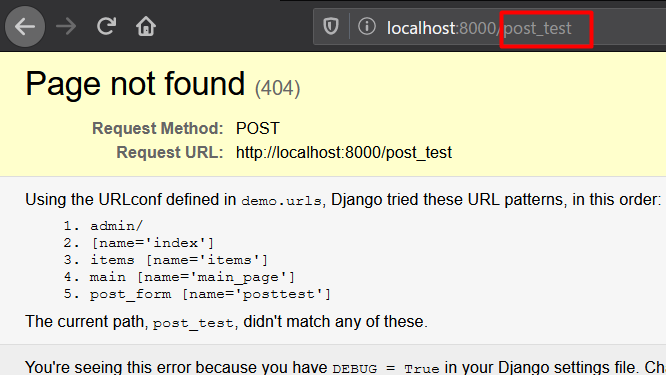
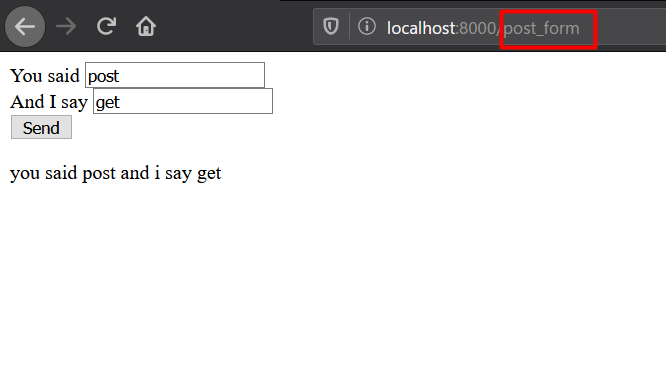
今回はHTML内でのURLの指定は一か所だけだったので、あまり意味がないように見えますが、もしそれが複数あったら......
This time the URL was only specified in one place in the HTML, so it doesn't seem to make much sense, but if there is more than one ......
<form action="{% url 'demoshop:posttest' %}" method="post">
<form action="{% url 'demoshop:posttest' %}" method="post">
<form action="{% url 'demoshop:posttest' %}" method="post">
<form action="{% url 'demoshop:posttest' %}" method="post">
<form action="{% url 'demoshop:posttest' %}" method="post">
<form action="{% url 'demoshop:posttest' %}" method="post">
...................................................
しかも色々なURLがちらばっていたら...
Moreover, if various URLs are scattered ...
<form action="{% url 'demoshop3:gettest3' %}" method="get">
<form action="{% url 'demoshop2:posttest7' %}" method="post">
<form action="{% url 'demoshop:gettest9' %}" method="get">
<form action="{% url 'demoshop4:getttest2' %}" method="get">
<form action="{% url 'demoshop6:posttest' %}" method="post">
<form action="{% url 'demoshop9:posttest6' %}" method="post">
...................................................
普通はこんな感じにはならないでしょうが、「app_name」や「name」を指定することの便利さが分かるはずです。
Such cases are usually rare. But now you know the convenience of specifying "app_name" or "name".
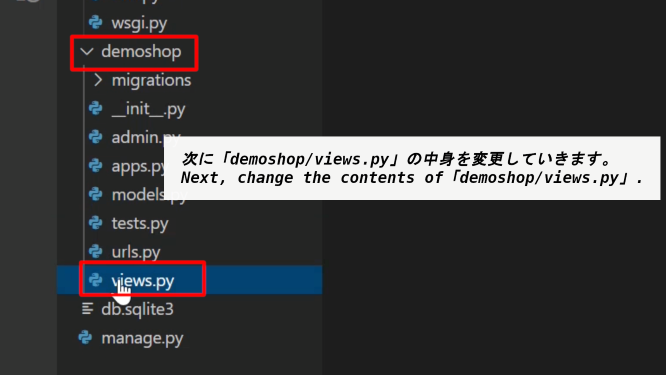
本題に戻ります。次に「demoshop/views.py」の中身を変更していきます。
Let's get back to the main subject. Next, change the contents of「demoshop/views.py」.
[get_items]という関数を用意し、Itemモデルを使って、データベースに登録したデータを取り出して、それらを表示させます。
A function called [get_items] is provided. The function uses the Item model to retrieve data stored in the database and display them.
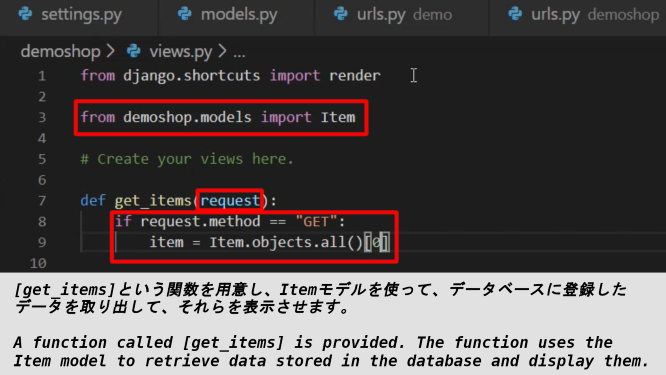
補足説明:関数にはリクエストが引数として渡されます。[get_items()関数]はこのリクエストがGETメソッドなら、それに対応する処理を行うように書かれています。
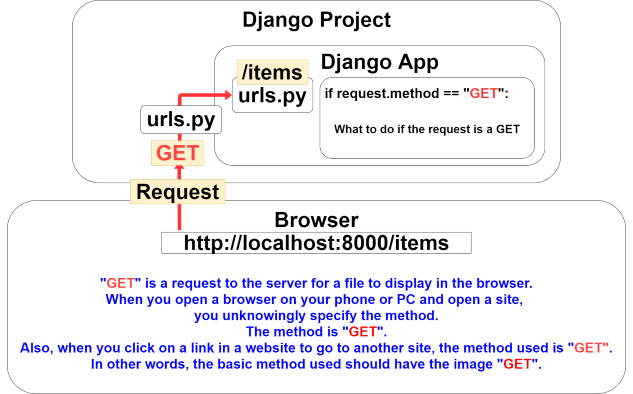
私達がブラウザを開いて、指定されたURLで検索してサイトにアクセスしようとすれば、サーバーに「外部からリクエストが来た」と認識されて、その後サーバーはリクエストメソッドが何か判断します。
基本的にただURLを入力してアクセスすればメソッドは「GET」になります。そして、ユーザー側からサーバーへデータを送る場合にPOSTメソッド等が使われます。
Explanation: The request is passed as an argument to the function. [get_items() function] is written to do the corresponding processing if the request is a GET method.
When we open a browser and try to access the site by searching at the specified URL, the server recognizes that "I got a request from the outside." and then it determines what the request method is.
Basically, if you just type in a URL and access it, the method becomes "GET". The POST method is used to send data from the user to the server.
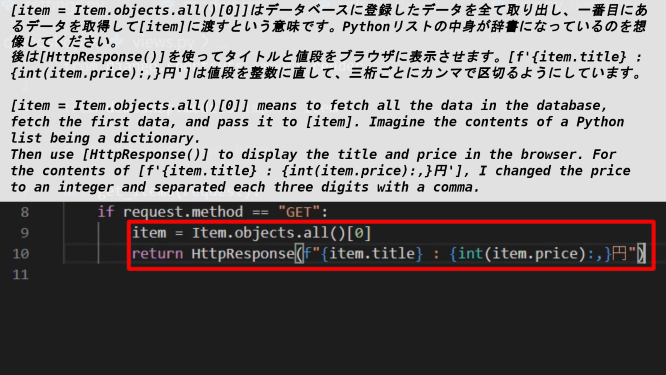
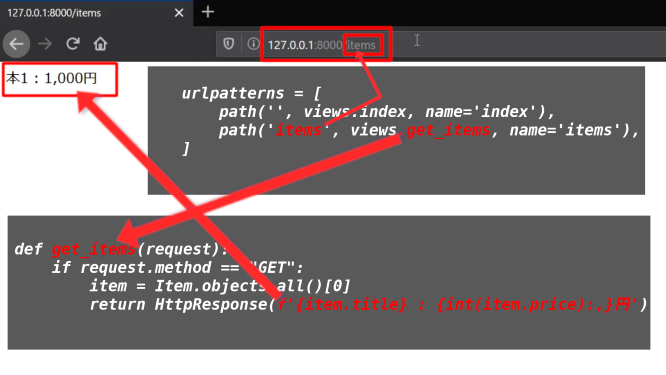
[item = Item.objects.all()[0]]はデータベースに登録したデータを全て取り出し、一番目にあるデータを取得して[item]に渡すという意味です。Pythonリストの中身が辞書になっているのを想像してください。
後は[HttpResponse()]を使ってタイトルと値段をブラウザに表示させます。[f'{item.title} : {int(item.price):,}円']は値段を整数に直して、三桁ごとにカンマで区切るようにしています。
[item = Item.objects.all()[0]] means to fetch all the data in the database, fetch the first data, and pass it to [item]. Imagine the contents of a Python list being a dictionary.
Then use [HttpResponse()] to display the title and price in the browser. For the contents of [f'{item.title} : {int(item.price):,}円'], I changed the price to an integer and separated each three digits with a comma.
補足:[HttpResponse()]はステータスコードとヘッダー部分、それと上のスクリプトでいう[f'{item.title} : {int(item.price):,}円']の部分をボディ(HTML形式)として変換して、それらをセットにしてHTTPレスポンスとしてリクエストが送られたブラウザに返して上げています。
supplementary explanation:[HttpResponse()] converts the status code, the header part, and the [f'{item.title} : {int(item.price):,}円'] part of the script above into a body (HTML format) and sends them back as a set to the requesting browser in an HTTP response.
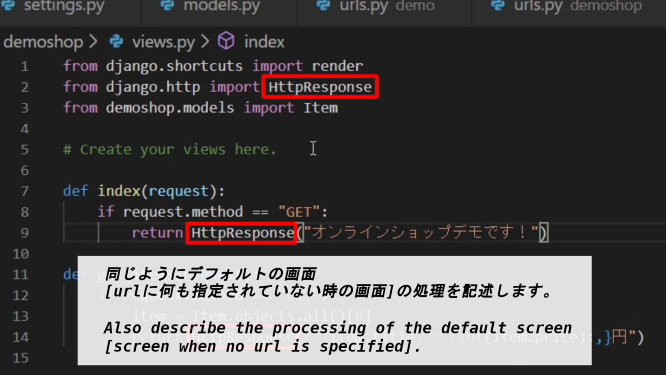
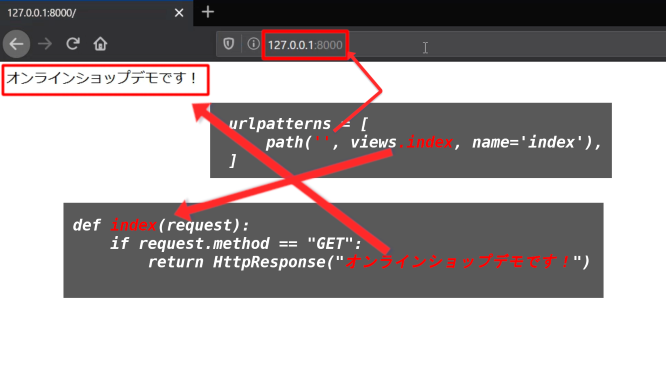
同じようにデフォルトの画面[urlに何も指定されていない時の画面]の処理を記述します。
Also describe the processing of the default screen [screen when no url is specified].
それでは「アプリのurls.py」でURLの設定をしていき、そのURL毎に先ほど書いた[views.py(アプリが行う処理)]を割り振っていきます。
Then, We will set the URL with [urls.py of the application], and We will assign the [views.py (What the app does)] to each URL.
② テンプレートを使いブラウザにサイトの内容を表示させる
② use a template to display the contents of a site in the browser
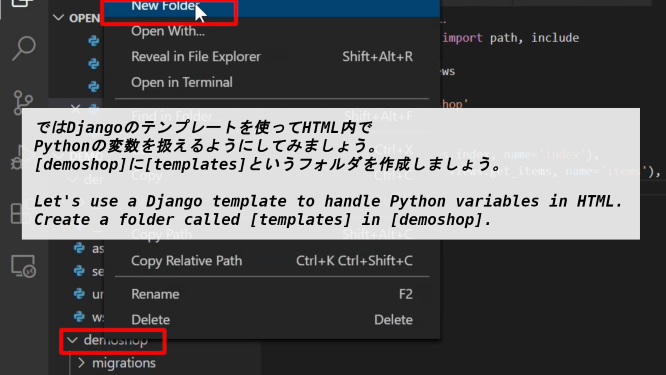
ではDjangoのテンプレートを使ってHTML内でPythonの変数を扱えるようにしてみましょう。
Let's use a Django template to handle Python variables in HTML.
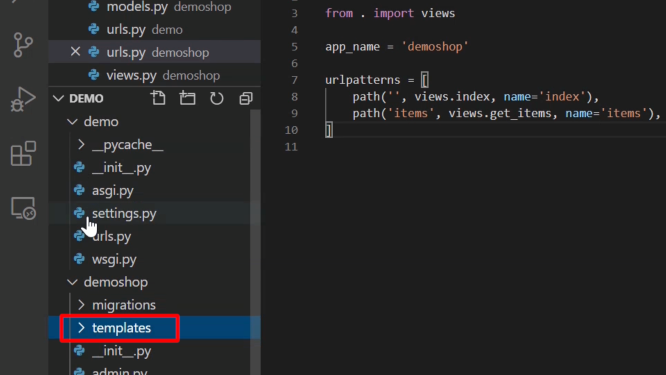
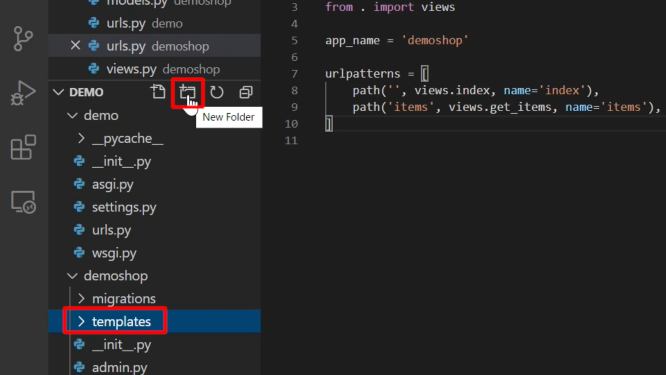
[demoshop]に[templates]というフォルダを作成しましょう。
Create a folder called [templates] in [demoshop].
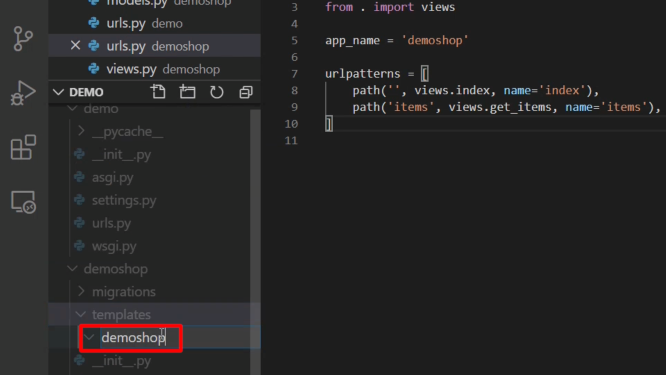
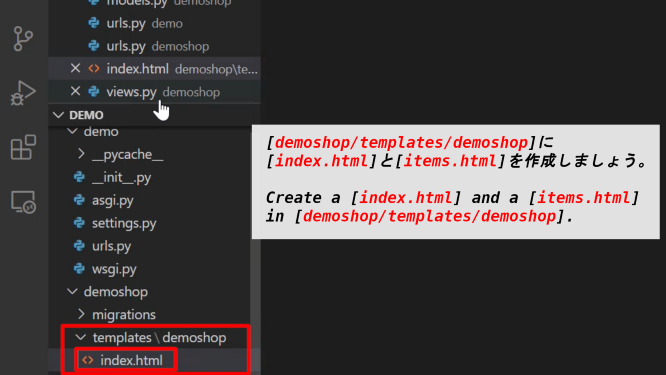
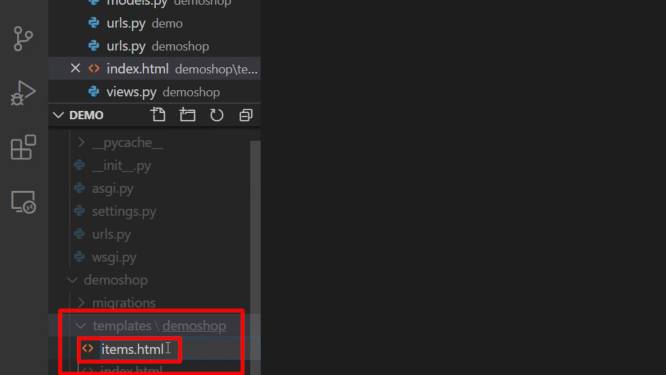
[demoshop/templates/demoshop]に[index.html]と[items.html]を作成しましょう。
Create a [index.html] and a [items.html] in [demoshop/templates/demoshop].
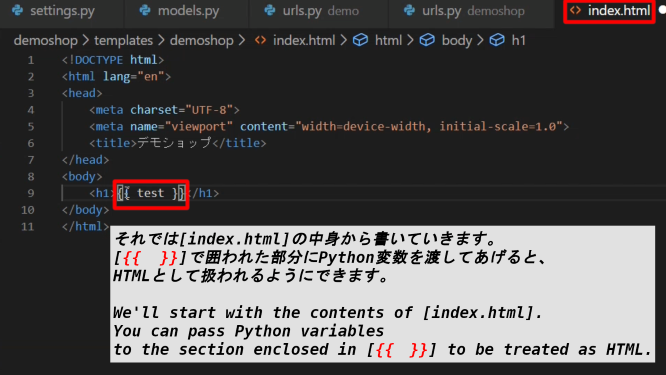
それでは[index.html]の中身から書いていきます。[{{ }}]で囲われた部分にPython変数を渡してあげると、HTMLとして扱われるようにできます。
We'll start with the contents of [index.html]. You can pass Python variables to the section enclosed in [{{ }}] to be treated as HTML.
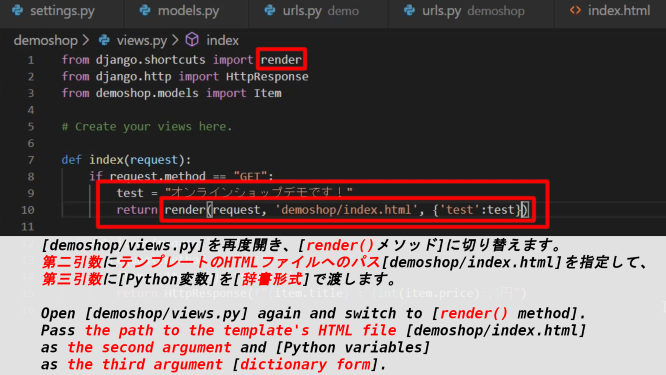
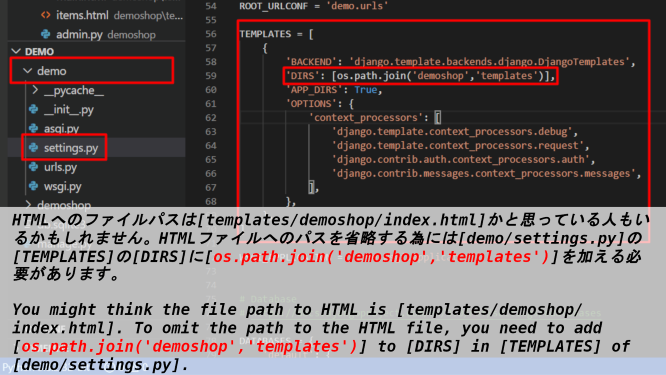
[demoshop/views.py]を再度開き、[render()メソッド]に切り替えます。第二引数にテンプレートのHTMLファイルへのパス[demoshop/index.html]を指定して、第三引数に[Python変数]を[辞書形式]で渡します。
Open [demoshop/views.py] again and switch to [render() method]. Pass the path to the template's HTML file [demoshop/index.html] as the second argument and [Python variables] as the third argument [dictionary form].
HTMLへのファイルパスは[templates/demoshop/index.html]かと思っている人もいるかもしれません。HTMLファイルへのパスを省略する為には[demo/settings.py]の[TEMPLATES]の[DIRS]に[os.path.join('demoshop','templates')]を加える必要があります。
You might think the file path to HTML is [templates/demoshop/index.html]. To omit the path to the HTML file, you need to add [os.path.join('demoshop','templates')] to [DIRS] in [TEMPLATES] of [demo/settings.py].
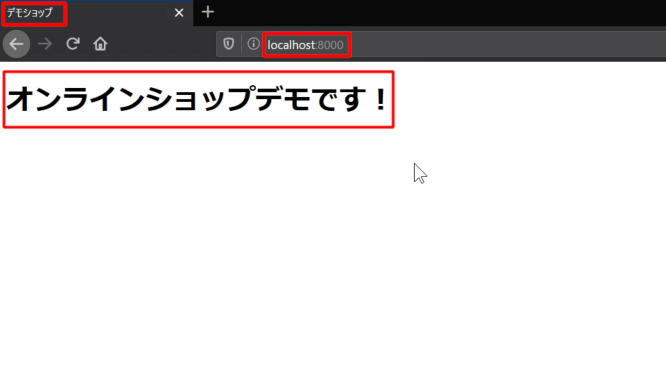
では挙動を確かめてみましょう。
Let's see how it works.
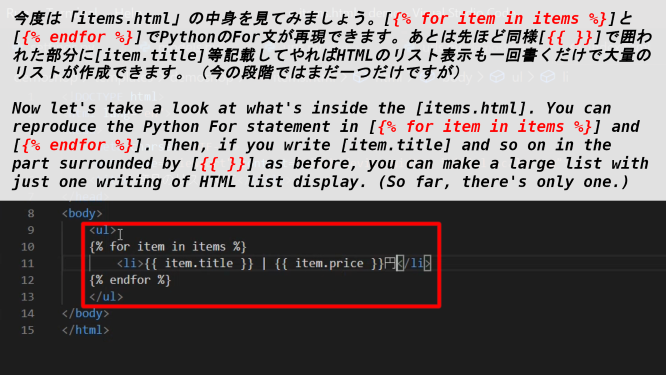
今度は「items.html」の中身を見てみましょう。[{% for item in items %}]と[{% endfor %}]でPythonのFor文が再現できます。あとは先ほど同様[{{ }}]で囲われた部分に[item.title]等記載してやればHTMLのリスト表示も一回書くだけで大量のリストが作成できます。(今の段階ではまだ一つだけですが)
Now let's take a look at what's inside the [items.html]. You can reproduce the Python For statement in [{% for item in items %}] and [{% endfor %}]. Then, if you write [item.title] and so on in the part surrounded by [{{ }}] as before, you can make a large list with just one writing of HTML list display. (So far, there's only one.)
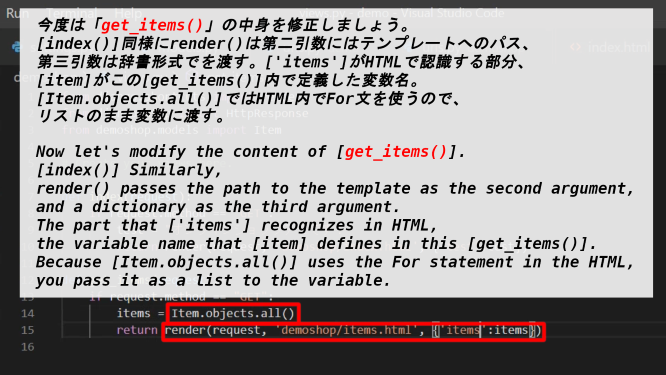
今度は「get_items()」の中身を修正しましょう。[index()]同様にrender()は第二引数にはテンプレートへのパス、第三引数は辞書形式でを渡す。['items']がHTMLで認識する部分、[item]がこの[get_items()]内で定義した変数名。[Item.objects.all()]ではHTML内でFor文を使うので、リストのまま変数に渡す。
Now let's modify the content of [get_items()]. [index()] Similarly, render() passes the path to the template as the second argument, and a dictionary as the third argument. The part that ['items'] recognizes in HTML, the variable name that [item] defines in this [get_items()]. Because [Item.objects.all()] uses the For statement in the HTML, you pass it as a list to the variable.
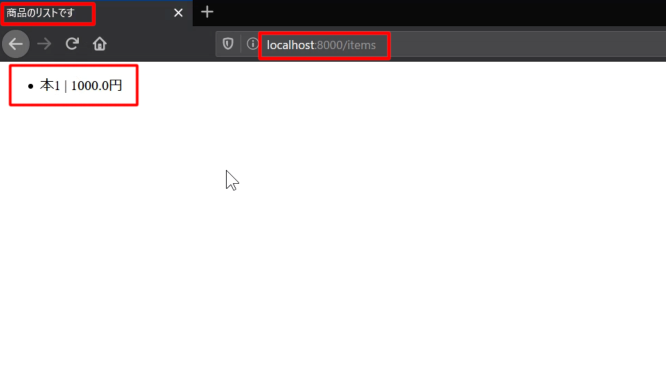
では挙動を確かめてみましょう。
Let's see how it works.
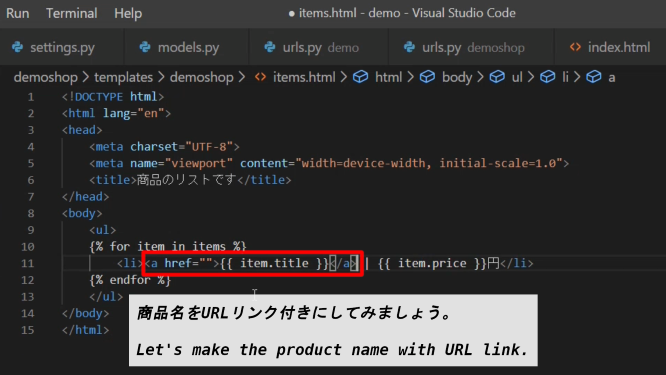
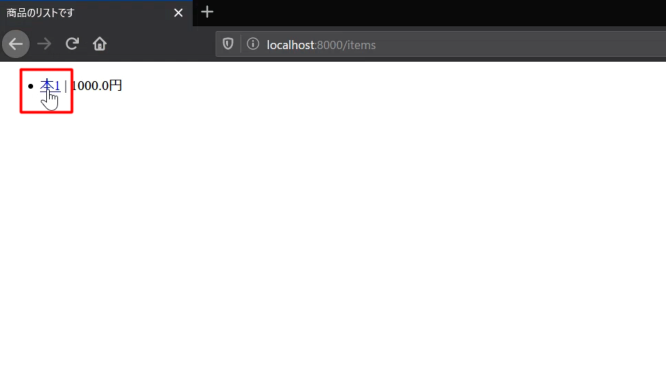
商品名をURLリンク付きにしてみましょう。
Let's make the product name with URL link.
③ Djangoシェルを使いデータベースにデータを登録、管理者画面からもできるようにする
③ Using the Django shell to register data in the database and make it possible to do so from the administrator screen as well
ではデータベースにもっとデータを登録していきましょう。最初にDjangoシェルを使って登録していく方法をお見せします。
Let's register more data in the database. First, I'll show you how to register using the Django shell.
[Item]クラスに定義した二つの「タイトル」と「値段」に新しい値を入れて[item]オブジェクトを作成します。その後[item.save()]を使えばモデルに新しいデータが登録されます。Djangoモデルとデータベース(デフォルトはSQLite Database)は最初に紐づけをしたので、データベースにも変更は反映されています。
Create a [item] object with new values for the two "Title" and "price" defined in class [Item]. Then use [item.save ()] to register new data in the model. The Django model and the database (The default is SQLite Database.) were first linked, so the changes are reflected in the database.

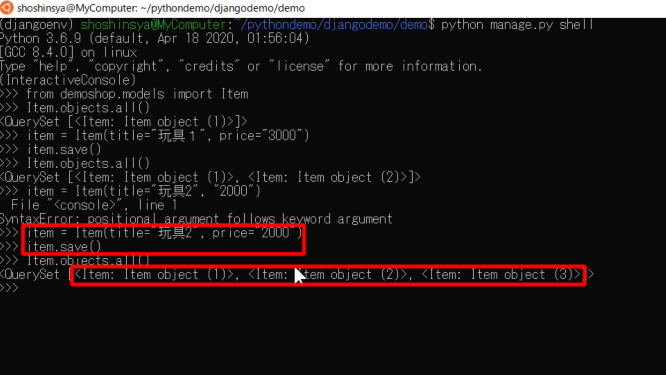
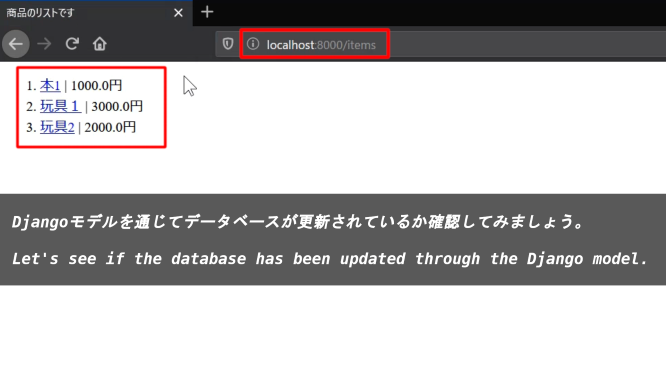
Djangoモデルを通じてデータベースが更新されているか確認してみましょう。
Let's see if the database has been updated through the Django model.
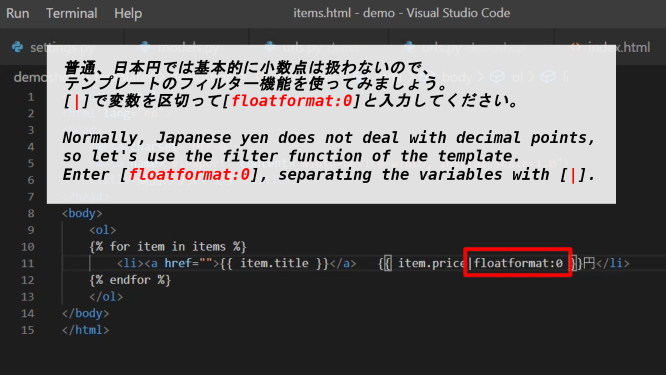
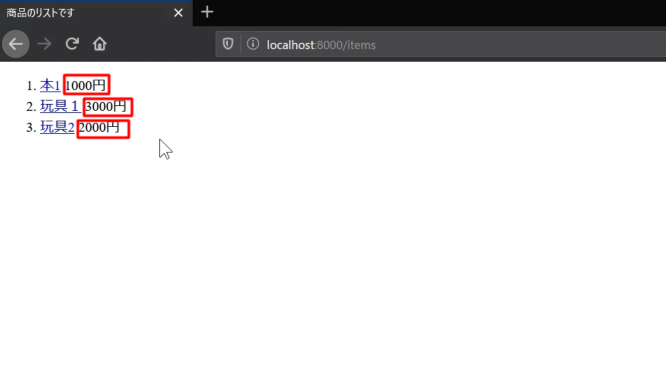
普通、日本円では基本的に小数点は扱わないので、テンプレートのフィルター機能を使ってみましょう。[|]で変数を区切って[floatformat:0]と入力してください。
Normally, Japanese yen does not deal with decimal points, so let's use the filter function of the template. Enter [floatformat:0], separating the variables with [|].
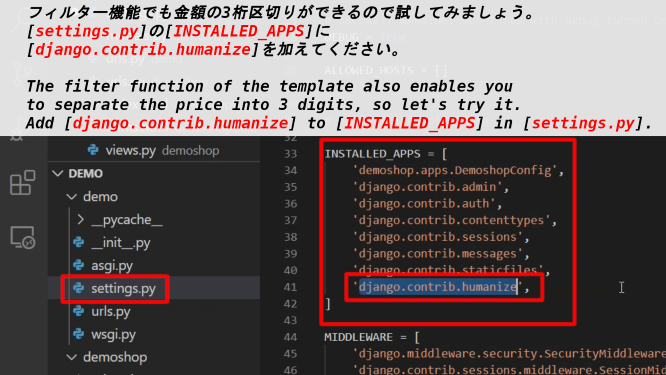
フィルター機能でも金額の3桁区切りができるので試してみましょう。[settings.py]の[INSTALLED_APPS]に[django.contrib.humanize]を加えてください。
The filter function of the template also enables you to separate the price into 3 digits, so let's try it. Add [django.contrib.humanize] to [INSTALLED_APPS] in [settings.py].
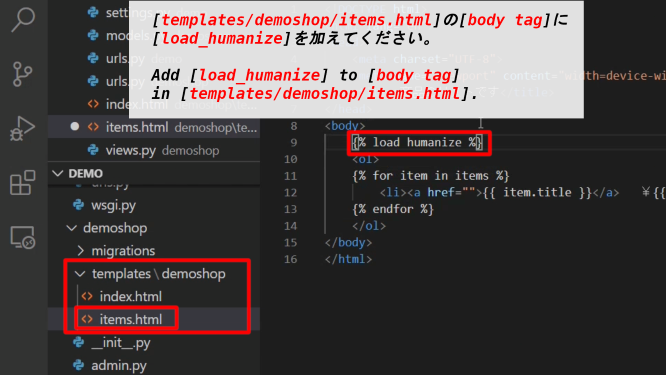
[templates/demoshop/items.html]の[body tag]に[load_humanize]を加えてください。
Add [load_humanize] to [body tag] in [templates/demoshop/items.html].
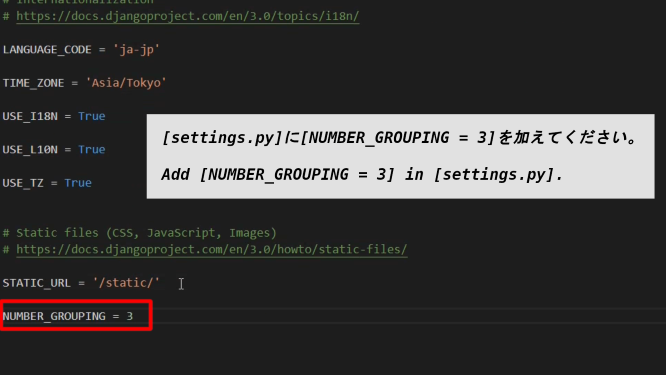
[settings.py]に[NUMBER_GROUPING = 3]を加えてください。
Add [NUMBER_GROUPING = 3] in [settings.py].
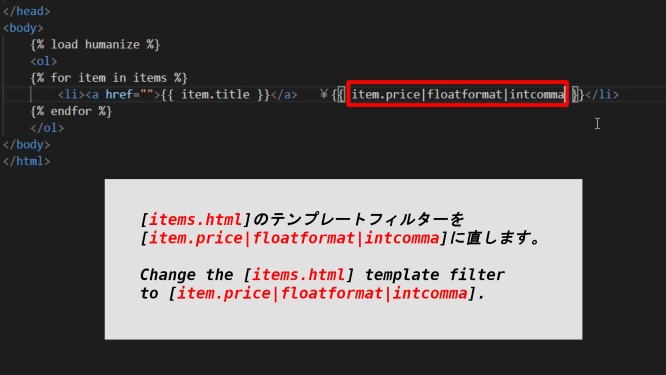
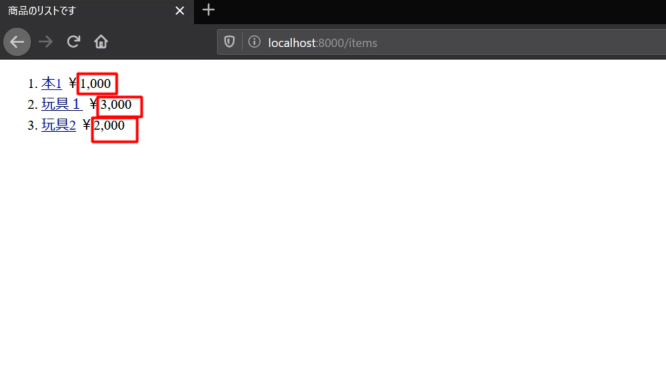
[items.html]のテンプレートフィルターを[item.price|floatformat|intcomma]に直します。
Change the [items.html] template filter to [item.price|floatformat|intcomma].
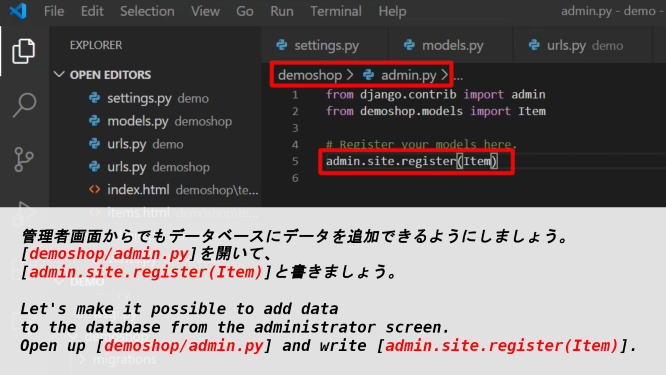
管理者画面からでもデータベースにデータを追加できるようにしましょう。
Let's make it possible to add data to the database from the administrator screen.
[demoshop/admin.py]を開いて、[admin.site.register(Item)]と書きましょう。
Open up [demoshop/admin.py] and write [admin.site.register(Item)].
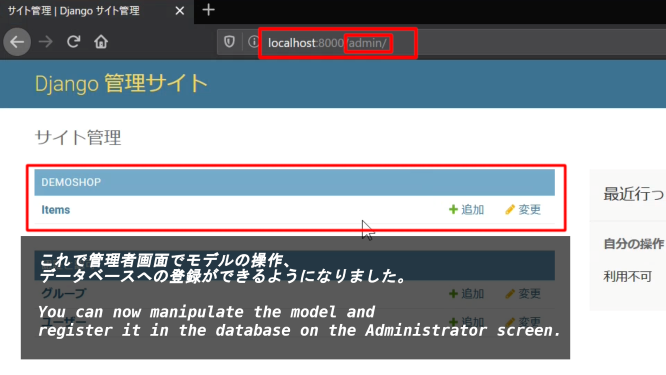
これで管理者画面でモデルの操作、データベースへの登録ができるようになりました。
You can now manipulate the model and register it in the database on the Administrator screen.
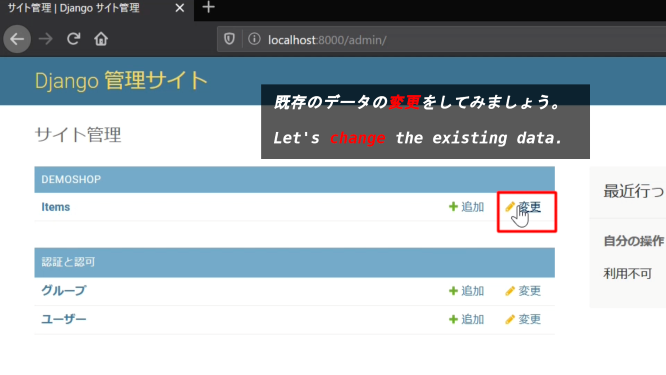
既存のデータの変更をしてみましょう。
Let's change the existing data.
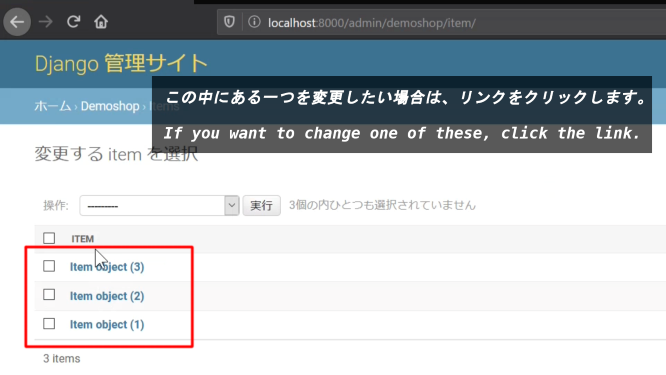
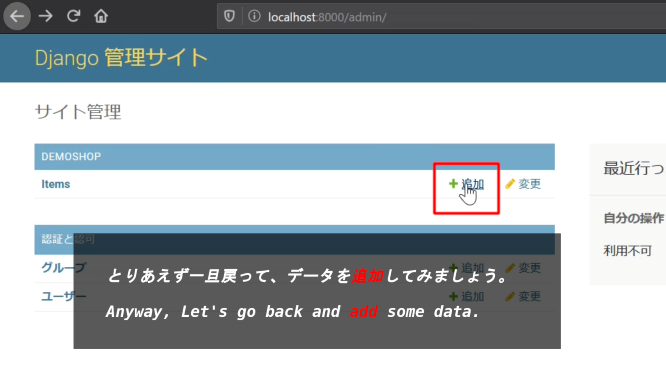
この中にある一つを変更したい場合は、リンクをクリックします。
If you want to change one of these, click the link.
とりあえず一旦戻って、データを追加してみましょう。
Anyway, Let's go back and add some data.
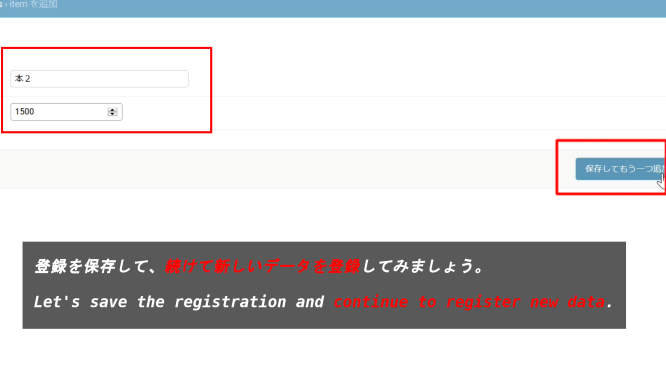
登録を保存して、続けて新しいデータを登録してみましょう。
Let's save the registration and continue to register new data.
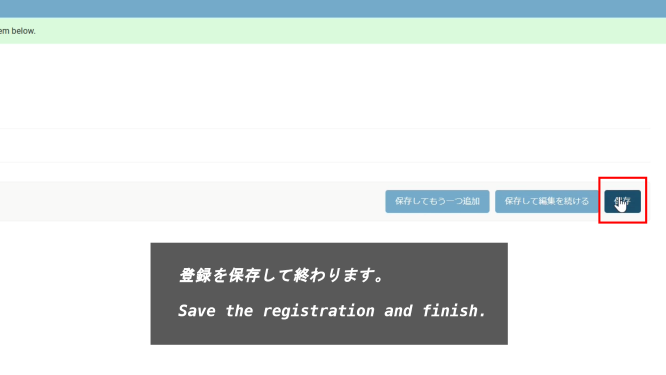
登録を保存して終わります。
Save the registration and finish.
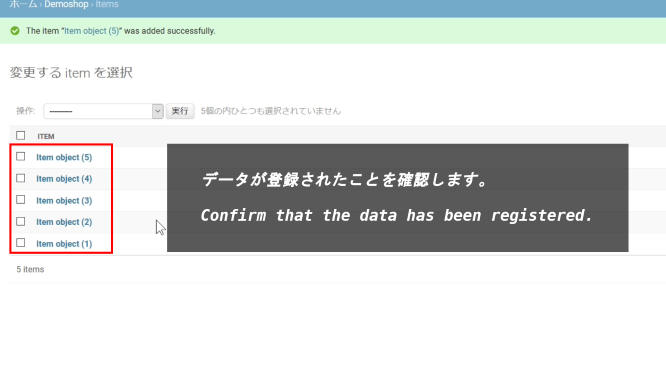
データが登録されたことを確認します。
Confirm that the data has been registered.
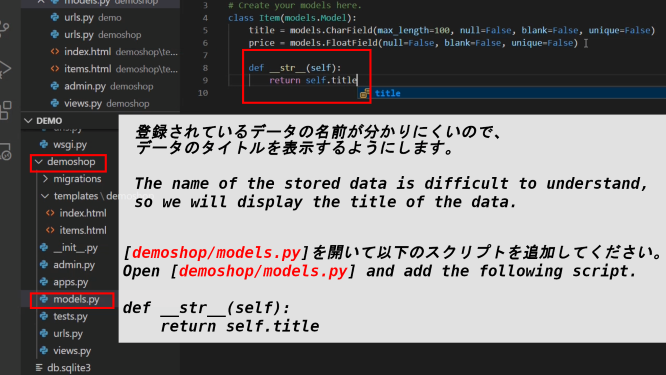
登録されているデータの名前が分かりにくいので、データのタイトルを表示するようにします。
The name of the stored data is difficult to understand, so we will display the title of the data.
[demoshop/models.py]を開いて以下のスクリプトを追加してください。
Open [demoshop/models.py] and add the following script.
def __str__(self):
    return self.title
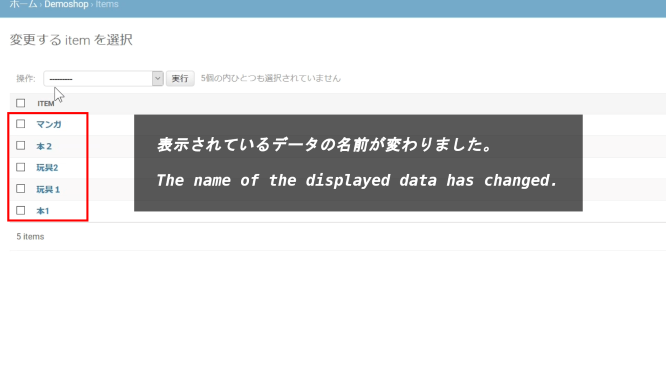
表示されているデータの名前が変わりました。
The name of the displayed data has changed.
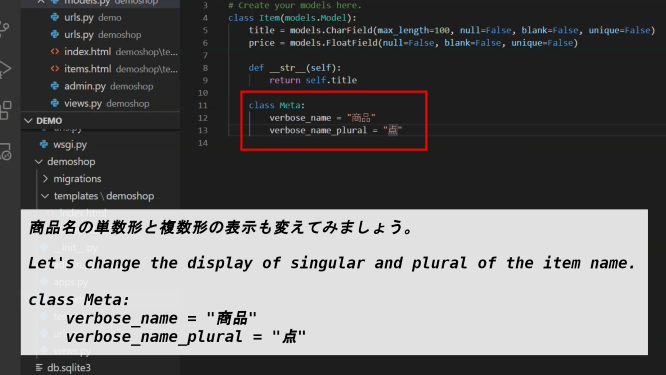
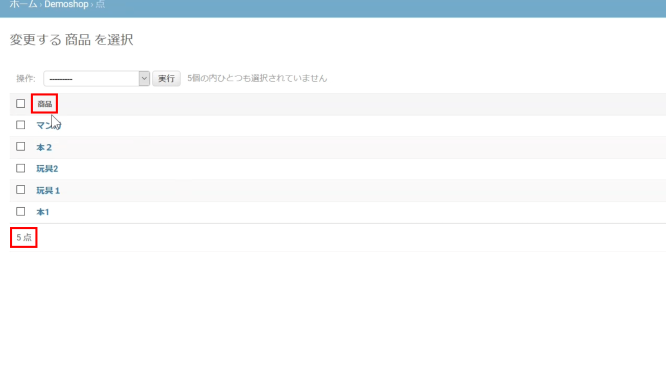
商品名の単数形と複数形の表示も変えてみましょう。
Let's change the display of singular and plural of the item name.
class Meta:
    verbose_name = "商品"
    verbose_name_plural = "点"
以上です。お疲れ様です。次回はBootstrapを使用して、サイトの見た目を整えていきましょう。
That's all. Thank you for your hard work. Next time we'll use Bootstrap to get our site looking good.