Published Date : 2020年5月22日11:06
Part 1 - Djangoを使って簡単なオンラインショップを作ってみよう
Part 1 - Create a Simple Online Shop with Django
This blog has an English translation
YouTubeにアップした動画、「【Django】Part 1 - Create a Simple Online Shop with Django:Djangoを使って簡単なオンラインショップを作ってみよう」の補足説明の記事です。
Here's a little more about the 「【Django】Part 1 - Create a Simple Online Shop with Django:Djangoを使って簡単なオンラインショップを作ってみよう」 video I uploaded to YouTube.
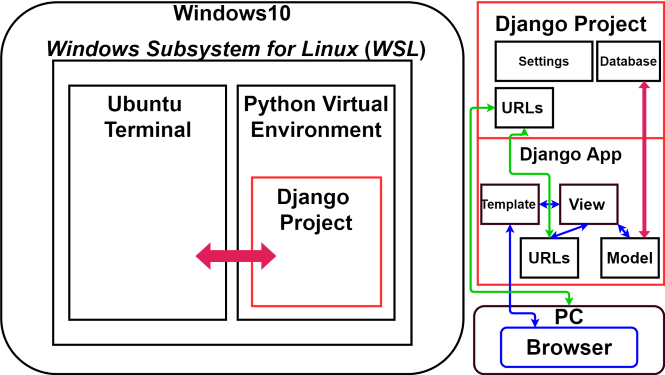
Djangoを使って簡単なログイン機能を持ったオンラインショップのようなサイトを作ってみましょう。 Part1となる今回の動画シリーズでは、WSLを使用してDjangoの開発環境を構築し、SQLite等のデータベースとDjangoのモデルを紐づける作業を行っていきます。
Use Django to create a site that looks like an online store with a simple login feature. In this video series, Part 1, we will build a Django development environment using WSL and link a database such as SQLite with Django model.
無駄な説明を省いて、忙しい時でも短時間で理解できるような動画です。
It's a video that can be understood in a short period of time even when you're busy, without any unnecessary explanation.
目次
Table of Contents
① WSLでDjangoの開発環境を整える ① Create a Django development environment with WSL |
② サイトのセットアップとDjangoモデルの作成 ② Setting up a site and creating a Django model |
ページの最後へ Go to the end of the page. |
① WSLでDjangoの開発環境を整える
① Create a Django development environment with WSL
注意:今回の動画の中ではWSLを使用して環境を構築しています。
Note:In this video, the environment is built using WSL.
WSLのインストール方法は以下の動画またはブログを参考にしてください。
Use the following video or blog to learn more about installing WSL.
https://youtu.be/K8tQTgRnEYshttps://akasatanahama.com/posts/135/#section_2
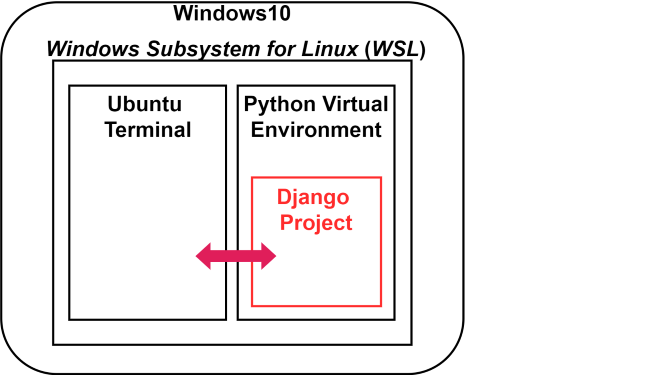
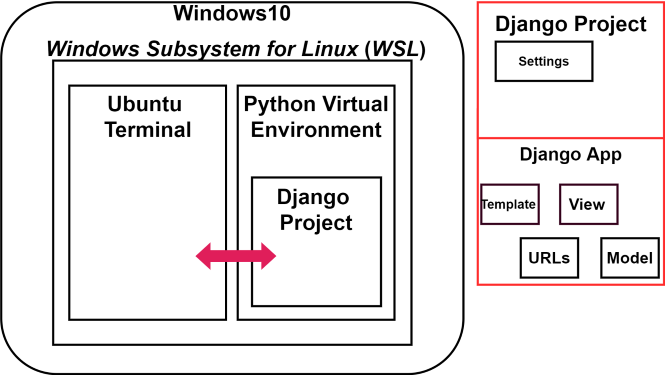
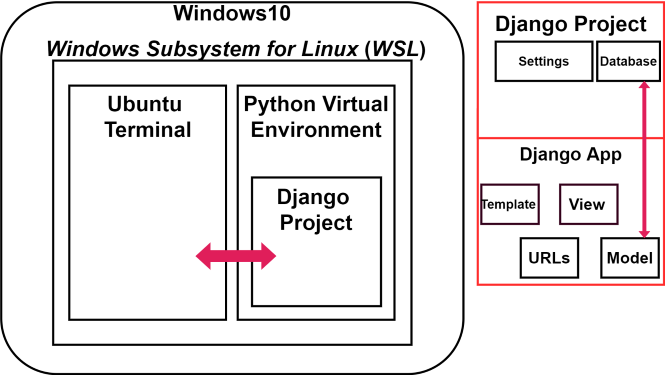
全体像
Overall
①
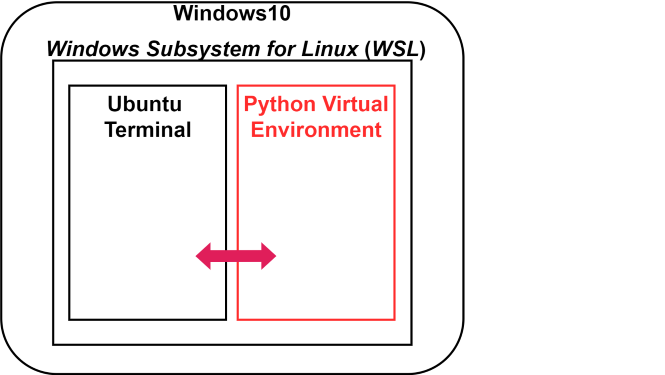
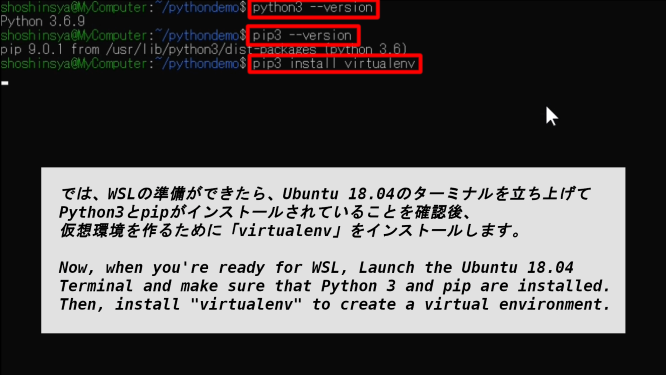
では、WSLの準備ができたら、Ubuntu 18.04のターミナルを立ち上げてPython3とpipがインストールされていることを確認後、 仮想環境を作るために「virtualenv」をインストールします。
Now, when you're ready for WSL, Launch the Ubuntu 18.04 Terminal and make sure that Python 3 and pip are installed. Then, install "virtualenv" to create a virtual environment.
補足説明:何故仮想環境を作るのか?例えば自分の環境のPython3には「Tensorflow」がインストールされていたとします。 今回のデモ用アプリでは使用しません。様々なライブラリをインストールすると不具合が起きる可能性があります。
さらに後ほど説明する「requirements.txt」を使って外部のWEBサーバー(Heroku等のクラウドサービス等やさくらレンタルサーバー等)に このアプリをデプロイする際、または他の人達と一緒に開発をする際には、開発環境を合わせるケースがでてきます。
物事をシンプルに、開発製品毎に分かりやすく管理したいので「仮想環境」というコンテナ―のような環境での開発が必要となってくるわけです。 あとはPython2系でしか動かせないコードやライブラリ等がある時にも便利です。
Additional Information: Why Create a Virtual Environment? For example, your python3 environment might have installed with "Tensorflow". I won't use it in this demo app. And Installing various libraries can cause problems.
In addition, when you deploy the app to an external web server (Cloud services such as Heroku and Sakura rental servers) using "requirements.txt" described later, Or when you're working with other people, you need to have the same development environment.
Because we want to keep things simple and easy to manage for each development product, we need to develop in a container like "virtual environment". Also, "virtual environment" is useful if you have code or libraries that can only be run in the Python2.
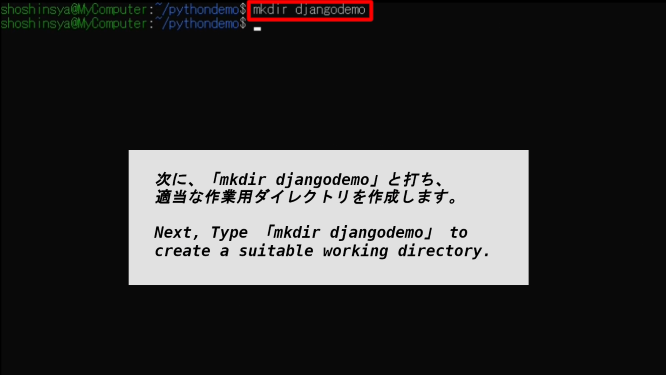
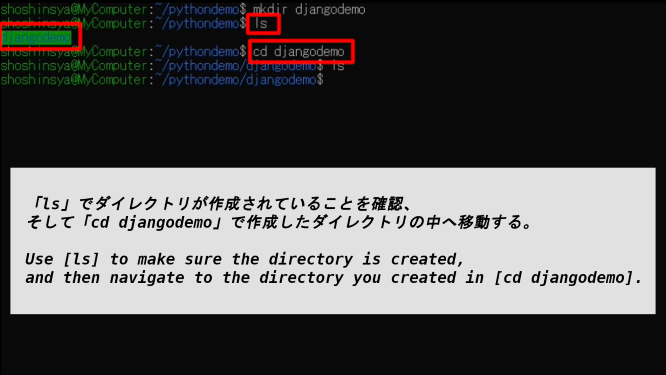
次に、「mkdir djangodemo」と打ち、適当な作業用ダイレクトリを作成します。
Next, Type 「mkdir djangodemo」 to create a suitable working directory.
「ls」でダイレクトリが作成されていることを確認、そして「cd djangodemo」で作成したダイレクトリの中へ移動する。
Use [ls] to make sure the directory is created, and then navigate to the directory you created in [cd djangodemo].
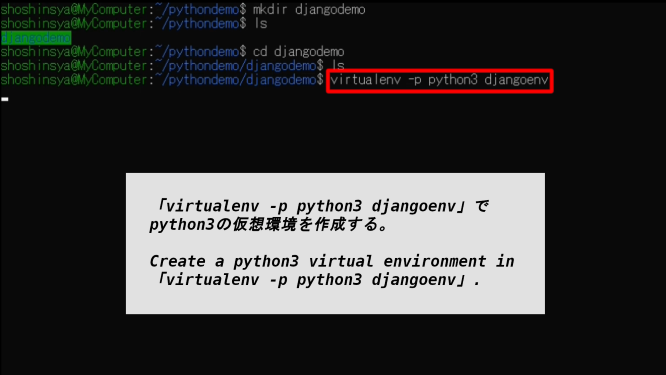
「virtualenv -p python3 djangoenv」でpython3の仮想環境を作成する。
Create a python3 virtual environment in 「virtualenv -p python3 djangoenv」.
補足説明:[-p]または[--python]オプションはその後に続く[python3]等のバージョン名で、どのバージョンのpythonのパスを指定するかを決める。(例:)[-p python3.5]等。
DESCRIPTION: The [-p] or [--python] option is followed by a version name, such as [python3], to determine which version of python path is specified. (Example:) [-p python3.5] etc.
もちろん指定したPythonへのパスが通ってなければ使用できない。[djangoenv]は作成する仮想環境の名前(好きな名前にしてください)。
Of course, it cannot be used unless the path to the specified Python is passed. [djangoenv] is the name of the virtual environment to create (Please give it a name you like).
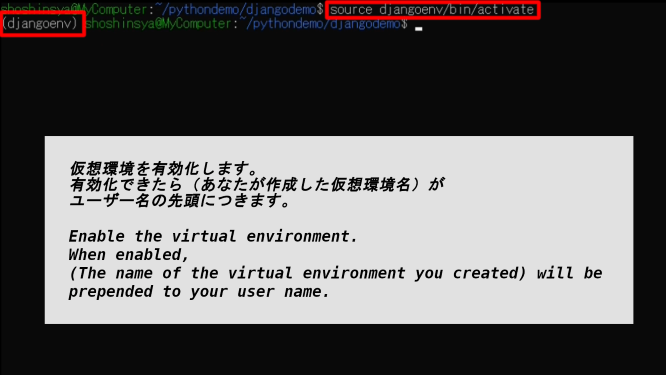
仮想環境を有効化します。有効化できたら(あなたが作成した仮想環境名)がユーザー名の先頭につきます。
Enable the virtual environment. When enabled, (The name of the virtual environment you created) will be prepended to your user name.
「python3」のバージョンは同じですが、「pip」のバージョンが違っています。無事仮想環境で操作できています。
The 「python3」 version is the same, but the 「pip」 version is different. It is operating in the virtual environment.

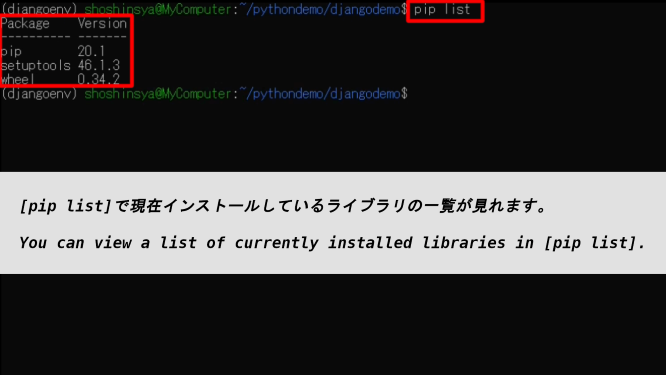
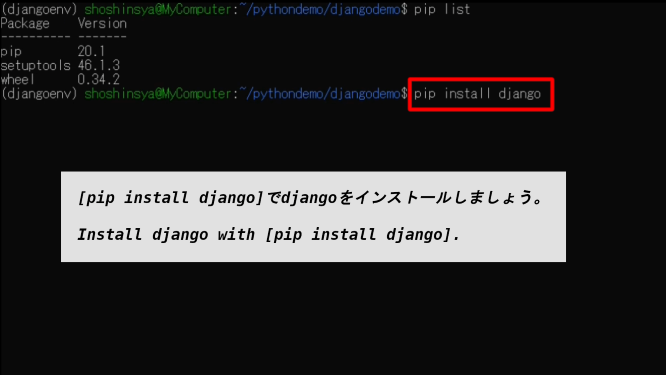
[pip list]で現在インストールしているライブラリの一覧が見れます。
You can view a list of currently installed libraries in [pip list].
[pip install django]でdjangoをインストールしましょう。
Install django with [pip install django].
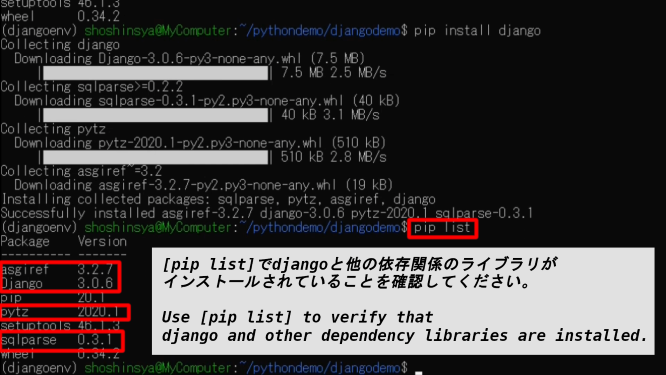
[pip list]でdjangoと他の依存関係のライブラリがインストールされていることを確認してください。
Use [pip list] to verify that django and other dependency libraries are installed.
②
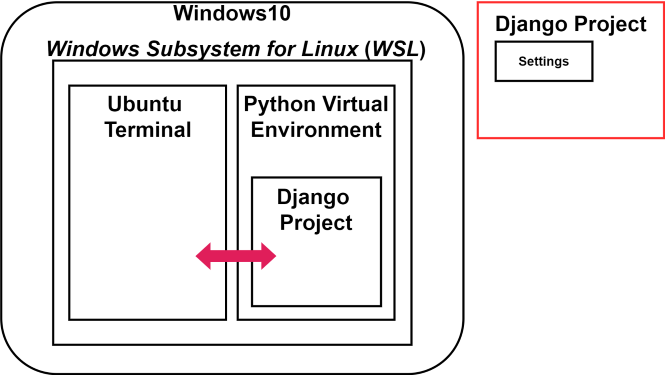
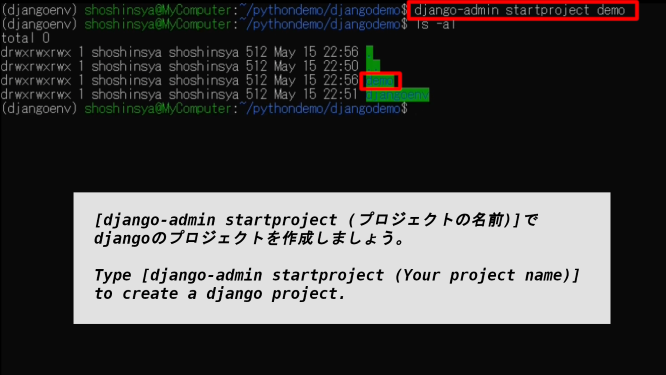
[django-admin startproject (プロジェクトの名前)]でdjangoのプロジェクトを作成しましょう。
Type [django-admin startproject (Your project name)] to create a django project.
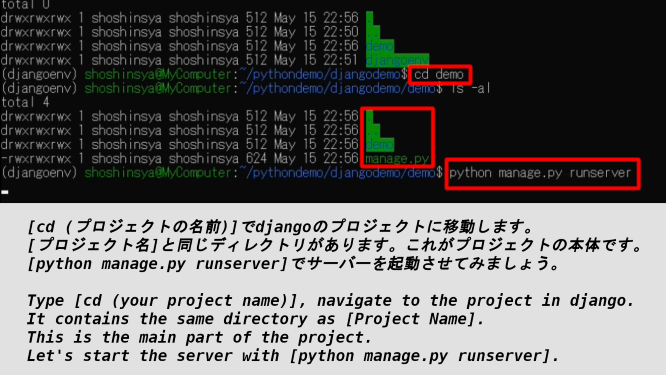
[cd (プロジェクトの名前)]でdjangoのプロジェクトに移動します。[プロジェクト名]と同じディレクトリがあります。これがプロジェクトの本体です。[python manage.py runserver]でサーバーを起動させてみましょう。
Type [cd (your project name)], navigate to the project in django. It contains the same directory as [Project Name]. This is the main part of the project. Let's start the server with [python manage.py runserver].
補足説明:[manage.py]はその名が示す通り、Djangoのプロジェクトのマネージャー的役割です。プロジェクト内でアプリの作成や変更をする際に頻繁に活用します。
supplementary explanation: As the name implies, [managepy] is similar to the role of the project manager in Django. We're going to use this a lot to create and modify apps in the project frequently.
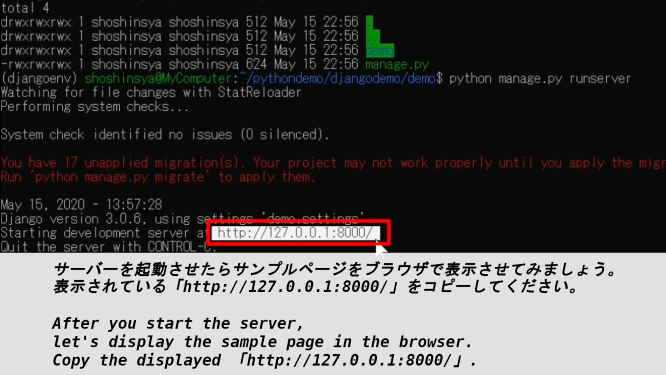
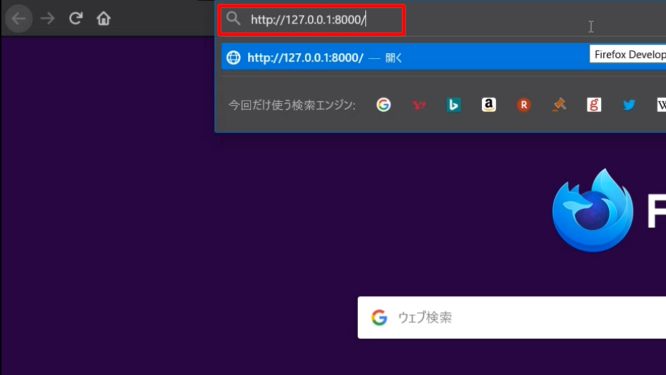
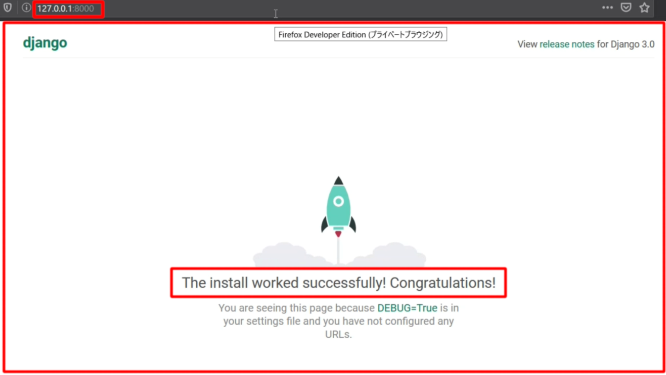
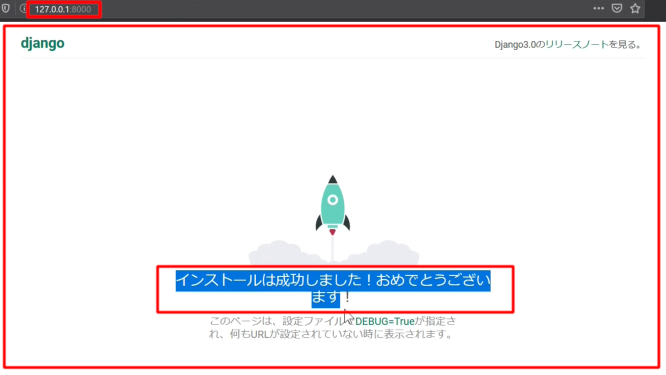
サーバーを起動させたらサンプルページをブラウザで表示させてみましょう。表示されている「http://127.0.0.1:8000/」をコピーしてください。
After you start the server, let's display the sample page in the browser. Copy the displayed 「http://127.0.0.1:8000/」.
補足説明:[http://127.0.0.1:8000]とは[自分のパソコンと通信するためのIPアドレス(127.0.0.1)に、HTTP通信を使ってアクセスする(http://)。使用するポートが8000番(:8000)]という意味です。
Supplement: [http://127.0.0.1:8000] means [An IP address (127.0.0.1) for communicating with your own personal computer is accessed using HTTP communication (http://). Use port 8000 (:8000)].
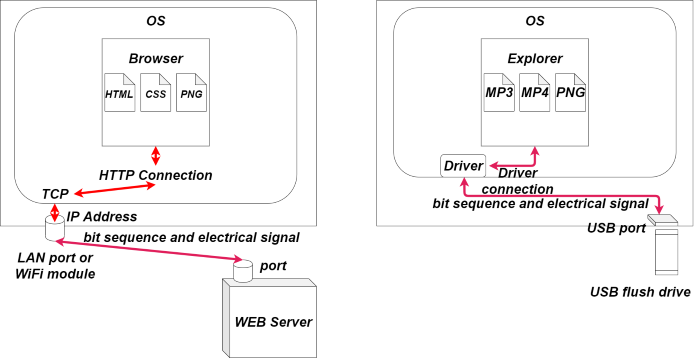
ポートとは簡単にいうとUSBの差し込み口みたいなものだと思ってください。あなたがUSBメモリをパソコンに接続した時を想像してください。
USBメモリがあなたのパソコンに認識されて、USB内部のファイル等をOSにコピーしたりするためには、 使用できるUSBメモリの挿し口と、あなたのパソコンとUSBを通信するための「ドライバー」がOSになければなりません。
この通信するためのドライバーが「HTTP通信」にあたり、「USBの接続口」が「接続するポート番号」になります。 そしてUSBを「WEBサーバー」と例えると、このUSBメモリがOSを認識するための番号が「IPアドレス」となります。
今回の場合「IPアドレス」である「127.0.0.1」は自分自身とだけ通信ができるアドレスとして用意されています。 つまりUSBメモリが既にパソコン内部に接続されていて、「特殊なIPアドレス」を用いなければ使用できないことを想像してください。
この「特殊なIPアドレス」は「自分のパソコンがループするように、自分のパソコンと通信をするためのアドレス」つまり「127.0.0.1またはlocalhost」と言われています。
ファイルを表示したり、やりとりするためのエクスプローラーが「ブラウザ」のようなものだと思ってください。
Think of a port simply as a USB plug in. Imagine you connected a USB flash drive to your computer.
In order for the USB flash drive to be recognized by your computer and to copy the files inside the USB flash drive to the operating system, the operating system must have a USB flash drive port that can be used and a "driver" to communicate with your computer.
The driver for this communication is "HTTP communication", and "USB connection port" becomes "Port number to connect to". If you think of USB as "WEB server", the number that this USB flash drive uses to recognize the OS is "IP Address".
In this case, "127.0.0.1" which is "IP Address" is prepared as an address that can communicate only with itself.
In other words, imagine that a USB flash drive is already connected to the inside of your computer, and that you cannot use it without using "special IP address".
This "special IP address" is said to be "an address for communicating with your computer so that your computer loops" or "127.0.0.1 or localhost".
Think of the Explorer for viewing and interacting with files as something like "Browser".
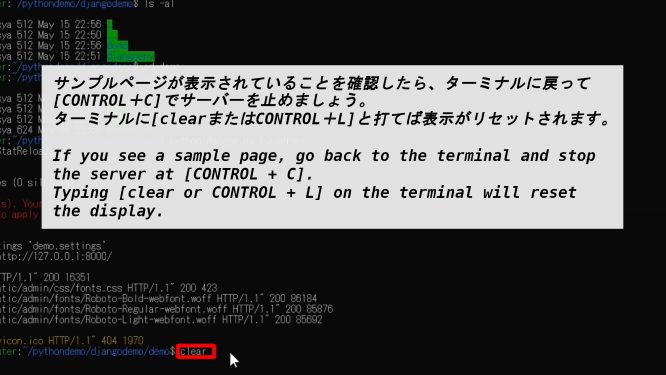
サンプルページが表示されていることを確認したら、ターミナルに戻って[CONTROL+C]でサーバーを止めましょう。ターミナルに[clearまたはCONTROL+L]と打てば表示がリセットされます。
If you see a sample page, go back to the terminal and stop the server at [CONTROL + C]. Typing [clear or CONTROL + L] on the terminal will reset the display.
③
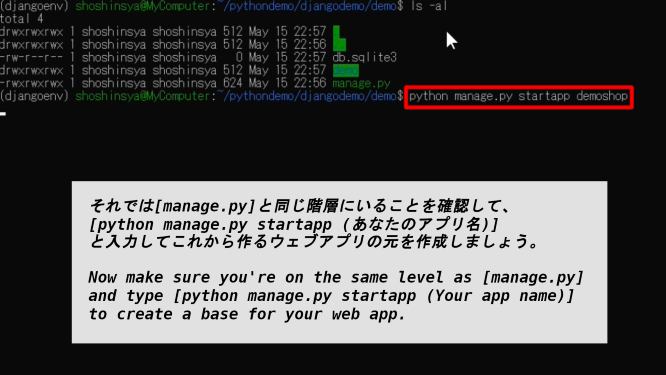
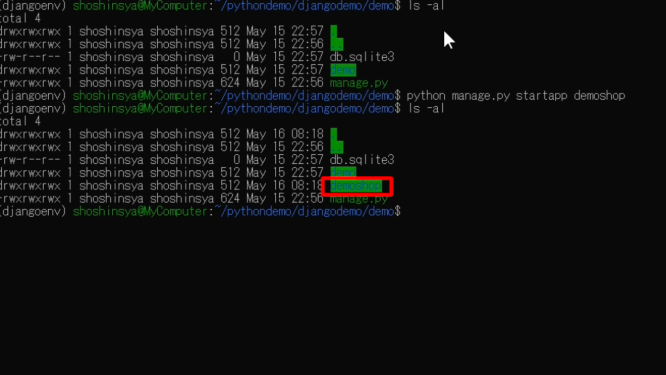
それでは[manage.py]と同じ階層にいることを確認して、[python manage.py startapp (あなたのアプリ名)]と入力してこれから作るウェブアプリの元を作成しましょう。
Now make sure you're on the same level as [manage.py] and type [python manage.py startapp (Your app name)] to create a base for your web app.
② サイトのセットアップとDjangoモデルの作成
② Setting up a site and creating a Django model
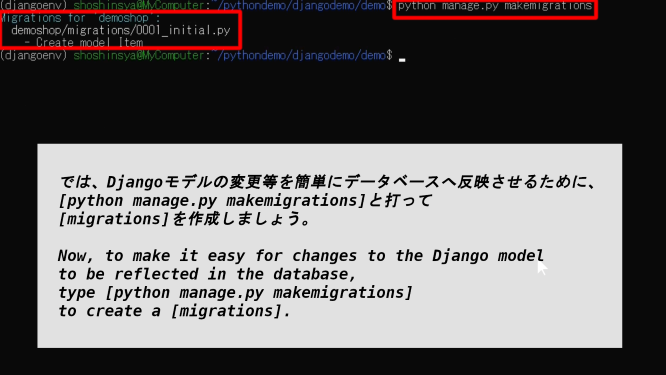
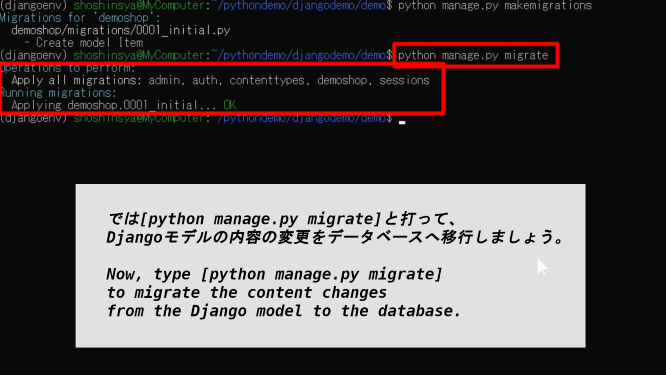
では、Djangoモデルの変更等を簡単にデータベースへ反映させるために、[python manage.py makemigrations]と打って[migrations]を作成しましょう。
Now, to make it easy for changes to the Django model to be reflected in the database, type [python manage.py makemigrations] to create a [migrations].
補足説明:この[migrations]は、Djangoのモデルオブジェクト(Pythonの辞書のようなもの)が作成されたり、変更されたりした時に[python manage.py migrate]と実行すると、 SQLite(Djangoのデフォルトのデータベース)やPostgreSQLやMySQL等のデータベースに変更を反映してくれます。 通常、SQLite等のデータベースへの変更やテーブル作成にはSQL文を使って命令します。 その変更内容をSQL文にしてデータベースに移行する作業を[migrations]を使うことによって自動的に行ってくれているわけです。
Description: This [migrations] can be used by executing [python manage.py migrate] when a Django model object (Like a Python dictionary) is created or modified. It will migrate changes to databases such as SQLite (Django's default database), PostgreSQL and MySQL. Normally, changes to databases such as SQLite and table creation are done using SQL statements. Instead, Using [migrations], the changes are automatically converted into SQL statements and migrated to the database.
④
では[python manage.py migrate]と打って、Djangoモデルの内容の変更をデータベースへ移行しましょう。
Now, type [python manage.py migrate] to migrate the content changes from the Django model to the database.
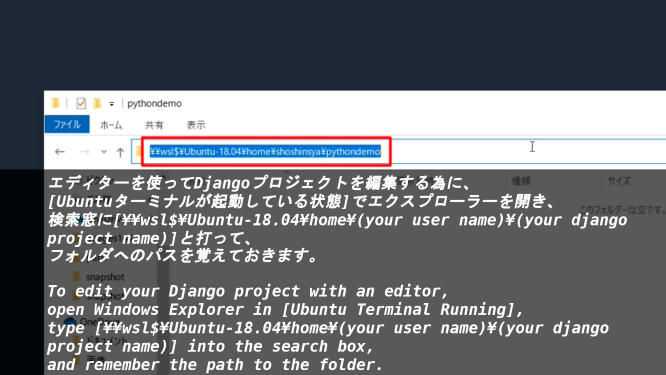
エディターを使ってDjangoプロジェクトを編集する為に、[Ubuntuターミナルが起動している状態]でエクスプローラーを開き、検索窓に[¥¥wsl$¥Ubuntu-18.04¥home¥(your user name)¥(your django project name)]と打って、フォルダへのパスを覚えておきます。
To edit your Django project with an editor, open Windows Explorer in [Ubuntu Terminal Running], type [¥¥wsl$¥Ubuntu-18.04¥home¥(your user name)¥(your django project name)] into the search box, and remember the path to the folder.
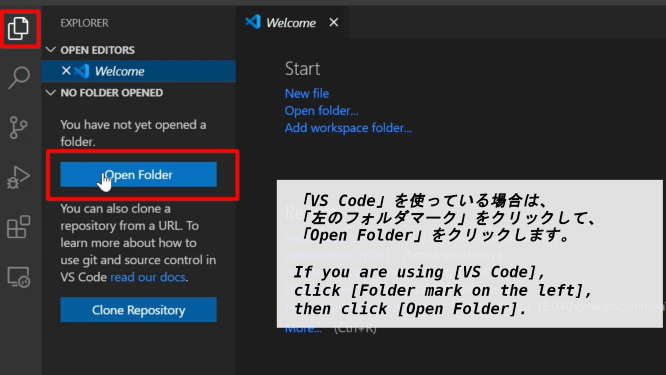
「VS Code」を使っている場合は、「左のフォルダマーク」をクリックして、「Open Folder」をクリックします。
If you are using [VS Code], click [Folder mark on the left], then click [Open Folder].
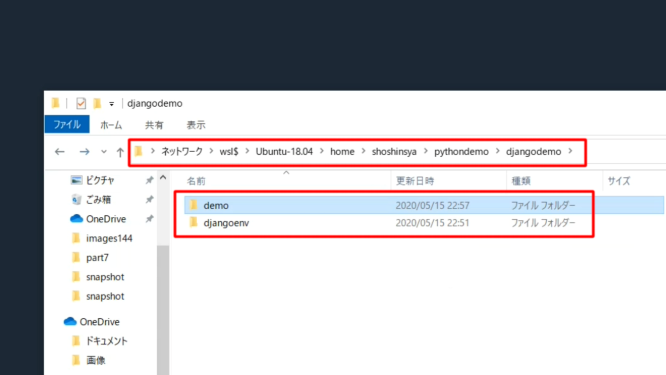
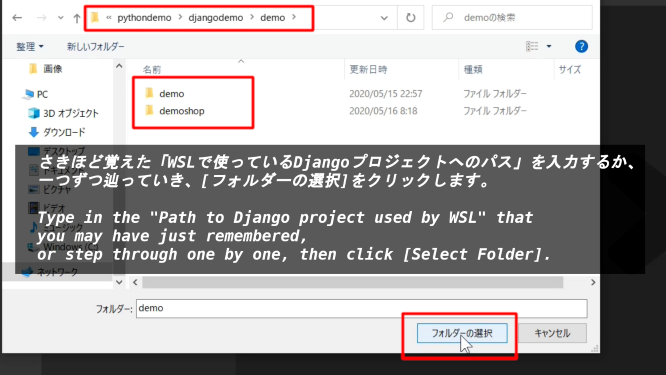
さきほど覚えた「WSLで使っているDjangoプロジェクトへのパス」を入力するか、一つずつ辿っていき、[フォルダーの選択]をクリックします。
Type in the "Path to Django project used by WSL" that you may have just remembered, or step through one by one, then click [Select Folder].
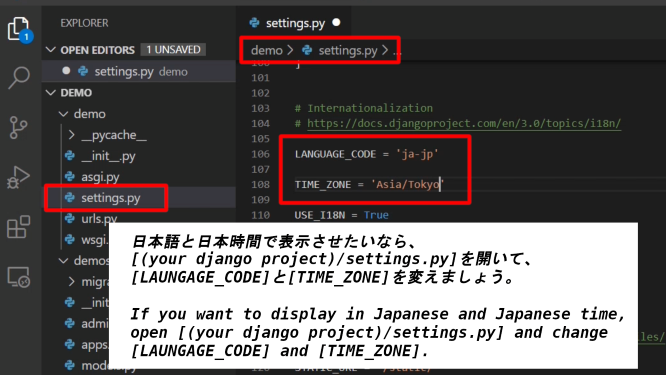
日本語と日本時間で表示させたいなら、[(your django project)/settings.py]を開いて、[LAUNGAGE_CODE]と[TIME_ZONE]を変えましょう。
If you want to display in Japanese and Japanese time, open [(your django project)/settings.py] and change [LAUNGAGE_CODE] and [TIME_ZONE].
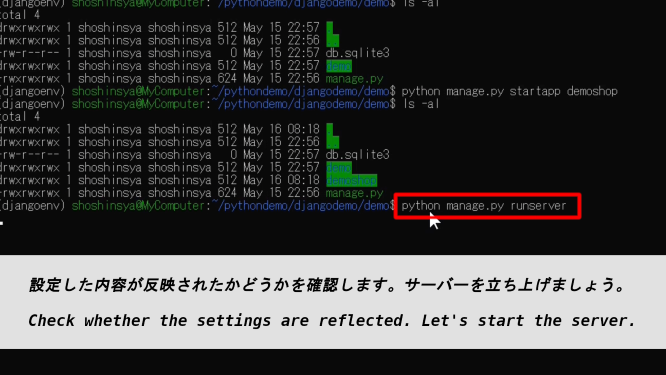
設定した内容が反映されたかどうかを確認します。サーバーを立ち上げましょう。
Check whether the settings are reflected. Let's start the server.
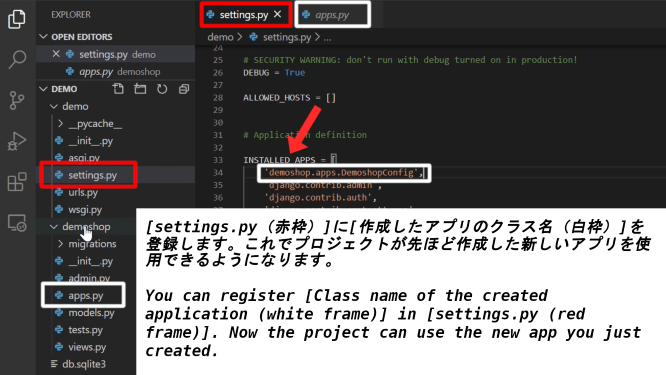
[settings.py(赤枠)]に[作成したアプリのクラス名(白枠)]を登録します。これでプロジェクトが先ほど作成した新しいアプリを使用できるようになります。
You can register [Class name of the created application (white frame)] in [settings.py (red frame)]. Now the project can use the new app you just created.
[(your app folder)/apps.py
from django.apps import AppConfig


class --->NewApplicationConfig(AppConfig):
    name = 'new application'
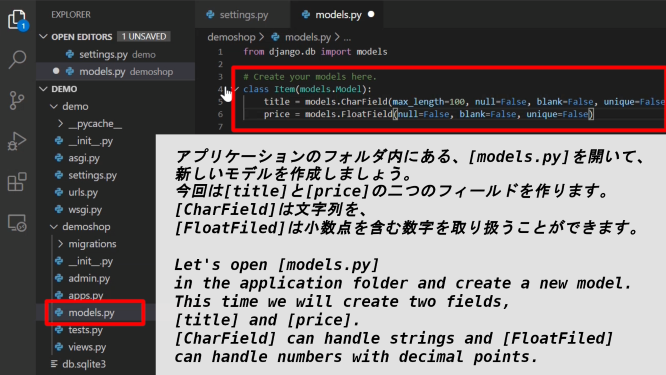
アプリケーションのフォルダ内にある、[models.py]を開いて、新しいモデルを作成しましょう。
Let's open [models.py] in the application folder and create a new model.
今回は[title]と[price]の二つのフィールドを作ります。[CharField]は文字列を、[FloatFiled]は小数点を含む数字を取り扱うことができます。
This time we will create two fields, [title] and [price]. [CharField] can handle strings and [FloatFiled] can handle numbers with decimal points.
[(your app folder)/models.py
from django.db import models

# Create your models here.
class Item(models.Model):
    title = models.CharField(max_length=100, null=False, blank=False, unique=False)
    price = models.FloatField(null=False, blank=False, unique=False)
max_lengthは最大文字数を、nullはデータベースに空の値を許すかどうか、blankはフォーム入力時に空の文字でも大丈夫かどうか、uniqueは固有の値として取り扱うかどうかを決めます。
max_length determines the maximum number of characters, null determines whether the database allows empty values, blank determines whether empty characters are allowed when filling out the form, and unique determines whether they are treated as unique values.
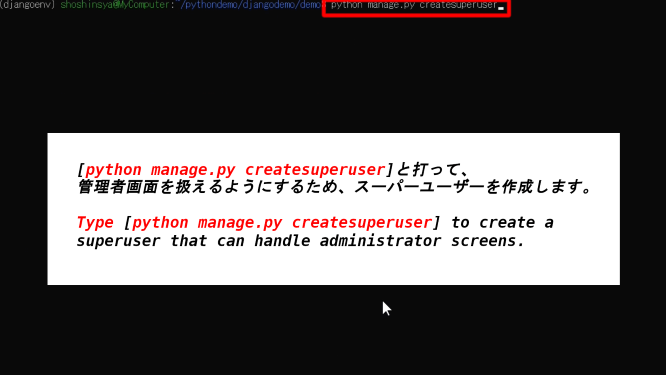
[python manage.py createsuperuser]と打って、管理者画面を扱えるようにするため、スーパーユーザーを作成します。
Type [python manage.py createsuperuser] to create a superuser that can handle administrator screens.
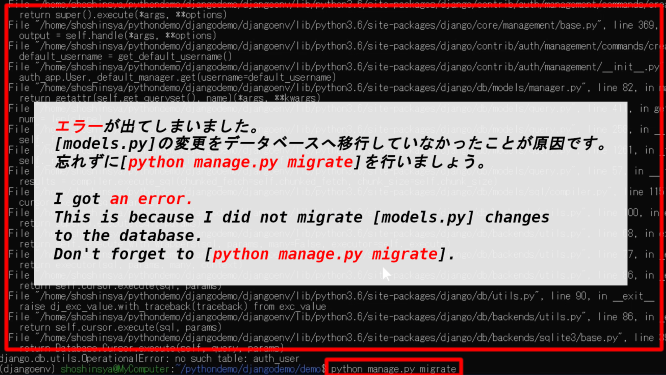
エラーが出てしまいました。[models.py]の変更をデータベースへ移行していなかったことが原因です。忘れずに[python manage.py migrate]を行いましょう。
I got an error. This is because I did not migrate [models.py] changes to the database. Don't forget to [python manage.py migrate].
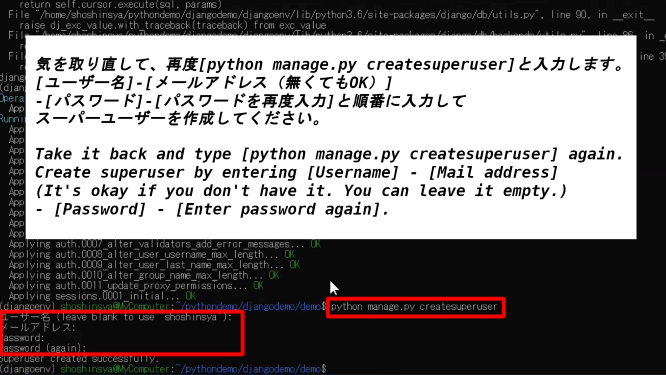
気を取り直して、再度[python manage.py createsuperuser]と入力します。[ユーザー名]-[メールアドレス(無くてもOK)]-[パスワード]-[パスワードを再度入力]と順番に入力してスーパーユーザーを作成してください。
Take it back and type [python manage.py createsuperuser] again. Create superuser by entering [Username] - [Mail address (It's okay if you don't have it. You can leave it empty.)] - [Password] - [Enter password again].
それでは再度サーバーを起動して、管理者画面に入れるかどうかを試してみましょう。
Then, start the server again and try to enter the administrator screen.

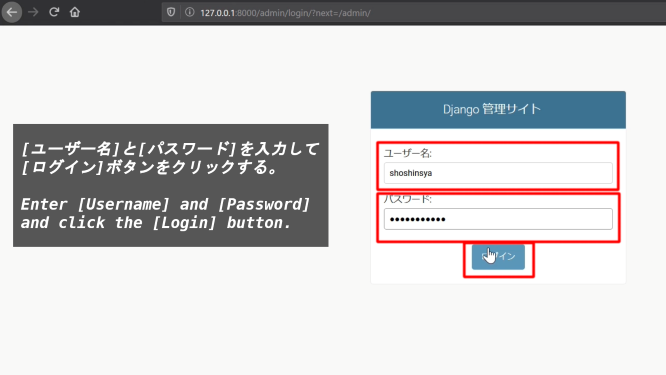
[ユーザー名]と[パスワード]を入力して[ログイン]ボタンをクリックする。
Enter [Username] and [Password] and click the [Login] button.
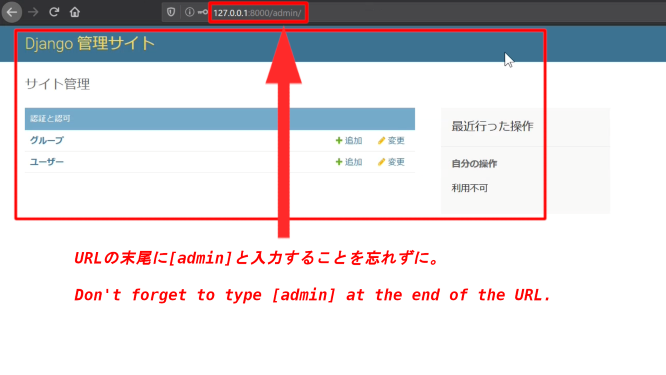
URLの末尾に[admin]と入力することを忘れずに。
Don't forget to type [admin] at the end of the URL.
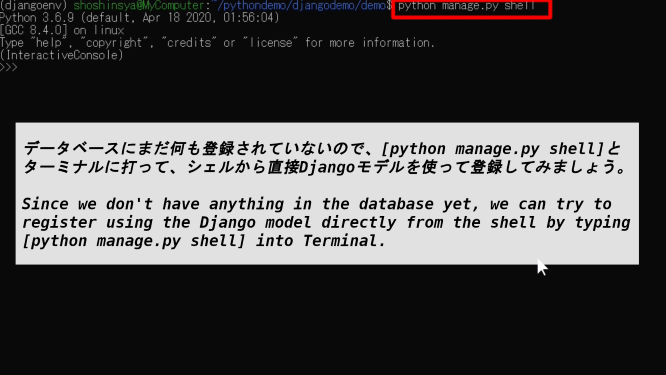
データベースにまだ何も登録されていないので、[python manage.py shell]とターミナルに打って、シェルから直接Djangoモデルを使って登録してみましょう。
Since we don't have anything in the database yet, we can try to register using the Django model directly from the shell by typing [python manage.py shell] into Terminal.
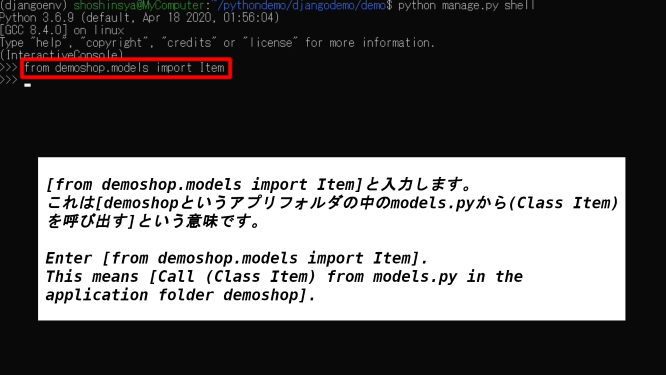
[from demoshop.models import Item]と入力します。これは[demoshopというアプリフォルダの中のmodels.pyから(Class Item)を呼び出す]という意味です。
Enter [from demoshop.models import Item]. This means [Call (Class Item) from models.py in the application folder demoshop].
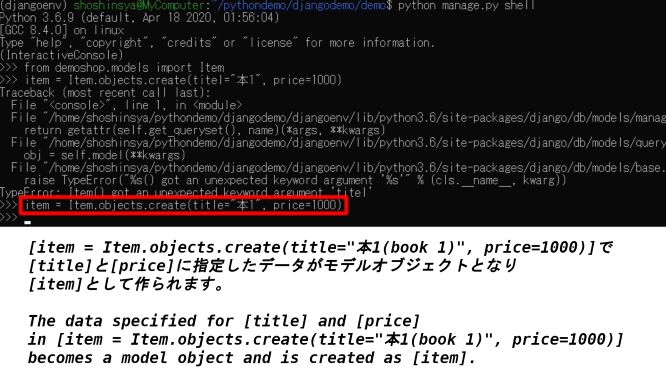
[item = Item.objects.create(title="本1(book 1)", price=1000)]で[title]と[price]に指定したデータがモデルオブジェクトとなり[item]として作られます。
The data specified for [title] and [price] in [item = Item.objects.create(title="本1(book 1)", price=1000)] becomes a model object and is created as [item].
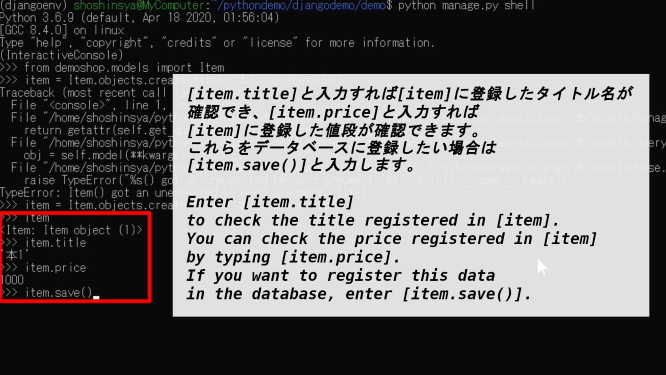
[item.title]と入力すれば[item]に登録したタイトル名が確認でき、[item.price]と入力すれば[item]に登録した値段が確認できます。 これらをデータベースに登録したい場合は[item.save()]と入力します。
Enter [item.title] to check the title registered in [item]. You can check the price registered in [item] by typing [item.price]. If you want to register this data in the database, enter [item.save()].
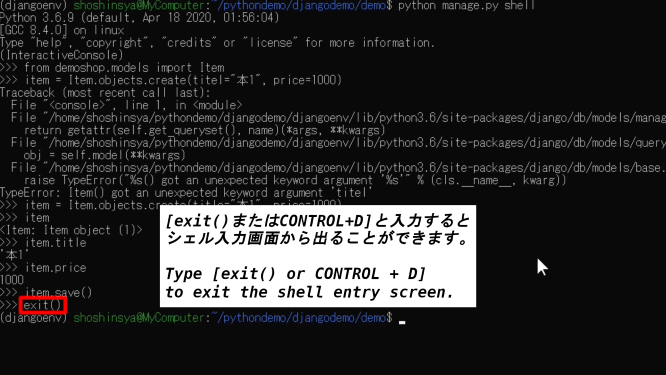
[exit()またはCONTROL+D]と入力するとシェル入力画面から出ることができます。
Type [exit() or CONTROL + D] to exit the shell entry screen.
以上です。お疲れ様です。次の動画ではもっと色々な品物を登録したり、管理画面からも品物を登録できるようにしたり、それらをDjangoのテンプレートを使用してブラウザに表示できるようにします。
That's all. Thank you for your hard work. In the next video, you can register more items, add items from the management screen, or display them in your browser using Django templates.