Published Date : 2020年3月26日12:49
【Part3】Djangoで簡単なブログを作ろう
【Part 3】Let's create a simple blog with Django
This blog has an English translation
YouTubeにアップした動画、「【Django】Part 3 - Let's create a simple blog with Django : Djangoで簡単なブログを作ろう」の補足説明の記事です。
Here's a little more about the "【Django】Part 3 - Let's create a simple blog with Django : Djangoで簡単なブログを作ろう" video I uploaded to YouTube.
この動画を作った理由は、初期のブログ記事にある「Djangoのシンプルなブログシリーズ」を動画にしてみたらどうなるか試してみたかったからです。
The reason I made this video is because I wanted to see what it would look like if I turned my early blog post "Django's simple blog series" into a video.
同時に、暫くPythonから遠ざかっていたので、Djangoも含めた復習のつもりで動画とこのブログ記事を作成しました。
At the same time, having been away from Python for a while, I wanted to relearn Python, including Django, so I created this video and blog post.
シリーズの第3部の内容は、①アップロードした画像をブログ記事の投稿一覧に表示させる。 ②ブログ記事投稿一覧の表示を整える。 ③個別の投稿ページへ記事のタイトルリンクから飛べるようにする。
The contents of the series Part 3 are as follows. ① To display an uploaded image in a post list of a blog post. ② Arrange the look of your blog post list. ③ Create a page that displays individual blog posts, and then add a link from the title of the blog post list to the page where you want the content of the article to appear.
全体の説明は動画に任せるとして、補足が必要だろうと思われる部分を説明していきます。
I'll leave the entire explanation to the video, but I'll explain the parts that I think need to be supplemented.
目次
Table of Contents
アップロードした画像をブログ記事の投稿一覧に表示させる
To display an uploaded image in a post list of a blog post
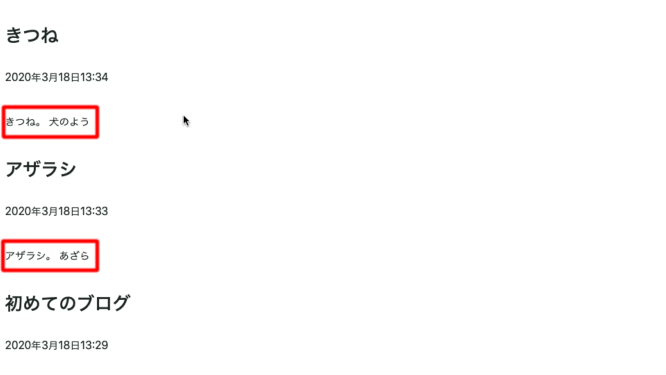
まず、投稿一覧ページを見やすくするため、投稿リストの記事本文は文の頭から10文字に省略して表示させます。
First, to make the post list page easier to read, the article body of the post list is truncated to 10 characters from the beginning of the sentence.
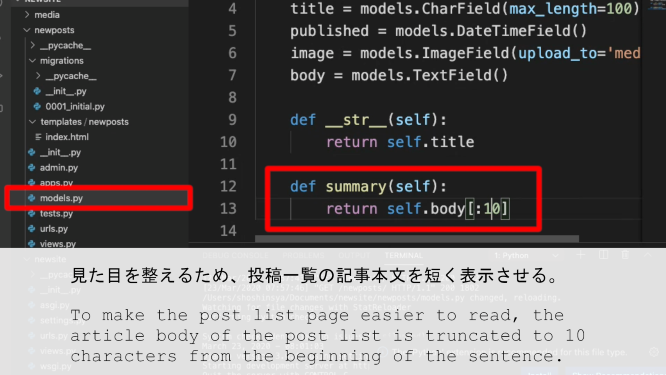
newposts/models.py
~~~~~~~~~~~~~~~~~~~~~~~~~~~~~~~
def summary(self):
    return self.body[:10]
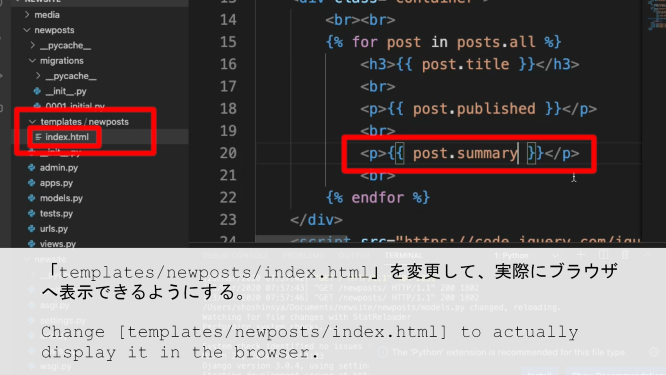
「templates/newposts/index.html」を変更して、実際にブラウザへ表示できるようにする。
Change [templates/newposts/index.html] to actually display it in the browser.
templates/newposts/index.html
~~~~~~~~~~~~~~~~~~~~~~~~~~~~~~~
<p> {{ post.summary }} </p>
~~~~~~~~~~~~~~~~~~~~~~~~~~~~~~~
画像を表示できるように「newsite/settings.py」の内容を変更する。
Change the content of [newsite/settings.py] so that the image can be displayed.

newsite/settings.py
~~~~~~~~~~~~~~~~~~~~~~~~~~~~~~~
STATIC_URL = '/static/'
MEDIA_URL = '/pics/'
MEDIA_ROOT = BASE_DIR
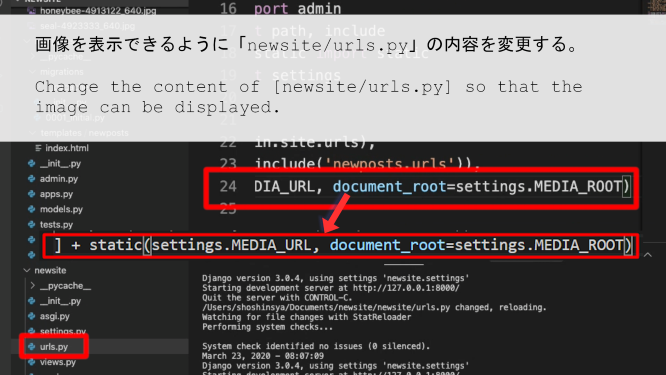
画像を表示できるように「newsite/urls.py」の内容を変更する。
Change the content of [newsite/urls.py] so that the image can be displayed.
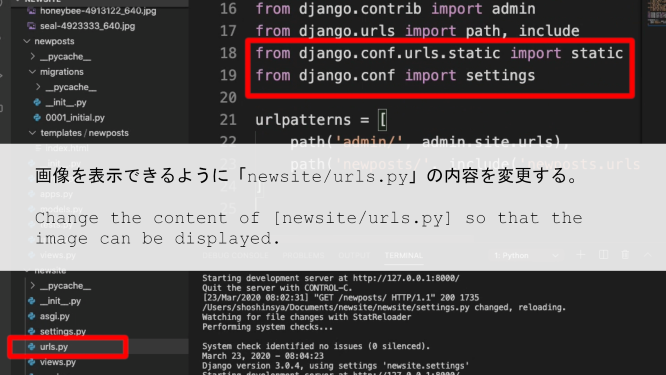
newsite/urls.py
from django.contrib import admin
from django.urls import path, include

from django.conf.urls.static import static
from django.conf import settings

urlpatterns = [
    path('admin/', admin.site.urls),
    path('newposts/', include('newposts.urls')),
    path('newposts/', views.post, name='post'),
] + static(settings.MEDIA_URL, document_root=settings.MEDIA_ROOT)
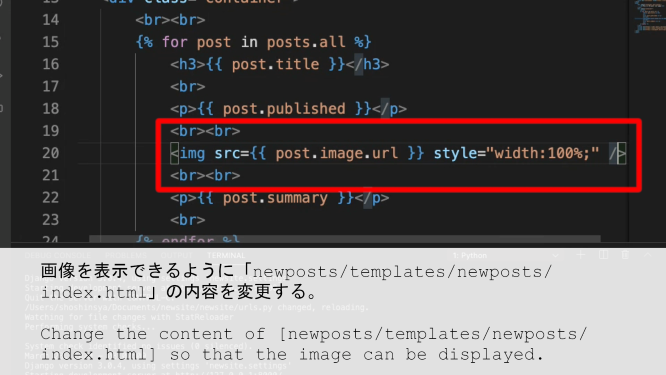
画像を表示できるように「newposts/templates/newposts/index.html」の内容を変更する。
Change the content of [newposts/templates/newposts/index.html] so that the image can be displayed.
newposts/templates/newposts/index.html
~~~~~~~~~~~~~~~~~~~~~~~~~~~~~~~
<br><br>
<img src={{ post.image.url }} style="width:100%;" />
<br><br>
<p> {{ post.summary }} </p>
~~~~~~~~~~~~~~~~~~~~~~~~~~~~~~~
ブログ記事投稿一覧の表示を整える
Arrange the look of your blog post list
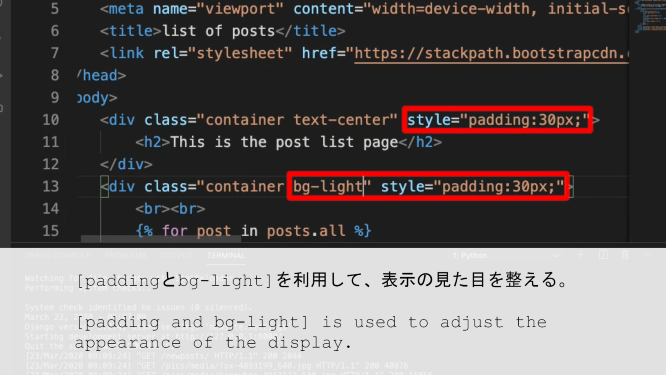
続いて、[paddingとbg-light]を利用して、表示の見た目を整える。
Next, [padding and bg-light] is used to adjust the appearance of the display.
templates/newposts/index.html
<div class="container text-center">
  <h2>This is the post list page</h2>
</div>
<div class="container" style="padding:30px;">
  <br><br>
  {% for post in posts.all %}
      <h3>post id -> {{ post.id }}</h3>
      <br>
      <p>{{ post.title }}</p>
      <br>
      <p>{{ post.published }}</p>
      <br><br>
      <div class="container bg-light" style="padding:30px;">
          <img class="img-fluid rounded" src={{ post.image.url }}/>
      </div>
      <br><br>
      <p>{{ post.summary }}</p>
      <br>
  {% endfor %}
</div>
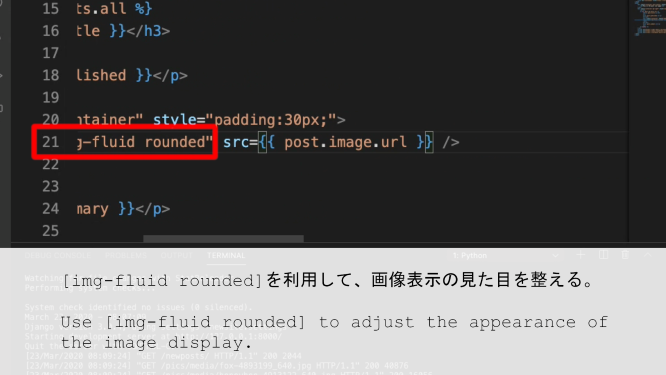
[img-fluid rounded]を利用して、画像表示の見た目を整える。
Use [img-fluid rounded] to adjust the appearance of the image display.
<br><br>
<div class="container bg-light" style="padding:30px;">
  <img class="img-fluid rounded" src={{ post.image.url }}/>
</div>
<br><br>
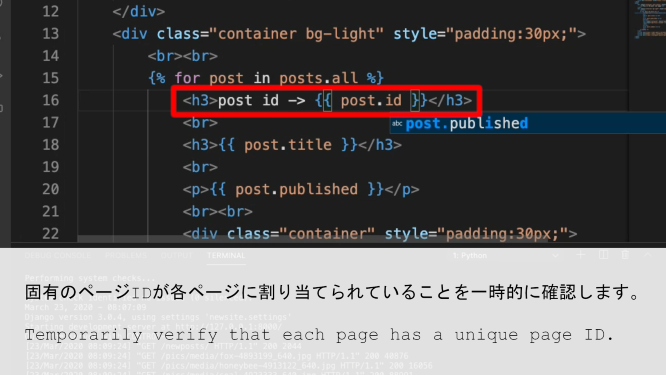
固有のページIDが各ページに割り当てられていることを一時的に確認します。
Temporarily verify that each page has a unique page ID.
<h3>post id -> {{ post.id }}</h3>
個別の投稿ページへ記事のタイトルリンクから飛べるようにする
Create a page that displays individual blog posts
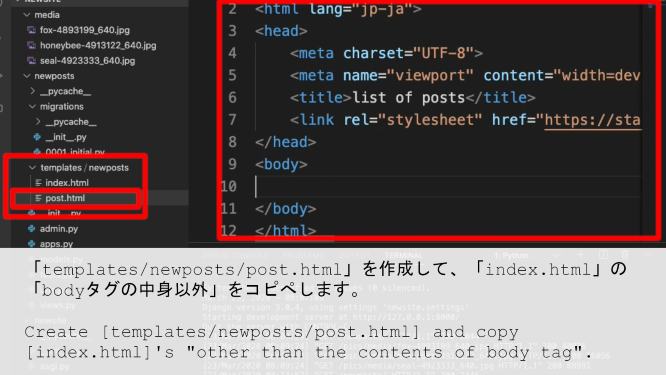
「templates/newposts/post.html」を作成して、「index.html」の「bodyタグの中身以外」をコピぺします。
Create [templates/newposts/post.html] and copy [index.html]'s "other than the contents of body tag".
templates/newposts/post.html
<!DOCTYPE html>
<html lang="jp-ja">
<head>
    <meta charset="UTF-8">
    <meta name="viewport" content="width=device-width, initial-scale=1.0">
    <title>投稿の一覧:list of posts</title>
    <link rel="stylesheet" href="https://maxcdn.bootstrapcdn.com/bootstrap/3.3.7/css/bootstrap.min.css" integrity="sha384-BVYiiSIFeK1dGmJRAkycuHAHRg32OmUcww7on3RYdg4Va+PmSTsz/K68vbdEjh4u" crossorigin="anonymous">
</head>
<body>
    <h1>post_id -> {{ post_id }}</h1>
    <script src="https://maxcdn.bootstrapcdn.com/bootstrap/3.3.7/js/bootstrap.min.js" integrity="sha384-Tc5IQib027qvyjSMfHjOMaLkfuWVxZxUPnCJA7l2mCWNIpG9mGCD8wGNIcPD7Txa" crossorigin="anonymous"></script>
</body>
</html>
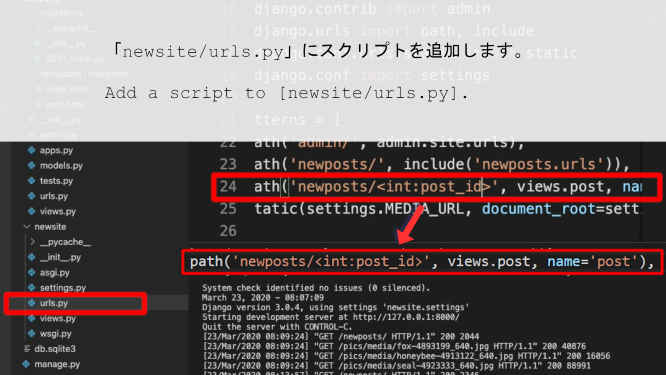
「newsite/urls.py」にスクリプトを追加します。
Add a script to [newsite/urls.py].
newsite/urls.py
path('newposts/', views.post, name='post'),
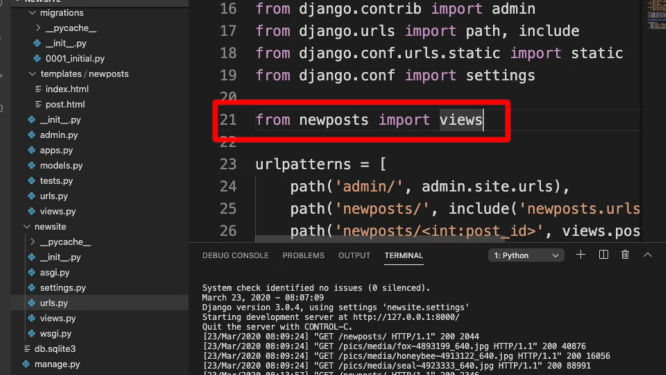
忘れずに「newpostsからviews.py」をインポートしておく。
Don't forget to import [views] from [newposts].
そして、「newposts」の「views.py」に「post関数」を作成します。
Create a [post Functions] in [views.py] of [newposts].
newposts/views.py
from django.shortcuts import render
from .models import Post
def index(request):
posts = Post.objects.order_by('-published')
return render(request, 'newposts/index.html', {'posts':posts})
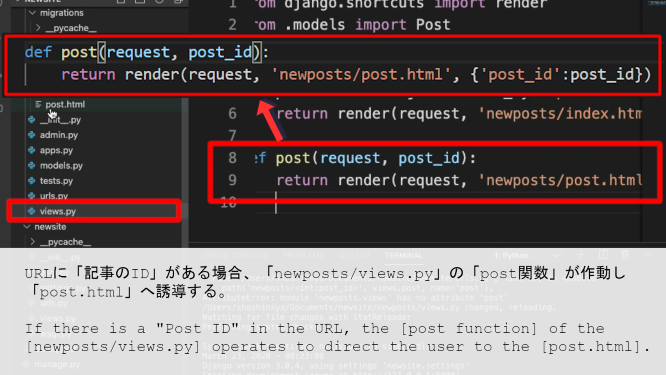
def post(request, post_id):
return render(request, 'newposts/post.html', {'post_id':post_id})
URLに「記事のID」がある場合、「newposts/views.py」の「post関数」が作動し「post.html」へ誘導する。
If there is a "Post ID" in the URL, the [post function] of the [newposts/views.py] operates to direct the user to the [post.html].
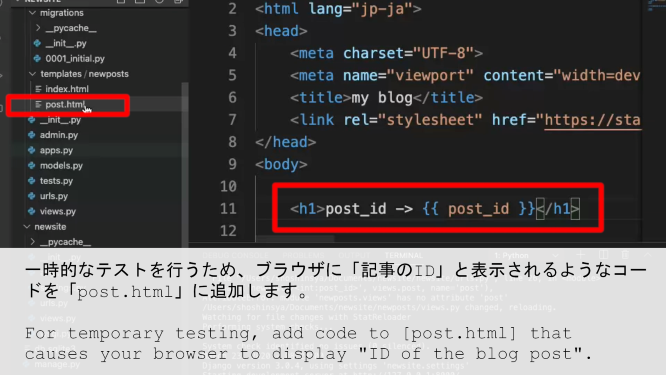
一時的なテストを行うため、ブラウザに「記事のID」と表示されるようなコードを「post.html」に追加します。
For temporary testing, add code to [post.html] that causes your browser to display "ID of the blog post".
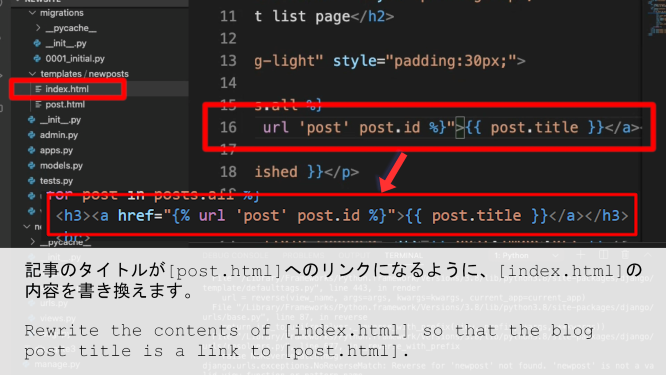
記事のタイトルが[post.html]へのリンクになるように、[index.html]の内容を書き換えます。
Rewrite the contents of [index.html] so that the blog post title is a link to [post.html].
<h1>post_id -> {{ post_id }}</h1>
ちょっと分かりにくいですが、「post_id -> 1」と表示されています。
It's a little hard to understand, but it says [post_id -> 1].

この記事のさらに詳しい説明は初期のブログ記事を参考にしてください。
For more information on how to upload your blog to CORESERVER and more on the content of this article, see my previous blog posts.
CORESERVERでDjangoのBLOGを作る 〜 後半 (Part 8) 〜