Published Date : 2019年11月23日17:11
Python Scriptと一緒に理解するCNN(Convolutional Neural Networks)の仕組み batch_size,epochs編
How CNN (Convolutional Neural Networks) Works with Python Scripts ~ batch_size and epochs ~
This blog has an English translation
画像認識シリーズ第14弾です。前回のブログ記事。
This is the 14th image recognition series. Last blog post.
前回はmodel_train関数内のCategorical-crossentropyの図による説明をおこないました。
In a previous my blog post, I explained about categorical-crossentropy, along with diagrams.
今回の記事はbatch_sizeとepochsの説明をしていきます。
In this blog post, I'm going to talk about batch_size and epochs.
この手のものはやり尽くされていますが、ただ一から全部やってみたかった。それだけです。 つーことで今回はbatch_size and epochsに関してを解説していきたいと思いMASU。
This kind of thing is done by many people, but I just wanted to do it all from scratch. That's all. Anyway, I would like to explain about batch_size and epochs this time.
目次
Table of Contents
趣旨 Purport of batch_size and epochs |
Pythonでのバッチサイズとエポック Batch size and epochs using Python scripts |
ページの最後へ Go to the end of the page. |
趣旨
Purport of batch_size and epochs
batch_size and epochsの簡単な趣旨です。
A quick overview of batch_size and epocks.
まずバッチとは、束のことです。
First, batch means bundling.
訓練データが仮に10000あるとします。 その全てを一気に機械に学習させると、 計算量の増加とメモリの容量に入らない場合は計算できないといった事態になります。 そこで、100個の”束”にしてメモリに転送して計算することによって、 コンピュータの負荷を減らすことができます。
For example, suppose you have 10,000 pieces of training data and if you try to learn them all on your machine at once. If you do so, the amount of computation increases rapidly and often makes computation impossible if the memory size does not accommodate the information. To avoid this, divide the 10,000 data into 100 "batch_size 100". These "Batch" are transferred one by one to the memory for calculation. This prevents your machine from becoming overloaded and computable.
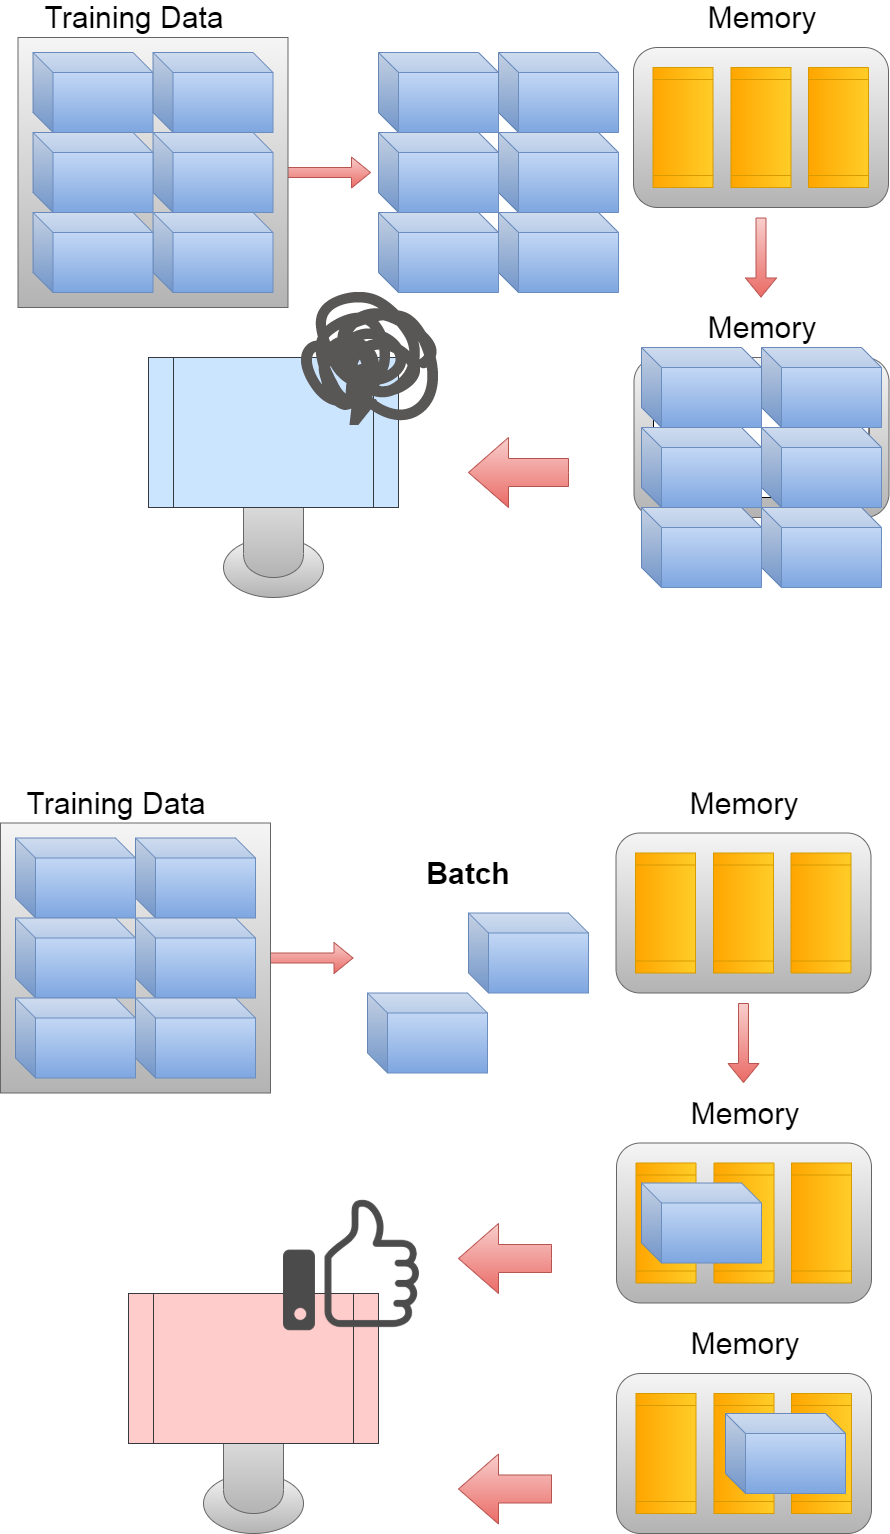
そしてエポックは「世代」の意味に近いです。
And epoch is close to the meaning of "generation".
つまり一回目のエポックは「第一世代」になり、 二回目のエポックは「第二世代」といった具合に 「第二世代」は「第一世代」をアップデートしていきます。
In other words, the first epoch will be "first generation" and second epoch will be "second generation" and "second generation" will be updated to "first generation".
このように最終的に10000のデータを100個の”束”に分けて、10回学習させる。 10000のデータ全てを学習させたら、「1エポック」です。
In this way, finally, the 10,000 pieces of data are divided into 100 "batch", and are learned 10 times. When all 10,000 pieces of data have been learned, "1 epoch".
なんとなくエポックの数が多ければ、良いと思いがちですが、エポックの数は多ければ良いというものではないです。 それとバッチサイズは多いと正解率と学習速度が上がる傾向にありますが、 どちらも適切な数で無いと逆に結果が悪くなったりします。
Many epochs make you want to think they're good for your learning results, but sometimes they don't make much sense. Also, if the batch size is large, the correct answer rate and learning speed tend to increase, but sometimes if both are not the right number, the result will be worse.
ちなみにバッチサイズの数は慣習的に2のN乗の数が用いられます。 今回の「32」は2の5乗、「64」なら2の6乗といった具合になります。
Note that the number of batch sizes is conventionally 2 raised to the power of N. This time "32" is 2 to the 5th power, "64" is 2 to the 6th power, and so on.
Pythonでのバッチサイズとエポック
Batch size and epochs using Python scripts
では趣旨を踏まえた上でBatch_sizeとepochsをPythonで簡単に説明します。
I'll briefly describe "batch_size" and "epochs" in Python based on the purport.
取り敢えず全体のコードは以下になります。
For now, the whole script is as follows.
Improved version of cifar10_cnn.py
imp_ver_cf10cnn.py
import keras
from keras.models import Sequential
from keras.layers import Dense, Dropout, Activation, Flatten
from keras.layers import Conv2D, MaxPooling2D
from keras.utils import np_utils
import numpy as np


labels = ["dogs", "cats", "monkeys", "birds", "fish", "lizards"]
total_num = len(labels)
image_size = 100

batch_size = 32
epochs = 100

def main():
    X_train, x_test, Y_train, y_test = np.load("data/augumented_images.npy")
    X_train = X_train.astype("float") / 256
    x_test = x_test.astype("float") / 256
    Y_train = np_utils.to_categorical(Y_train, total_num)
    y_test = np_utils.to_categorical(y_test, total_num)

    model = model_train(X_train, Y_train)
    model_eval(model, x_test, y_test)

def model_train(X, y):
    model = Sequential()
    model.add(Conv2D(32, (3, 3), padding='same',
                    input_shape=X.shape[1:]))
    model.add(Activation('relu'))
    model.add(Conv2D(32, (3, 3)))
    model.add(Activation('relu'))
    model.add(MaxPooling2D(pool_size=(2, 2)))
    model.add(Dropout(0.25))

    model.add(Conv2D(64, (3, 3), padding='same'))
    model.add(Activation('relu'))
    model.add(Conv2D(64, (3, 3)))
    model.add(Activation('relu'))
    model.add(MaxPooling2D(pool_size=(2, 2)))
    model.add(Dropout(0.25))

    model.add(Flatten())
    model.add(Dense(512))
    model.add(Activation('relu'))
    model.add(Dropout(0.5))
    model.add(Dense(total_num))
    model.add(Activation('softmax'))

    opt = keras.optimizers.adam()

    model.compile(loss='categorical_crossentropy',
                optimizer=opt,
                metrics=['accuracy'])

    model.fit(X,y,batch_size=batch_size, epochs=epochs)

    model.save("data/creatures_cnn.h5")

    return model

def model_eval(model, X, y):
    scores = model.evaluate(X, y, verbose=1)
    print('Test Loss', scores[0])
    print('Test Accuracy', scores[1])

if __name__=="__main__":
    main()
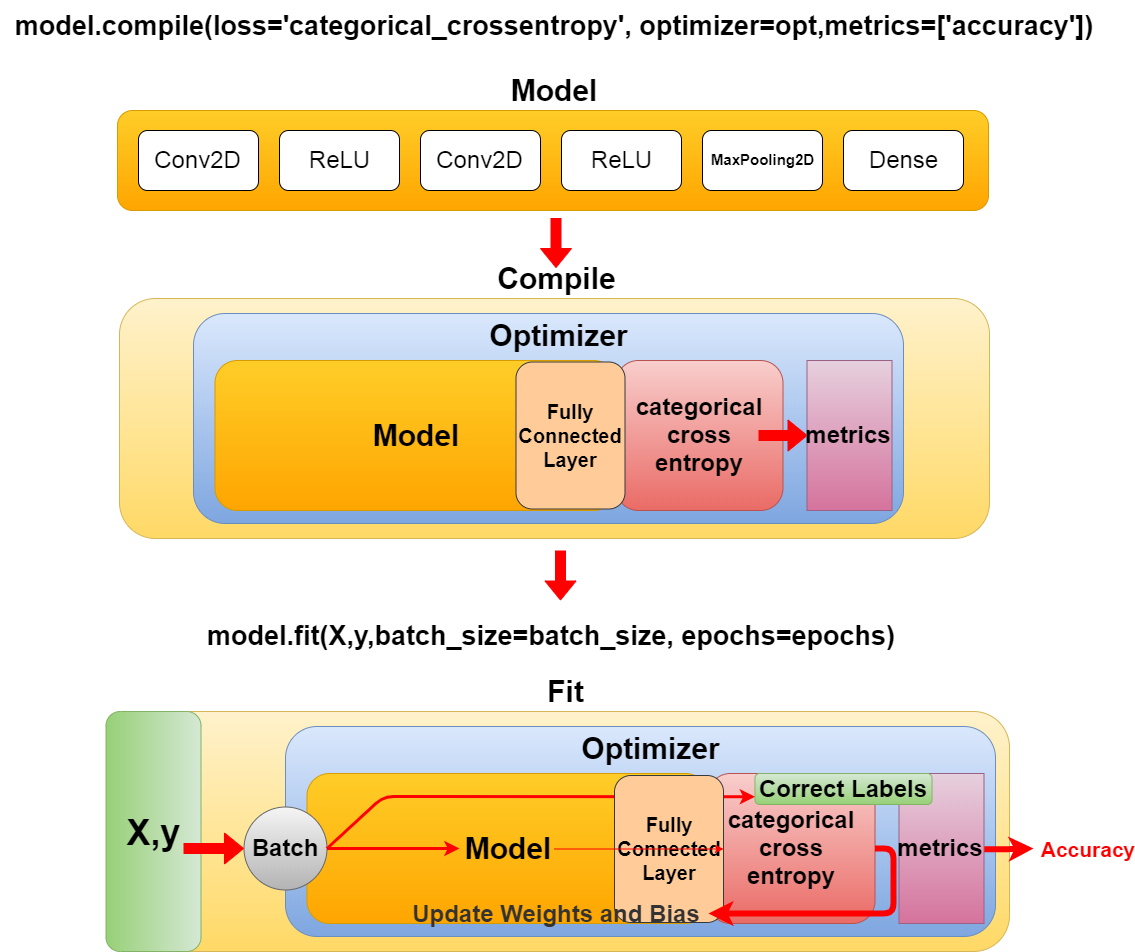
batch_sizeとepochsはmodel.fitの中の引数に指定されています。
batch_size and epochs is specified as an argument in model.fit.
batch_size = 32
epochs = 100
model.fit(X,y,batch_size=batch_size, epochs=epochs)
引数のXとyはトレーニング用に分けた学習データです。
The arguments X and y are separate learning data for training purposes.
model = model_train(X_train, Y_train)
model.fitはmodel.compileで学習用モデルを組み立てた後、実際にトレーニングを開始する関数です。
model.fit() is a function that assembles the learning model in model.compile() and then actually starts the training using batch_size, epochs and training data.
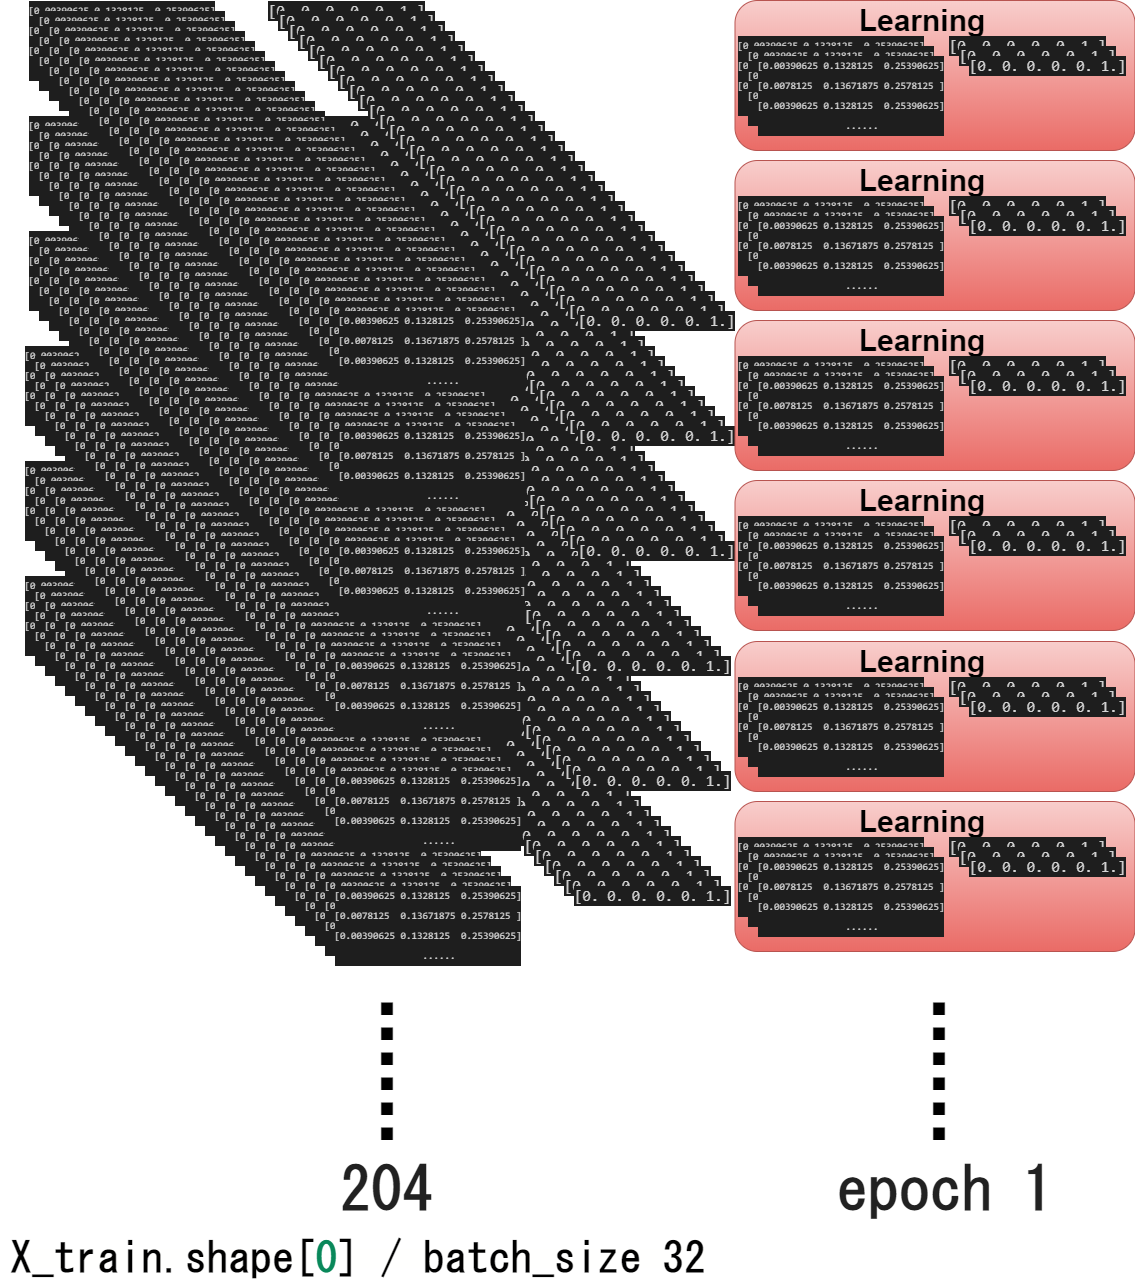
実際の訓練データの中身を見ていきます。
Let's look at the actual training data.
from keras.utils import np_utils
import numpy as np

classes = ["dogs", "cats", "monkeys", "birds", "fish", "lizards"]
num_classes = len(classes)
image_size = 100

X_train, x_test, Y_train, y_test = np.load("data/augumented_creatures.npy")
X_train = X_train.astype("float") / 256
x_test = x_test.astype("float") / 256
Y_train = np_utils.to_categorical(Y_train, num_classes)
y_test = np_utils.to_categorical(y_test, num_classes)
In: X_train.shape
out: (6520, 100, 100, 3)
In: Y_train.shape
out: (6520, 6)
In: X_train.shape[0]
out: 6520
In: Y_train.shape[0]
out: 6520
batch_size = 32
x = []
y = []
for i in range(0, X_train.shape[0], batch_size):
    x.append(X_train[i:i+batch_size])
    y.append(Y_train[i:i+batch_size])
print(x)
print(y)
out:
  [[[[0.00390625 0.1328125  0.25390625]
    [0.0078125  0.13671875 0.2578125 ]
    [0.00390625 0.1328125  0.25390625]
    ...
    [0.0234375  0.28515625 0.4609375 ]
    [0.01953125 0.28125    0.44921875]
    [0.         0.2578125  0.421875  ]]

    [[0.         0.12890625 0.25      ]
    [0.0078125  0.13671875 0.2578125 ]
    [0.00390625 0.1328125  0.25390625]
    ...
    [0.00390625 0.26953125 0.4453125 ]
    [0.         0.25       0.41796875]
    [0.00390625 0.2578125  0.421875  ]]

    [[0.         0.12890625 0.25      ]
    [0.0078125  0.13671875 0.2578125 ]
    [0.01171875 0.140625   0.26171875]
    ...
    [0.03515625 0.30078125 0.4765625 ]
    [0.         0.24609375 0.4140625 ]
    [0.         0.2421875  0.41015625]]

    ...

  [[0. 0. 0. 0. 0. 1.]
    [1. 0. 0. 0. 0. 0.]
    [0. 0. 0. 0. 1. 0.]
    [0. 0. 0. 1. 0. 0.]
    [1. 0. 0. 0. 0. 0.]
    [1. 0. 0. 0. 0. 0.]
    [0. 0. 0. 0. 1. 0.]
    [0. 0. 0. 0. 0. 1.]
    [0. 0. 0. 0. 1. 0.]
    [1. 0. 0. 0. 0. 0.]
    [0. 0. 0. 1. 0. 0.]
    [0. 1. 0. 0. 0. 0.]
    [0. 0. 0. 0. 1. 0.]
    [0. 0. 0. 0. 0. 1.]
    [1. 0. 0. 0. 0. 0.]
    [0. 1. 0. 0. 0. 0.]
    [1. 0. 0. 0. 0. 0.]
    [0. 0. 0. 0. 1. 0.]
    [0. 0. 1. 0. 0. 0.]
    [0. 0. 0. 0. 0. 1.]
    [0. 0. 0. 0. 1. 0.]
    [0. 0. 1. 0. 0. 0.]
    [0. 0. 0. 0. 0. 1.]
    [0. 0. 0. 0. 1. 0.]]
    ...
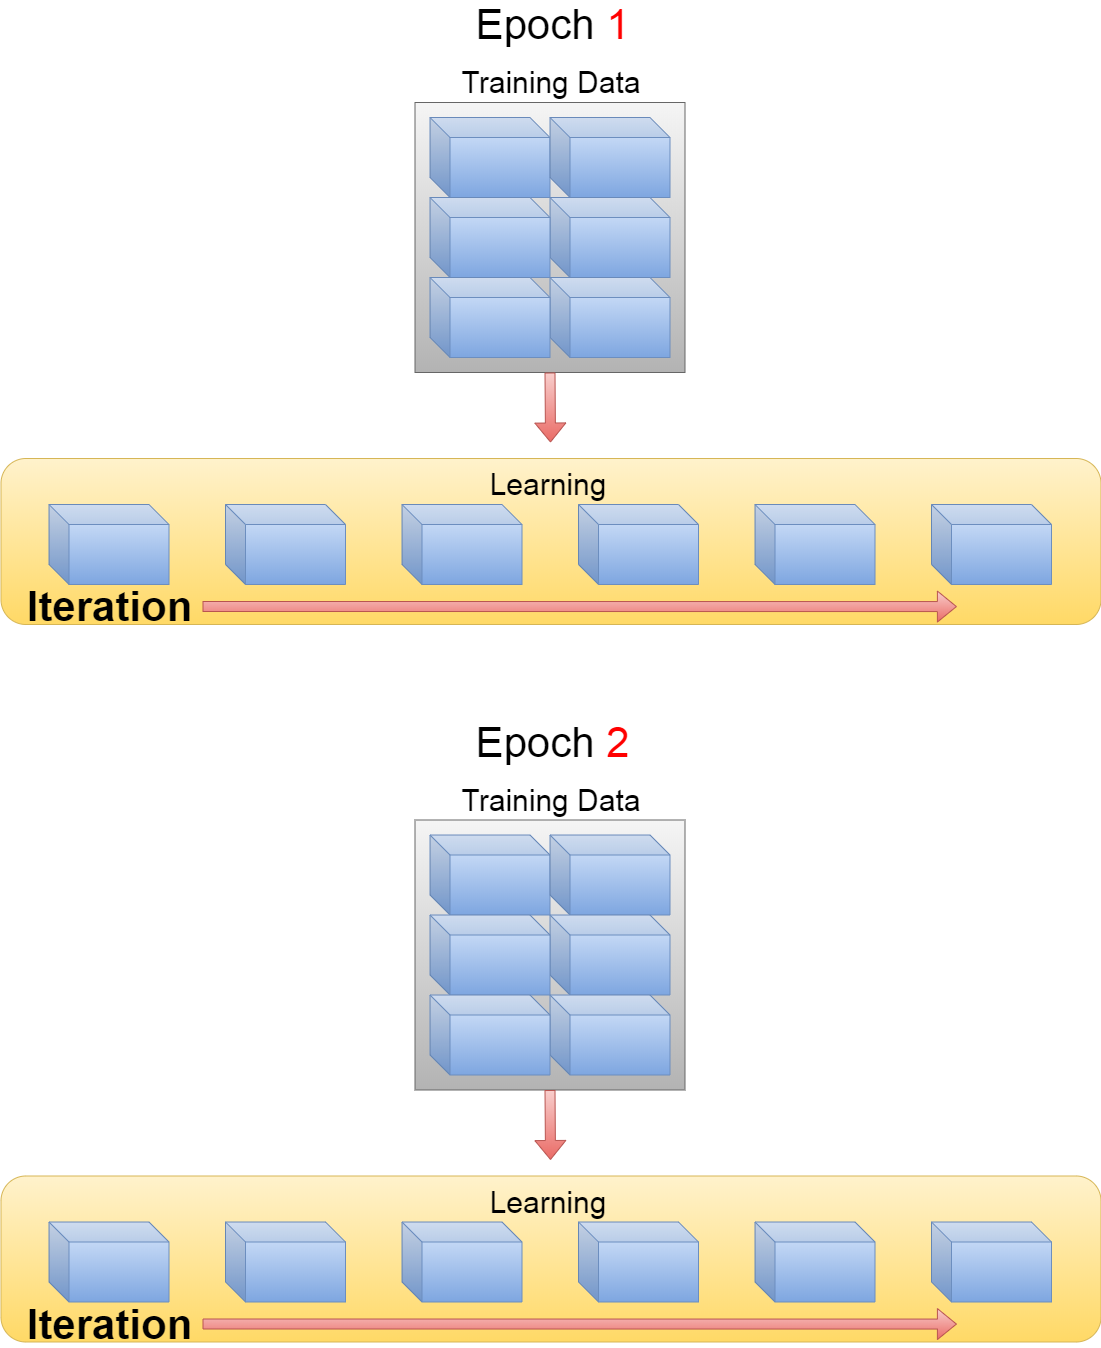
図にすると以下の様になると思います。
The diagram is as follows.
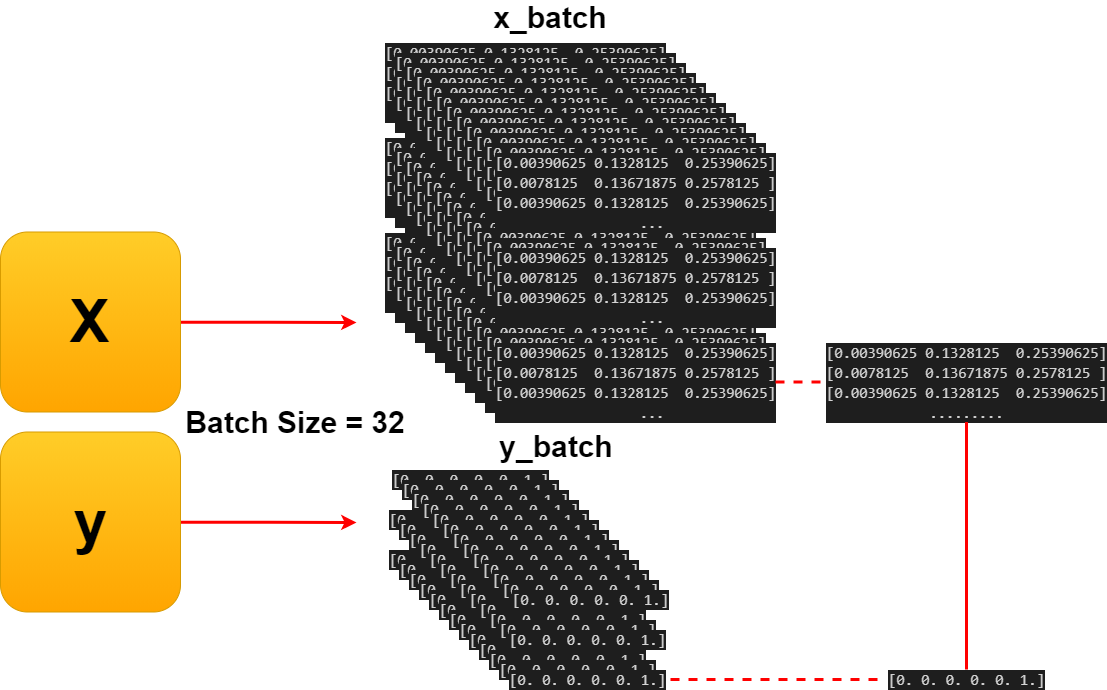
そしてデータ数÷バッチサイズ分の学習を繰り返したら、1エポックになります。
And when all the learning (Total training data / Batch size count) is over, it becomes one epoch.
残りの説明は次回に持ち越します。お次はopt = keras.optimizers.adam()の説明を予定してます。
I will carry over the rest of the explanation next time. Next comes about opt = keras.optimizers.adam().