Published Date : 2019年11月16日9:45
Python Scriptと一緒に理解するCNN(Convolutional Neural Networks)の仕組み softmax編
How CNN (Convolutional Neural Networks) Works with Python Scripts ~ Softmax ~
This blog has an English translation
画像認識シリーズ第12弾です。前回のブログ記事。
This is the 12th image recognition series. Last blog post.
前回はmodel_train関数内のFlatten,Denseの図による説明をおこないました。
In a previous my blog post, I explained flatten function and dense function, along with diagrams.
この手のものはやり尽くされていますが、ただ一から全部やってみたかった。それだけです。 つーことで今回は活性化関数Softmaxに関してを解説していきたいと思いMASU。
This kind of thing is done by many people, but I just wanted to do it all from scratch. That's all. Anyway, I would like to explain about activation function softmax this time.
目次
Table of Contents
趣旨
Purport of Softmax
Softmaxの簡単な趣旨です。 今回のような画像の分類問題の場合。 猫の画像が与えられ時、学習モデルがこのような答えを出したとします。
A quick overview of softmax. In the case of image classification problem like this time. If a learning model derives these answers from a picture of a cat.
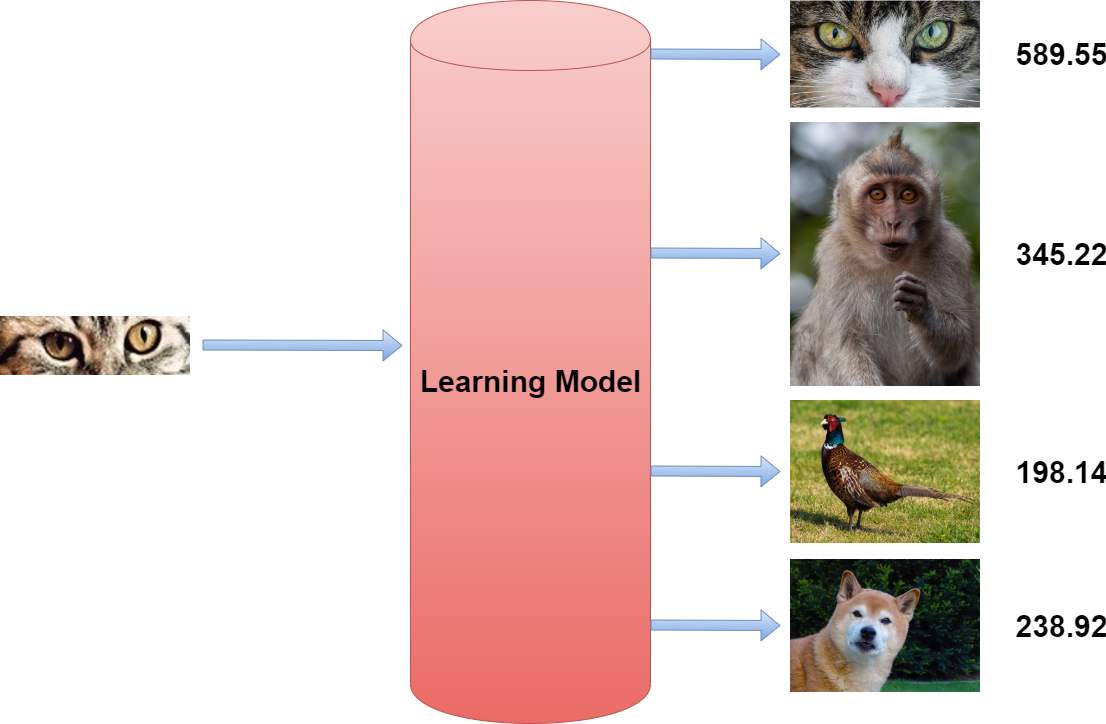
直感的には猫の割合が多いのは理解できます。
Looking at the output values, I think I can intuitively understand that it is a cat.
でも、ここからどうやって答えを猫に近づけるようにするのかがあまり見えてきません。
But I can't really see how to get the answer close to the cat from here.
そこで、以前の記事のnp_utils.to_categoricalで作ったワンホットベクトルを思い出してくだちぃ。
So, remember the one-hot vector we created with to_categorical function in my previous blog post.
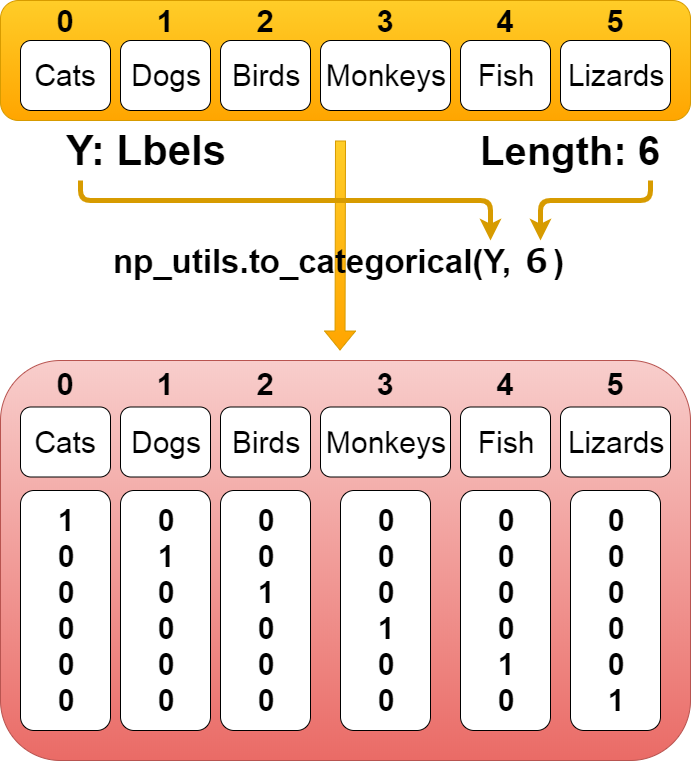
上の図のとおり、例えば猫なら、猫に「1」、猫以外は「0」となります。
As you can see from upper diagram, for example, the cat label would be "itself" is 1, otherwise it would be 0.
これはつまり言葉を変えると、猫が100%という意味になります。 この100%になる割合を利用して、学習モデルの最終出力を全て0から1の間に収まるようにすれば、色々と便利になります。
This means, in other words, 100% for cats. Using this 100% ratio to keep the final output of the learning model entirely between 0 and 1 can be useful in many ways.
活性化関数softmax
Activation Function Softmax
では趣旨を踏まえた上でSoftmax自体を簡単に説明します。
Let's take a quick look at Softmax itself based on the purport.
取り敢えず全体のコードは以下になります。
For now, the whole script is as follows.
Improved version of cifar10_cnn.py
imp_ver_cf10cnn.py
import keras
from keras.models import Sequential
from keras.layers import Dense, Dropout, Activation, Flatten
from keras.layers import Conv2D, MaxPooling2D
from keras.utils import np_utils
import numpy as np


labels = ["dogs", "cats", "monkeys", "birds", "fish", "lizards"]
total_num = len(labels)
image_size = 100

batch_size = 32
epochs = 100

def main():
    X_train, x_test, Y_train, y_test = np.load("data/augumented_images.npy")
    X_train = X_train.astype("float") / 256
    x_test = x_test.astype("float") / 256
    Y_train = np_utils.to_categorical(Y_train, total_num)
    y_test = np_utils.to_categorical(y_test, total_num)

    model = model_train(X_train, Y_train)
    model_eval(model, x_test, y_test)

def model_train(X, y):
    model = Sequential()
    model.add(Conv2D(32, (3, 3), padding='same',
                    input_shape=X.shape[1:]))
    model.add(Activation('relu'))
    model.add(Conv2D(32, (3, 3)))
    model.add(Activation('relu'))
    model.add(MaxPooling2D(pool_size=(2, 2)))
    model.add(Dropout(0.25))

    model.add(Conv2D(64, (3, 3), padding='same'))
    model.add(Activation('relu'))
    model.add(Conv2D(64, (3, 3)))
    model.add(Activation('relu'))
    model.add(MaxPooling2D(pool_size=(2, 2)))
    model.add(Dropout(0.25))

    model.add(Flatten())
    model.add(Dense(512))
    model.add(Activation('relu'))
    model.add(Dropout(0.5))
    model.add(Dense(total_num))
    model.add(Activation('softmax'))

    opt = keras.optimizers.adam()

    model.compile(loss='categorical_crossentropy',
                optimizer=opt,
                metrics=['accuracy'])

    model.fit(X,y,batch_size=batch_size, epochs=epochs)

    model.save("data/creatures_cnn.h5")

    return model

def model_eval(model, X, y):
    scores = model.evaluate(X, y, verbose=1)
    print('Test Loss', scores[0])
    print('Test Accuracy', scores[1])

if __name__=="__main__":
    main()
全体の中の[model.add(Activation('softmax'))]は前回説明した、「全結合層」の最後に出てきます。
The [model.add (Activation ('softmax'))] comes at the end of the "Fully Connected Layers" I explained my previous blog post.
Softmaxの数式はこのようになっています。
The formula for "Softmax" is here.
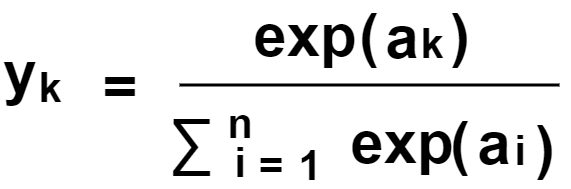
上の式のこの部分に着目します。
Note this part of the expression above.
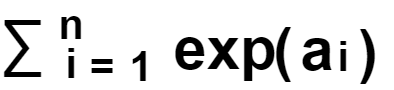
∑はi番目からn番目まで足していくという意味。
∑ means to add from i to n.
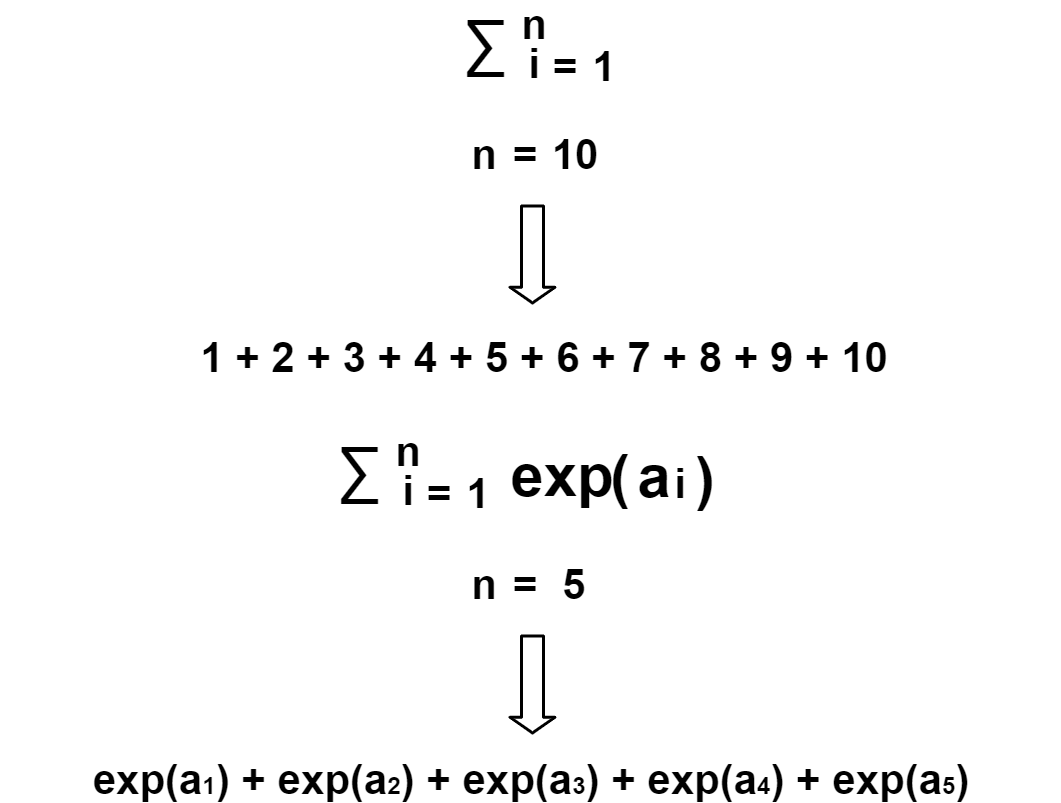
次にこのexp()ですが、これはe(ネイピア数)を底とする自然指数関数を意味します。
The exp() is then the natural exponential function with base e (Eulers Number)
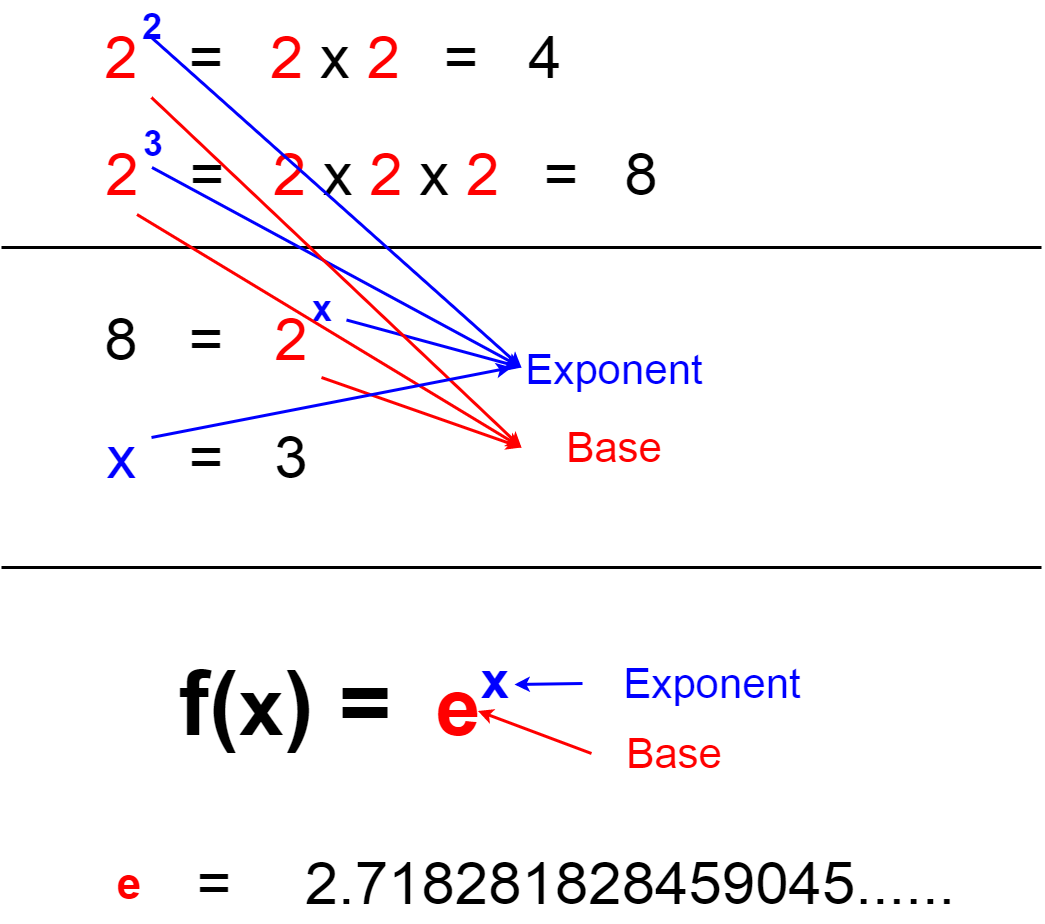
このexp()はPythonで簡単に計算できます。
This exp() is easily computed in Python.
In [1]: import math

In [2]: print(math.exp(1))
2.718281828459045
∑とexp()が何をしているのか分かったら、後はニューロンの模式図と共に考えればすぐ理解できまつ。
Once you know what ∑ and exp() are doing, you can begin to understand them by working with schematic diagrams of the neural network.
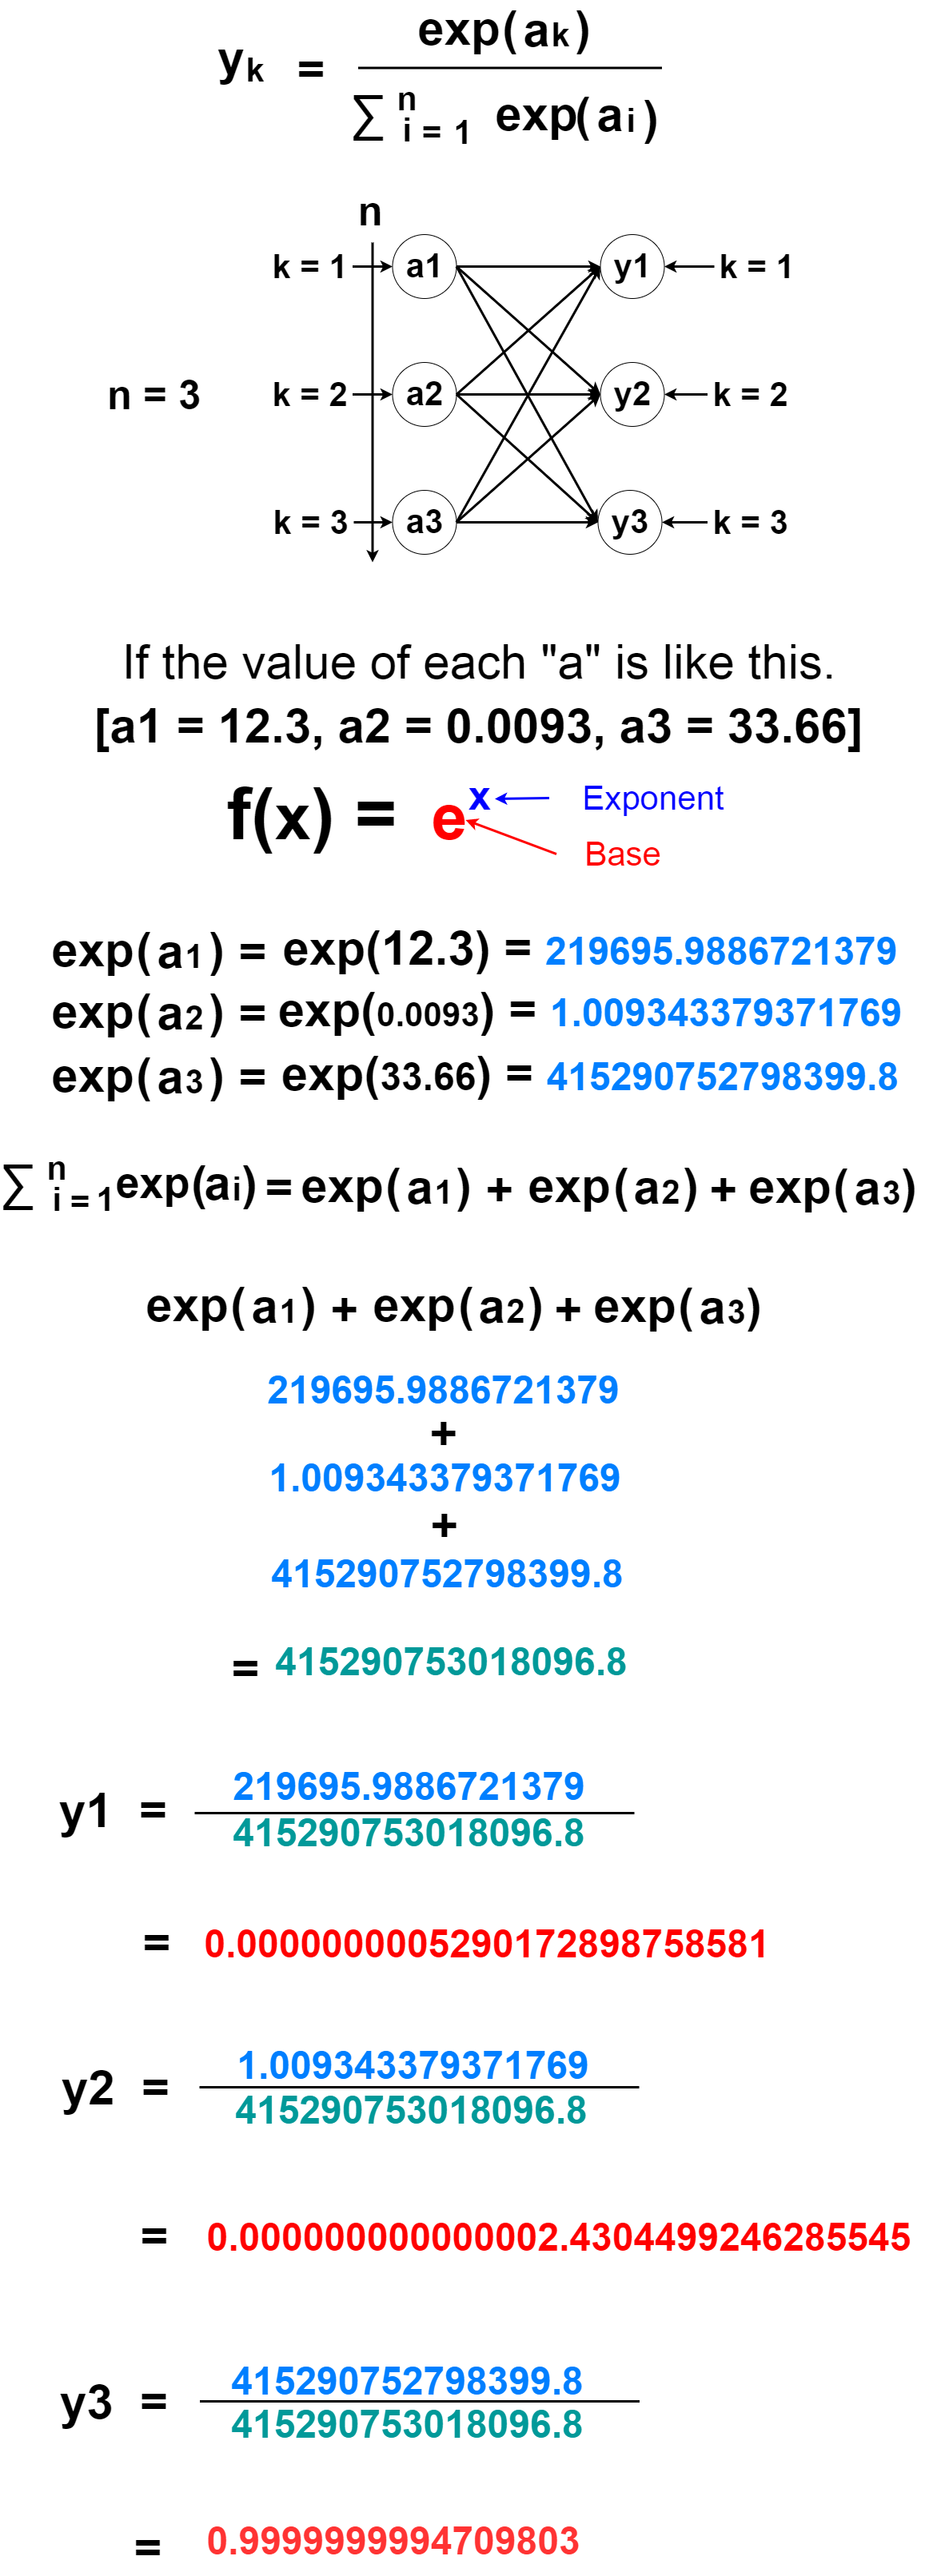
ということで冒頭の図の数値で計算してみましょう。
Now, let's actually calculate the output results in the diagram of the "Purport of Softmax".
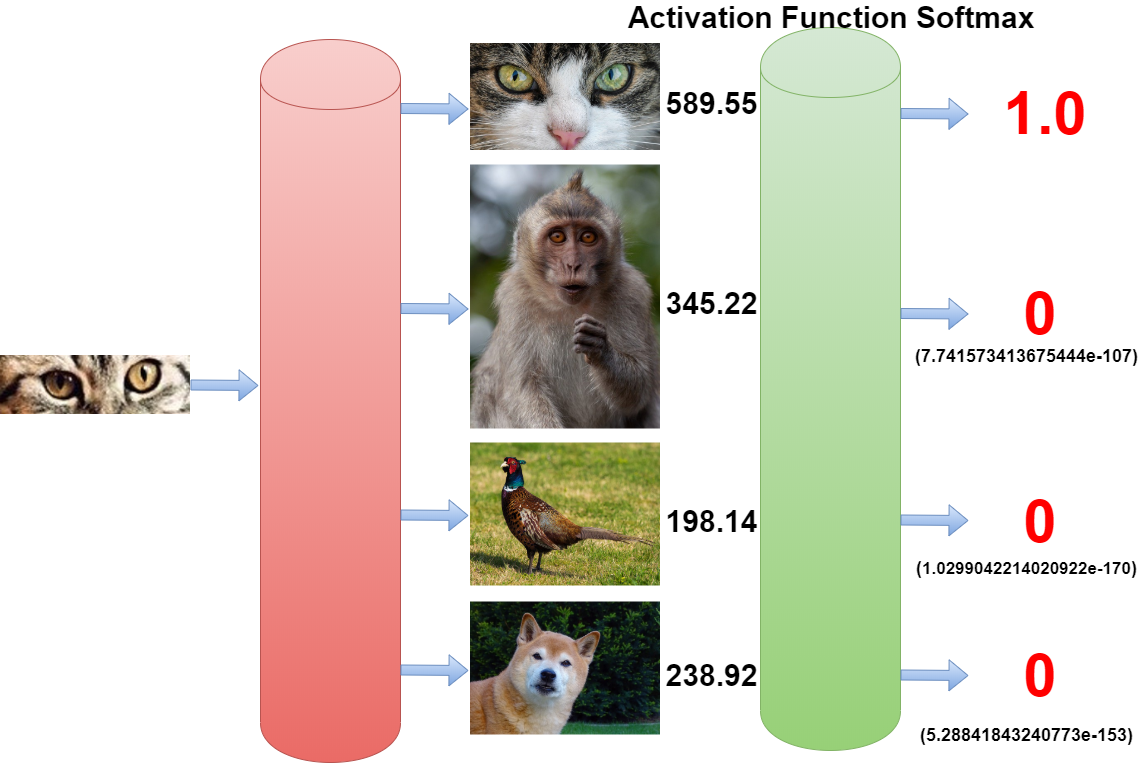
猫の確率100%ですが、他にも出力が出ています。 ですが、あまりにも小さい値なので無視されていますね。 (例えば「2.14e-100」は0.0 ..... と0が100個続いたあとに「214」がくる, [2.14の10のマイナス100乗].)
The probability of a cat is 100%, but there are other outputs. But it is ignored because the value is too small.
model.add(Flatten())
model.add(Dense(512))
model.add(Activation('relu'))
model.add(Dropout(0.5))
model.add(Dense(total_num))
model.add(Activation('softmax'))
Softmaxのおかげで全結合層の出力は確率的な数になりました。 さてそこでこの数値を元にDeepLearningの肝となる「バックプロパゲーション」が始まるわけです。 それに関係しているのが次回説明予定の「opt = keras.optimizers.adam()」です。
Softmax turns the output of [Fully Connected Layers] into a stochastic number. Here it starts the "back propagation" which is very important for deep learning begins. Related to this is the "opt = keras.optimizers.adam()" which I will be explained next time.
残りの説明は次回に持ち越します。お次はoptimizers.adam()の説明を予定してます。
I will carry over the rest of the explanation next time. Next comes about [optimizers.adam()].