Published Date : 2019年10月30日8:22
Google Cloud Speech APIとPythonを使って日本語音声を文字に変換する(後半)
Converting Japanese Audio Voice to Text Using the Google Cloud Speech API and Python (Second half)
This blog has an English translation
前半の続きです。
Continued from the first half.
Google Cloud Speech APIとPythonを使って日本語音声を文字に変換してくださいという架空の依頼を受けました。すぐにでも取り掛かりたいと思います。
I received a fictitious request to use the Google Cloud Speach API and Python to convert Japanese Audio Voice to text. I'll get right to it.
目次
Table of Contents
前回の簡単なおさらい
A quick review from last time
仕事の依頼内容は、Google Cloud Speech APIとPythonを使って日本語音声を文字に変換です。
My job is to use the Google Cloud Speach API and Python to convert Japanese Audio Voice to text.
前回のまとめ
Previous Summary
1 |
Google Cloud Platformに新しいプロジェクトを作成。 Created a new project on the Google Cloud Platform. |
|---|---|
2 |
Google Cloud Speech APIを使える状態にする。 End of Google Cloud Speech API Configuration. |
3 |
音声ファイルを作成。 Create Audio File. |
4 |
Google Cloud Storageの設定とファイルのアップロード。 I finished configuring Google Cloud Storage and uploaded a file. |
Pythonコードの作成
Write Python code
今回はGoogle Cloud Shellを使ってPythonを動かします。
This time around, I'll use Google Cloud Shell to run Python.
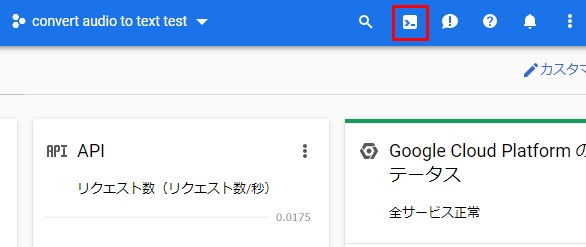
コンソールのダッシュボードから、Google Cloud Shellをアクティブ化します。赤枠の場所をクリックするだけです。
From the console dashboard, activate Google Cloud Shell. Just click the red box in the image below.
前回ダウンロードしたサービスアカウントキーのJSONファイルをアップロードします。
Upload the JSON file of the last downloaded service account key.
サービスアカウントキーを環境変数に設定します。
Set your service account key to the environment variable.
export GOOGLE_APPLICATION_CREDENTIALS=[your service account key].json
もしJSONファイルに半角スペースが入っているなら、下記の様にしてください。
If the JSON file contains half-width spaces, do the following.
export GOOGLE_APPLICATION_CREDENTIALS="[your service account key].json"
ちゃんと環境変数に設定されたか確認する時は以下のコマンドを打ってくだちぃ。
To verify that the environment variable is set correctly, type the following command.
printenv | less
ここまで環境変数の設定を行ってきたと思いますが、悲しいお知らせ。
I think you have set the environment variable so far, but it is sad news.
自分の環境では、またエラーが発生したので、 次のPythonスクリプト内の変数として、サービスアカウントキーのパスを記入しました。 エラーにならない人もいるかもしれませんが、念の為のお知らせ。
The error occurred again in my environment. We filled in the path of the service account key as a variable in the Python script shown below. Some people may not get an error, but just in case.
今回はこちらのGithubにあるtranscribe.pyを使います。Google様ありがとう。
This time I will use the transcribe.py on Github. Thank you, Google.
Pythonスクリプトを作成するその前に、google-cloud-speechはデフォルトで入っていないので、インストールします。
Before writing Python scripts, install google-cloud-speech module, which is not included by defalut.
sudo pip install google-cloud-speech
それでは、少し改良したtranscribe.pyをnanoで作成します。
Now let's create a slightly improved transcribe.py in nano editor.
nano transcribe.py
transcribe.py
#!/usr/bin/env python
# coding: utf-8
import argparse
import os
from datetime import datetime

def transcribe_gcs(gcs_uri):
    os.environ['GOOGLE_APPLICATION_CREDENTIALS'] = '[Path of the JSON file where your account key is stored].json'
    from google.cloud import speech
    from google.cloud.speech import enums
    from google.cloud.speech import types
    client = speech.SpeechClient()

    audio = types.RecognitionAudio(uri=gcs_uri)
    config = types.RecognitionConfig(
        encoding=enums.RecognitionConfig.AudioEncoding.FLAC,
        sample_rate_hertz=8000,
        language_code='ja-JP')

    response = client.long_running_recognize(config, audio).result()

    today = datetime.today()
    today_text = today.strftime("%Y-%m-%d_%H-%M-%S")

    with open(f'output{today_text}.txt', 'a') as fout:
      for result in response.results:
        for alternative in result.alternatives:
            fout.write(f'{alternative.transcript}\n')

if __name__ == '__main__':
    parser = argparse.ArgumentParser(
        description=__doc__,
        formatter_class=argparse.RawDescriptionHelpFormatter)
    parser.add_argument(
        'path', help='GCS path for audio file to be recognized')
    args = parser.parse_args()
    transcribe_gcs(args.path)
「Ctrl + O」でファイルの保存。 「Ctrl + X」でnanoエディターの終了です。
You can save the file in [Ctrl + O] and Close the nano editor in [Ctrl + X].
変更点と簡単な説明。
Changes and brief descriptions.
os.environ['GOOGLE_APPLICATION_CREDENTIALS'] = '[Path of the JSON file where your account key is stored].json'
環境変数として、アカウントキーが格納されているJSONファイルのパスを変数名「GOOGLE_APPLICATION_CREDENTIALS」に登録します。
As an einvironment variable, add the path of the JSON file that contains your account key to the variable name [GOOGLE_APPLICATION_CREDENTIALS].
    config = types.RecognitionConfig(
        encoding=enums.RecognitionConfig.AudioEncoding.FLAC,
        sample_rate_hertz=8000,
        language_code='ja-JP')
結構大事な部分。エラーになる原因は大抵ここ。 encodingはFLACに、ヘルツ数は前回確認した通りの数値に。言語は日本語に指定。
A pretty important part. This is usually the cause of the error. The encoding is in FLAC, and the Hertz number is as We checked last time. The language is specified as Japanese.
response = client.long_running_recognize(config, audio).result()
依頼内容が60分とあったので(テスト用は2秒程度だが。。。)、音声処理オペレーションの長時間実行用のメソッドを使用する。結果はresultメソッドで取り出す。
My fictional customer's request was 60 minutes (The playback time of the test file is about 2 seconds...), so I used a long-running method of voice processing operations. The result is retrieved using the result method.
    today = datetime.today()
    today_text = today.strftime("%Y-%m-%d_%H-%M-%S")

    with open(f'output{today_text}.txt', 'a') as fout:
      for result in response.results:
        for alternative in result.alternatives:
            fout.write(f'{alternative.transcript}\n')
datetime.today()を使用して、現在の日付と時刻をファイル名にして、テキストファイルとして保存していく。
Use datetime.today() to save name the file with current date and time as a text file.
実行結果
Execution Result
実行ファイルの準備ができたら、実際に試してみましょう。
When the python script is ready, let's try it.
実行コマンド
Execution Command.
python transcribe.py [Google Cloud Storage:URI]
Google Cloud StorageへアップロードしたファイルのURIの確認方法は前々回と同じ。
I explained how to verify the URI of file uploaded to Google Cloud Storage in my blog post the other day, but I will explain again just in case.
Google Cloud Platformの[ダッシュボード]から[リソース]をクリック。
From the Google Cloud Platform [Dashboard], click [Resources].

バケットをクリック。
Click [Bucket name] you created.

アップロードしたファイルをクリック。
Click you uploaded file.

表示されているURIをコピーします。
Copy the displayed URI.

確認できたら以下の実行コマンドのGCSのURIの部分に貼り付けて( []は消して。)、実行します。
Once the URI has been copied, paste it (Clear the brackets[].) into GCS URI portion of the following execute command.
実行コマンド
Execution Command.
python transcribe.py [Google Cloud Storage:URI]
クラウドシェルをアクティブ化するのを忘れずに。
Don't forget to activate the cloud chell.

それと、一度クラウドシェルの接続を切ると、またpipでGoogle-Cloud-Speechモジュールをインポートし直さなければならないことも注意してくだちぃ。
Also note that once you disconnect the Cloud Shell, you will have to re-import the google-cloud-speech module via the pip.
sudo pip install google-cloud-speech
無事に成功したら、作成されたファイルをダウンロードしてみましょう。
Once you've successfully converted audio voice, download the file you've created.

ファイルの名前を確認
Check the name of the file.
ls
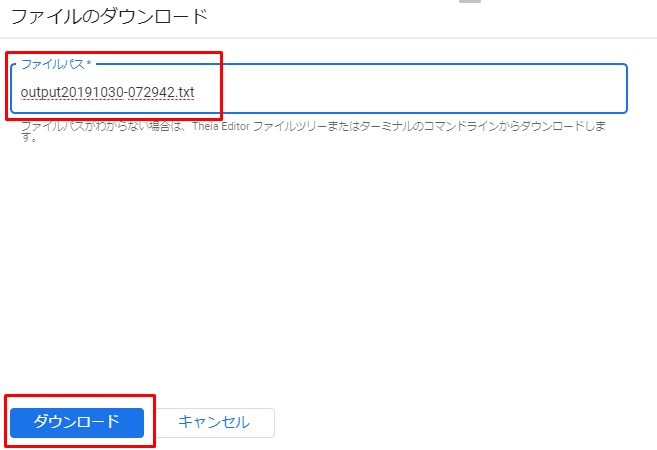
ファイル名をコピー
Copy file name.
output20191030-072942.txt
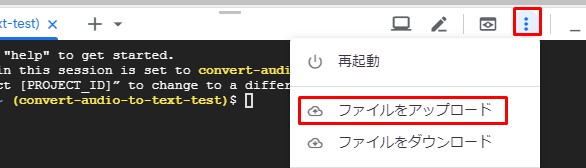
クラウドシェルの右上のスリードットマークをクリック。
Click the three-dot mark at the top right of Cloud Shell screen.

[ファイルをダウンロード]をクリック。
Click [Download file].

先程のファイル名を「ファイルのパス」にペーストして、「ダウンロード」をクリック。
Paste the copied file name into [File Path] and click [Download]
ダウンロードしたファイルをメモ帳で開いてみる。
Try opening the downloaded file in Notepad.

「これで」が「それで」に。 一応「あってます」は漢字(合ってます)に変換してくれたらしい。 あと句読点、感嘆符、疑問符等は省略されますので、ニュアンスが伝わりヅライかも。
"Is this" becomes "Is that". Apparently, "right" was converted into kanji (あっ ー> 合っ). Also, punctuation marks, exclamation marks and question marks are omitted, so it may be difficult to convey the nuance.
以上です。長くなりましたので、ここでストップします。
That's all. It's longer, so I'll stop here.
音声の長さがあまりにも長くなりすぎると不安要素しか無いですが、 一応10分程度なら試して大丈夫でした。
I haven't tried the 1 hour sound (I'm worried.), but about 10 minutes was fine.
60分ならffmpeg等で6分割するといいかもです。 各自トライしてみてくだちぃ。
If it's 60 minutes, you might want to divide it into 6 parts using ffmpeg. Let's give it a try.