Published Date : 2021年4月12日10:11
【Androidアプリ:パート3】個人事業主と給与所得者の所得税と住民税を計算するAndroidアプリ
【Android app:Part 3】Android App Calculates
Income and
Resident Taxes for sole proprietors and salaried workers
This blog has an English translation
ニコニコ動画にアップした動画のまとめ記事です。
This is a summary blog post about a video I uploaded to NicoNico.
細かい部分は動画を参考にしてください。
Please refer to the video for details.
目次
Table of Contents
① 動画の説明
① Video
Description
警告:
今回説明する給与所得者と個人事業主等の所得税及び住民税を計算するアプリは、あくまで簡易的なお遊び用のアプリです。
正確な数値、計算方法は各自で調べて下さい。
このアプリは大雑把に大体の見積りを計算して楽しむ為のアプリです。
決して従業員の年末調整や個人の確定申告等に使用しないでください。
さらに、税金の計算方法は変更される場合があり、控除についても同様です。
また、控除や税金の計算方法が間違っている可能性もありますので、
あまり信用せずに、各自で調べてから実験してみてください。
このアプリを使って何かしらの損害が発生したとしても、私は一切の責任を負いません。
Warning:
The app I'm going to show you for calculating income and residence taxes for salaried workers and Individual employers, etc. is just a simple application for playing.
Please check the exact number and calculation method by yourself.
This app is used to calculate rough estimates and enjoy them.
Do not use for year-end adjustment of employees or for individual tax return.
In addition, the method of calculating taxes and deductions may change.
Also, there is a possibility that the deduction and tax calculation methods are incorrect.
Don't trust it too much, and test it yourself.
I will not be liable for any damage caused by using this app.
個人事業主と給与所得者の所得税と住民税を計算するAndroidアプリパート3。
Android App Calculates Income and Resident Taxes for sole proprietors and salaried workers, Part 3.
前回の続きです。
Continued from last time.
ではメイン画面からコードを書いていきましょう。
Let's start with the code of the main screen contents.

[strings.xml]にメイン画面で使う文字列を登録しておきましょう。
Let's define the text used in the main screen in [strings.xml].
アプリのタイトル名です。
The title of the app.
テキスト:「税金の計算をする」。
Text:Calculate taxes.
<resources>
    <string name="app_name">個人事業主と給与所得者の税金計算</string>
    <string name="calcTaxesText">税金の計算をする</string>
</resources>
レイアウトファイルの中身を書いていきます。
Write the contents of the layout file.
リニアレイアウトを配置します。
Places a linear layout.
テキストビューを配置します。
Places a text view.
先ほど登録したテキストを使います。
Use the text you registered earlier.
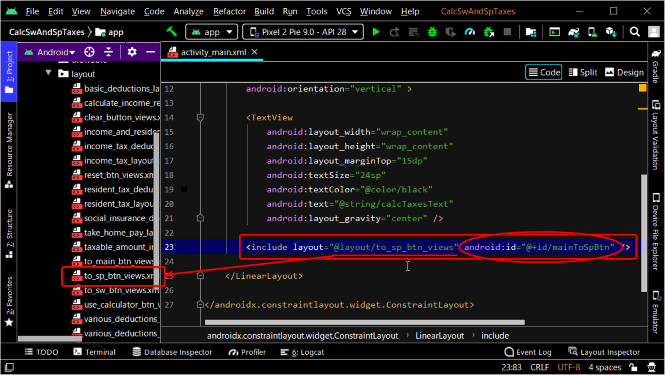
共通レイアウトファイルから個人事業主の税金計算アプリボタンのビューを配置します。
Place a view of the tax calculation app button for the sole proprietors from the Common Layout file.
このレイアウトファイル固有のビューとなるようにID名を付ければ、他のレイアウトファイルのビューと混在せずに済みます。
If you assign an ID name so that the view is unique to this layout file, you can avoid mixing it with the views of other layout files.
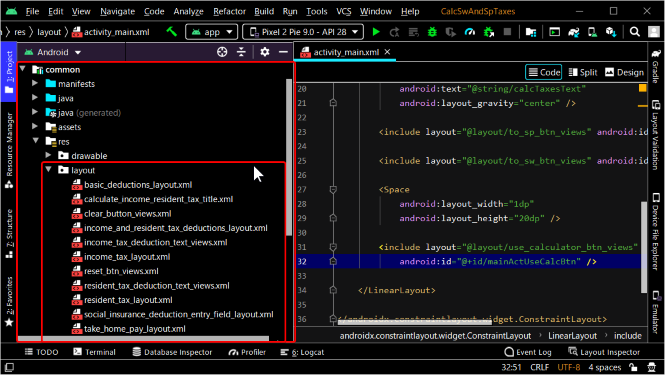
共通レイアウトファイルから給与所得者の税金計算アプリボタンのビューを配置します。
Place a view of the Tax Calculator app button for the Salaried Workers from the Common Layout file.
スペースを設けます。
Provide space.
共通レイアウトファイルから電卓アプリボタンのビューを配置します。
Places the view of the Calculator app button from a common layout file.
画面右上真ん中のスプリットタグをクリックしてコードとレイアウトを確認してみましょう。
Click the split tag in the middle of the top right corner of the screen to see the code and layout.
では共通ライブラリのレイアウトファイルを作成していきましょう。
Now let's create a layout file for the common library.
個人事業主の税金計算アプリボタンのビューの作成です。
Creating a view of the tax calculation app button for a sole proprietor.
最初に用意されているコードを消します。
Delete the code provided first.
個人事業主の税金計算アプリボタンのビューを配置します。
Place a view of the Tax Calculation app button for a sole proprietor.
次に共通ライブラリのvaluesフォルダのcolors.xmlの内容を書いていきます。
Next, write the contents of the colors.xml created in the values folder of the common library.
ここで登録した色は共通ライブラリを呼び出しているアプリなら使えるようになります。
The colors registered here can be used by applications calling the common library.
登録してある色は前回の動画の時に作成した色とデフォルトで用意されている色です。
The colors registered here can be used in applications that implement the common library.
色がビューの属性値として反映されています。
The specified color is reflected as an attribute value in the view.
今度は共通のテキストをstrings.xmlに登録しましょう。
Now add the common text to strings.xml.
共通ライブラリのdrawableフォルダ内にある個人事業主用のイメージをボタンビューのdrawableBottom属性値に指定します。
Specify the image for the sole proprietor in the drawable folder of the common library for the drawableBottom attribute value of the button view.
次は給与所得者の税金計算アプリボタンのビューの作成です。
Next, you create a view of the tax calculation app button for the salaried worker.
同じようにボタンビューを配置して、色とテキストも登録します。
Position the button view in the same way and specify the color and text.
今度は電卓アプリボタンのビューの作成です。
Now create a view for the calculator app button.
メイン画面のレイアウトが出来上がったら、次はJavaファイルのコードを書きましょう。
Once you have created the code for the layout file for the main screen, you create a Java file.
先ほどボタンビューに登録したIDを使って、クリックイベントリスナーをセットして、ボタンが押された時に発動する関数を指定します。
Using the ID registered in the button view, set the click event listener and specify a function to be invoked when the button is pressed.
findViewById(R.id.mainActUseCalcBtn).setOnClickListener(this::startCalculator);
アプリの挙動を確かめてみましょう。
Let's see how the app works.
それぞれのボタンを押したとき本当に各アプリケーションへ変移しているか確かめるため、それぞれのアプリのメインレイアウトファイルにそれぞれのアプリの名前のテキストビューを一時的に配置します。
Temporarily place a text view of each application name in each application's main layout file to see if it actually switches to each application when you press each button.
アプリの挙動を確かめてみましょう。
Let's see how the app works.
パート4へ続く。
Continue to Part 4.
以上です。お疲れ様です。
That's all. Thank you for your hard work.