Published Date : 2021年2月8日17:25
1. 期待値を計算するAndroidアプリケーションの作成
1. Creating an Android Application to Calculate
Expectations
This blog has an English translation
ニコニコ動画にアップした動画のまとめ記事です。
This is a summary blog post about a video I uploaded to NicoNico.
細かい部分は動画を参考にしてください。
Please refer to the video for details.
目次
Table of Contents
① 動画の説明
① Video
Description
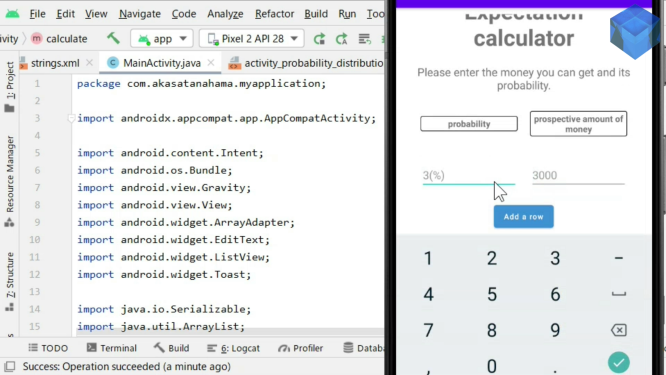
今回作るAndroidのアプリはこのようになります。
This is the Android app we are going to make this time.

Android Studioの環境設定方法は以前の動画を参考にしてください。
See my previous video for how to set up the Android Studio.
前回の動画でPythonのFlaskを使って作成した期待値を計算するアプリのAndroid版です。
This is the Android version of the app that calculates expectations I created in the last video using Flask in Python.
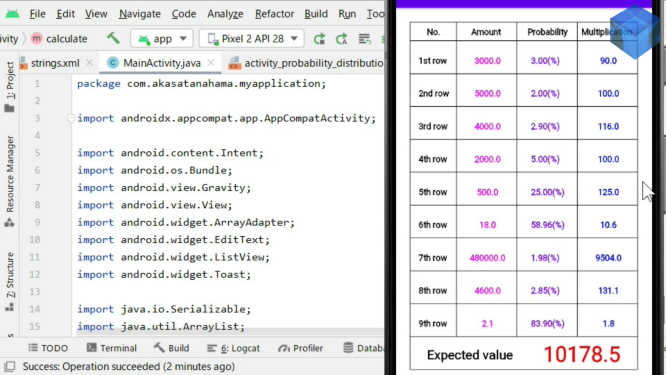
今回は入力した確率と金額とそれらを掛けた数値、期待値を表形式で表示する別のページを追加しました。
This time, we added another page that displays the probability and amount entered, the number multiplied by that number, and the expected value as a table.
Androidアプリの作り方は以前の動画で何回か紹介しているので参考にしてみてください。
I've shown you how to make an Android app a few times before, so check it out.
ではいつも通りにAndroid Studioを立ち上げてから、空のアクティビティを選択して新しいプロジェクトを作成してください。
Start Android Studio as usual, then select an empty activity to create a new project.
プロジェクトの名前は好きなようにつけてください。分かりやすい名前が良いかもしれません。
Name the project as you like. An easy to understand name might be good.
[layout]フォルダ内の[activity_main.xml]ファイルに[ScrollView]を配置します。
Place [ScrollView] in the [activity_main.xml] file in the [layout] folder.
<ScrollView
    android:layout_width="match_parent"
    android:layout_height="match_parent"
    android:layout_margin="10dp" >

</ScrollView>
これは後に追加する[ListView]の表示スペースが確率や金額を入力すると大きくなるので、画面を全て表示できるようにスクロールさせる必要があるからです。
This is because the display space for the [ListView] that you add later becomes larger as you enter the probability or amount, so you need to scroll the screen so that you can see all of it.
次に[LinearLayout]を[ScrollView]の中に配置してから、[LinearLayout]の[orientation]プロパティに[vertical]を指定して画面に対して垂直にアプリのタイトルと説明のテキストを配置していきます。
Next, place [LinearLayout] in [ScrollView], and then place the app title and description text vertically on the screen by specifying [vertical] in the [orientation] property of [LinearLayout].
<LinearLayout
    android:layout_width="match_parent"
    android:layout_height="match_parent"
    android:layout_margin="10dp"
    android:orientation="vertical"
    android:isScrollContainer="false" >
[values]フォルダ内の[strings.xml]ファイルにプロジェクト全般で使用するテキスト等を予め別で作成して登録しておきます。
In the [strings.xml] file in the [values] folder, create and register the text, etc. to be used for the entire project separately.
この[strings.xml]で登録したテキストをレイアウトファイルで使用する時は、頭にアットマークを付けて[name属性]に登録した名前を指定します。
To use the text registered in this [strings.xml] in the layout file, add an [at sign] to the beginning of the character and specify the name registered in [name attribute].
<string name="Title">Expectation calculator</string>
android:text="@string/Title"
[res]フォルダ内の[drawable]フォルダで右クリックして、[new]ー>[Drawable Resource File]の順に選択して新しいリソースファイルを作成します。
Right-click the [drawable] folder in the [res] folder to create a new resource file by selecting [new] ー> [Drawable Resource File].
ファイル名を[border.xml]にして、[shape]を使って外枠を作成します。
Name the file [border.xml] and use [shape] to create the border.
[values]フォルダ内の[colors.xml]ファイルにプロジェクト全般で使用する色を予め別で作成して登録しておきます。
In the [colors.xml] file in the [values] folder, create and register the color to be used for the entire project separately.
色は十六進数を使用して指定します。
Uses hex decimals to specify colors.
左側に作成した色が表示されているので、指定した色を目で見て確認できます。
The color you created is displayed on the left, so you can see the color you specified.
ではまた[activity_main.xml]ファイルに戻り、アプリのタイトルと説明のテキストを配置していきます。
You then return to the [activity_main.xml] file and place the application title and description text inside it.
今度は[LinearLayout]の[orientation]プロパティに[horizontal]を指定して画面に対して水平に確率と金額の入力用のエディットテキストの説明用ラベルのテキストビューを配置していきます。
Next, in the [LinearLayout], set the [orientation] property to [horizontal] so that the text view which is a descriptive label for edit text for the probability and amount is placed horizontally on the screen.
二つの値の入力用のエディットテキストも同様に設置していきます。
The edit text for entering the two values should also be horizontal to the screen.
EditTextが複数あるので、最初のEditTextに数値を入力した際に、キーボードのエンターマークの表示が次のEditTextに入力のフォーカスの移動を促す表示に変わってしまいます。
Because there is more than one EditText, entering a number in the first EditText automatically switches the display of the [Enter] symbol on the keyboard to the symbol that moves to the next EditText.
最初のEditTextの時はそれでいいのですが、最後のEditTextの時は入力を完了せさる為にいちいちキーボード画面を折り畳まないといけないのは面倒です。
I think that specification is good for the first EditText, but it is troublesome that I have to fold the keyboard screen to complete each entry for the last EditText.
そこで、[imeOptions]プロパティに[actionDone]を指定して単一のEditTextで入力を終わらせるようにしています。
Therefore, I set the [imeOptions] property to [actionDone] to end the input with a single EditText.
次に、入力した各値をListViewに追加するボタンを配置します。
It then places a button that adds each value entered to the ListView.
[textAllCaps]をfalseにして、文字の全てが大文字にならないようにして、小文字も表示できるようにします。
Set [textAllCaps] to false so that all letters are not uppercase and that lowercase letters are also displayed.
ではまた[LinearLayout]を配置して[orientation]プロパティを[horizontal]にして、ListViewを水平に配置できるようにします。
It then arranges the ListViews horizontally by placing [LinearLayout] and setting the [orientation] property to [horizontal].
ListViewの表示の高さを追加された値に応じて変化させる為に、独自のカスタマイズListViewを作成する必要があります。
To change the display height of the ListView to correspond to the added value, you need to create your own customized ListView.
[Java]フォルダ内にある、[MainActivity.java]等があるパッケージフォルダで右クリックして、[new]を選択して[Java Class]ファイルを作成しましょう。
In the [Java] folder, right click on the package folder that contains [MainActivity.java] and select [new] to create the [Java Class] file.
ListViewを継承した独自のカスタムListViewを作成します。
Create your own custom ListView that inherits from ListView.
public class MaxHeightListView extends ListView {
}
必要なライブラリをインポートします。
Import the required libraries.
import android.content.Context;
import android.util.AttributeSet;
import android.view.View;
import android.view.ViewGroup;
import android.widget.ListView;
コンストラクタを準備します。
Prepare the constructor.
public MaxHeightListView(Context context) {
    super(context);
}

public MaxHeightListView(Context context, AttributeSet attrs) {
    super(context, attrs);
}

public MaxHeightListView(Context context, AttributeSet attrs, int defStyleAttr) {
    super(context, attrs, defStyleAttr);
}
[onMeasure]メソッドをオーバーライドします。
Override the [onMeasure] method.
@Override
protected void onMeasure(int widthMeasureSpec, int heightMeasureSpec) {
    int expandSpec = MeasureSpec.makeMeasureSpec(MEASURED_SIZE_MASK, View.MeasureSpec.AT_MOST);
    super.onMeasure(widthMeasureSpec, expandSpec);
    ViewGroup.LayoutParams params = getLayoutParams();
    params.height = getMeasuredHeight();
}
このメソッド内で行われているのは、親ビューの高さと幅から、子ビューの高さと幅を計算しています。
In this method, the height and width of the child view are calculated from the height and width of the parent view.
子ビューであるリストビューの高さは値が追加される度に変わります。
The height of the child view, the listview, changes each time a value is added.
子ビューの高さに変更があったら親ビューの高さも変わります。
If the height of the child view changes, the height of the parent view also changes.
スクロールビューの中でもうまく子ビューの高さが展開されるように、その度に親ビューの値を基に子ビューに渡すサイズを明確に指定してあげる必要があります。
Each time you want to expand the height of a child view in a scroll view, you must explicitly specify the size to pass to the child view based on the value of the parent view.
後は作成した独自ビューの名前をレイアウトファイル内で指定して使用するだけです。
All you have to do is specify the name of the custom view you created in the layout file to use.
以上です。お疲れ様です。
That's all. Thank you for your hard work.