Published Date : 2020年12月30日21:13
Djangoアプリのまとめ Part4 ~ Part6
Review of the Django app Part4 ~ Part6
This blog has an English translation
ニコニコ動画にアップした動画のまとめ記事です。
This is a summary blog post about a video I uploaded to NicoNico.
細かい部分は動画を参考にしてください。
Please refer to the video for details.
目次
Table of Contents
① Signinページを作成、アプリのHTMLとCSSを修正する
① Create a Signin page and modify the app's HTML and CSS
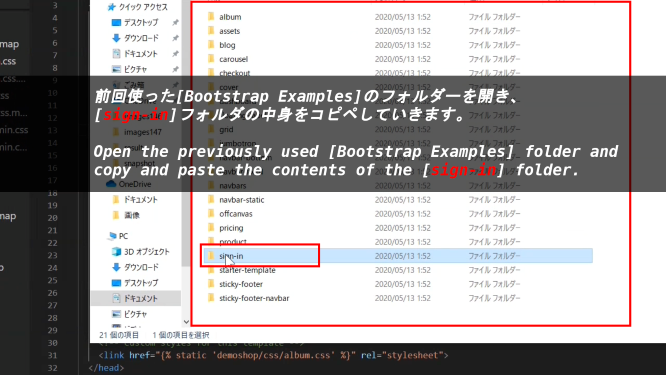
前回使った[Bootstrap Examples]のフォルダーを開き、[sign-in]フォルダの中身をコピペしていきます。
Open the previously used [Bootstrap Examples] folder and copy and paste the contents of the [sign-in] folder.
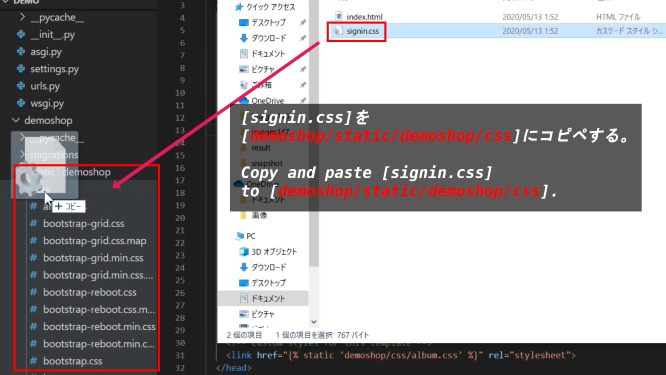
[signin.css]を[demoshop/static/demoshop/css]にコピペする。
Copy and paste [signin.css] to [demoshop/static/demoshop/css].
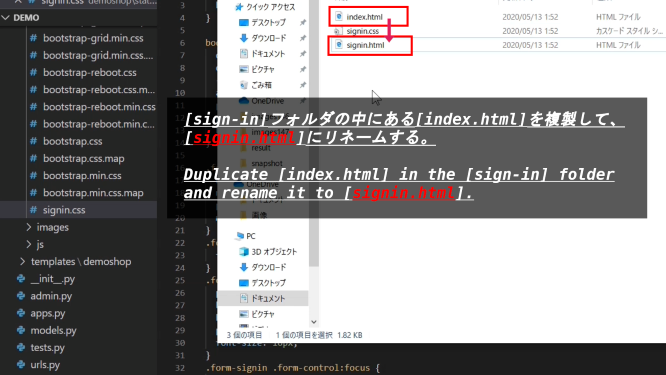
[sign-in]フォルダの中にある[index.html]を複製して、[signin.html]にリネームする。
Duplicate [index.html] in the [sign-in] folder and rename it to [signin.html].
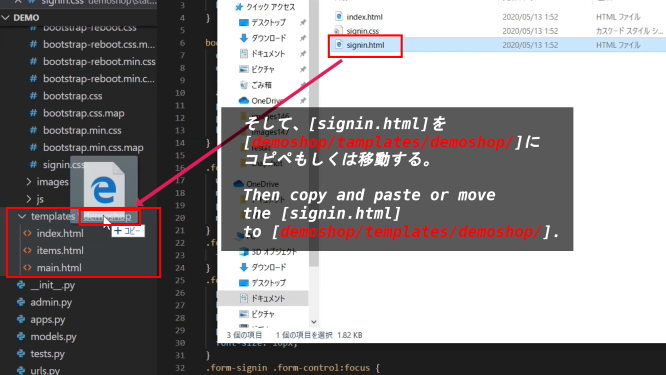
そして、[signin.html]を[demoshop/tamplates/demoshop/]にコピペもしくは移動する。
Then copy and paste or move the [signin.html] to [demoshop/templates/demoshop/].
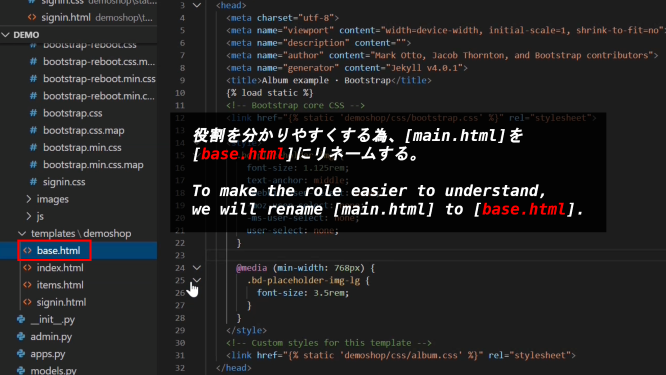
役割を分かりやすくする為、[main.html]を[base.html]にリネームする。
To make the role easier to understand, we will rename [main.html] to [base.html].
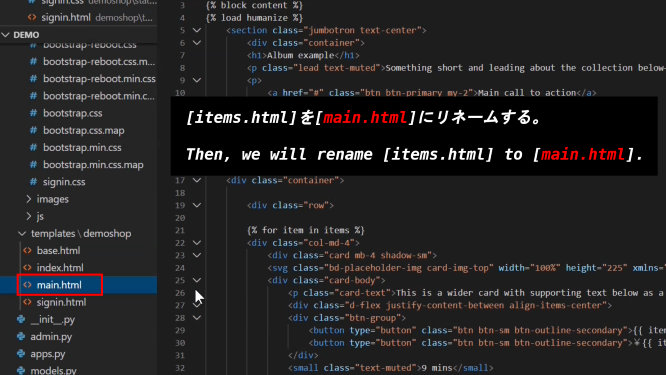
[items.html]を[main.html]にリネームする。
Then, we will rename [items.html] to [main.html].
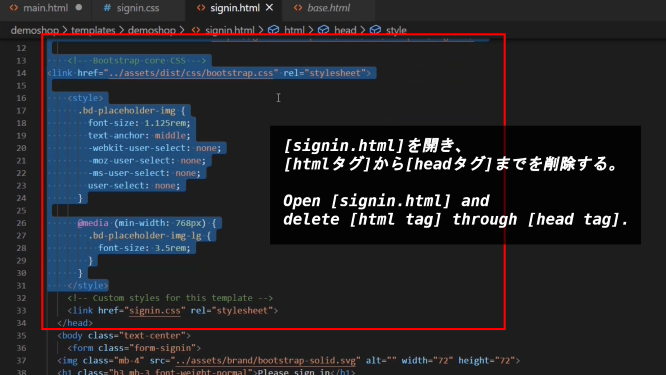
[signin.html]を開き、[htmlタグ]から[headタグ]までを削除する。
Open [signin.html] and delete [html tag] through [head tag].
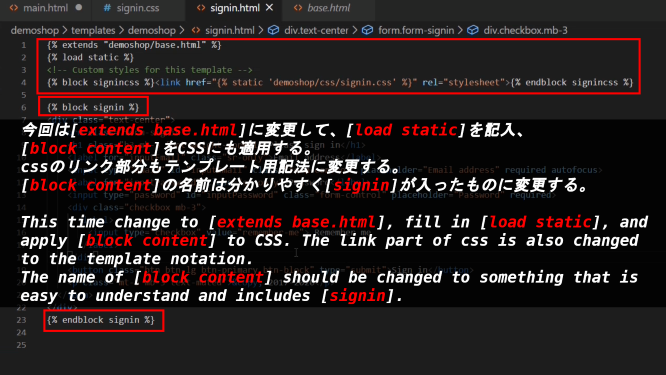
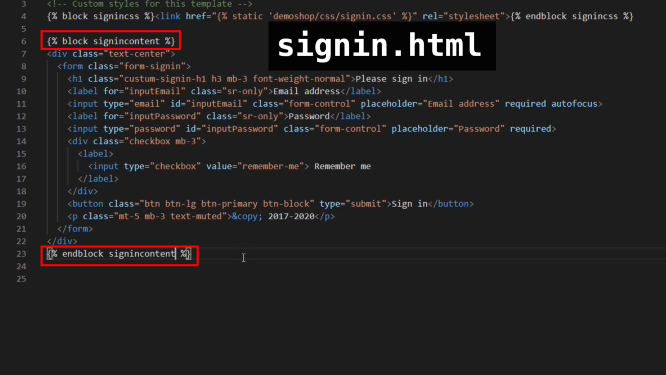
今回は[extends base.html]に変更して、[load static]を記入、[block content]をCSSにも適用する。cssのリンク部分もテンプレート用記法に変更する。[block content]の名前は分かりやすく[signin]が入ったものに変更する。
This time change to [extends base.html], fill in [load static], and apply [block content] to CSS. The link part of css is also changed to the template notation. The name of [block content] should be changed to something that is easy to understand and includes [signin].
補足:前回では[block content]と書いていたが、この[content]の部分は、継承される親のHTML内にある[block xxx]と継承する子のHTML内の[block xxx]が統一されていれば名前は自由に決めることができます。
supplementary explanation: Last time I wrote [block content], but this [content] part is freely named if the [block xxx] in the HTML of the inherited parent and the [block xxx] in the HTML of the inheriting child are unified.
base.html
{% block signincontent %}{% endblock signincontent %}
{% block maincontent %}{% endblock maincontent %}
signin.html
{% extends "demoshop/base.html" %}

{% block signincontent %}{
    .............................................
% endblock signincontent %}
main.html
{% extends "demoshop/base.html" %}

{% block maincontent %}{
    .............................................
% endblock maincontent %}
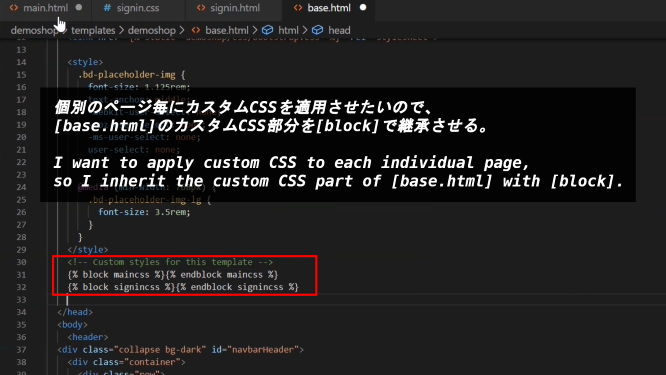
個別のページ毎にカスタムCSSを適用させたいので、[base.html]のカスタムCSS部分を[block]で継承させる。
I want to apply custom CSS to each individual page, so I inherit the custom CSS part of [base.html] with [block].
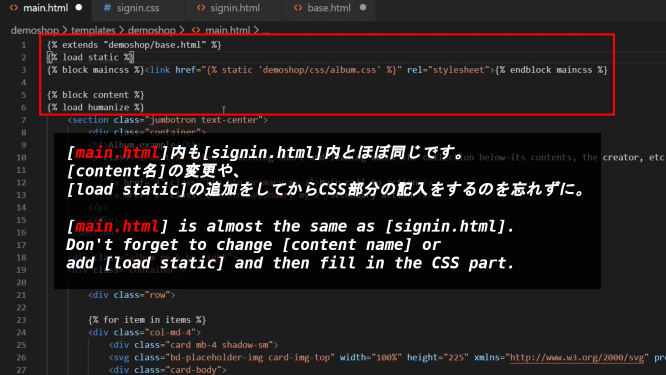
[main.html]内も[signin.html]内とほぼ同じです。[content名]の変更や、[load static]の追加をしてからCSS部分の記入をするのを忘れずに。
[main.html] is almost the same as [signin.html]. Don't forget to change [content name] or add [load static] and then fill in the CSS part.
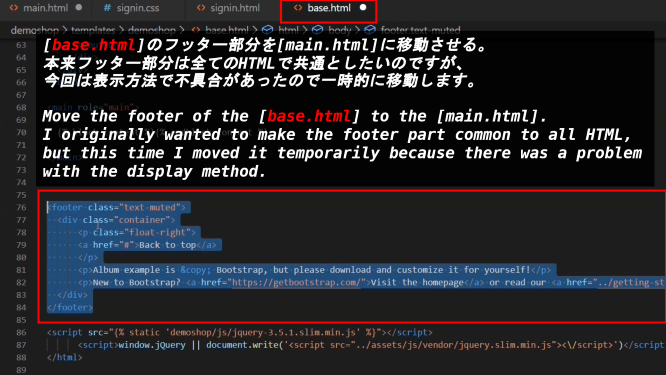
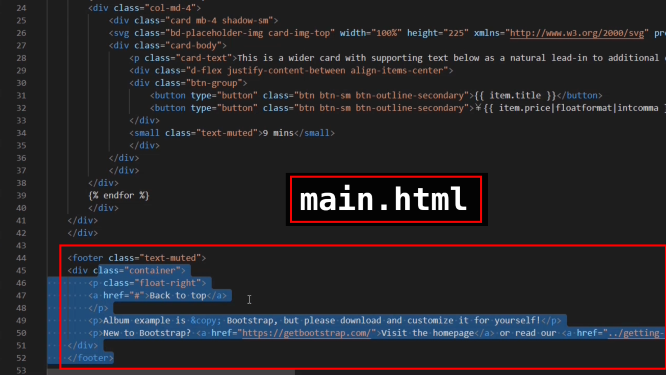
[base.html]のフッター部分を[main.html]に移動させる。本来フッター部分は全てのHTMLで共通としたいのですが、今回は表示方法で不具合があったので一時的に移動します。
Move the footer of the [base.html] to the [main.html]. I originally wanted to make the footer part common to all HTML, but this time I moved it temporarily because there was a problem with the display method.
main.html
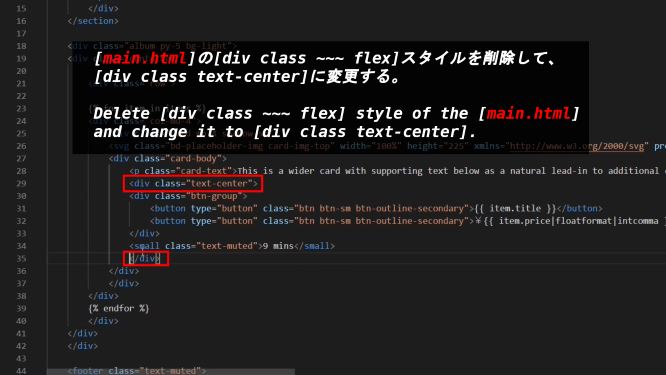
[main.html]の[div class ~~~ flex]スタイルを削除して、[div class text-center]に変更する。
Delete [div class ~~~ flex] style of the [main.html] and change it to [div class text-center].
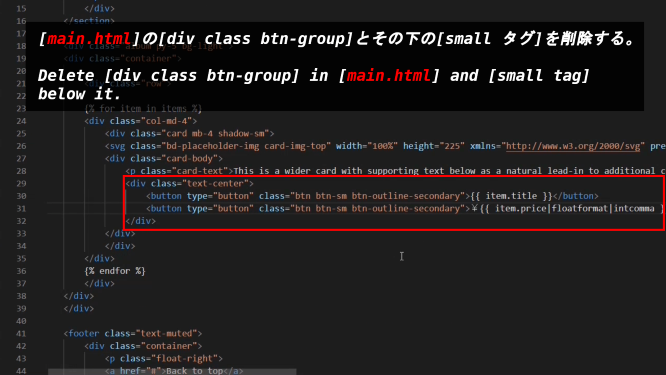
[main.html]の[div class btn-group]とその下の[small タグ]を削除する。
Delete [div class btn-group] in [main.html] and [small tag] below it.
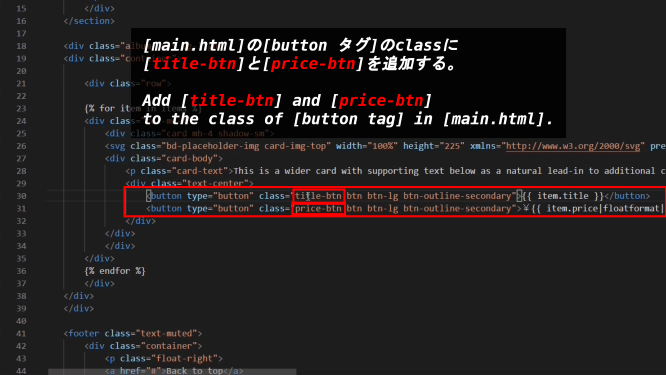
[main.html]の[button タグ]のclassに[title-btn]と[price-btn]を追加する。
Add [title-btn] and [price-btn] to the class of [button tag] in [main.html].
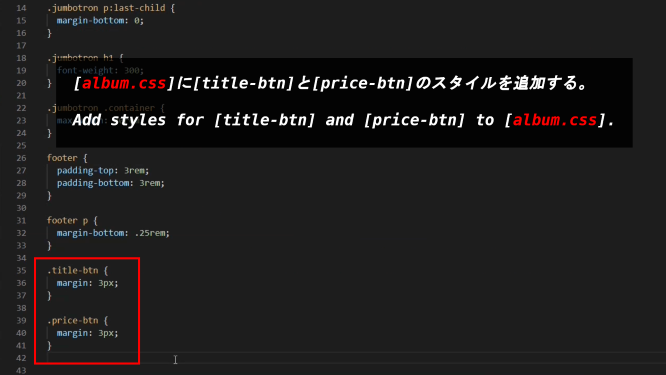
[album.css]に[title-btn]と[price-btn]のスタイルを追加する。
Add styles for [title-btn] and [price-btn] to [album.css].
[signin.css]の[body tag]のスタイルを一部削除して、[custom-signin-h1]のスタイルを追加する。
Next, open [signin.css], delete some of the [body tag] styles, and add the [custom-signin-h 1] styles.
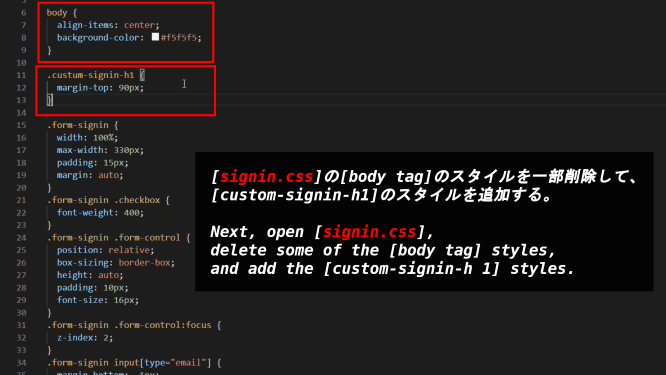
[signin.html]の[form タグのh1タグ]に[class custom-signin-h1]を追加する。
Add [class custom-signin-h1] to [h1 tag of the form tag] in [signin.html].

[base.html]の[naviバー]にある[Contact]を[Menu]に、[liタグ]を[Sign in]に変えて[a href]のリンクを[demoshop:singin]にする。
[Contact] in [navi bar] of [base.html] is changed to [Menu], [li tag] is changed to [Sign In], and the link of [a href] is changed to [demoshop:singin].

[base.html]の[naviバー]にある[ロゴ]のリンクを[demoshop:main_page]に変えます。
Change the link for [logo] in [navi bar] of [base.html] to [demoshop:main_page].

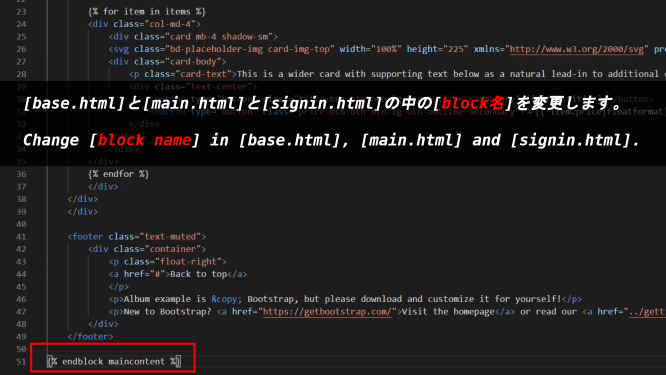
[base.html]と[main.html]と[signin.html]の中の[block名]を変更します。
Change [block name] in [base.html], [main.html] and [signin.html].
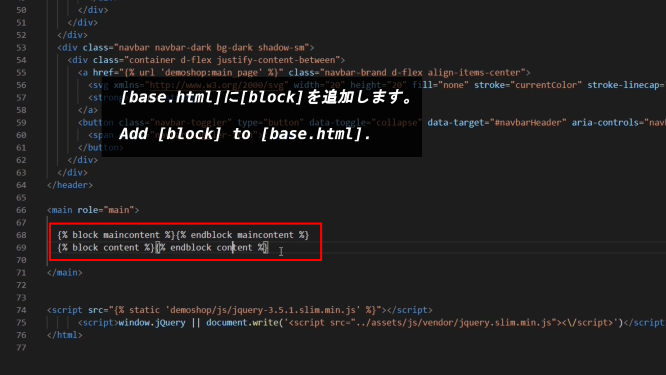
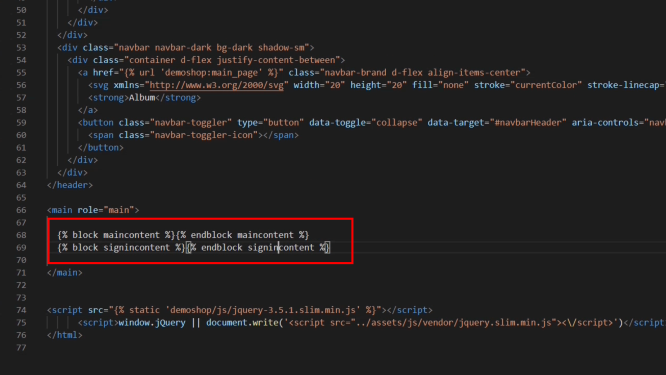
[base.html]に[block]を追加します。
Add [block] to [base.html].
signin.html
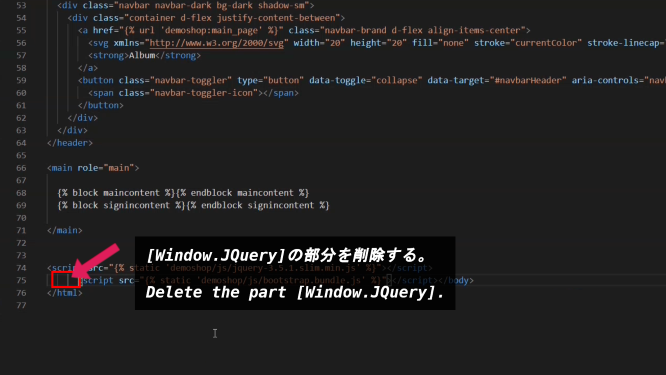
[Window.JQuery]の部分を削除する。
Delete the part [Window.JQuery].
補足説明:[window.jQuery || document.write]とはCDN(Content Delivery Network)が使えなくなった時の対処法です。
CDNとは今回のようにJSファイル等を自分のプロジェクトフォルダに置くのではなく、外部のサーバーから提供してくれるJSを読み込んで使えるサービスです。
つまり、外部のサーバーなので、何かの不具合でアクセス出来なくなる時があるかもしれません。その為の対処方法が上の記法になります。
[A || B]この部分はAが偽ならBを返すという意味です。
CDNでjQueryが正常に読み込めている場合の時、Aは真になります。
そしてAが偽の時、つまりCDNでjQueryが読み込めない時にはBが返される、つまり「document.write」の部分が実行されるわけです。
この「document.write( )」の「( )」の部分にはJSファイルのソースパスが記述されます。
つまりCDNが実行されない、なら別のパスからjQueryを読み込もう。という事になります。
Note: [window.jQuery || document.write] is a way to deal with CDN (Content Delivery Network) when it becomes unavailable.
CDN is a service that you can use by loading JS provided from an external server, instead of putting JS files in your project folder like this time.
In other words, since it is an external server, it may become inaccessible due to some trouble. The way to deal with this is the notation above.
[[A || B] This means that if A is false, B is returned.
A is true if jQuery is successfully loaded on the CDN.
If A is false, meaning that the CDN cannot read jQuery, B is returned, meaning that the [document.write] part is executed.
The [( )] part of [document.write( )] contains the source path of the JS file.
That is, if the CDN is not executed, then try to read jQuery from another path. It means that.
② Django側を設定してページを表示させる
② Set up the Django side to view the page
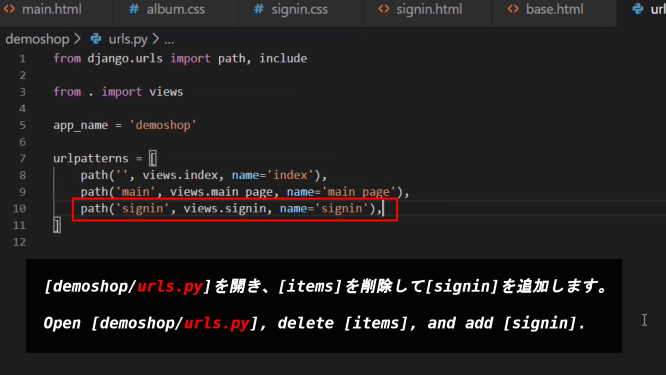
[demoshop/urls.py]を開き、[items]を削除して[signin]を追加します。
Open [demoshop/urls.py], delete [items], and add [signin].
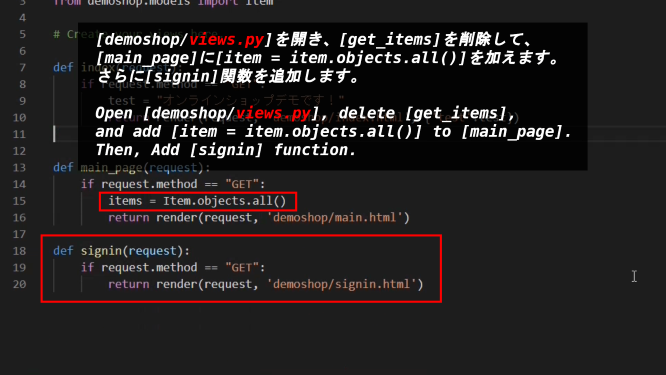
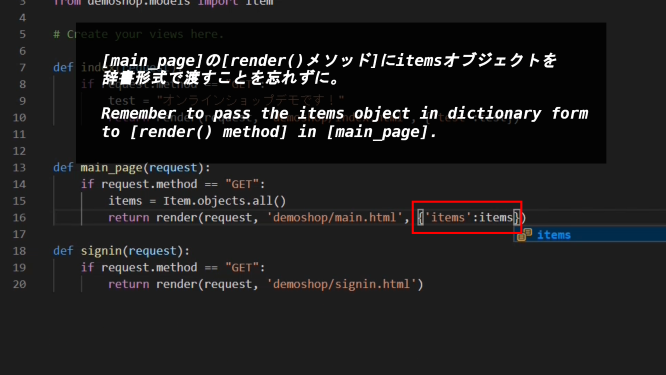
[demoshop/views.py]を開き、[get_items]を削除して、[main_page]に[item = Item.objects.all()]を加えます。さらに[signin]関数を追加します。
Open [demoshop/views.py], delete [get_items], and add [item = Item.objects.all()] to [main_page]. Then, Add [signin] function.
[main_page]の[render()メソッド]にitemsオブジェクトを辞書形式で渡すことを忘れずに。
Remember to pass the items object in dictionary form to [render() method] in [main_page].
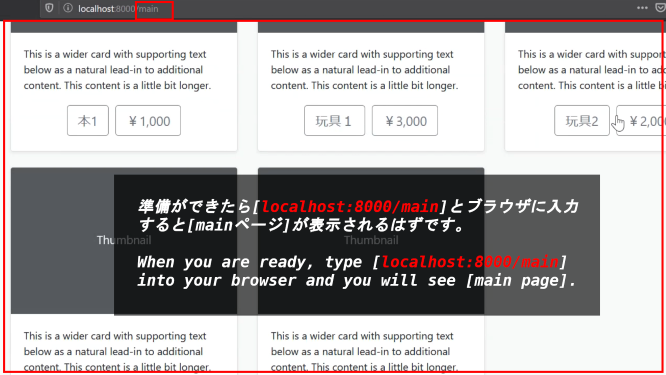
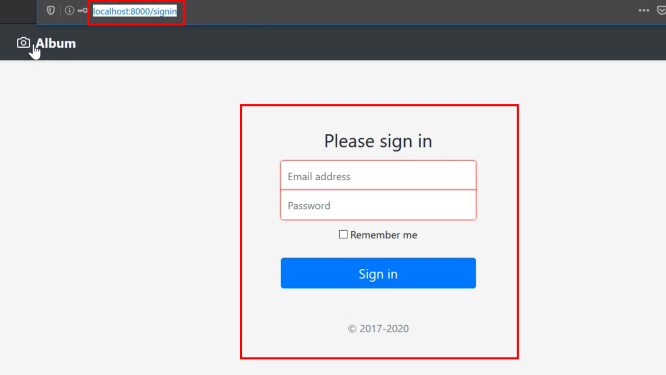
準備ができたら[localhost:8000/main]とブラウザに入力すると[mainページ]が表示されるはずです。
When you are ready, type [localhost:8000/main] into your browser and you will see [main page].
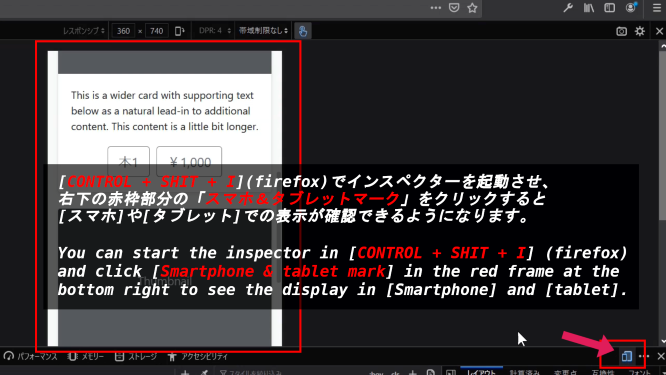
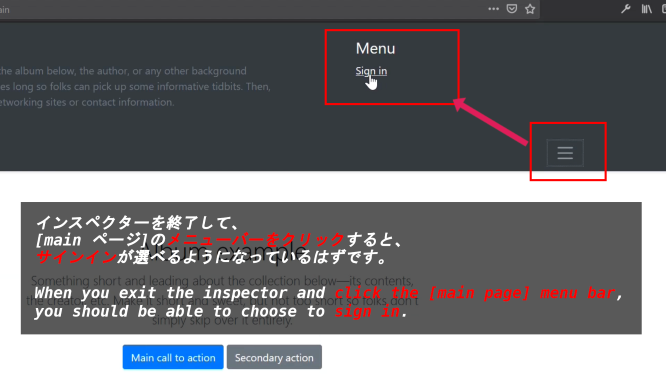
[CONTROL + SHIT + I](firefox)でインスペクターを起動させ、右下の赤枠部分の「スマホ&タブレットマーク」をクリックすると[スマホ]や[タブレット]での表示が確認できるようになります。
You can start the inspector in [CONTROL + SHIT + I] (firefox) and click [Smartphone & tablet mark] in the red frame at the bottom right to see the display in [Smartphone] and [tablet].
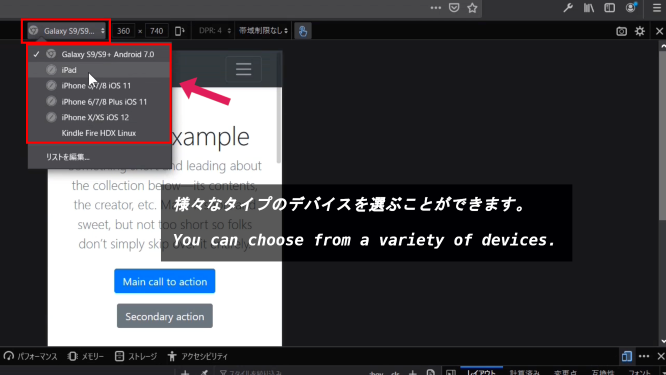
様々なタイプのデバイスを選ぶことができます。
You can choose from a variety of devices.
インスペクターを終了して、[main ページ]のメニューバーをクリックすると、サインインが選べるようになっているはずです。
When you exit the inspector and click the [main page] menu bar, you should be able to choose to sign in.
③ Customerモデルを作成してマイグレーションする
③ Creating and Migrating the Customer Model
[demoshop/models.py]を開き、[Userモデルオブジェクト]をインポートします。そして新たに[Customer]と[Seller]クラスを作成します。
Open [demoshop/models.py] and import [User Model Object]. You then create new [Customer] and [Seller] classes.
補足説明:supplementary explanation
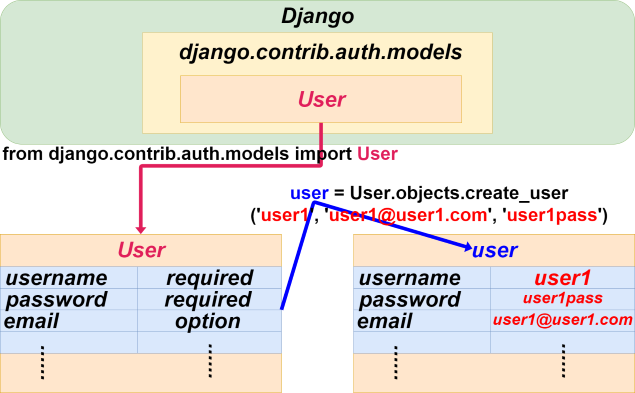
Userモデルとは、Djangoにデフォルトで用意されているモデルです。
前回までにItemモデルを作成した時、CharField等を設定したと思います。
The User model is the default model provided with Django.
When we created the Item model last time, then we set CharField, etc.
class Item(models.Model):
    title = models.CharField(max_length=100, null=False, blank=False, unique=False)
    price = models.FloatField(null=False, blank=False, unique=False)
つまり、上記のようなスクリプトが最初からDjangoに用意されていて、Userモデルとして読み込むと使えるようになっています。(Userモデルからモデルオブジェクトを作る際には、ユーザーネームやパスワードは必須の入力項目となります。)
This means that a script like the one above is already provided in Django and can be used when loaded as a User model. (When creating a model object from a User model, the user name and password are required.)
Userモデルのスクリプトの一部
Part of the User model script
username = models.CharField(
        _('username'),
        max_length=150,
        unique=True,
        help_text=_('Required. 150 characters or fewer. Letters, digits and @/./+/-/_ only.'),
        validators=[username_validator],
        error_messages={
            'unique': _("A user with that username already exists."),
        },
      )
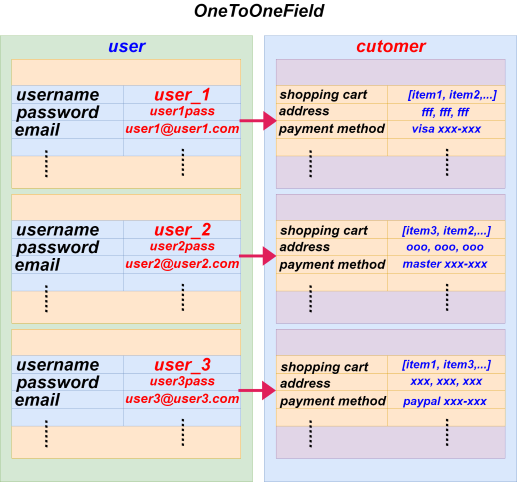
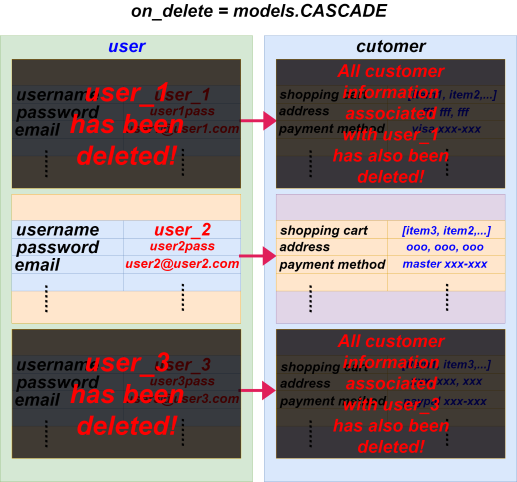
このUserモデル(テーブル)は別のモデル(別のテーブル)に紐づけて使用することもできます。
例えば[User]モデル(テーブル)に複数のユーザーが登録されているとします。
そして、[Customer]モデルには買い物かごの中身や、閲覧履歴、支払い履歴、住所、支払い方法等が登録できるとします。
この[Customer]モデルと[User]モデルを紐づけるとします。
Userモデルから作られたそれぞれのユーザーはそれぞれの[Customer]モデルから作られた情報に紐づいていなければ訳が分からなくなってしまいます。
このようなケースで、各ユーザーに一対一で紐づいた別のモデルを作成したい時に使用するのがOneToOneFieldです。
This User model (Table) can also be tied to another model (another table).
For example, the [User] model (Table) has multiple users.
Then, Assume that the [Customer] model includes items such as shopping cart contents, browsing history, payment history, address, and payment method.
Suppose you want to tie this [Customer] model to a [User] model.
Each user created from a [User] model has to be tied to the information created from each [Customer] model.
In this case, OneToOneField is used when you want to create a separate model tied to each user one-on-one.
from django.db import models
from django.contrib.auth.models import User

class Customer(models.Model):
    user = models.OneToOneField(User, on_delete=models.CASCADE)
[models.OneToOneField(User, on_delete=models.CASCADE)]は第一引数に親となる[User]モデルを渡します。第二引数の[on_delete=models.CASCADE]は[OneToOneFileds]で作成された[user]を削除した時に、それに紐づいているモデルの情報も全て削除するという意味です。
[models.OneToOneField(User, on_delete=models.CASCADE)] passes its parent [User] model as its first argument. The second argument, [on_delete = models.CASCADE], means that if you delete the [user] created in [OneToOneFileds], you will also delete all the model information associated with it.
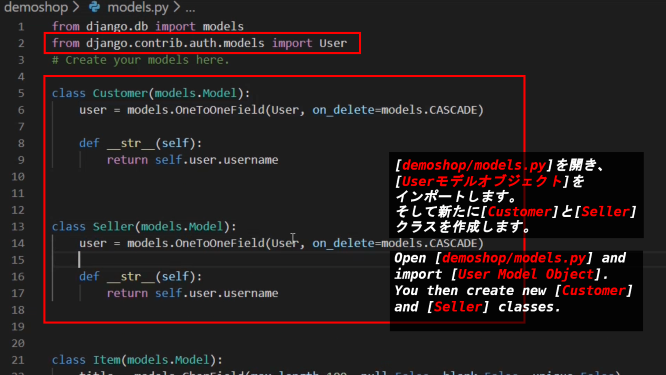
demoshop/models.py
from django.db import models
from django.contrib.auth.models import User
# Create your models here.

class Customer(models.Model):
    user = models.OneToOneField(User, on_delete=models.CASCADE)

    def __str__(self):
        return self.user.username


class Seller(models.Model):
    user = models.OneToOneField(User, on_delete=models.CASCADE)

    def __str__(self):
        return self.user.username

class Item(models.Model):
    .................................
    .................................
    .................................
    .................................
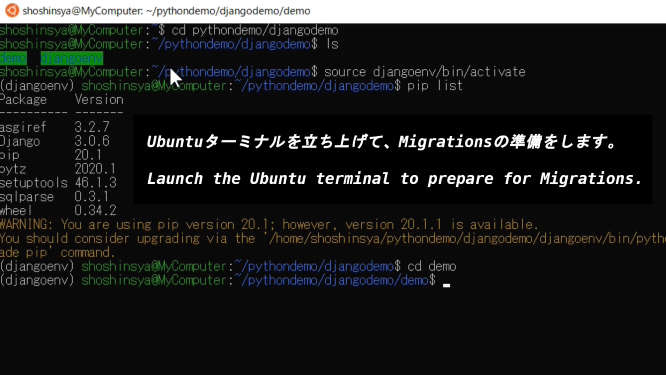
Ubuntuターミナルを立ち上げて、Migrationsの準備をします。
Launch the Ubuntu terminal to prepare for Migrations.
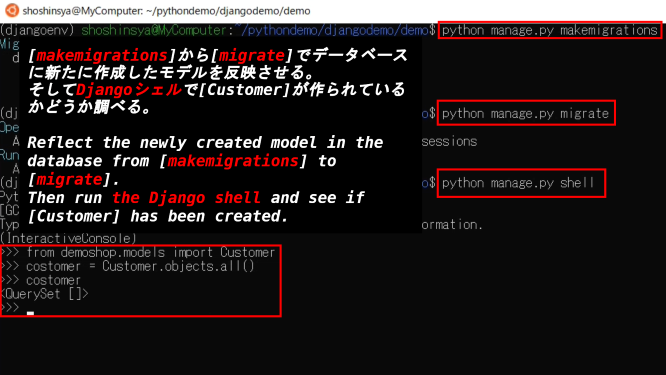
[makemigrations]から[migrate]でデータベースに新たに作成したモデルを反映させる。そしてDjangoシェルで[Customer]が作られているかどうか調べる。
Reflect the newly created model in the database from [makemigrations] to [migrate]. Then run the Django shell and see if [Customer] has been created.
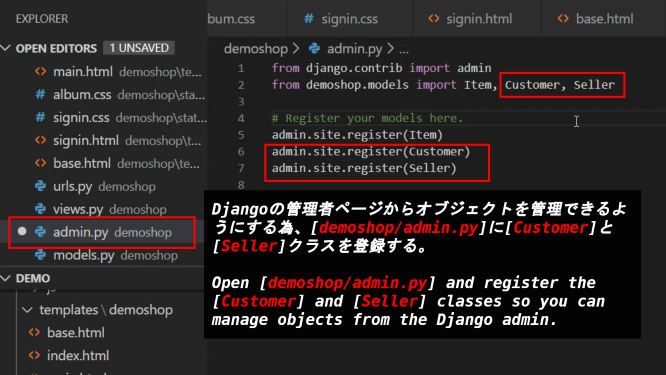
Djangoの管理者ページからオブジェクトを管理できるようにする為、[demoshop/admin.py]に[Customer]と[Seller]クラスを登録する。
Open [demoshop/admin.py] and register the [Customer] and [Seller] classes so you can manage objects from the Django admin.
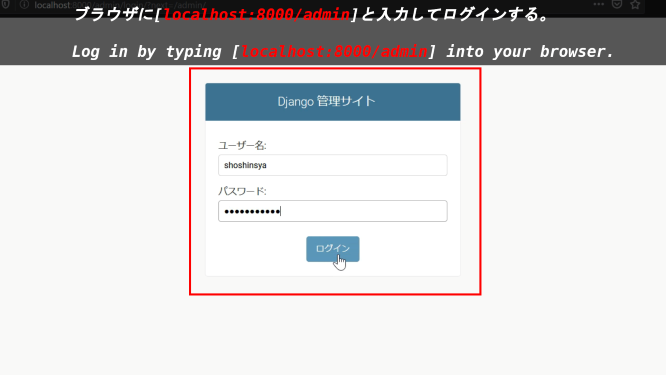
ブラウザに[localhost:8000/admin]と入力してログインする。
Log in by typing [localhost:8000/admin] into your browser.
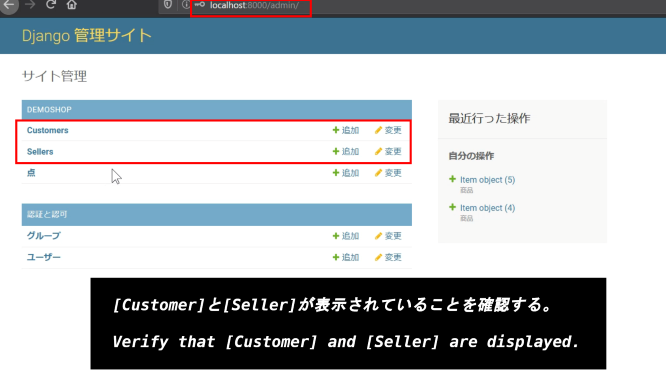
[Customer]と[Seller]が表示されていることを確認する。
Verify that [Customer] and [Seller] are displayed.
④ 登録画面の実装
④
Implementation of the registration screen
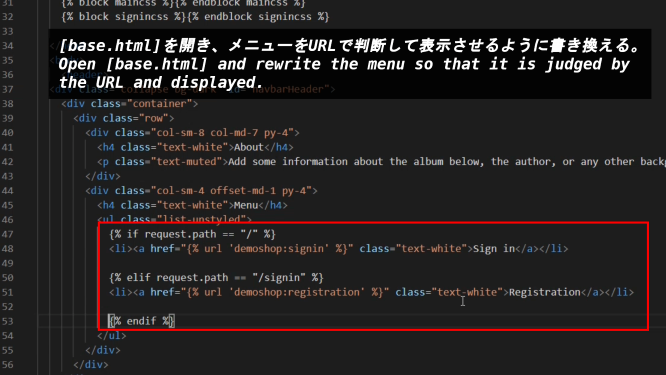
[base.html]を開き、メニューをURLで判断して表示させるように書き換える。
Open [base.html] and rewrite the menu so that it is judged by the URL and displayed.
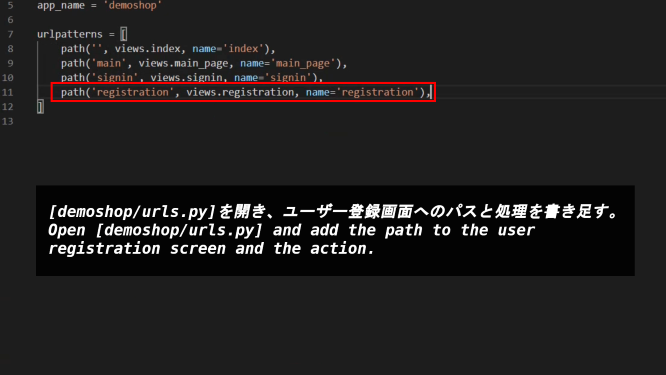
[demoshop/urls.py]を開き、ユーザー登録画面へのパスと処理を書き足す。
Open [demoshop/urls.py] and add the path to the user registration screen and the action.
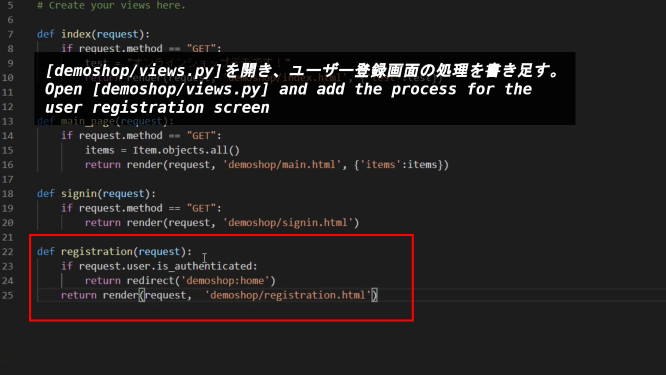
[demoshop/views.py]を開き、ユーザー登録画面の処理を書き足す。
Open [demoshop/views.py] and add the process for the user registration screen
「request.user.is_authenticated」でログインしているかどうかを見ています。ログインしているならホーム画面へ、そうでないなら登録画面へ変移させます。
「request.user.is_authenticated」is checking if user logged in. If user is logged in, move to the home screen. Otherwise, move to the registration screen.
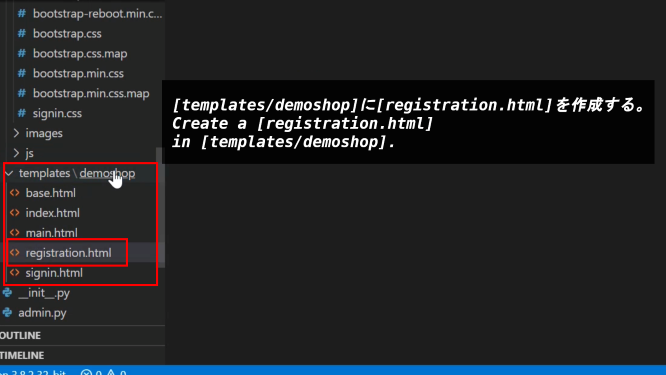
[templates/demoshop]に[registration.html]を作成する。
Create a [registration.html] in [templates/demoshop].
[signin.html]の内容を[registration.html]にコピペして、修正します。
Copy and paste the contents of [signin.html] into [registration.html] and modify it.
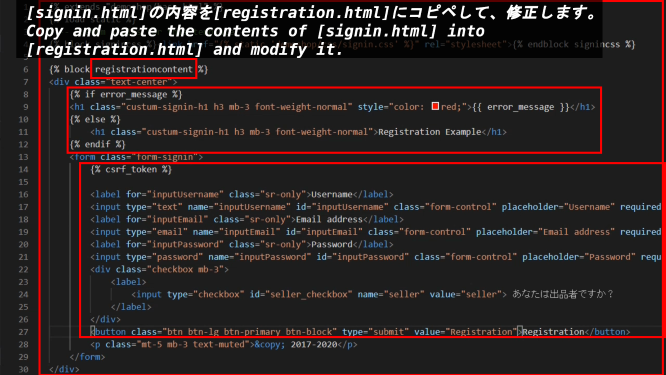
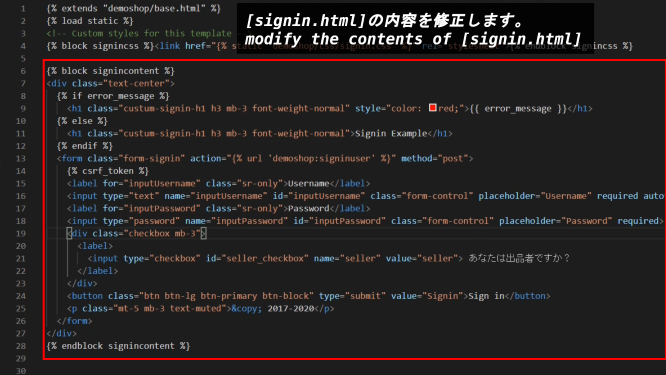
エラーメッセージがある場合はそれを表示させる。[inputタグ]に[required]と記述すれば、名前等の項目の入力が必須になります。[csrf_token]はPOSTリクエストをする際にセキュリティ上必要です。
Display error messages, if any. If you write [required] in [input tag], user will be required to enter a name and other information. [csrf_token] is required for security when making POST requests.
scrf token:クロスサイトリクエストフォージェリトークン
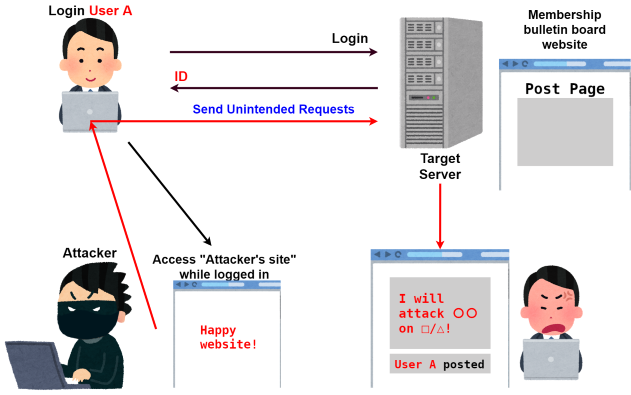
(scrf)クロスサイトリクエストフォージェリとは簡単に説明すると、「悪意のある誰かが作った攻撃用WEBページ」が「何も知らないユーザー」を利用して、「攻撃対象のWEBサーバー」に攻撃を仕掛けることを指します。
「攻撃者」は自ら「攻撃対象サーバー」へアクセスしなくても、「攻撃対象サーバー」を攻撃できます。
そして「攻撃対象サーバー」にアクセスして攻撃したユーザーは「何も知らないユーザー」になってしまいます。
その為「攻撃されたサーバー」は「実際に攻撃したユーザー」として「何も知らないユーザー」を認識します。
「何も知らないユーザー」は「実際に攻撃したユーザー」のレッテルを貼られてしまうのです。
The cross-site Request Forgery, in short, means that "Attack web page created by someone malicious" uses "General User who doesn't know anything" to attack "target web server to be attacked".
"attackers" can attack "target server" without accessing "target server" itself.
The user who accesses "target server" and attacks becomes "User who knows nothing".
Therefore, "Web server that was attacked" recognizes "User who knows nothing" as "actual attacker".
"User who knows nothing" is labeled "actual attacker".
この「csrf攻撃」で使われるリクエストは「攻撃者」が作ったものです。
これを防ぐには、「ユーザーのリクエスト」か「攻撃者のリクエスト」なのかを判断する為に最初に「ユーザーのブラウザに返すフォーム」の中に、「攻撃者が推測できない情報」を入れておけばいいのです。
Djangoでこれを実現するには、POSTリクエストする[formタグ]の直ぐ後に[csrf_token]と記述するだけです。
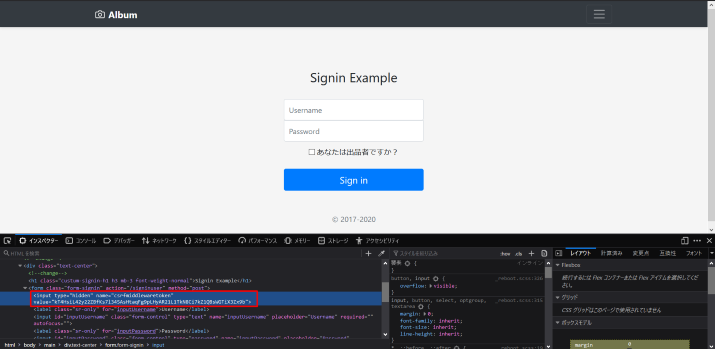
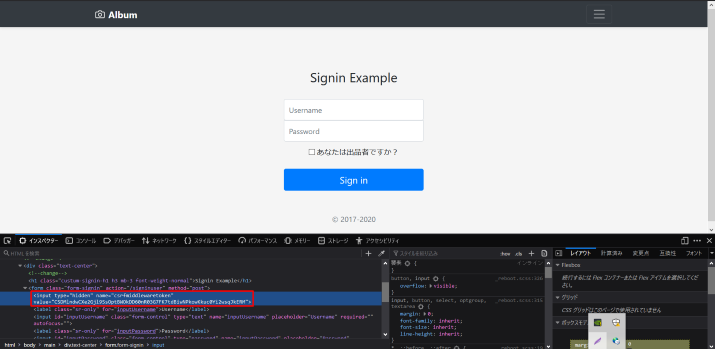
この[csrf_token]の部分は[input type]がHidden(画面に表示されない)になりHTMLに展開されます。
<input type='hidden' name='csrfmiddlewaretoken' value="zLDGdfadJt1X77Qfadfdf8e8989daeeV3EUHh460zfadfega99862022928273GYSmarq07Srx1y4S"/>
この[value]にできている[乱数]はPOSTリクエストフォームが送られる度に変化します。
試しにPOSTリクエストフォームがある画面で更新を何回かしてみてください。
The request used in this "csrf attack" was made by "attackers".
To prevent this, put "Information that an attacker cannot guess" in "Form returned to user's browser" first to determine whether it is "User Requests" or "request of the attacker".
In Django, this is accomplished by writing [csrf_token] immediately after the [form tag] POST request.
This [csrf_token] part is expanded to HTML where [input type] becomes Hidden (not displayed on the screen).
<input type='hidden' name='csrfmiddlewaretoken' value="zLDGdfadJt1X77Qfadfdf8e8989daeeV3EUHh460zfadfega99862022928273GYSmarq07Srx1y4S"/>
The [random number] in [value] changes each time a POST request form is sent.
Try refreshing the page several times on the screen in the POST request form.
例えばGETリクエスト時の場合、サーバへ送信するデータはリクエストしたURLの後に付け加えられています。
For example, in the case of a GET request, the data sent to the server is appended to the requested URL.
http://spamspamegg.spam/index.html?name=spam&password=egg
そしてPOSTリクエストの場合は、値を見えない所に隠して送ります。ですが「name=spam」のような書き方は一緒です。
In the case of a POST request, the value is sent hidden. However, writing like "name=spam" is the same.
          (HTTP message)
          message header
          empty line(CR+LF)
          message body -> name=spam&password=egg
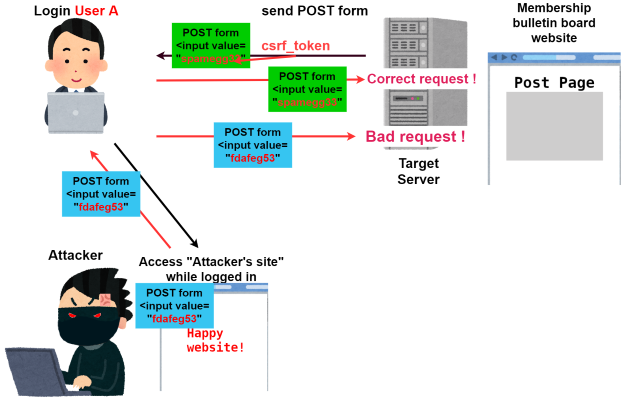
物事を簡単にすると、攻撃者はPOSTフォームを作成して「ユーザー」にそのPOSTフォームを「対象サーバー」に送るように仕向ける。
To simplify things, an attacker creates a POST form and directs "Users" to send the POST form to "target server".
しかし、[対象サーバー]が[csrf_token]をPOSTフォームを[ユーザー]に送る度に発行していれば、攻撃者はPOSTフォームに含まれる[乱数トークン]を予測することが困難になる(ほぼ不可能)。このような仕組みによって[csrf_token]は攻撃者から[ユーザー]を守っている。
However, if [target server] issues a [csrf_token] every time it sends a POST form to [Users]、an attacker would have difficulty predicting the [random number token] contained in the POST form (almost impossible). In this way, [csrf_token] protects [Users] from attackers.
[base.html]に[registration.html]の[block文]を追加する。
Add [block statement] of [registration.html] to [base.html].
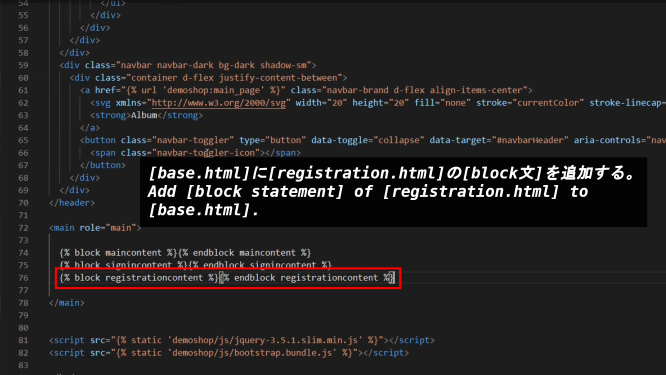
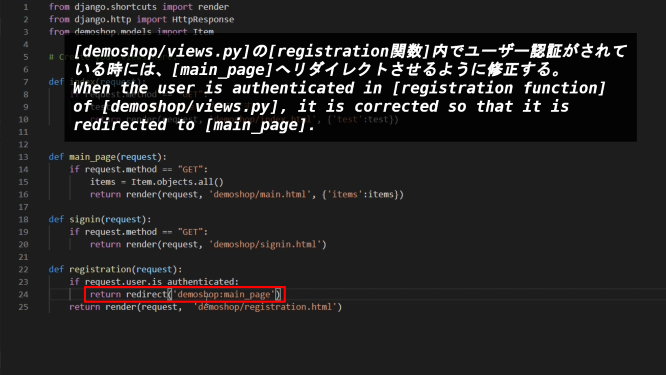
[demoshop/views.py]の[registration関数]内でユーザー認証がされている時には、[main_page]へリダイレクトさせるように修正する。
When the user is authenticated in [registration function] of [demoshop/views.py], it is corrected so that it is redirected to [main_page].
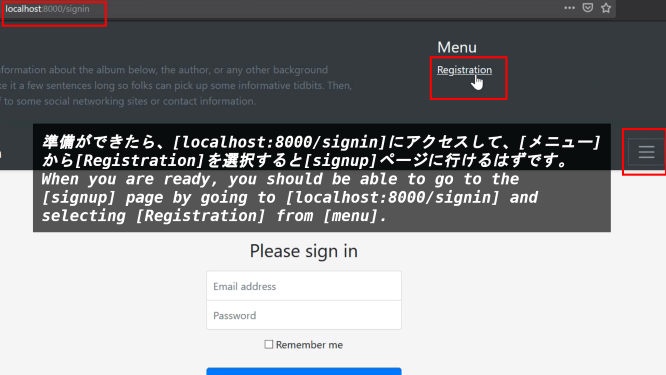
準備ができたら、[localhost:8000/signin]にアクセスして、[メニュー]から[Registration]を選択すると[signup]ページに行けるはずです。
When you are ready, you should be able to go to the [signup] page by going to [localhost:8000/signin] and selecting [Registration] from [menu].
⑤ 登録と認証システムの実装
⑤
Implementation of registration and authentication systems
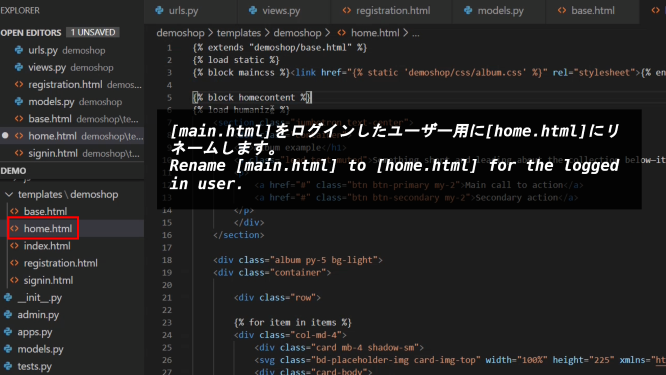
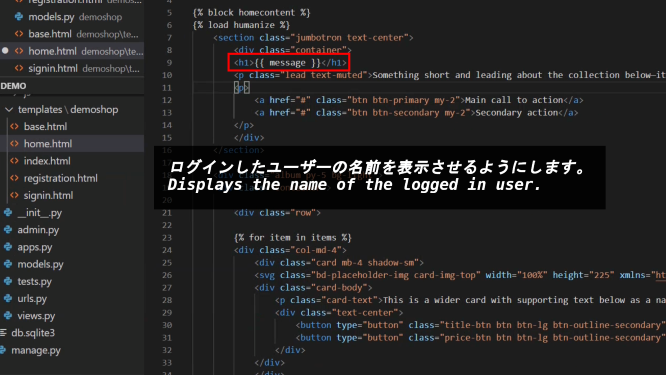
[main.html]をログインしたユーザー用に[home.html]にリネームします。
Rename [main.html] to [home.html] for the logged in user.
ログインしたユーザーの名前を表示させるようにします。
Displays the name of the logged in user.
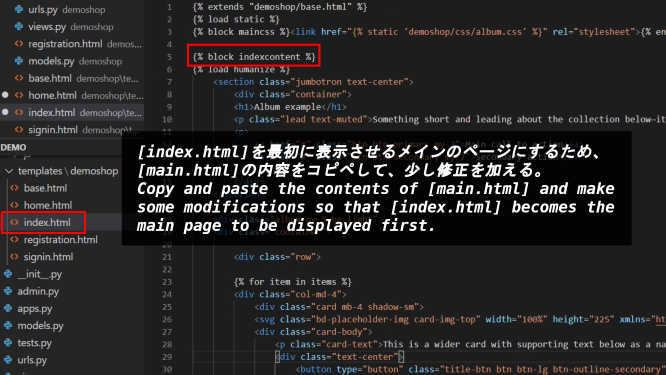
[index.html]を最初に表示させるメインのページにするため、[main.html]の内容をコピペして、少し修正を加える。
Copy and paste the contents of [main.html] and make some modifications so that [index.html] becomes the main page to be displayed first.
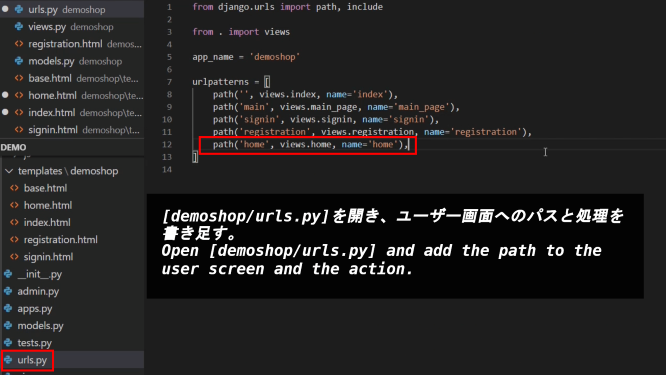
[demoshop/urls.py]を開き、ユーザー画面へのパスと処理を書き足す。
Open [demoshop/urls.py] and add the path to the user screen and the action.
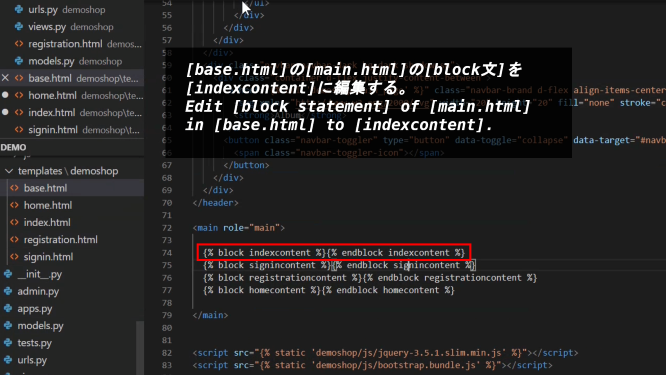
[base.html]の[main.html]の[block文]を[indexcontent]に編集する。
Edit [block statement] of [main.html] in [base.html] to [indexcontent].
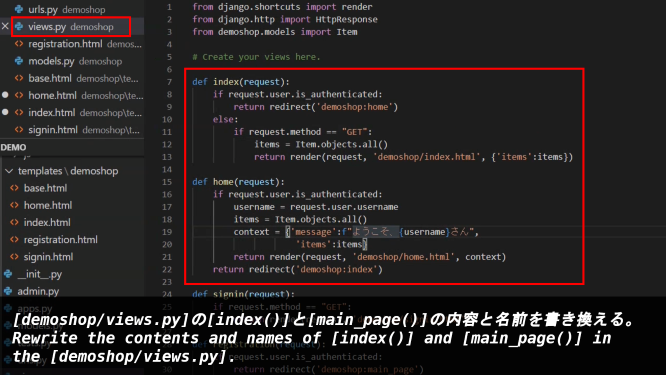
[demoshop/views.py]の[index()]と[main_page()]の内容と名前を書き換える。
Rewrite the contents and names of [index()] and [main_page()] in the [demoshop/views.py].
[demoshop/urls.py]の内容を書き換える。
Rewrite the contents of the [demoshop/urls.py].

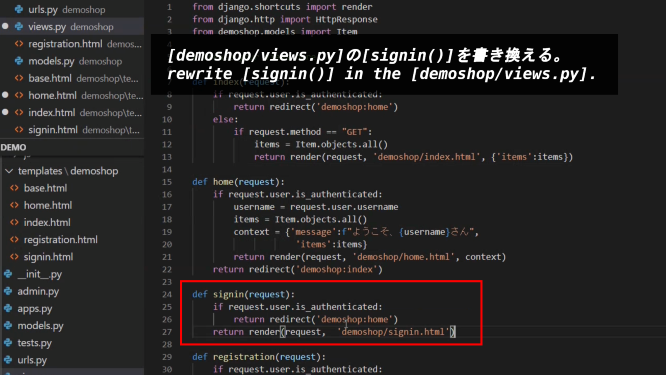
[demoshop/views.py]の[signin()]を書き換える。
rewrite [signin()] in the [demoshop/views.py].
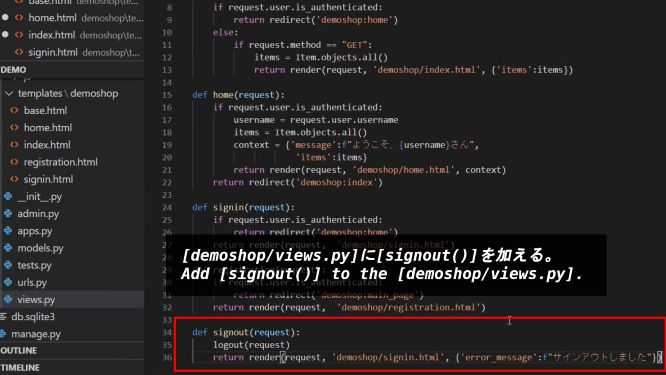
[demoshop/views.py]に[signout()]を加える。
Add [signout()] to the [demoshop/views.py].
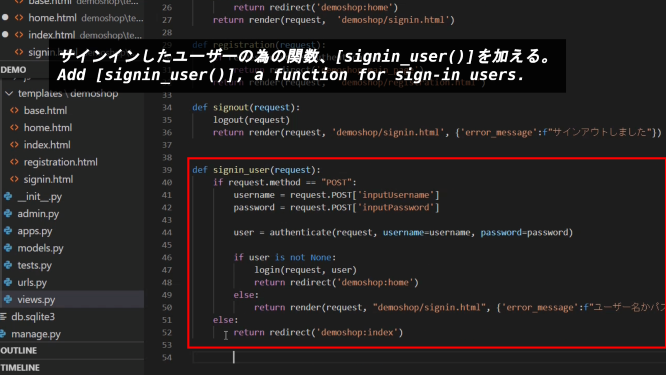
サインインしたユーザーの為の関数、[signin_user()]を加える。
Add [signin_user()], a function for sign-in users.
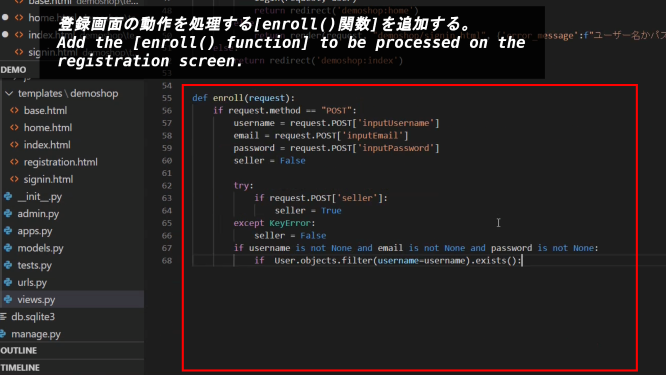
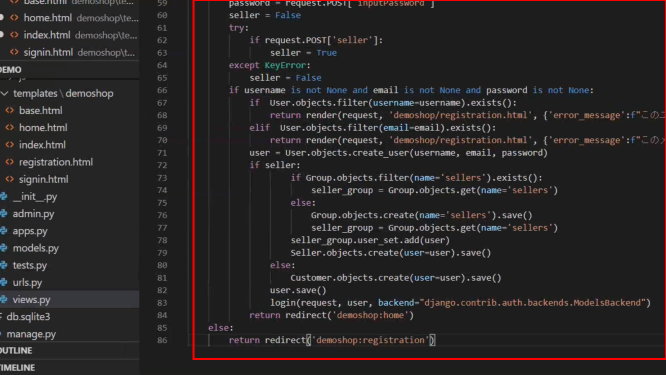
登録画面の動作を処理する[enroll()関数]を追加する。
Add the [enroll() function] to be processed on the registration screen.
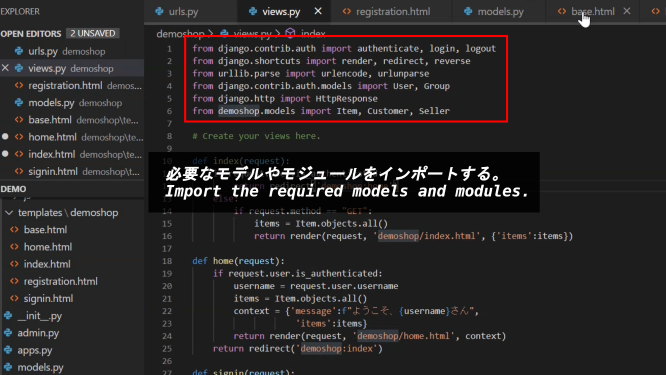
必要なモデルやモジュールをインポートする。
Import the required models and modules.
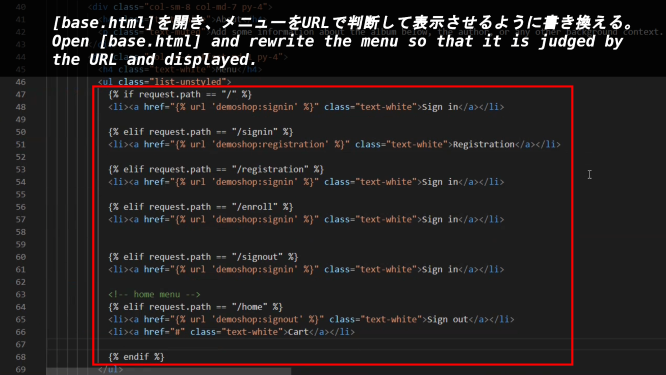
[base.html]を開き、メニューをURLで判断して表示させるように書き換える。
Open [base.html] and rewrite the menu so that it is judged by the URL and displayed.
[signin.html]の内容を修正します。
modify the contents of [signin.html]
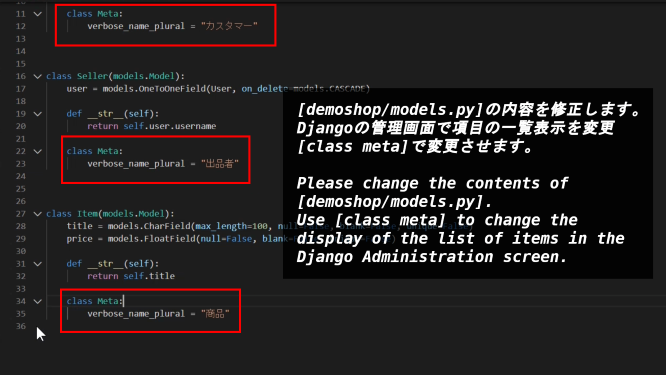
[demoshop/models.py]の内容を修正します。Djangoの管理画面で項目の一覧表示を変更[class meta]で変更させます。
Please change the contents of [demoshop/models.py]. Use [class meta] to change the display of the list of items in the Django Administration screen.
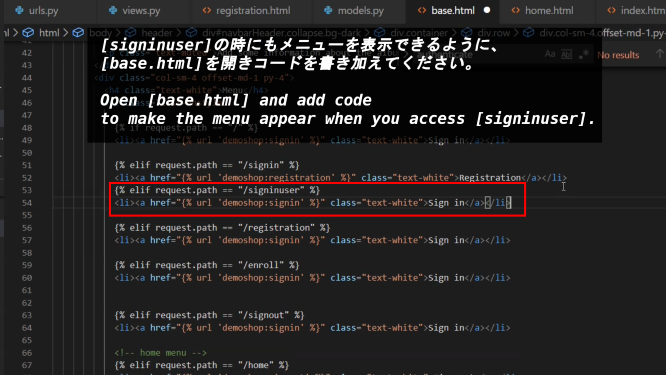
[signinuser]の時にもメニューを表示できるように、[base.html]を開きコードを書き加えてください。
Open [base.html] and add code to make the menu appear when you access [signinuser].
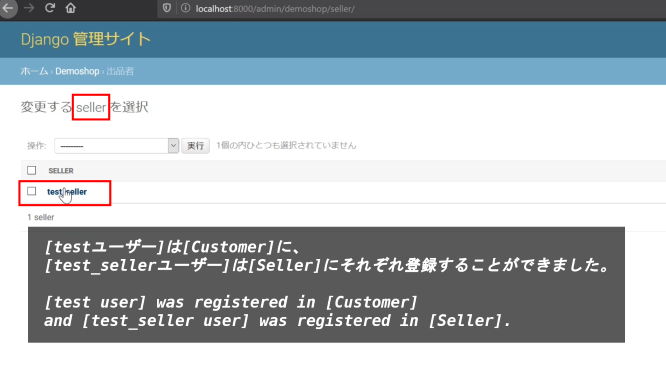
管理画面から登録したユーザーを削除することもできます。
You can also delete registered users from the administration screen.
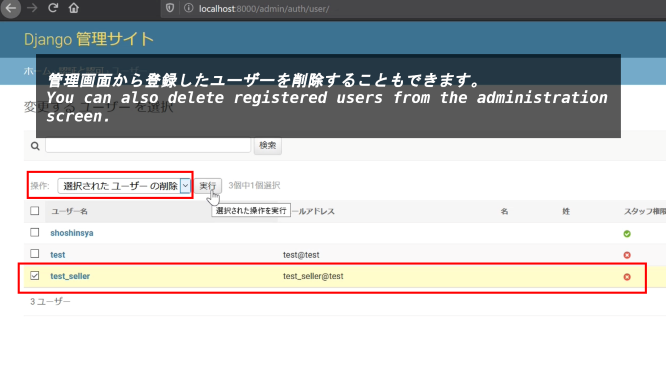
[testユーザー]は[Customer]に、[test_sellerユーザー]は[Seller]にそれぞれ登録することができました。
[test user] was registered in [Customer] and [test_seller user] was registered in [Seller].
⑥ Herokuの環境を整える
⑥
Prepare the environment for Heroku
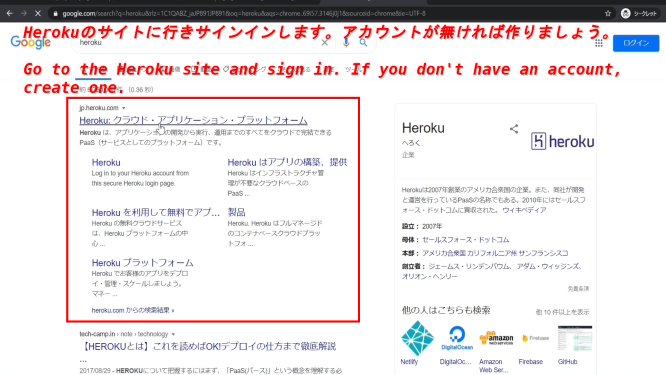
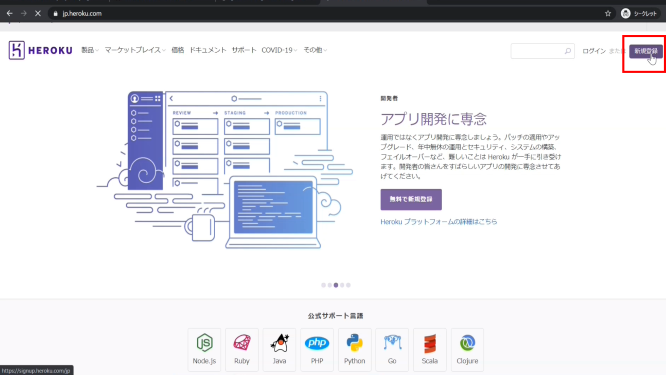
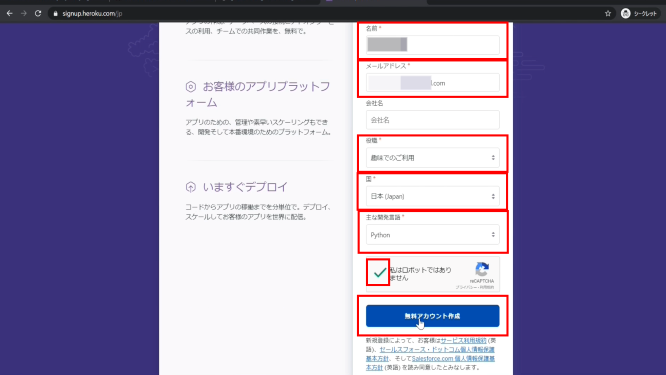
Herokuのサイトに行きサインインします。アカウントが無ければ作りましょう。
Go to the Heroku site and sign in. If you don't have an account, create one.
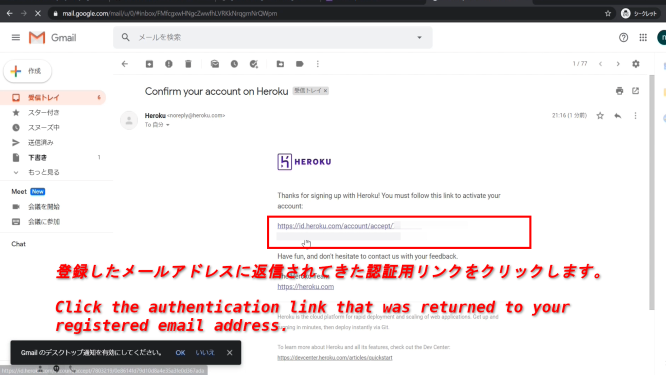
登録したメールアドレスに返信されてきた認証用リンクをクリックします。
Click the authentication link that was returned to your registered email address.
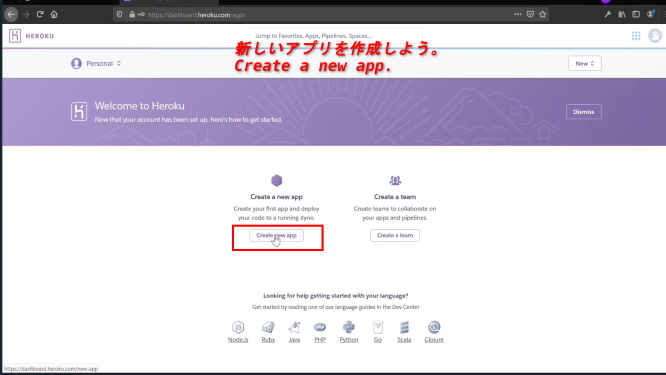
新しいアプリを作成しよう。
Create a new app.
Heroku CLIをインストールして、コマンドラインからHerokuの操作ができるようにしよう。(WindowsのWSLのインストール方法です)
Install the Heroku CLI so that you can work with Heroku from the command line. (Windows WSL installation instructions)
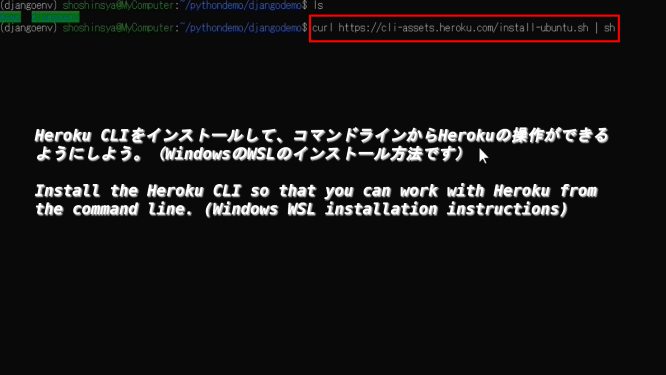
curl https://cli-assets.heroku.com/install.sh | sh
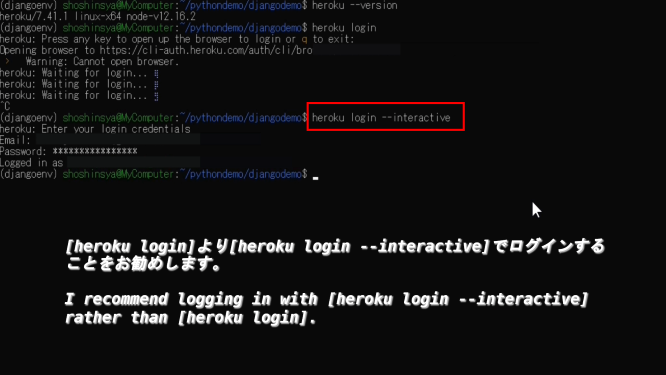
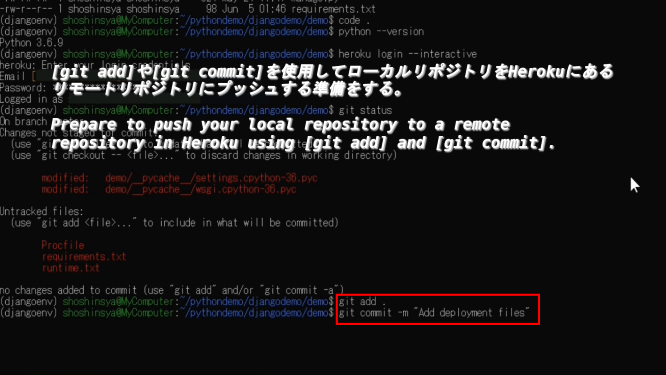
[heroku login]より[heroku login --interactive]でログインすることをお勧めします。
I recommend logging in with [heroku login --interactive] rather than [heroku login].
⑦ GitとHeroku
CLIを使ってHerokuにアプリをデプロイする
⑦ Deploy apps to Heroku using Git and Heroku
CLI
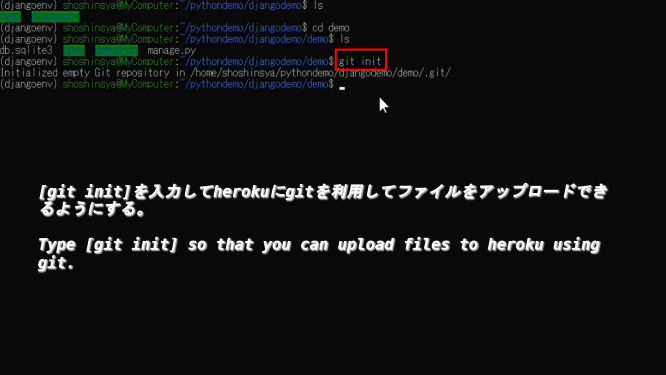
[git init]を入力してherokuにgitを利用してファイルをアップロードできるようにする。
Type [git init] so that you can upload files to heroku using git.
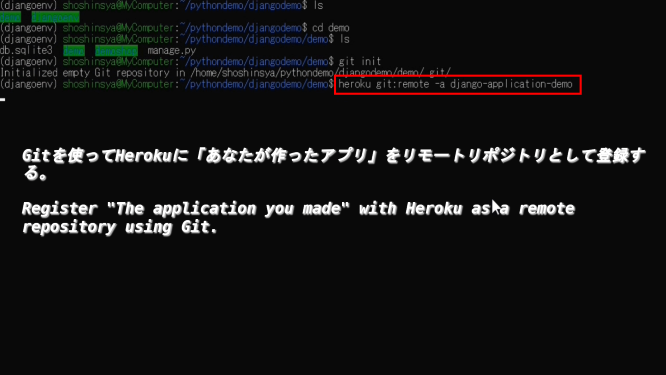
Gitを使ってHerokuに「あなたが作ったアプリ」をリモートリポジトリとして登録する。
Register "The application you made" with Heroku as a remote repository using Git.
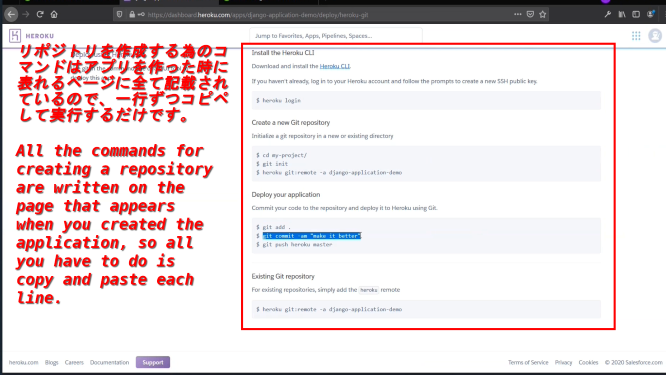
リポジトリを作成する為のコマンドはアプリを作った時に表れるページに全て記載されているので、一行ずつコピペして実行するだけです。
All the commands for creating a repository are written on the page that appears when you created the application, so all you have to do is copy and paste each line.
cd yourapp

git init

heroku git:remote -a "Application name you created in heroku"

git add .

git commit -m "My first commit"

git push heroku master
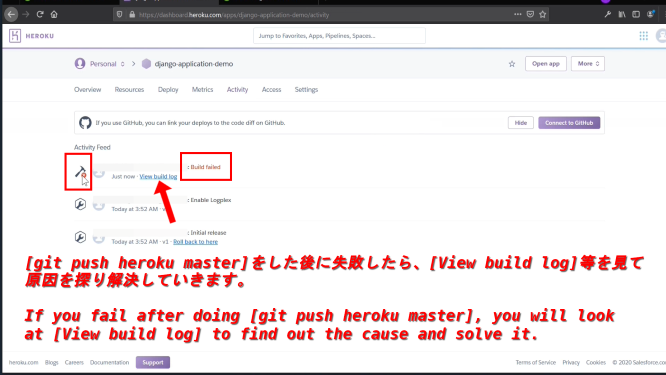
[git push heroku master]をした後に失敗したら、[View build log]等を見て原因を探り解決していきます。
If you fail after doing [git push heroku master], you will look at [View build log] to find out the cause and solve it.
HerokuにDjangoアプリを正常にアップロードできるように必要なPythonモジュールをインストールしていく。
Install the necessary Python modules so that you can successfully upload Django apps to Heroku.
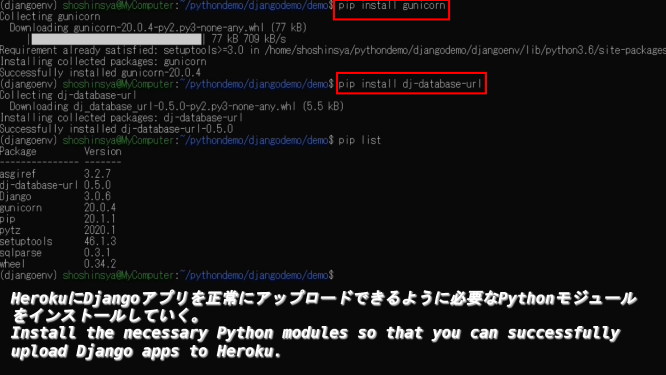
pip install gunicorn
pip install dj_database_url
pip install whitenoise
ローカルのPythonモジュールをHeroku側のアプリでもインストールできるようにrequirements.txtを用意します。
Prepare requirements.txt so that local Python modules can be installed in Heroku's apps.
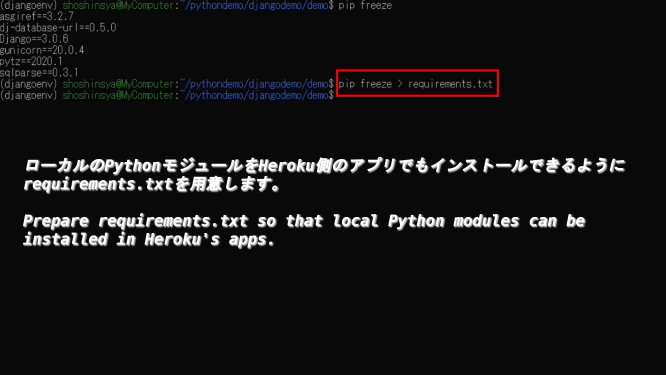
pip freeze > requirements.txt
Gunicorn(APサーバー)を使用してアプリを処理できるようにする為、Procfileを作成して中身を書く。(Djangoの純正のAPサーバーを使うより高速に動くため(動的ファイルの処理に特化して最適化してくれている為))
In order to be able to process apps using Gunicorn (AP server), We create a Procfile and write the contents.
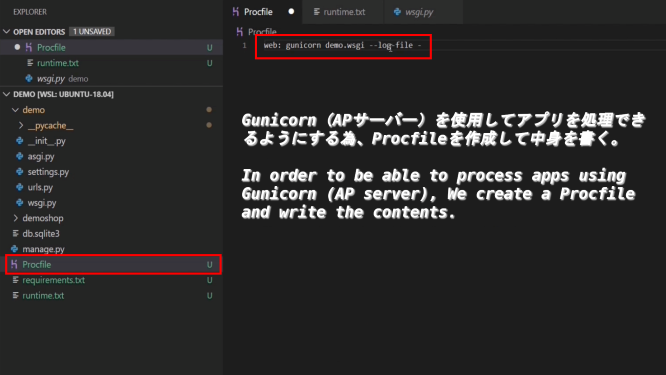
Procfile
web: gunicorn (yourprojectname).wsgi --log-file -
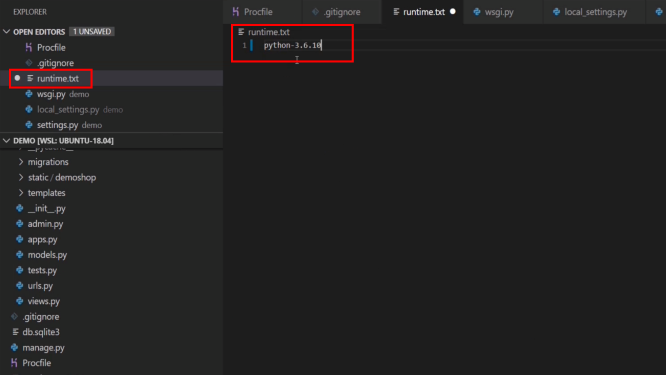
HerokuにどのバージョンのPythonを使用するかを教えるため、runtime.txtを作成する。
Create runtime.txt to tell Heroku which version of Python to use.
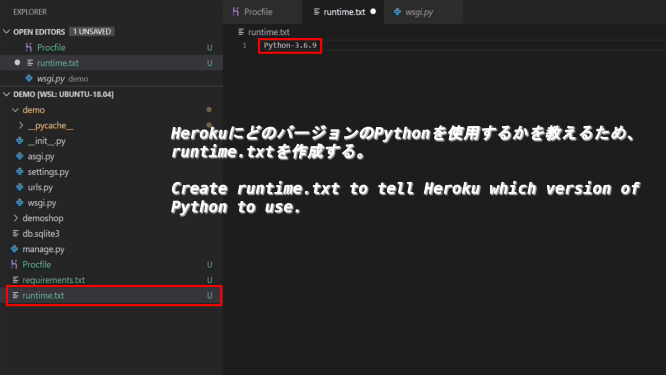
runtime.txt
python-x.x.x
[git add]や[git commit]を使用してローカルリポジトリをHerokuにあるリモートリポジトリにプッシュする準備をする。
Prepare to push your local repository to a remote repository in Heroku using [git add] and [git commit].
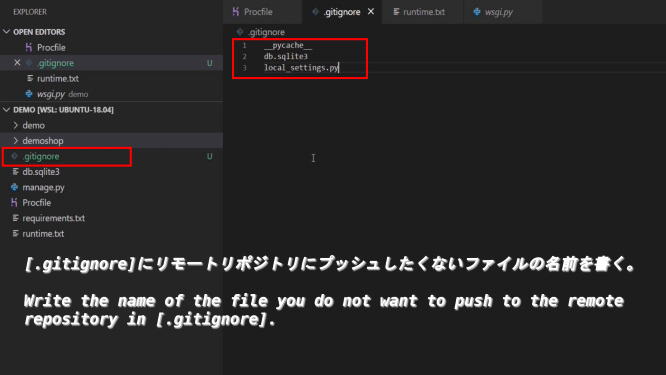
[.gitignore]にリモートリポジトリにプッシュしたくないファイルの名前を書く。
Write the name of the file you do not want to push to the remote repository in [.gitignore].
⑧ 細かい設定を行っていく
⑧ make
detailed settings
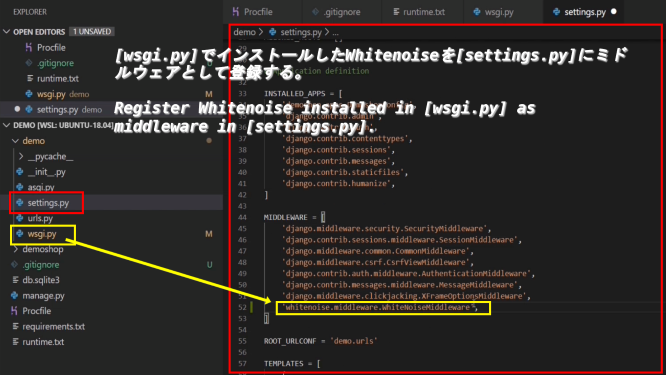
[wsgi.py]でインストールしたWhitenoiseを[settings.py]にミドルウェアとして登録する。
Register Whitenoise installed in [wsgi.py] as middleware in [settings.py].
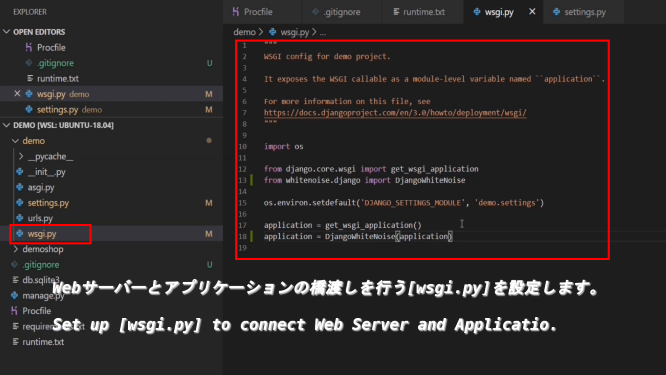
Webサーバーとアプリケーションの橋渡しを行う[wsgi.py]を設定します。
Set up [wsgi.py] to connect Web Server and Application.
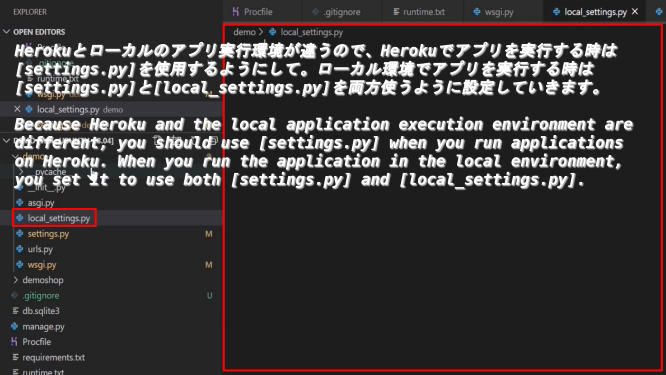
Herokuとローカルのアプリ実行環境が違うので、Herokuでアプリを実行する時は[settings.py]を使用するようにして。ローカル環境でアプリを実行する時は[settings.py]と[local_settings.py]を両方使うように設定していきます。
Because Heroku and the local application execution environment are different, you should use [settings.py] when you run applications on Heroku. When you run the application in the local environment, you set it to use both [settings.py] and [local_settings.py].
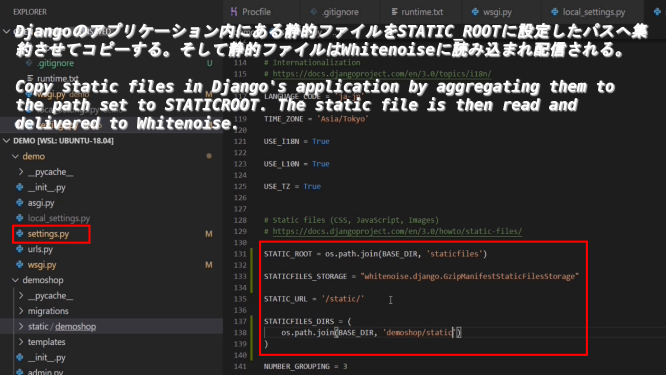
Djangoのアプリケーション内にある静的ファイルをSTATIC_ROOTに設定したパスへ集約させてコピーする。そして静的ファイルはWhitenoiseに読み込まれ配信される。
Copy static files in Django's application by aggregating them to the path set to STATICROOT. The static file is then read and delivered to Whitenoise.
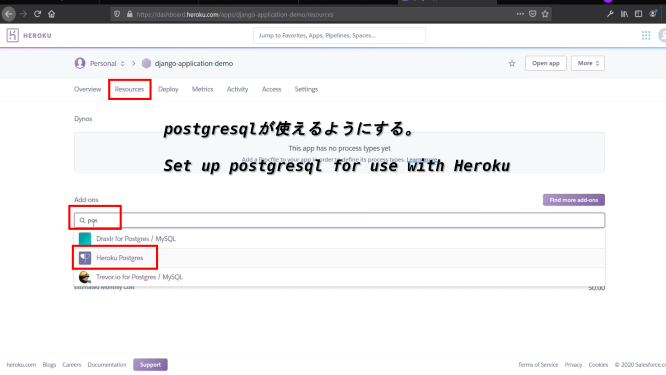
postgresqlが使えるようにする。
Set up postgresql for use with Heroku
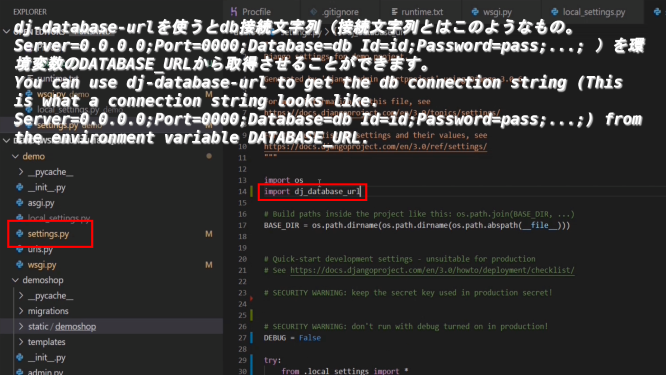
dj-database-urlを使うとdb接続文字列(接続文字列とはこのようなもの。Server=0.0.0.0;Port=0000;Database=db Id=id;Password=pass;...; )を環境変数のDATABASE_URLから取得させることができます。
You can use dj-database-url to get the db connection string (This is what a connection string looks like. Server=0.0.0.0;Port=0000;Database=db Id=id;Password=pass;...;) from the environment variable DATABASE_URL.
Herokuで使えるPythonバージョンが合わないようなので変更します。
It seems that the Python version available in Heroku is different, so I will change it.

環境変数としてSECRETE_KEYを設定してHerokuのConfig Varsに加えましょう。
Set SECRETE_KEY as an environment variable and add it to Heroku's Config Vars.
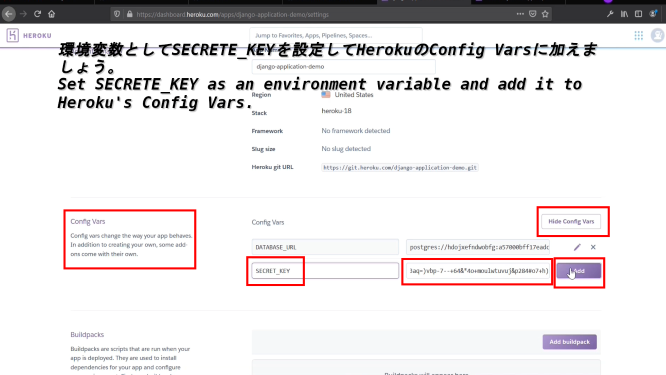
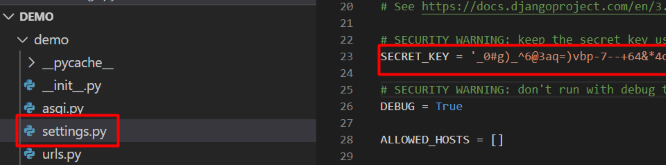
補足:SECRETE_KEYは通常[(project)/settings.py]にあります。
Note: SECRETE_KEY is normally found in [(project)/settings.py].
DATABASE_URL等取得できるように[django-heroku]をインストールするため依存関係のモジュール等もインストールする。
In order to obtain the DATABASE_URL, etc., install the [django-heroku] and the modules of the dependencies.
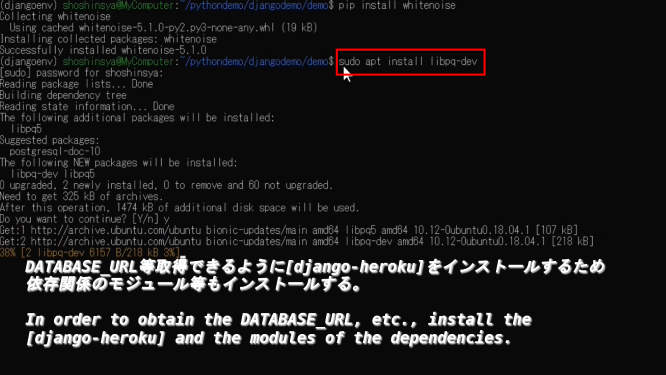
sudo apt install libpq-dev
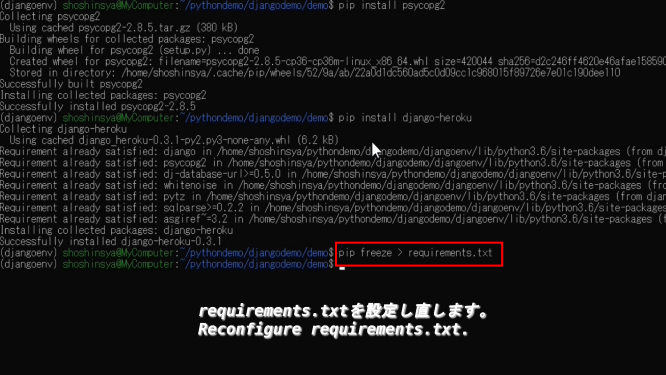
pip install pyscopg2
pip install django-heroku
requirements.txtを設定し直します。
Reconfigure requirements.txt.
Herokuのデプロイエラーになったら、原因を見つけて修正していきます。
If you get a Heroku deployment error, find the cause and fix it.

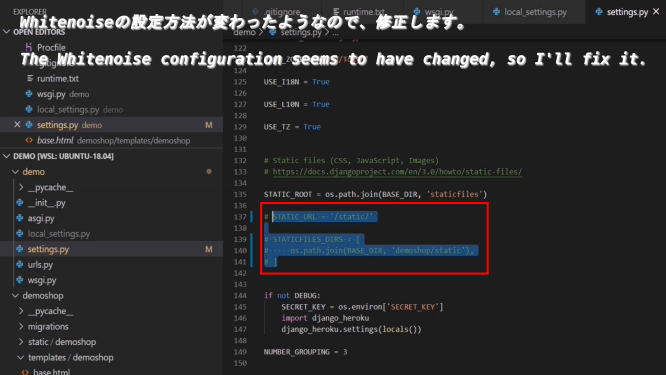
Whitenoiseの設定方法が変わったようなので、修正します。
The Whitenoise configuration seems to have changed, so I'll fix it.
(your project)/wsgi.py
import os

from django.core.wsgi import get_wsgi_application

os.environ.setdefault('DJANGO_SETTINGS_MODULE', 'demo.settings')

application = get_wsgi_application()
(your project)/settings.py
import os
import dj_database_url
BASE_DIR = os.path.dirname(os.path.dirname(os.path.abspath(__file__)))
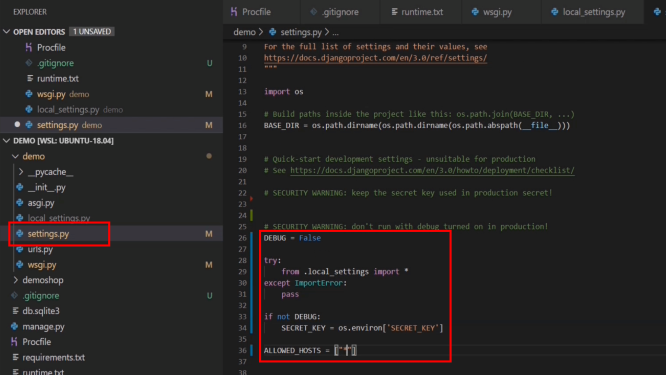
DEBUG = False
try:
from .local_settings import *
except ImportError:
pass
ALLOWED_HOSTS = ["*"]
INSTALLED_APPS = [
'demoshop.apps.DemoshopConfig',
'django.contrib.admin',
'django.contrib.auth',
'django.contrib.contenttypes',
'django.contrib.sessions',
'django.contrib.messages',
'django.contrib.staticfiles',
'django.contrib.humanize',
]
MIDDLEWARE = [
'django.middleware.security.SecurityMiddleware',
'whitenoise.middleware.WhiteNoiseMiddleware',
'django.contrib.sessions.middleware.SessionMiddleware',
'django.middleware.common.CommonMiddleware',
'django.middleware.csrf.CsrfViewMiddleware',
'django.contrib.auth.middleware.AuthenticationMiddleware',
'django.contrib.messages.middleware.MessageMiddleware',
'django.middleware.clickjacking.XFrameOptionsMiddleware',
]
STATICFILES_STORAGE = 'whitenoise.storage.CompressedManifestStaticFilesStorage'
ROOT_URLCONF = '(your project).urls'
TEMPLATES = [
{
'BACKEND': 'django.template.backends.django.DjangoTemplates',
'DIRS': [os.path.join('(your application)','templates')],
'APP_DIRS': True,
'OPTIONS': {
'context_processors': [
'django.template.context_processors.debug',
'django.template.context_processors.request',
'django.contrib.auth.context_processors.auth',
'django.contrib.messages.context_processors.messages',
],
},
},
]
WSGI_APPLICATION = '(your project).wsgi.application'
DATABASES = {'default' : dj_database_url.config()}
AUTH_PASSWORD_VALIDATORS = [
{
'NAME': 'django.contrib.auth.password_validation.UserAttributeSimilarityValidator',
},
{
'NAME': 'django.contrib.auth.password_validation.MinimumLengthValidator',
},
{
'NAME': 'django.contrib.auth.password_validation.CommonPasswordValidator',
},
{
'NAME': 'django.contrib.auth.password_validation.NumericPasswordValidator',
},
]
LANGUAGE_CODE = 'ja-jp'
TIME_ZONE = 'Asia/Tokyo'
USE_I18N = True
USE_L10N = True
USE_TZ = True
STATIC_ROOT = os.path.join(BASE_DIR, 'staticfiles')
if not DEBUG:
SECRET_KEY = os.environ['SECRET_KEY']
import django_heroku
django_heroku.settings(locals())
NUMBER_GROUPING = 3
(your project)/local_settings.py
import os

BASE_DIR = os.path.dirname(os.path.dirname(os.path.abspath(__file__)))

SECRET_KEY = 'your seceret key'

DATABASES = {
    'default': {
        'ENGINE': 'django.db.backends.sqlite3',
        'NAME': os.path.join(BASE_DIR, 'db.sqlite3'),
    }
}

DEBUG = True
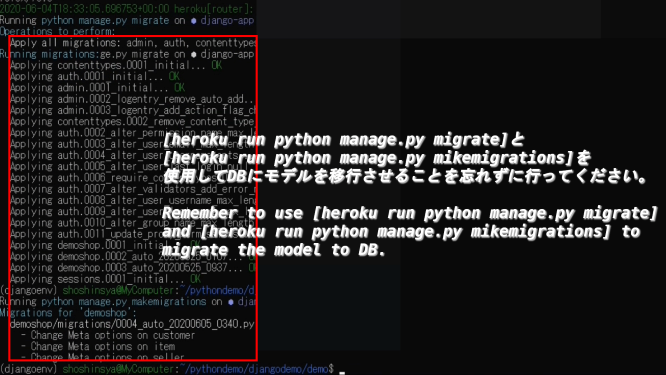
[heroku run python manage.py migrate]と[heroku run python manage.py mikemigrations]を使用してDBにモデルを移行させることを忘れずに行ってください。
Remember to use [heroku run python manage.py migrate] and [heroku run python manage.py mikemigrations] to migrate the model to DB.
無事にアプリは表示できましたが、DBが空なのでローカルにあるSQLiteの情報をコピーしましょう。
I was able to display the application without any problem, but since the DB is empty, let's copy the local SQLite information.

SQLiteが使用できる状態にします。
Make SQLite available.
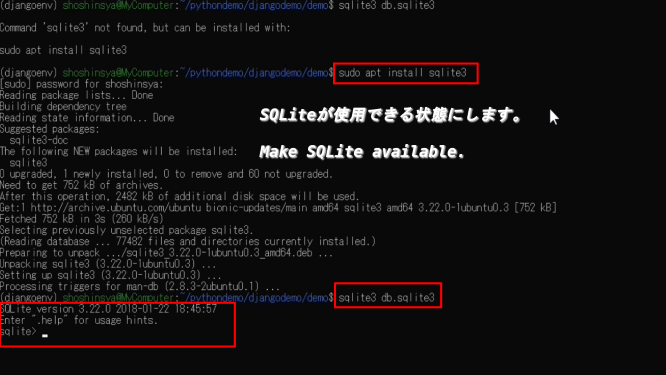
sudo apt install sqlite3
$ python
>>> import sqlite3
>>> con = sqlite3.connect('your sqlite3 database name')
>>> cur = con.cursor()
>>> cur.execute('select * from (your table name)')
>>> import csv
>>> with open('output.csv', 'w') as f:
...     csv_out = csv.writer(f)
...     csv_out.writerow([d[0] for d in cur.description])
...     for result in cur:
...         csv_out.writerow(result)
>>>
>>> con.close()
>>> exit()
Pythonを使ってSQLiteの情報をCSVに出力したら、今度はposgreSQLを使用できるようにします。
After you use Python to output the contents of SQLite data to CSV, you prepare to use posgreSQL next.
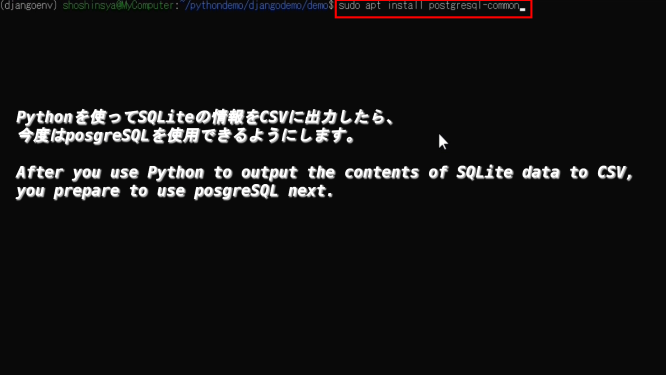
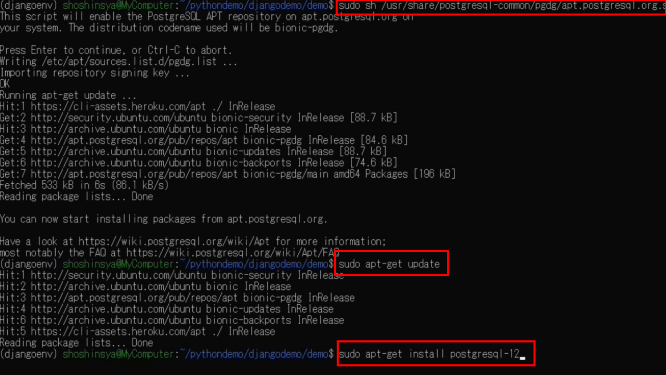
sudo apt install postgresql-common
sudo sh /usr/share/postgresql-common/pgdg/apt.postgresql.org.sh
sudo apt-get update
sudo apt-get install postgresql-12
posgreSQLが使用できていることを確認してください。
Please make sure that you can use posgreSQL.

sudo /etc/init.d/postgresql start
sudo -i -u postgres
postgres@xxxx: ~$ psql
postgres=# \q
postgres@xxxx: ~$ exit
sudo /etc/init.d/postgresql stop
Herokuにログインして、アプリのpostgreSQLにアクセスします。/p>
You log in to Heroku and access the app postgreSQL.
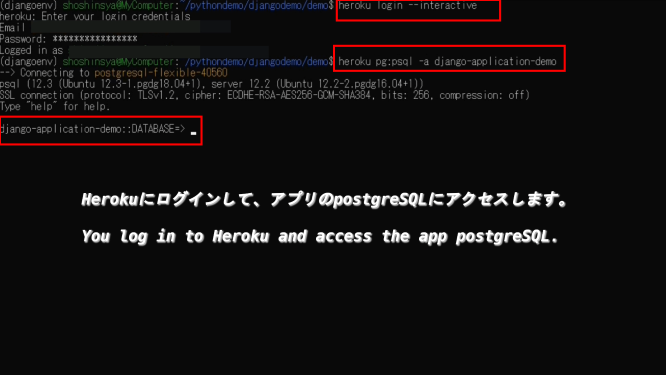
heroku pg:psql -a (your app)
ローカルにあるCSVをHerokuのアプリのPostgreSQLにコピーします。
Copy the local CSV into the PostgreSQL of Heroku's app.
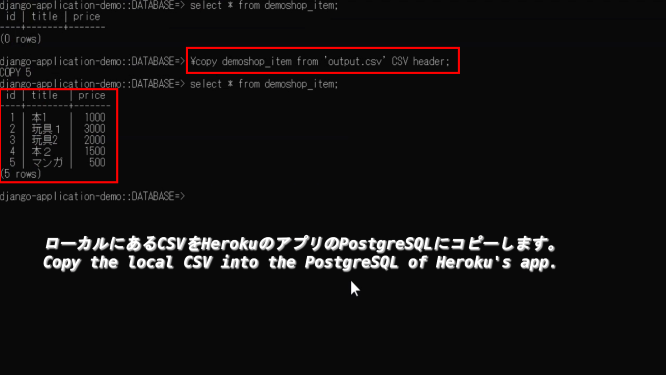
(your app)::DATABASE=> \copy (tablename in heroku postgresql) from 'output.csv' CSV header;
(your app)::DATABASE=> \q
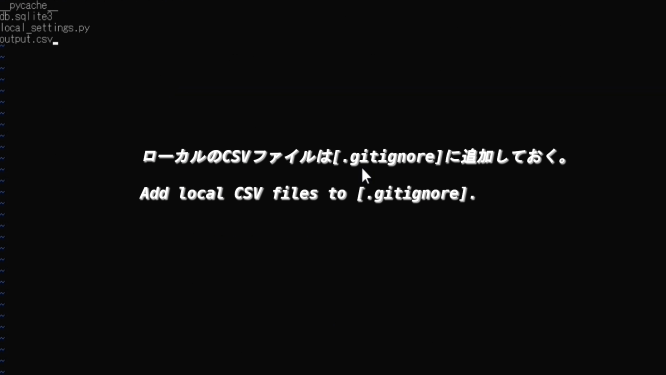
ローカルのCSVファイルは[.gitignore]に追加しておく。
Add local CSV files to [.gitignore].
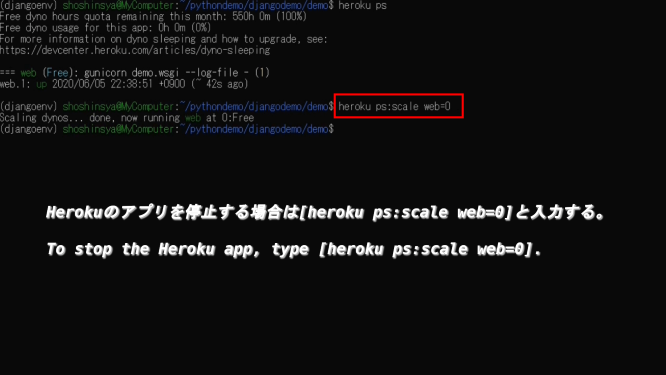
Herokuのアプリを停止する場合は[heroku ps:scale web=0]と入力する。
To stop the Heroku app, type [heroku ps:scale web=0].
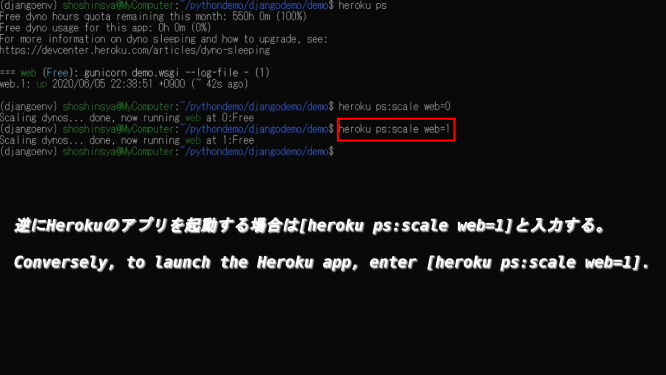
逆にHerokuのアプリを起動する場合は[heroku ps:scale web=1]と入力する。
Conversely, to launch the Heroku app, enter [heroku ps:scale web=1].
以上です。お疲れ様です。
That's all. Thank you for your hard work.