Published Date : 2020年10月3日4:49
【python, flask】賃金階級年齢階級別労働者割合のWEBアプリ part2
【python, flask】Web application for ratio of
workers by wage class and age group part 2
This blog has an English translation
YouTubeにアップした動画、「【python, flask】賃金階級年齢階級別労働者割合のWEBアプリ part2」の補足説明の記事です。
Here's a little more about the 「【python, flask】Web application for ratio of workers by wage class and age group part 2」 video I uploaded to YouTube.
目次
Table of Contents
① 動画の説明
① Video
Description
前回の続きです。
This is the continuation of the last time.
ユーザーが年収と年齢をセレクトしてボタンを押すと、結果を表示させる機能を実装していきましょう。
we'll implement a feature that lets users select their annual income and age, press a button, and see the results.
アプリ用のHTMLファイルを作成してください。
Create an HTML file for your application.
project folder/
    app_test/
    templates/
        -> app.html
        index.html
    app.py
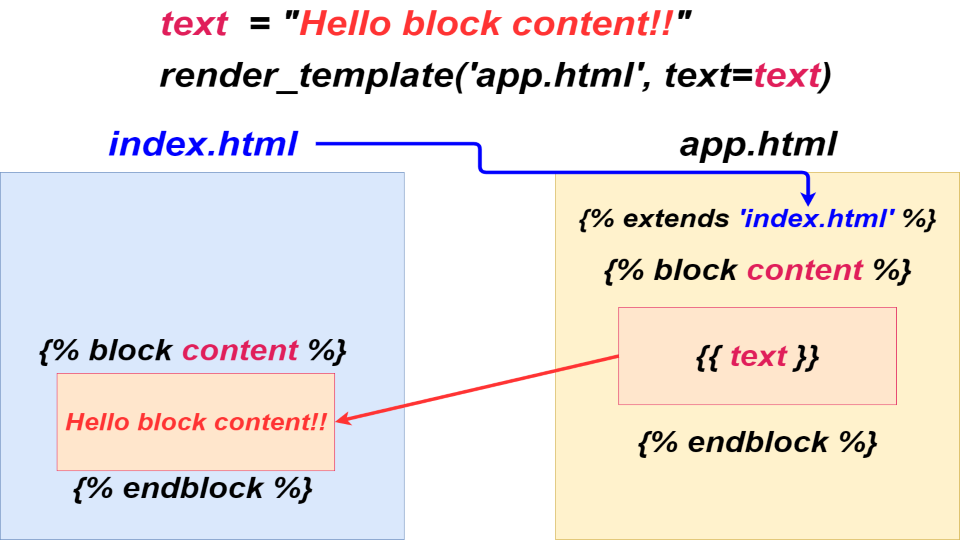
{% extends "index.html" %}
{% block content %}
<p> {{ text }} </p>
{% endblock %}
project folder/
    app_test/
    templates/
        app.html
        -> index.html
    app.py
<p> {{ description }} </p>
{% block content %}
{% endblock %}
この[block content]で囲まれた部分を[index.html]内で表示させることができます。
The area enclosed by [block content] can be displayed in [index.html].
こうすることによって、基本となるサイト部分(index.html)と、アプリの部分(app.html)を分けることができ、
This is useful because you can separate the basic site part (index.html) from the application part (app.html),
アプリ部分のHTMLのコードの量が大きくなってしまった時に、見やすく、分かりやすくなるので便利です。
When the amount of HTML code in the application becomes large, it becomes easy to see and understand.
URLの["/app"]ディレクトリにアクセスがあった時に、アプリを表示させる関数が動きます。
When the ["/app"] directory of the URL is accessed, the function to display the application runs.
project folder/
    app_test/
    templates/
        app.html
        index.html
-> app.py
@app.route('/app')
def application():
    text = 'This is an application test'
    return render_template('app.html', text=text)
CSVファイルをPandasを使って整形してから、再度CSVファイルに直し、そのCSVファイルのパスを設定します。
Format the CSV file using Pandas, convert it to a CSV file again, and set the path of the CSV file.
POSTメソッドを使ってユーザーの入力情報を取得して処理するので、[request]と、[csv]をインポートします。
It uses the POST method to retrieve and process user input, so it imports [request] and [csv].
import pandas as pd

csv_file_path = 'csv/file/path'
df = pd.read_csv(csv_file_path)

new_df = df[df.columns[2:]][:24]
new_df.index = df['賃金階級'][:24]

new_df.to_csv('new csv/file/path')
次にCSVファイルを読み込み、二次元配列に直します。
Then read the CSV file and convert it into a two-dimensional array.
project folder/
    app_test/
    templates/
        app.html
        index.html
-> app.py
import csv

csv_path = 'new csv/file/path'
with open(csv_path, 'r', encoding='utf-8_sig') as f:
    reader = csv.reader(f)
    l = [row for row in reader]
因みに、[utf-8_sig]とはBOMが有るUTF-8をエンコードする際に必要です。
Note that [utf-8_sig] is required to encode UTF-8 with a BOM.
OSによってはテキストデータを読み込む際に先頭の3バイトのBOMが無いと、どの文字コードなのか判断できないことがあります。
Depending on the OS, it may not be possible to determine the character code without the first 3 bytes of BOM when reading text data.
先ほど保存したcsvファイルは何らかの理由でBOMが有るUTF-8として保存されてしまいました。
The csv file you just saved was saved as UTF-8 with BOM for some reason.
PythonはBOM付きのテキストファイルを正常に処理することができないことがあり、実際にエラーを表示してしまいます。
Python may not be able to successfully process text files with BOMs, and will actually display an error.
そこでエンコードを[utf_8_sig]とすると、BOM付きの場合BOMを無視して読み込んでくれます。
If you set the encoding to [utf_8_sig], it will ignore the BOM and load it.
そして、セレクトタグのオプションとして使用する部分の配列を新たに作り、
It then creates a new array to use as options in the select tag,
ユーザーがセレクトしたオプションの値を[request.get()メソッド]を使用して取得します。
and uses [request.get() method] to get the value of the option selected by the user.
age_options = l[0][1:]
ai_options = [l_[0] for l_ in l[1:]]

select_age = request.form.get('age')
select_ai = request.form.get('ai')
変数をまとめて辞書形式として[render_template()メソッド]に渡すことができます。引数の変数が多くなってしまった時に便利です。
You can pass variables together as a dictionary to [render_template() Method]. This is useful when there are too many variables in the argument.
return render_template('app.html', **content)
Bootstrapを利用して、Form部分を作成します。コピペして、少し改良するだけなので便利です。
Create a Form part using Bootstrap. It's convenient because you just need to copy and paste it and improve it a little.
Bootstrapを使えるようにするため、[index.html]のヘッダータグにCSSのURLを、ボディタグの一番最後のあたりにjsのURLをコピペしてください。
To enable Bootstrap, copy and paste the CSS URL in the [index.html] header tag and the js URL at the very end of the body tag.
先ほど用意したオプション用の配列を、For文を使ってブラウザ画面に表示させます。
Use the For statement to display the array of options you just created on the browser screen.
オプションタグのバリューに指定した変数の値が、POSTメソッドを通じて、ユーザーがセレクトした値として取得できます。
The value of the variable specified in the value of the option tag can be retrieved as the value selected by the user through the POST method.
Form内にあるサブミットボタンを押せば先ほどの値が取得されるので、条件分岐を使ってブラウザ画面に処理の内容を表示させるようにします。
If you press the Submit button in the Form, the previous value will be retrieved, so you can use a conditional branch to display the process on the browser screen.
[route()メソッド]の引数にPOSTメソッドを指定することを忘れずに。
Remember to include the POST method as an argument to [route() method].
@app.route('/app', methods=['GET','POST'])
これで取得した値をブラウザ画面に表示させることができました。
The retrieved value is displayed on the browser screen.
続いては年収と年齢から年代別の年収割合を算出して、表示させるようにしてみましょう。
Next, let's calculate the annual income ratio by age from the annual income and age and display it.
処理の内容は前回の時とほぼ同じですが、Pandasを使った時と比べて、配列のインデックスが違うので注意してください。
The process is similar to the previous one, but note that the array indices are different compared to when using Pandas.
上手くいったらしばらくこのアプリで遊んでみてください。次回はこのアプリをHerokuにアップロードして、誰でも使える状態にしてみましょう。
If it works, please try this application for a while. Next time you'll upload the app to Heroku to make it universally available.
以上です。お疲れ様です。
That's all. Thank you for your hard work.