Published Date : 2020年7月7日11:57
002 - Generative DesignをUnityで再現してみよう
002 - Reproduce Generative Design in
Unity
This blog has an English translation
YouTubeにアップした動画、「002 - Generative DesignをUnityで再現してみよう」の補足説明の記事です。
Here's a little more about the 「002 - Reproduce Generative Design in Unity」 video I uploaded to YouTube.
Generative Design(ProcessingやP5.js)で使われているコードをUnityで再現してみようという企画です。 「Generative Design-Processingで切り拓く、デザインの新たな地平」という名前で販売されている本のGithubで公開されているコードを使用しています。
This project aims to reproduce the code used in Generative Design (Processing and P5.js) in Unity. I am using code published on Github in a book sold under the name "Generative Design: Visualize, Program, and Create with Processing".
無駄な説明を省いて、忙しい時でも短時間で理解できるような動画です。
It's a video that can be understood in a short period of time even when you're busy, without any unnecessary explanation.
目次
Table of Contents
|
Unity側の設定 Unity Side Configuration |
|
Unityスクリプト作成 Creating Unity Scripts |
|
ページの最後へ Go to the end of the page. |
Unity側の設定
Unity Side
Configuration
まずはGenerative DesignのGithubページに行き、コードの挙動を確かめます。
First, Go to Generative Design's Github page to see how the code behaves.
今回はM_1_2_01のコードを使わせてもらいます。
無数の球がMouseの動きで円状になったり、拡散したりします。これをUnityで再現します。
This time I will use the code of M_1_2_01.
It seems that the movement of the mouse causes many spheres to be arranged in a circle or scattered apart.
まず新しいUnityプロジェクトを作成し、 Assets内で右クリック、クリエイトからフォルダーを作成。 名前はResourcesにします。 これはUnityのスクリプト側でプレハブを読み込む際に必要になります。
First, create a new Unity project. Right-click in Assets and create a folder from Create. Name the folder Resources. This is required when importing the prefabricated in Unity scripting.
次にメインカメラのバックグラウンドカラーをソリッドにして白にします。 ヒエラルキー内で右クリックして3dオブジェクトの球体を作成します。
Next, make the main camera background color solid and white. Right-click in the hierarchy to create a sphere for the 3d object.
続いてAssets内で右クリックして新しいマテリアルを作ります。 好きな色を決めて、 先ほど作成した球体をResourcesフォルダーにドラックアンドドロップします。 すると自動で球体のプレハブが作られます。
Then right-click in Assets to create a new material. Choose your favorite color and drag and drop the Sphere you just created into the Resources folder. This automatically creates a Sphere prefab.
Unityスクリプト作成
Creating
Unity Scripts
ではC#スクリプトファイルを作成してください。 ダブルクリックをすると自動でVisualStudioが開きます。
Now create a C# script file. Double-click to automatically open Visual Studio.
NewBehaviourScript.cs
using System.Collections;
using System.Collections.Generic;
using UnityEngine;

public class NewBehaviourScript : MonoBehaviour
{
    GameObject[] spheres;

    Camera cam;
    Vector3 pPos;

    int actRandomSeed;
    float faderX;
    float count;
    float angle;

    // Start is called before the first frame update
    void Start()
    {
        cam = Camera.main;
        cam.clearFlags = CameraClearFlags.SolidColor;

        GameObject prefab = (GameObject)Resources.Load("Sphere");

        count = 150;

        spheres = new GameObject[(int)count];

        angle = (360 / count) * Mathf.Deg2Rad;

        actRandomSeed = 0;
        for (int i = 0; i < count; i++)
        {
            GameObject instance = Instantiate(prefab, new Vector3(0.0f, 0.0f, 0.0f), Quaternion.identity);
            instance.gameObject.transform.localScale = new Vector3(0.1f, 0.1f, 0.1f);
            spheres[i] = instance;
        }
    }

    // Update is called once per frame
    void Update()
    {
        Vector3 mPos = Input.mousePosition;

        mPos.x = Mathf.Clamp(mPos.x, 0.0f, Screen.width);
        mPos.y = Mathf.Clamp(mPos.y, 0.0f, Screen.height);
        mPos.z = 6.0f;

        Random.InitState(actRandomSeed);

        faderX = Mathf.Clamp(mPos.x / 673, 0.0f, Screen.width);

        for (int i = 0; i < count; i++)
        {
            float randomX = Random.Range(-6, 6);
            float randomY = Random.Range(-4, 4);

            float circleX = Mathf.Cos(angle * i) * 3;
            float circleY = Mathf.Sin(angle * i) * 3;

            float x = Mathf.Lerp(randomX, circleX, faderX);
            float y = Mathf.Lerp(randomY, circleY, faderX);

            spheres[i].transform.position = new Vector3(x, y, 0.0f);
        }

        if (Input.GetMouseButtonDown(0))
        {
            pPos = cam.ScreenToViewportPoint(mPos);
        }
        if (Input.GetMouseButton(0))
        {
            Vector3 dir = pPos - cam.ScreenToViewportPoint(mPos);
            cam.transform.RotateAround(new Vector3(), new Vector3(1, 0, 0), dir.y * 360);
            cam.transform.RotateAround(new Vector3(), new Vector3(0, 1, 0), dir.x * 360);
            pPos = cam.ScreenToViewportPoint(mPos);
        }

        if (Input.GetMouseButtonDown(1))
        {
            actRandomSeed = (int)(Random.value * 100000);
        }
    }
}
public class NewBehaviourScript : MonoBehaviour
{
    GameObject[] spheres;

    Camera cam;
    Vector3 pPos;

    int actRandomSeed;
    float faderX;
    float count;
    float angle;
まず、Class内全体で使う変数を宣言します。
First, declare variables for use throughout the Class.
用意するのは、 球体のオブジェクトを格納するための配列変数、 カメラオブジェクト用の変数、マウスのポジション用の変数、 画面に球体をバラバラに散らす為のランダムシードの値、 フェーダーXは線形補間の補間係数です。
It provides an array variable for storing the sphere's objects, and a a variable for the camera object, a variable for the mouse position, The random seed value for scattering spheres on the screen, and faderX is a linear interpolation factor.
GameObject[] spheres;

Camera cam;
Vector3 pPos;

int actRandomSeed;
float faderX;
0から1までの値をとり、0になれば球体はランダムな配置になり 1に近づくにつれて綺麗に円状に並びます。
Values range from 0 to 1, where 0 gives the sphere a random arrangement. Line up neatly in a circle as you get closer to 1.
カウントは作成する球体の数。 アングルは360度をカウント(球体の数)で割った角度が入ります。 こうすることで等間隔な円状に球体が並びます。
The count is the number of spheres to create and the angle is 360 degrees divided by the count (Number of spheres). In this way, the spheres are arranged in a circle at equal intervals.
float count;
float angle;
// Start is called before the first frame update
void Start()
{
    cam = Camera.main;
    cam.clearFlags = CameraClearFlags.SolidColor;

    GameObject prefab = (GameObject)Resources.Load("Sphere");

    count = 150;

    spheres = new GameObject[(int)count];

    angle = (360 / count) * Mathf.Deg2Rad;

    actRandomSeed = 0;
    for (int i = 0; i < count; i++)
    {
        GameObject instance = Instantiate(prefab, new Vector3(0.0f, 0.0f, 0.0f), Quaternion.identity);
        instance.gameObject.transform.localScale = new Vector3(0.1f, 0.1f, 0.1f);
        spheres[i] = instance;
    }
}
次にボイドスタートメソッド内でメインカメラのオブジェクトを作成。
Then create the main camera object in the void start method.
cam = Camera.main;
ボイドスタートメソッドはスタートボタンが押された時、 最初に一回だけ実行されます。
The void start method runs only once, the first time the start button is pressed.
ちなみにボイドとは何も返さないメソッドや関数という意味です。
By the way, void means a method or function that returns nothing.
バックグラウンドカラーをソリッドにして、 resourcesメソッドを使ってプレハブを取得。
We then make the background color solid, get the prefab using the resources method,
cam.clearFlags = CameraClearFlags.SolidColor;

GameObject prefab = (GameObject)Resources.Load("Sphere");
カウントは150個、 球体のオブジェクトを入れる変数を初期化し、 アングルを決めて、三角関数を利用するため、角度をラジアンに変換します。
set the count to 150, initialize the variable that holds the sphere's object, determine the angle, and convert the degree to radians to use the trigonometric function.
count = 150;

spheres = new GameObject[(int)count];

angle = (360 / count) * Mathf.Deg2Rad;
最初のランダムシードの数は0。 球体の数の分だけFor文で回し、 プレハブから球体を作成、 初期位置は全て原点で大きさを0.1にして150個が画面に収まるようにします。 それをspheres変数に一個ずつ格納して、あとで何回でも再利用できるようにします。
The first number of random seeds is 0. Repeat the For statement for as many spheres, creating a sphere from the prefab with the initial position of the sphere all at the origin and the size set to 0.1 so that 150 of them fit on the screen. We store them one by one in the spheres variable so that they can be reused any number of times later.
actRandomSeed = 0;
for (int i = 0; i < count; i++)
{
    GameObject instance = Instantiate(prefab, new Vector3(0.0f, 0.0f, 0.0f), Quaternion.identity);
    instance.gameObject.transform.localScale = new Vector3(0.1f, 0.1f, 0.1f);
    spheres[i] = instance;
}
続いてボイドアップデートを作成 アップデートはフレーム毎に繰り返されるメソッドです。
Then create the void update. An update is a method that iterates over each frame.
// Update is called once per frame
void Update()
{
    Vector3 mPos = Input.mousePosition;

    mPos.x = Mathf.Clamp(mPos.x, 0.0f, Screen.width);
    mPos.y = Mathf.Clamp(mPos.y, 0.0f, Screen.height);
    mPos.z = 6.0f;

    Random.InitState(actRandomSeed);

    faderX = Mathf.Clamp(mPos.x / 673, 0.0f, Screen.width);

    for (int i = 0; i < count; i++)
    {
        float randomX = Random.Range(-6, 6);
        float randomY = Random.Range(-4, 4);

        float circleX = Mathf.Cos(angle * i) * 3;
        float circleY = Mathf.Sin(angle * i) * 3;

        float x = Mathf.Lerp(randomX, circleX, faderX);
        float y = Mathf.Lerp(randomY, circleY, faderX);

        spheres[i].transform.position = new Vector3(x, y, 0.0f);
    }

    if (Input.GetMouseButtonDown(0))
    {
        pPos = cam.ScreenToViewportPoint(mPos);
    }
    if (Input.GetMouseButton(0))
    {
        Vector3 dir = pPos - cam.ScreenToViewportPoint(mPos);
        cam.transform.RotateAround(new Vector3(), new Vector3(1, 0, 0), dir.y * 360);
        cam.transform.RotateAround(new Vector3(), new Vector3(0, 1, 0), dir.x * 360);
        pPos = cam.ScreenToViewportPoint(mPos);
    }

    if (Input.GetMouseButtonDown(1))
    {
        actRandomSeed = (int)(Random.value * 100000);
    }
}
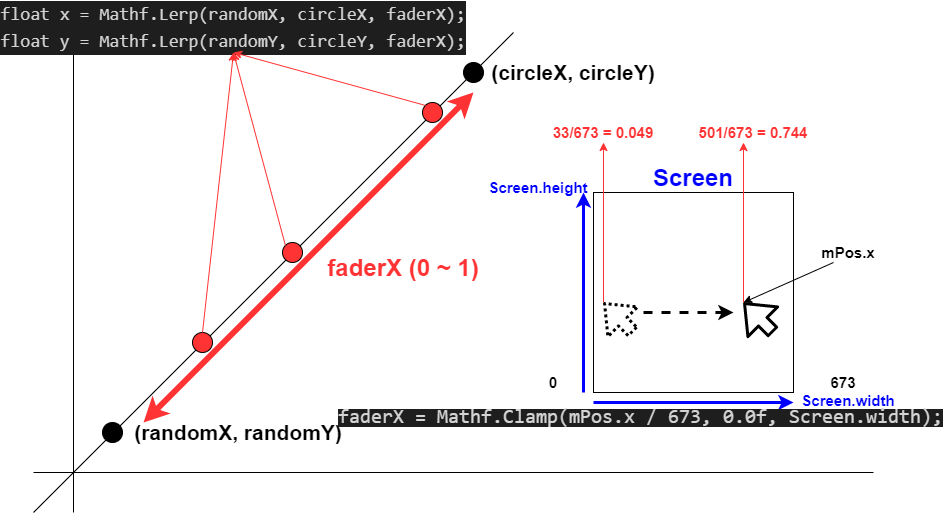
MathfドットClampを使用して, 現在のマウスの座標を, カメラに映っている画面内の値だけ取得するようにします。
With the Mathf dot Clamp method Causes the current mouse coordinates to be taken only from the camera's in-screen values.
Vector3 mPos = Input.mousePosition;

mPos.x = Mathf.Clamp(mPos.x, 0.0f, Screen.width);
mPos.y = Mathf.Clamp(mPos.y, 0.0f, Screen.height);
mPos.z = 6.0f;
ランダムシードの値を決めます。 ランダムシードの値が一定なら毎回同じランダムの値になりますが、 変更するとランダムの値が変化します。
Then determine the random seed value. A constant Random Seed value gives the same random value each time, but changing it changes the random value.
Random.InitState(actRandomSeed);
右クリックをすれば変更できるようにします。 その処理方法はあとで作成します。
Right-click to make changes. Don't worry, We will create the process later.
次にフェーダーXを設定します。 マウスの動きに合わせて変化するようにします。
Then set fader X. Changes as you move the mouse.
faderX = Mathf.Clamp(mPos.x / 673, 0.0f, Screen.width);
後はFor文を使って球体を画面に配置していきます。 MathfドットLerpを使い、フェーダーXに合わせて つまりマウスの横の動きに合わせて 球体の位置を決めていきます。
The For statement is then used to position the sphere on the screen. Use the Mathf dot Lerp method to position a sphere interactively by fader X values. In other words, you will position the sphere according to the movement of the mouse.
for (int i = 0; i < count; i++)
{
    float randomX = Random.Range(-6, 6);
    float randomY = Random.Range(-4, 4);

    float circleX = Mathf.Cos(angle * i) * 3;
    float circleY = Mathf.Sin(angle * i) * 3;

    float x = Mathf.Lerp(randomX, circleX, faderX);
    float y = Mathf.Lerp(randomY, circleY, faderX);

    spheres[i].transform.position = new Vector3(x, y, 0.0f);
}
ちなみにLerpとはリニア―インターポレーション(線形補間)の略で 簡単にいうと、フェーダーX(マウスの横の動き) が0なら(つまり画面とマウスの座標の比率が0、マウスの座標がX=0の時) ランダムX、Yの値に近づき、1なら円形上に並ぶようにします。
By the way, Lerp stands for linear interpolation (linear interpolation). If fader X (lateral mouse movement) is 0 (That is, when the ratio of screen to mouse coordinates is 0 and the mouse coordinates are X = 0.), it approaches the random X and Y values, and if it is 1, it is arranged in a circle.
お次はマウスを画面上でドラッグすれば カメラの視点が3Dになるようにします。 先ほど説明した右クリックをした時の動作も書きます。
Now, if you drag the mouse on the screen, Makes the camera's viewpoint 3D. I will also write the right click action that I explained earlier.
if (Input.GetMouseButtonDown(0))
{
    pPos = cam.ScreenToViewportPoint(mPos);
}
if (Input.GetMouseButton(0))
{
    Vector3 dir = pPos - cam.ScreenToViewportPoint(mPos);
    cam.transform.RotateAround(new Vector3(), new Vector3(1, 0, 0), dir.y * 360);
    cam.transform.RotateAround(new Vector3(), new Vector3(0, 1, 0), dir.x * 360);
    pPos = cam.ScreenToViewportPoint(mPos);
}

if (Input.GetMouseButtonDown(1))
{
    actRandomSeed = (int)(Random.value * 100000);
}
GetMouseButtonDownの0は左クリック 1は右クリックを表しています。
GetMouseButtonDown(0) is Left Click (1) indicates right-click.
最後にヒエラルキー内にエンプティ―オブジェクトを作成して ドラッグ&ドロップで作成したスクリプトファイルを コンポーネントとしてアタッチします。
Finally, create an empty object in the hierarchy. Then, Attach the script file you just created to it as a component using drag and drop.
最初に作ったSphereオブジェクトが邪魔なので、 アクティブのチェックを外してください。 そうすれば存在はしますが、画面から見えなくなります。
The Sphere object you initially created is in the way, so uncheck the object's Active. It will exist, but you will not be able to see it from the screen.
以上です。お疲れ様です。
後は自分の好きように動かしてみてください。 グルグルと視点を動かしたり、 Processingみたいにそのまま平面上で開いたり閉じたりして 楽しんでみてください。 ARSDK等を利用して実世界に映して楽しむのいいかもしれません。
That's all. Thank you for your hard work.
Then move it as you like. Please enjoy trying various things by moving your viewpoint. It might be fun to use AR SDK to show it in the real world.
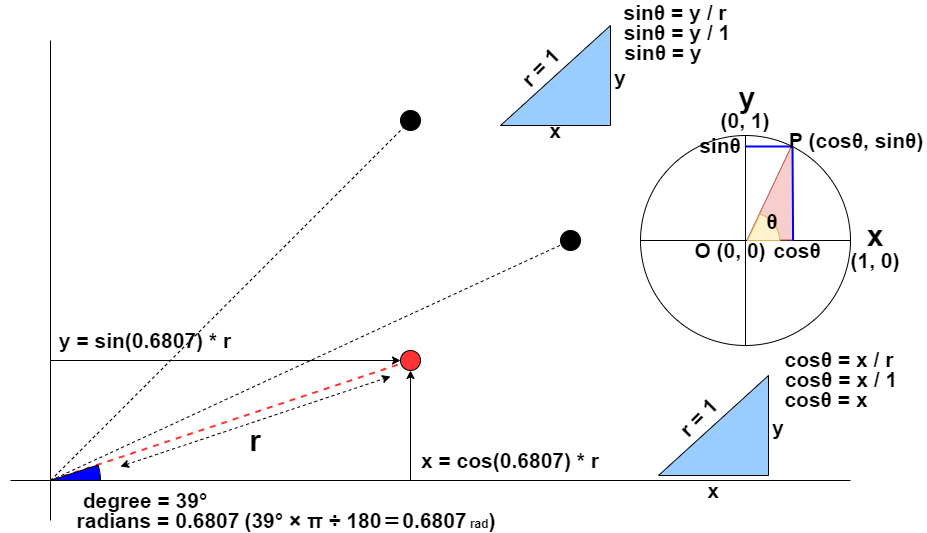
三角関数を使った座標の求め方の大体のイメージは以下の動画を参考にしてください。
Check out the video below to get an idea of How to Find Coordinates Using Trigonometric Functions