Published Date : 2020年6月1日22:23
Part 5 - Djangoを使って簡単なオンラインショップを作ってみよう
Part 5 - Create a Simple Online Shop with Django
This blog has an English translation
YouTubeにアップした動画、「【Django】Part 5 - Create a Simple Online Shop with Django:Djangoを使って簡単なオンラインショップを作ってみよう」の補足説明の記事です。
Here's a little more about the 「【Django】Part 5 - Create a Simple Online Shop with Django:Djangoを使って簡単なオンラインショップを作ってみよう」 video I uploaded to YouTube.
Djangoを使って簡単なログイン機能を持ったオンラインショップのようなサイトを作ってみましょう。 Part5となる今回の動画シリーズでは、Signup, Signin, Signout等の処理を実装していきましょう。
Use Django to create a site that looks like an online store with a simple login feature. In this video series, Part 5, we will implement processes such as Signup, Signin, and Signout.
無駄な説明を省いて、忙しい時でも短時間で理解できるような動画です。
It's a video that can be understood in a short period of time even when you're busy, without any unnecessary explanation.
目次
Table of Contents
① 登録画面の実装 ① Implementation of the registration screen |
② 登録と認証システムの実装 ② Implementation of registration and authentication systems |
ページの最後へ Go to the end of the page. |
① 登録画面の実装
① Implementation of the registration screen
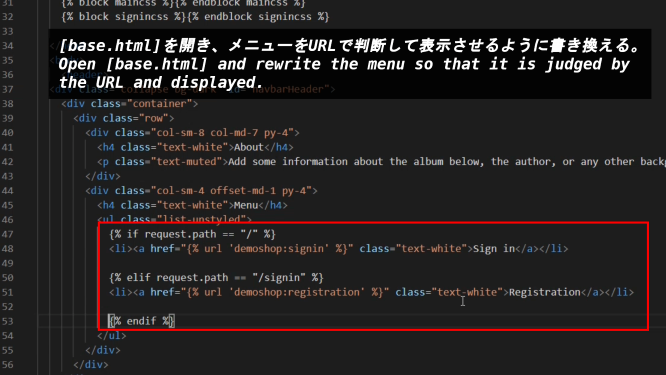
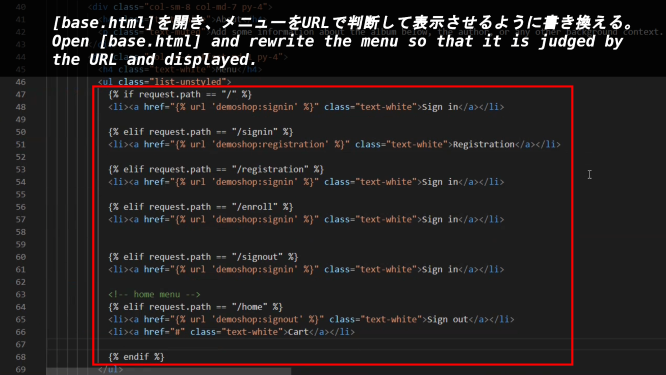
[base.html]を開き、メニューをURLで判断して表示させるように書き換える。
Open [base.html] and rewrite the menu so that it is judged by the URL and displayed.
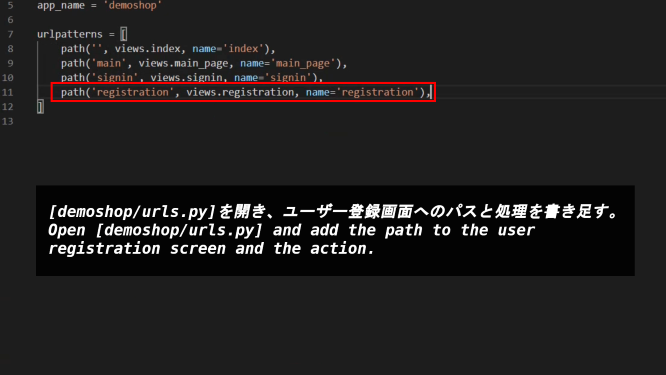
[demoshop/urls.py]を開き、ユーザー登録画面へのパスと処理を書き足す。
Open [demoshop/urls.py] and add the path to the user registration screen and the action.
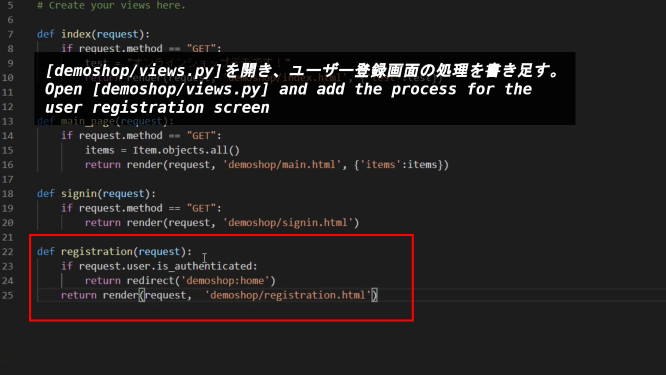
[demoshop/views.py]を開き、ユーザー登録画面の処理を書き足す。
Open [demoshop/views.py] and add the process for the user registration screen
「request.user.is_authenticated」でログインしているかどうかを見ています。ログインしているならホーム画面へ、そうでないなら登録画面へ変移させます。
「request.user.is_authenticated」is checking if user logged in. If user is logged in, move to the home screen. Otherwise, move to the registration screen.
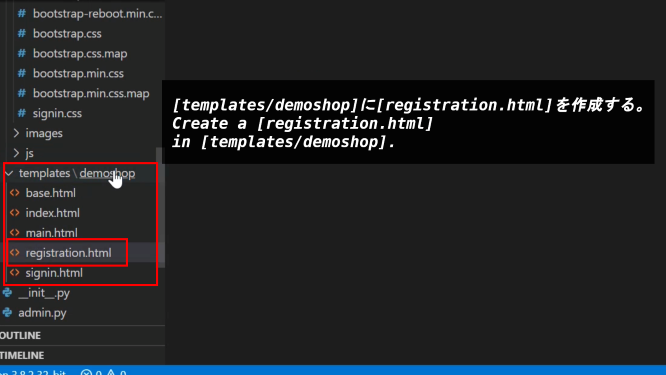
[templates/demoshop]に[registration.html]を作成する。
Create a [registration.html] in [templates/demoshop].
[signin.html]の内容を[registration.html]にコピペして、修正します。
Copy and paste the contents of [signin.html] into [registration.html] and modify it.
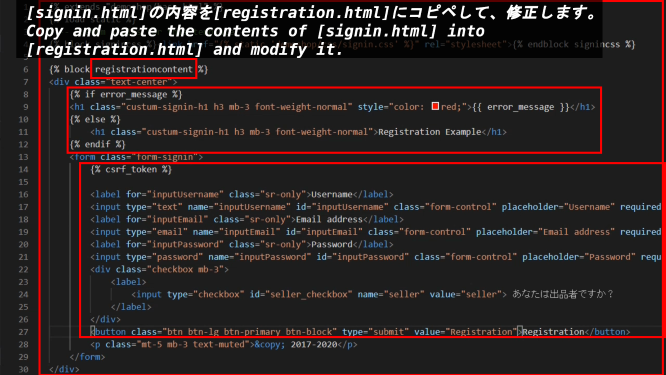
エラーメッセージがある場合はそれを表示させる。[inputタグ]に[required]と記述すれば、名前等の項目の入力が必須になります。[csrf_token]はPOSTリクエストをする際にセキュリティ上必要です。
Display error messages, if any. If you write [required] in [input tag], user will be required to enter a name and other information. [csrf_token] is required for security when making POST requests.
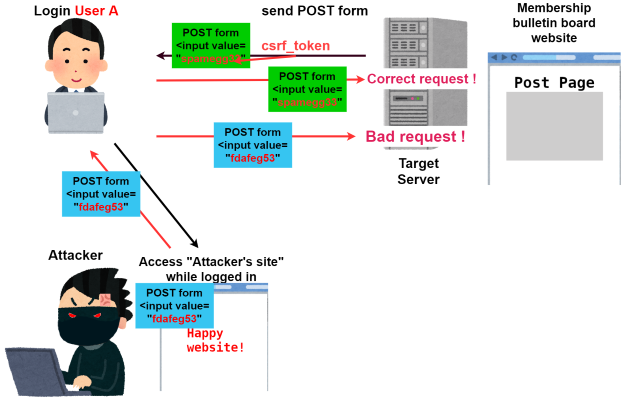
scrf token:クロスサイトリクエストフォージェリトークン
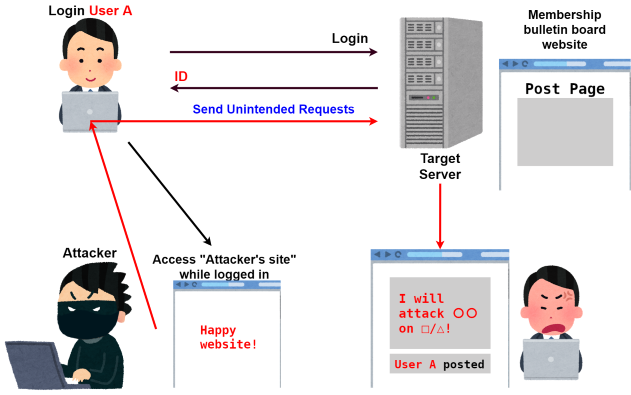
(scrf)クロスサイトリクエストフォージェリとは簡単に説明すると、「悪意のある誰かが作った攻撃用WEBページ」が「何も知らないユーザー」を利用して、「攻撃対象のWEBサーバー」に攻撃を仕掛けることを指します。
「攻撃者」は自ら「攻撃対象サーバー」へアクセスしなくても、「攻撃対象サーバー」を攻撃できます。
そして「攻撃対象サーバー」にアクセスして攻撃したユーザーは「何も知らないユーザー」になってしまいます。
その為「攻撃されたサーバー」は「実際に攻撃したユーザー」として「何も知らないユーザー」を認識します。
「何も知らないユーザー」は「実際に攻撃したユーザー」のレッテルを貼られてしまうのです。
The cross-site Request Forgery, in short, means that "Attack web page created by someone malicious" uses "General User who doesn't know anything" to attack "target web server to be attacked".
"attackers" can attack "target server" without accessing "target server" itself.
The user who accesses "target server" and attacks becomes "User who knows nothing".
Therefore, "Web server that was attacked" recognizes "User who knows nothing" as "actual attacker".
"User who knows nothing" is labeled "actual attacker".
この「csrf攻撃」で使われるリクエストは「攻撃者」が作ったものです。
これを防ぐには、「ユーザーのリクエスト」か「攻撃者のリクエスト」なのかを判断する為に最初に「ユーザーのブラウザに返すフォーム」の中に、「攻撃者が推測できない情報」を入れておけばいいのです。
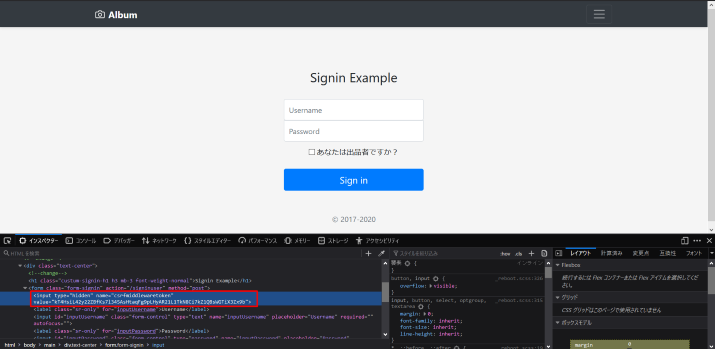
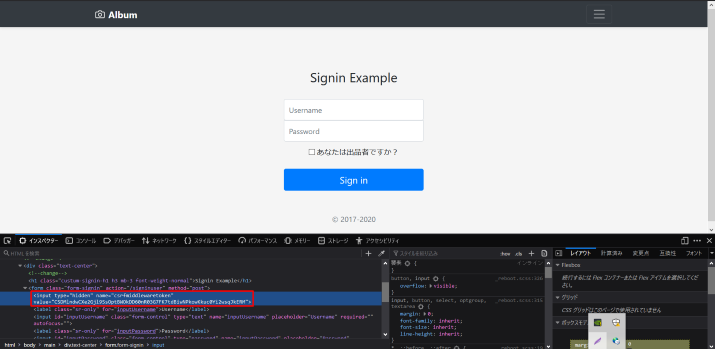
Djangoでこれを実現するには、POSTリクエストする[formタグ]の直ぐ後に[csrf_token]と記述するだけです。
この[csrf_token]の部分は[input type]がHidden(画面に表示されない)になりHTMLに展開されます。
<input type='hidden' name='csrfmiddlewaretoken' value="zLDGdfadJt1X77Qfadfdf8e8989daeeV3EUHh460zfadfega99862022928273GYSmarq07Srx1y4S"/>
この[value]にできている[乱数]はPOSTリクエストフォームが送られる度に変化します。
試しにPOSTリクエストフォームがある画面で更新を何回かしてみてください。
The request used in this "csrf attack" was made by "attackers".
To prevent this, put "Information that an attacker cannot guess" in "Form returned to user's browser" first to determine whether it is "User Requests" or "request of the attacker".
In Django, this is accomplished by writing [csrf_token] immediately after the [form tag] POST request.
This [csrf_token] part is expanded to HTML where [input type] becomes Hidden (not displayed on the screen).
<input type='hidden' name='csrfmiddlewaretoken' value="zLDGdfadJt1X77Qfadfdf8e8989daeeV3EUHh460zfadfega99862022928273GYSmarq07Srx1y4S"/>
The [random number] in [value] changes each time a POST request form is sent.
Try refreshing the page several times on the screen in the POST request form.
例えばGETリクエスト時の場合、サーバへ送信するデータはリクエストしたURLの後に付け加えられています。
For example, in the case of a GET request, the data sent to the server is appended to the requested URL.
http://spamspamegg.spam/index.html?name=spam&password=egg
そしてPOSTリクエストの場合は、値を見えない所に隠して送ります。ですが「name=spam」のような書き方は一緒です。
In the case of a POST request, the value is sent hidden. However, writing like "name=spam" is the same.
          (HTTP message)
          message header
          empty line(CR+LF)
          message body -> name=spam&password=egg
物事を簡単にすると、攻撃者はPOSTフォームを作成して「ユーザー」にそのPOSTフォームを「対象サーバー」に送るように仕向ける。
To simplify things, an attacker creates a POST form and directs "Users" to send the POST form to "target server".
しかし、[対象サーバー]が[csrf_token]をPOSTフォームを[ユーザー]に送る度に発行していれば、攻撃者はPOSTフォームに含まれる[乱数トークン]を予測することが困難になる(ほぼ不可能)。このような仕組みによって[csrf_token]は攻撃者から[ユーザー]を守っている。
However, if [target server] issues a [csrf_token] every time it sends a POST form to [Users]、an attacker would have difficulty predicting the [random number token] contained in the POST form (almost impossible). In this way, [csrf_token] protects [Users] from attackers.
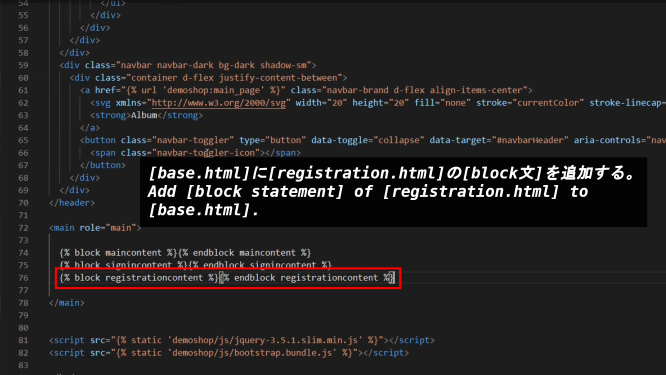
[base.html]に[registration.html]の[block文]を追加する。
Add [block statement] of [registration.html] to [base.html].
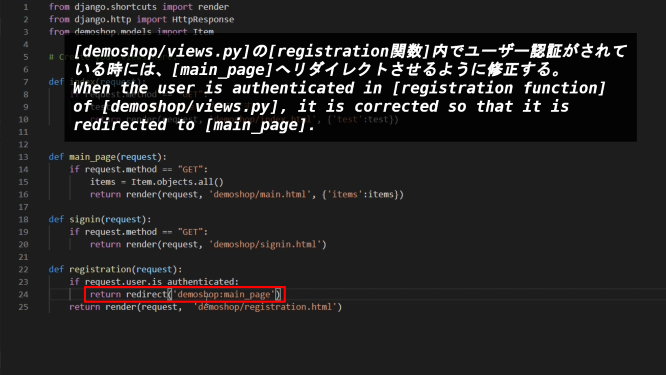
[demoshop/views.py]の[registration関数]内でユーザー認証がされている時には、[main_page]へリダイレクトさせるように修正する。
When the user is authenticated in [registration function] of [demoshop/views.py], it is corrected so that it is redirected to [main_page].
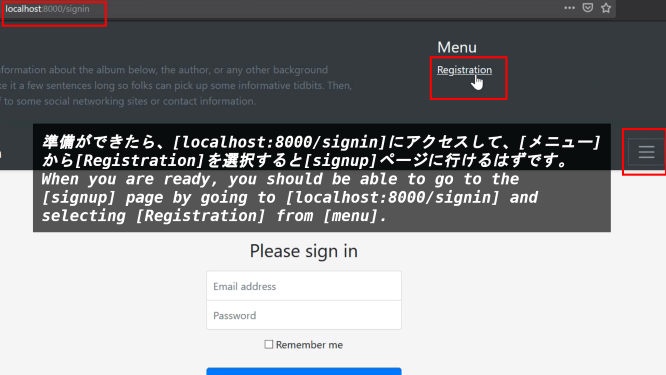
準備ができたら、[localhost:8000/signin]にアクセスして、[メニュー]から[Registration]を選択すると[signup]ページに行けるはずです。
When you are ready, you should be able to go to the [signup] page by going to [localhost:8000/signin] and selecting [Registration] from [menu].
② 登録と認証システムの実装
② Implementation of registration and authentication systems
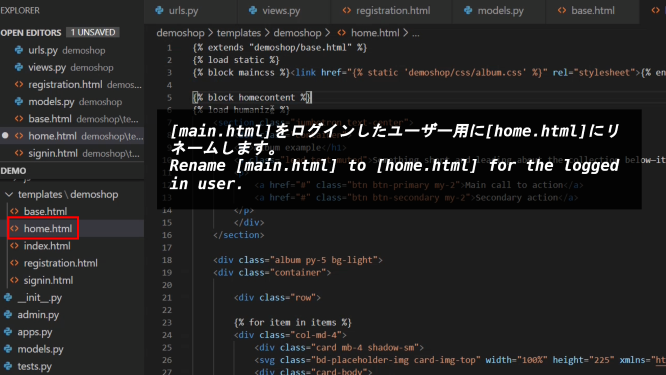
[main.html]をログインしたユーザー用に[home.html]にリネームします。
Rename [main.html] to [home.html] for the logged in user.
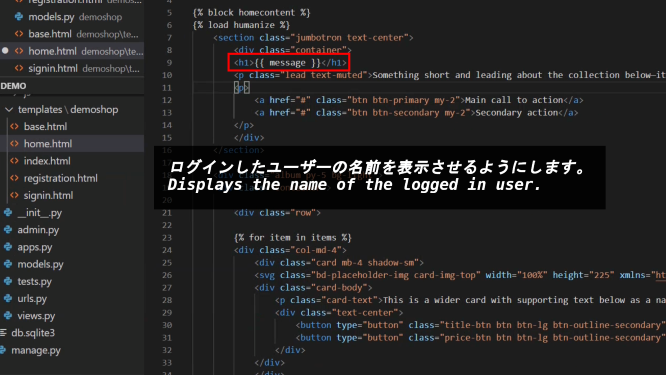
ログインしたユーザーの名前を表示させるようにします。
Displays the name of the logged in user.
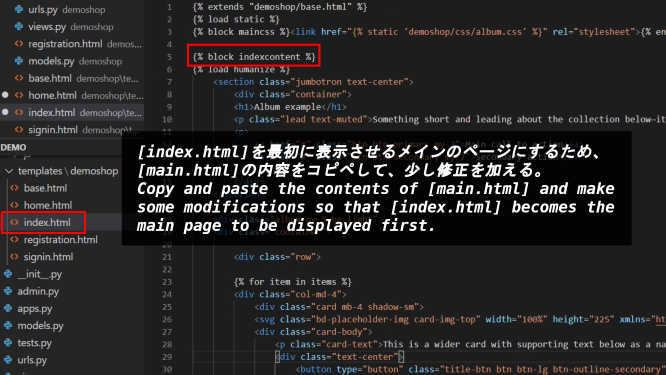
[index.html]を最初に表示させるメインのページにするため、[main.html]の内容をコピペして、少し修正を加える。
Copy and paste the contents of [main.html] and make some modifications so that [index.html] becomes the main page to be displayed first.
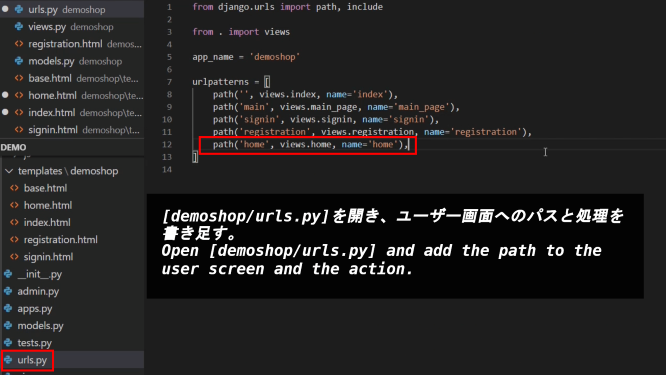
[demoshop/urls.py]を開き、ユーザー画面へのパスと処理を書き足す。
Open [demoshop/urls.py] and add the path to the user screen and the action.
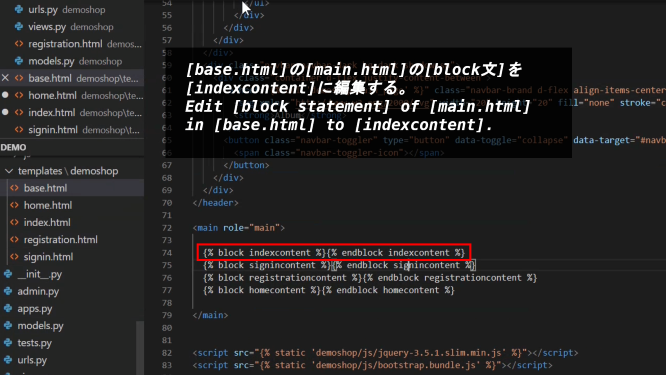
[base.html]の[main.html]の[block文]を[indexcontent]に編集する。
Edit [block statement] of [main.html] in [base.html] to [indexcontent].
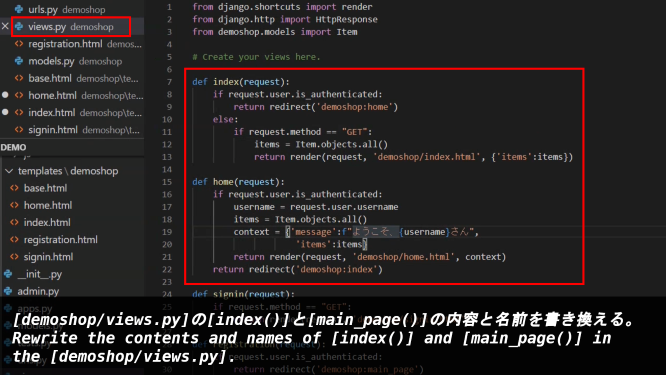
[demoshop/views.py]の[index()]と[main_page()]の内容と名前を書き換える。
Rewrite the contents and names of [index()] and [main_page()] in the [demoshop/views.py].
[demoshop/urls.py]の内容を書き換える。
Rewrite the contents of the [demoshop/urls.py].

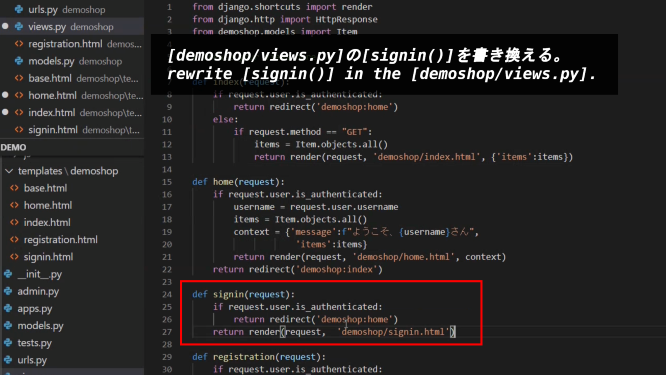
[demoshop/views.py]の[signin()]を書き換える。
rewrite [signin()] in the [demoshop/views.py].
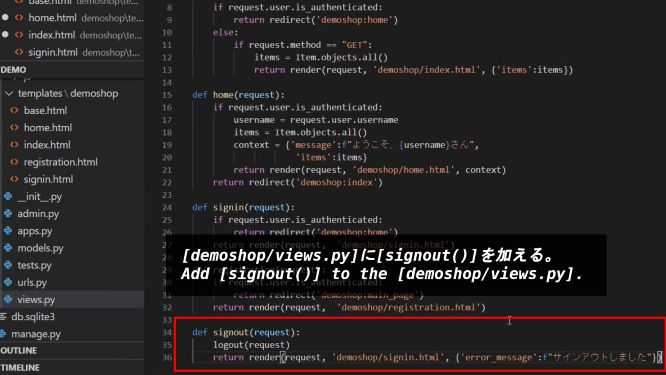
[demoshop/views.py]に[signout()]を加える。
Add [signout()] to the [demoshop/views.py].
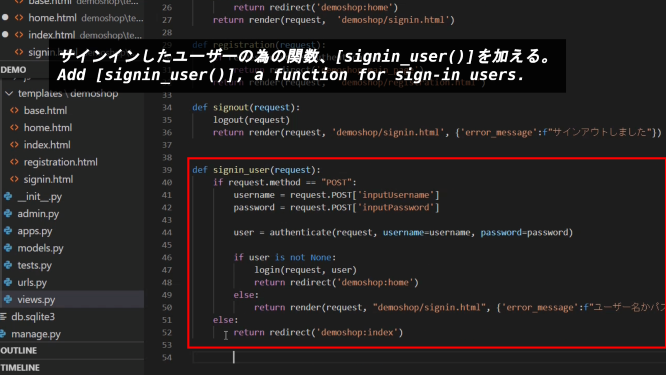
サインインしたユーザーの為の関数、[signin_user()]を加える。
Add [signin_user()], a function for sign-in users.
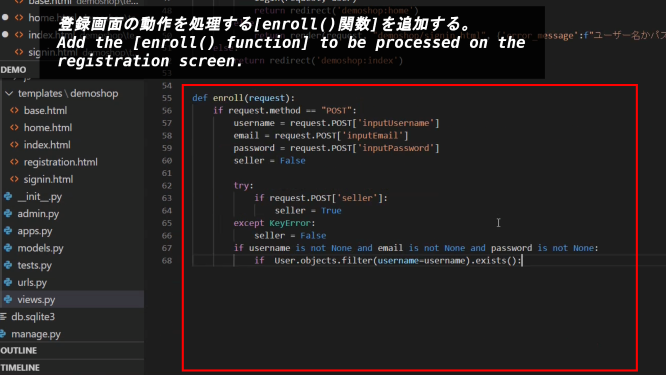
登録画面の動作を処理する[enroll()関数]を追加する。
Add the [enroll() function] to be processed on the registration screen.
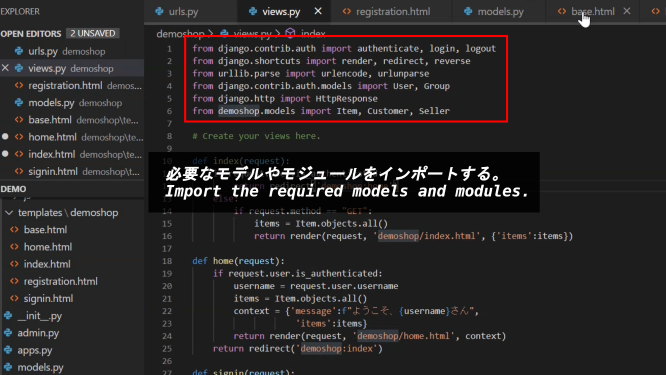
必要なモデルやモジュールをインポートする。
Import the required models and modules.
[base.html]を開き、メニューをURLで判断して表示させるように書き換える。
Open [base.html] and rewrite the menu so that it is judged by the URL and displayed.
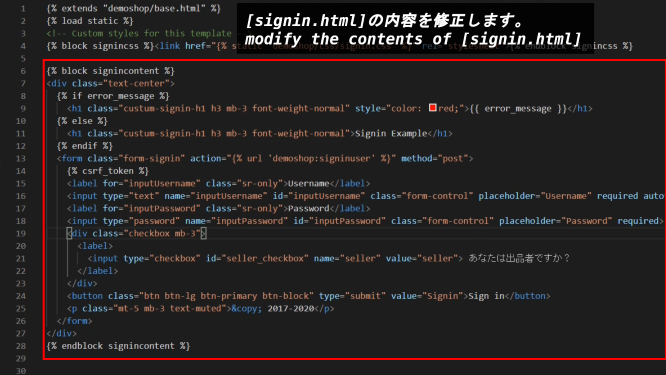
[signin.html]の内容を修正します。
modify the contents of [signin.html]
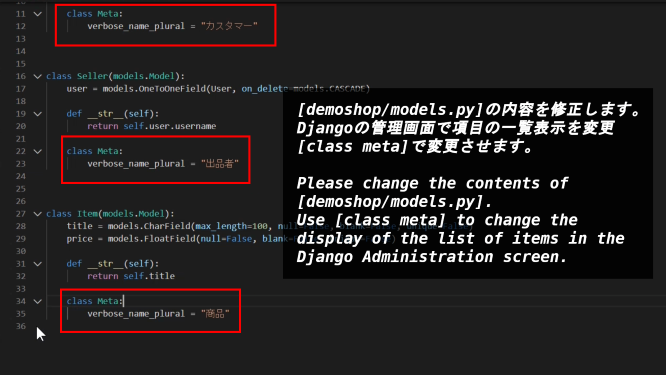
[demoshop/models.py]の内容を修正します。Djangoの管理画面で項目の一覧表示を変更[class meta]で変更させます。
Please change the contents of [demoshop/models.py]. Use [class meta] to change the display of the list of items in the Django Administration screen.
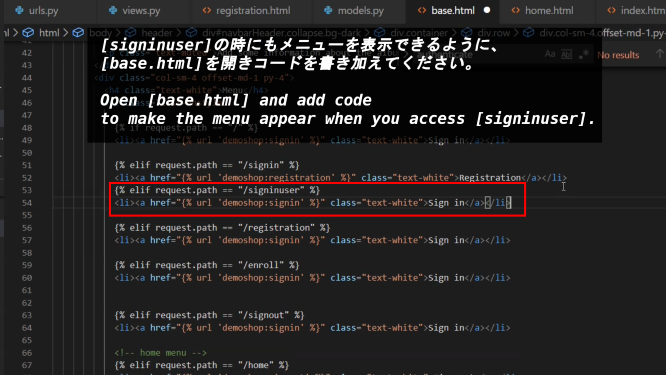
[signinuser]の時にもメニューを表示できるように、[base.html]を開きコードを書き加えてください。
Open [base.html] and add code to make the menu appear when you access [signinuser].
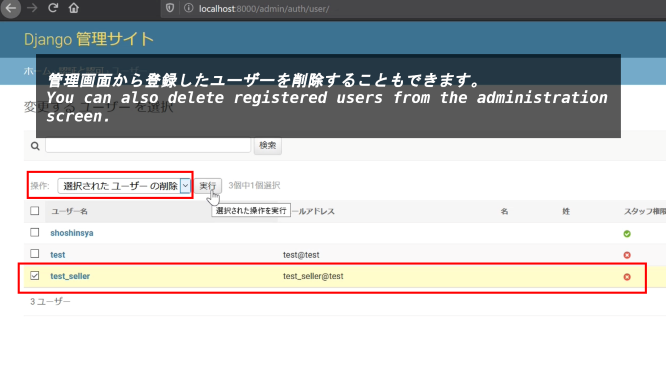
管理画面から登録したユーザーを削除することもできます。
You can also delete registered users from the administration screen.
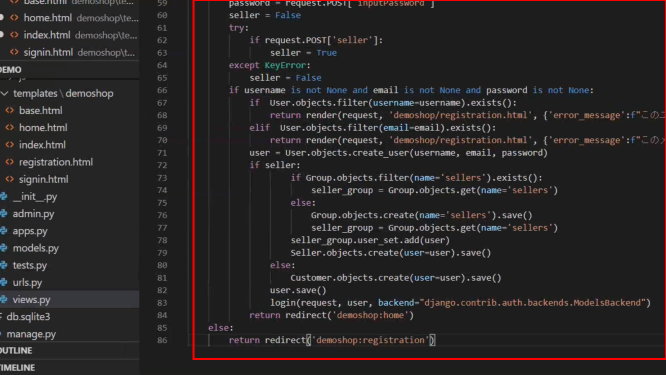
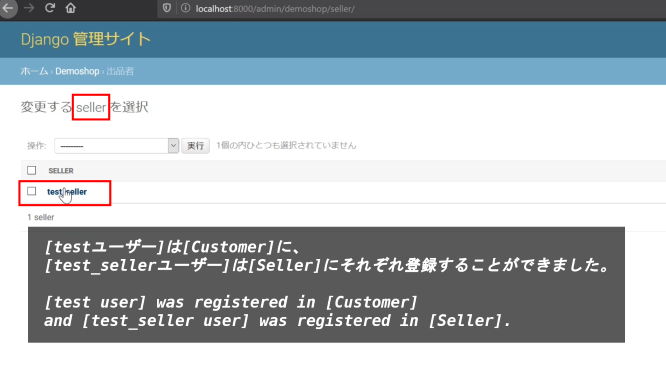
[testユーザー]は[Customer]に、[test_sellerユーザー]は[Seller]にそれぞれ登録することができました。
[test user] was registered in [Customer] and [test_seller user] was registered in [Seller].
以上です。お疲れ様です。
That's all. Thank you for your hard work.