Published Date : 2020年1月22日20:57
【Part 2】Processingでギターフレットボードから単純なTAB譜を表示するアプリを作ろう
【Part 2】Create an app that displays simple TAB notation from guitar fretboard in Processing
This blog has an English translation
YouTubeにアップした動画、「Create an app that displays simple TAB notation from guitar fretboard in Processing - Part 2」の補足説明の記事です。
Here's a little more about the "Create an app that displays simple TAB notation from guitar fretboard in Processing - Part 2" video I uploaded to YouTube.
まずは上の動画の趣旨を軽く説明します。 Processingを使用してギターのフレットボードから簡単なTAB譜を描画するアプリケーションを作成します。 このアプリケーションの利点は、ギターの弦と音階の関係をギターフレットボードから直接理解でき、1つずつ画像ファイルとして保存できることです。
First, let me briefly explain the purpose of the video above. Create an application to draw a simple TAB notation from a guitar fretboard with Processing. The advantage of this application is that you can understand the relationship between guitar strings and musical scales directly from the guitar fretboard and save them one by one as image files.
簡単に誰でもすぐに作れます。 パート2では少しコードを整理して、ControlP5(By Andreas Schlegel)を使用してギターノートを表示/非表示にするコードを作成します。 さらに、ギターノートのテキストの近くをクリックするとテキストの色が赤になるようなコードを書いてみますた。
It's very easy to make this. This time, I'll clean up the code a bit and create a code that shows and hides the guitar note using ControlP5 (By Andreas Schlegel). In addition, I will try to write a code that turns the text color to red when I click near the text on the guitar note.
全体の説明は動画に任せるとして、補足が必要だろうと思われる部分を説明していきマウス。
I'll leave the entire explanation to the video, but I'll explain the parts that I think need to be supplemented.
過去に似たアプリをP5.jsとPythonを使ってブラウザに表示させるものを作ったのでこちらの記事も参考にしてみてくだちぃ。
I've created a similar app in the past that uses P5.js and Python to display in the browser, so check out this post.
目次
Table of Contents
ControlP5のインストールと基本的な使い方 - 1:11 ~, 4:23 ~
Installation and basic usage of ControlP5 - 1:11 ~, 4:23 ~
まずControlP5のインストールと基本的な使い方についてざっと説明します。
First, let's start with a quick overview of installing and using ControlP5.
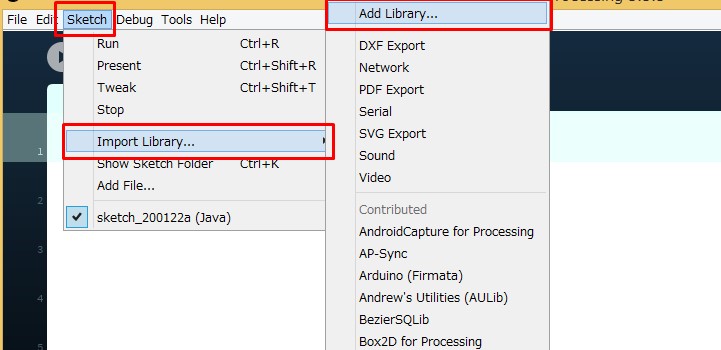
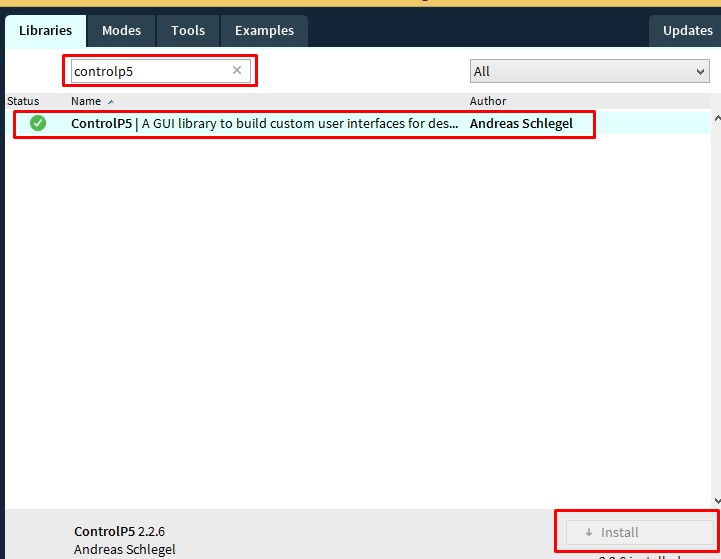
インストールは簡単。 ファイルの上部にある、「Sketch」を選択、「Import Library」を選択、「Add Library」を選択、検索窓に「controlP5」と入力。 でてきたライブラリを選択して、インストールボタンを押すだけ。
Installation is simple. Select "Sketch" located at the top, select "Import Library", select "Add Library" and enter "ControlP5" in the search window. Simply select the library you created and press the install button.
このライブラリの作者であるAndreas Schlegelに感謝して使いましょう。
Thanks to Andreas Schlegel, the author of this library.
ControlP5の使い方ですが、今回は動画に出ているトグルスイッチの作り方を説明します。 ボタンを作成するにしても、大体同じような手順です。 詳しい使い方は作者のgithubページに載っています。
This time, I will explain how to make the toggle switch shown in the video. Creating a button is a similar precess. More details on how to use it can be found on the author's github page.
import controlP5.*;
ControlP5 cp5;
cp5 = new ControlP5(this);
まず、ライブラリをインポートする。 この「*」マークは「controlP5パッケージ」が持っているクラス全部を指している。 要するに一つ一つクラスを指名してインポートするのではなく まとめてインポートしてしまおうということ。
どんなクラスファイルをインポートしているのかは作者のgithubページの「src/controlP5」の中身を見てみれば分かります。
First, import the library. The "*" mark refers to all the classes that "controlP5 package" has. So instead of picking and importing classes one by one, The idea is to import them all together.
You can find out what class files are being imported by looking inside the author's github page "src/controlP5".
クラスをインポートしたら、あとはインポートしたクラスを使ってCP5のインスタンスを作成します。
After you import the classes, you create an instance of CP5 using the imported classes.
このコンストラクターに渡す引数の「this」はJAVAアプレットを指し、 簡単に言ってしまえば、書いているスケッチ自体のことです。 こうすることでProcessingが用意している様々な機能にCP5インスタンスはアクセスでき、 それによって便利なGUIの機能を提供しているとも言えます。
The "this" argument passed to this constructor points to a JAVA applet. To put it simply, it is the sketch you are writing. This gives the CP5 instance access to the useful features provided by Processing, which in turn provides GUI functionality.
cp5.addToggle("toggleNotes")
    .setPosition(widthSpacing/2,heightSpacing/2)
    .setSize(100,30)
    .setValue(true)
    .setCaptionLabel("Show:Notes/Hide:Notes")
    .setMode(ControlP5.SWITCH);
上から順に説明します。
I will explain from the top.
addToggleはトグルスイッチをスケッチに追加します。
addToggle adds a toggle switch to the sketch.
("toggleNotes")はこのトグルが切り替わった時にさせたい処理をする関数名です。
("toggleNotes") is the name of the function that performs the operation you want to perform when this toggle is switched.
setPositionはトグルスイッチを画面のどこに配置するかです。
setPosition is where the toggle switch should be placed on the screen.
setSizeはトグルスイッチの大きさ(横幅、縦幅)です。
setSize is the size (Width, Height) of the toggle switch.
setValueはスイッチの初期値です。トグルスイッチはTrueかFalseの切り替えをするスイッチですのでこの2つの真偽値のうちどれかです。
setValue is the initial value of the switch. The toggle switch is either true or false because it switches between true and false.
setCaptionLabelはトグルスイッチの下に文字を表示させることができます。
setCaptionLabel allows you to display characters under toggle switches.
setModeは見た目をどのようにするかです。SWITCHにすると今回のような見た目になります。
setMode can change how it looks. if you choose SWITCH, it will look like this time.
SWITCH

もうひとつDEFAULTが用意されています。
There is also mode called DEFAULT. like this.
OFF

ON

このようにDEFAULT MODEは色で切り替わる見た目になります。
In this way, "DEFAULT MODE" switches on and off by color.
他にも色やフォントを変える等色々な機能があるので、各自試してみてください。
There are many other functions such as changing colors and fonts, so please try each one.
Processingのテキスト表示調整方法 - 7:10 ~
Text display adjustment method for Processing - 7:10 ~
次に、テキストの表示を調整するやり方を簡単に説明します。
Next, A brief explanation of how to adjust the display of text.
Processingのtext関数の引数はTEXT(文字、X座標、Y座標)となります。
The text function augument of the Processing is text(Text, x coordinate, y coordinate).
今回使用しているTextAlign関数はこのX座標とY座標の位置を変化させます。
The textAlign function is changes the position of the X and Y coordinates.
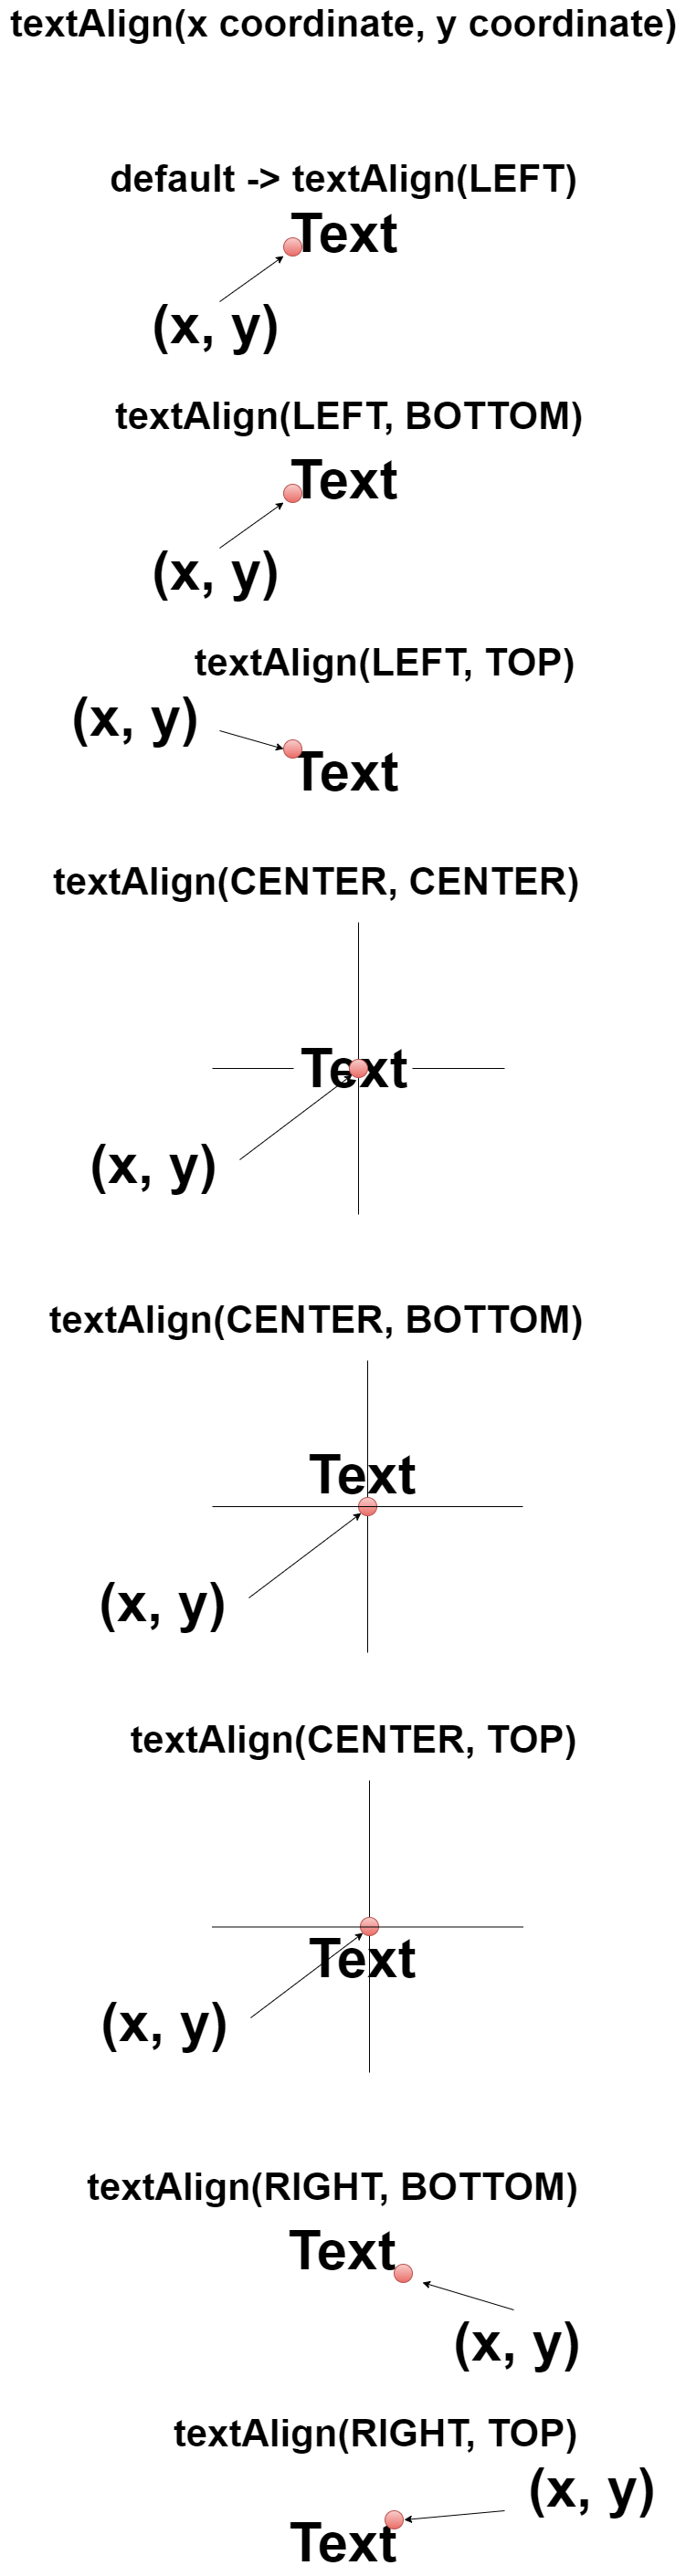
アニメーションにするとこのようになります。
This is what it looks like in animation
textAlign function
マウスの範囲判定方法 - 9:30 ~
Mouse range determination method - 9:30 ~
次に、マウス位置の判定方法を簡単に説明します。
The following is a brief explanation of how to determine the mouse position range.
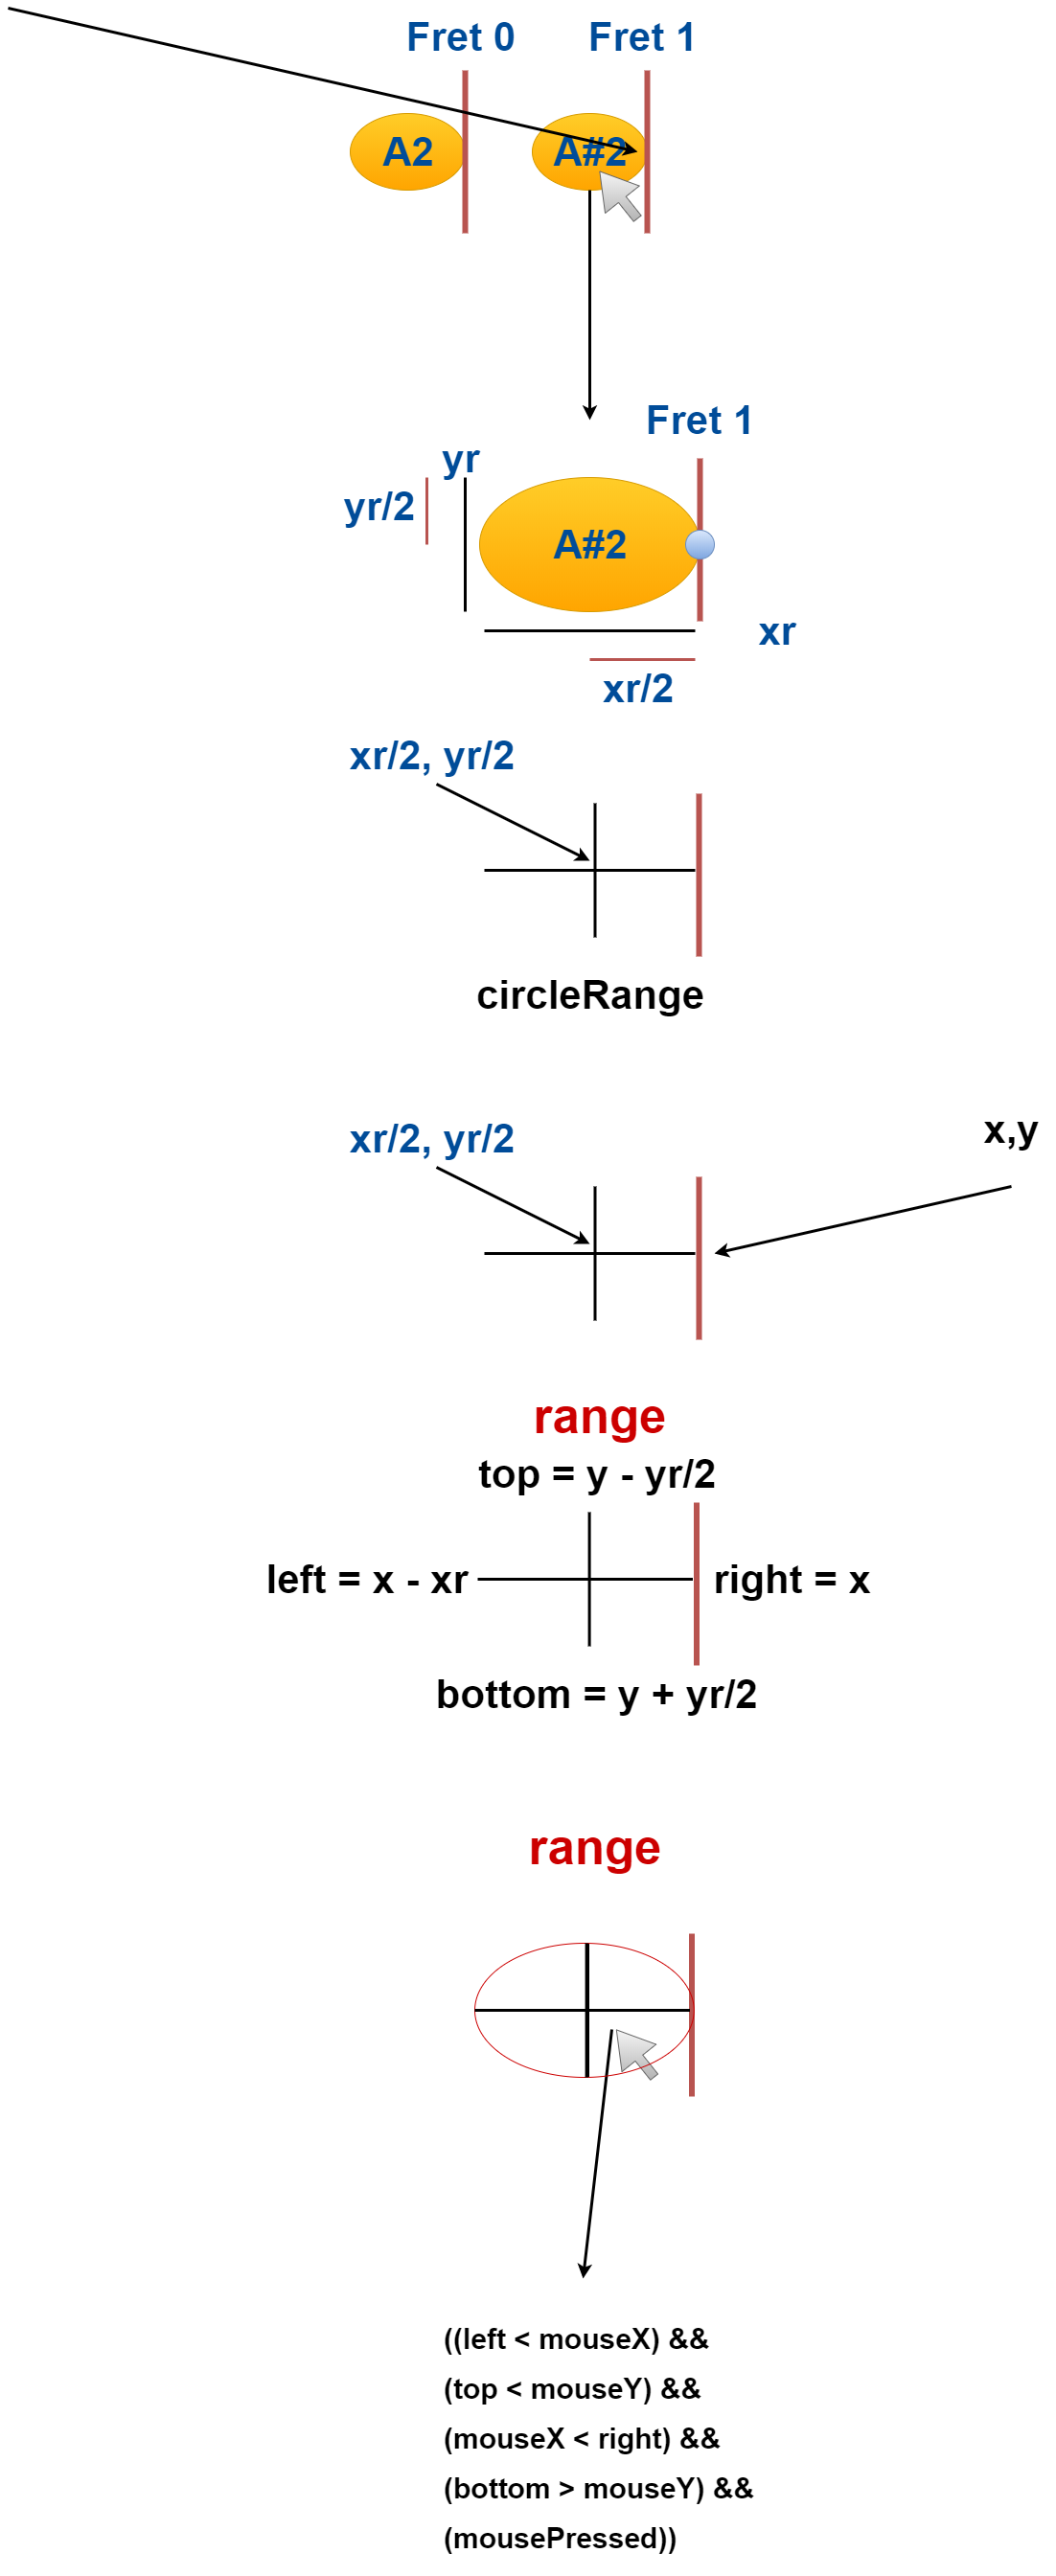
フレットと円が触れる場所のX座標から、円のX軸の直径を引けば、左側のXの判定座標になり、 フレットと円が触れる場所のX座標が右側のXの判定座標、 フレットと円が触れる場所のY座標から、円のY軸の直径の半分を引けば、上側のYの判定座標 フレットと円が触れる場所のY座標から、円のY軸の直径の半分を足せば、下側のYの判定座標になります。
If the diameter of the X axis of the circle is subtracted from the X coordinate of the place where the fret and the circle touch, it becomes the decision coordinate of X on the left side. The X coordinate of the place where the fret and the circle touch is the determination coordinate of X on the right side. If you subtract half the diameter of the Y axis of the circle from the Y coordinate of the location where the fret and the circle touch, you get the upper Y decision coordinate. If you coordinate where the fret and circle touch, you get the bottom Y decision coordinate.
そしてその範囲内でマウスがクリックされれば、テキストや弦の色が変わる仕組みになります。
If the mouse is clicked within that range, the text and guitar strings will change color
ControlP5との連携方法 - 13:00 ~
Collaboration with ControlP5 - 13:00 ~
そして、ControlP5をProcessingで連携させて使う簡単な方法を説明します。
Then, I'll show you how to use ControlP5 in conjunction with Processing.
cp5.addToggle("toggleNotes")
上で説明したCP5のトグルスイッチを作る際、名前を指定しました。
When creating the CP5 toggle switch described above, I specified a name.
これを関数名にして、行いたい処理を指定します。 その前にトグルスイッチと連動するBoolean変数を作りましょう。
Use this as a function name to specify what you want to do. Before that, let's create a Boolean variable that works with the toggle switch.
// toggle display for the notes on a guitar
boolean toggleDisplayNotes = false;
void toggleNotes(boolean theFlag){
  if(theFlag==true) {
    toggleDisplayNotes = true;
  } else {
    toggleDisplayNotes = false;
  }
}
関数に渡すのはTrueかFalseのBoolean変数です。 これがTrueであればTrue、そうでないならFalseです。 トグルスイッチのONとOFFの結果を変数に格納するものだと思ってください。
You must pass a Boolean variable, either True or False, to the function. True if this is true, False otherwise. Think of it as storing the ON and OFF results of a toggle switch in a variable.
void darwGuitarNotes(){
  // Adding the ability to toggle the guitar note display
  if (toggleDisplayNotes) {
そして、toggleDisplayNotesの真偽値がTrueの時にギターノートが表示されるようにするだけです。
Then, when the true or false value of toggleDisplayNotes is True, the guitar notes is displayed.
失敗と解決方法について考える - 13:20 ~
Think about failure and solutions - 13:20 ~
最後に、音符の非表示と表示は上手くいきましたが、テキストが同じ弦で反応してしまうこと、 クリックした時の動作がおかしい等の失敗の原因と簡単な解決策について説明します。
Eventually, I managed to show and hide the notes, but when I clicked the mouse, the text changed color on the same guitar string, and sometimes it didn't respond or was delayed, resulting in strange behavior. This section describes the causes of failure and simple solutions.
Processingではループ関数(draw function)内で絵を描画しています。 この時、darwGuitarNotes関数はFor文で一気にギターノートの描画をしています。 そしてdarwGuitarNotes関数の処理が終わったら、またループを始めて処理を繰り返します。
Processing draws a figure inside a loop function (draw function). At this time, the drawGuitarNotes function used the For statement to draw the guitar notes all at once. After processing the drawGuitarNotes function, start the loop again and repeat.
このFor文が終わるまでギターノートの表示や更新がされないことの遅延が問題となります。
The problem is that the guitar note is not displayed or updated until the For statement is completed.
このループ速度は人間には感知できないぐらい超高速で行われいています。 クリックした時がたまたまdarwGuitarNotes関数の中で、かつクリックしたテキストの描画処理の直前であれば 反応しますが、それ以降はまた次のdarwGuitarNotes関数の処理が始まるまでクリックしても反応はありません。 これが問題の原因です。
This loop speed is so fast that humans can't sense it. However, if the click happens to be in the drawGuitarNotes function and just before the drawing of the clicked text. It will respond, but no further clicks until the next darwGuitarNotes function begins. This is the cause of the problem.
テキストの色を変える、同じ弦でギターノートが2つ以上反応しないようにする。 この2つの問題を解決するためには、弦に値を記憶させておくこと、かつ弦が一本ずつオブジェクトととして振る舞うように設計する必要があります。
Change the color of the text so that no more than one guitar note reacts to the same guitar string. To solve these two problems, it need to remember the value on the guitar strings and design them to behave as objects one by one.
そこで次回はこのギターフレットボードの弦とノート情報を取り扱うクラスファイルを作成することにします。
Next time, I will create a class file to handle the strings and note information of this guitar fretboard.
この動画とアプリは現在進行形で作っています。
This video and the app are in progress.
P5.jsの時より、機能が複雑になっていきそうなので多少時間がかかる可能性があります。
It may take some time since the functions seem to be more complicated than in P5.js.
ま、兎に角長くなってしまったのでPart3へ続きます。
In any case, since the blog post is long, so continues on to Part 3.