Published Date : 2020年1月15日22:22
Processing Tutorial - 動画補足記事
Processing Tutorial - an article explanation a supplement to a video
This blog has an English translation
今回はYouTubeにアップした動画、「Use Processing as a physics notebook - The First Equation of Motion」の補足説明の記事です。
Here's a little more about the "Use Processing as a physics notebook - The First Equation of Motion" video I uploaded to YouTube.
全体の説明は動画に任せるとして、説明が必要だろうと思われる関数やアルゴリズム等を時系列順に紹介していきMASU。
I'll leave the entire explanation to the video, but I'll show you the functions, algorithms, and so on, in chronological order.
目次
Table of Contents
ProcessingのClass - 3:28 ~
Processing's Class - 3:28 ~
ProcessingのClassの説明です。 Class自体は殆どのプログラミング言語が持っている概念です。
This is an explanation about Class of Processing. Class itself is a concept that most programming language have.
そして、Processingはコードの可視化がすぐにできるので、このクラスの概念を理解するのに最適な言語です。
And Processing is the best way to understand the concepts of this Class because it provides a quick visualization of the code.
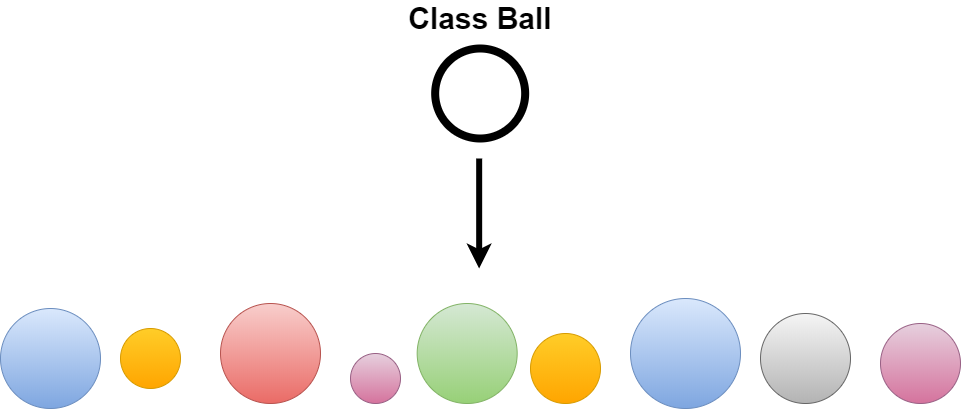
クラスを簡単に説明すると、例えばボールをいくつも作るとします。 ある程度ボールの形や色や動きを決めてくれる”ボールの型”みたいなものがあれば、一つ一つ違ったボールを作るより、 一度に大量に様々なボールを作れて便利です。
To briefly describe the class, let's say you're making a bunch of balls. If you have a "form for ball" that determines the shape, color and movement of the balls to some extent, you can make many different balls at once rather than making them one by one.
つまり、Classとは同じようなものを大量生産できる工場みたいなものです。
In other words, Class is like a factory where you can mass-produce similar things.
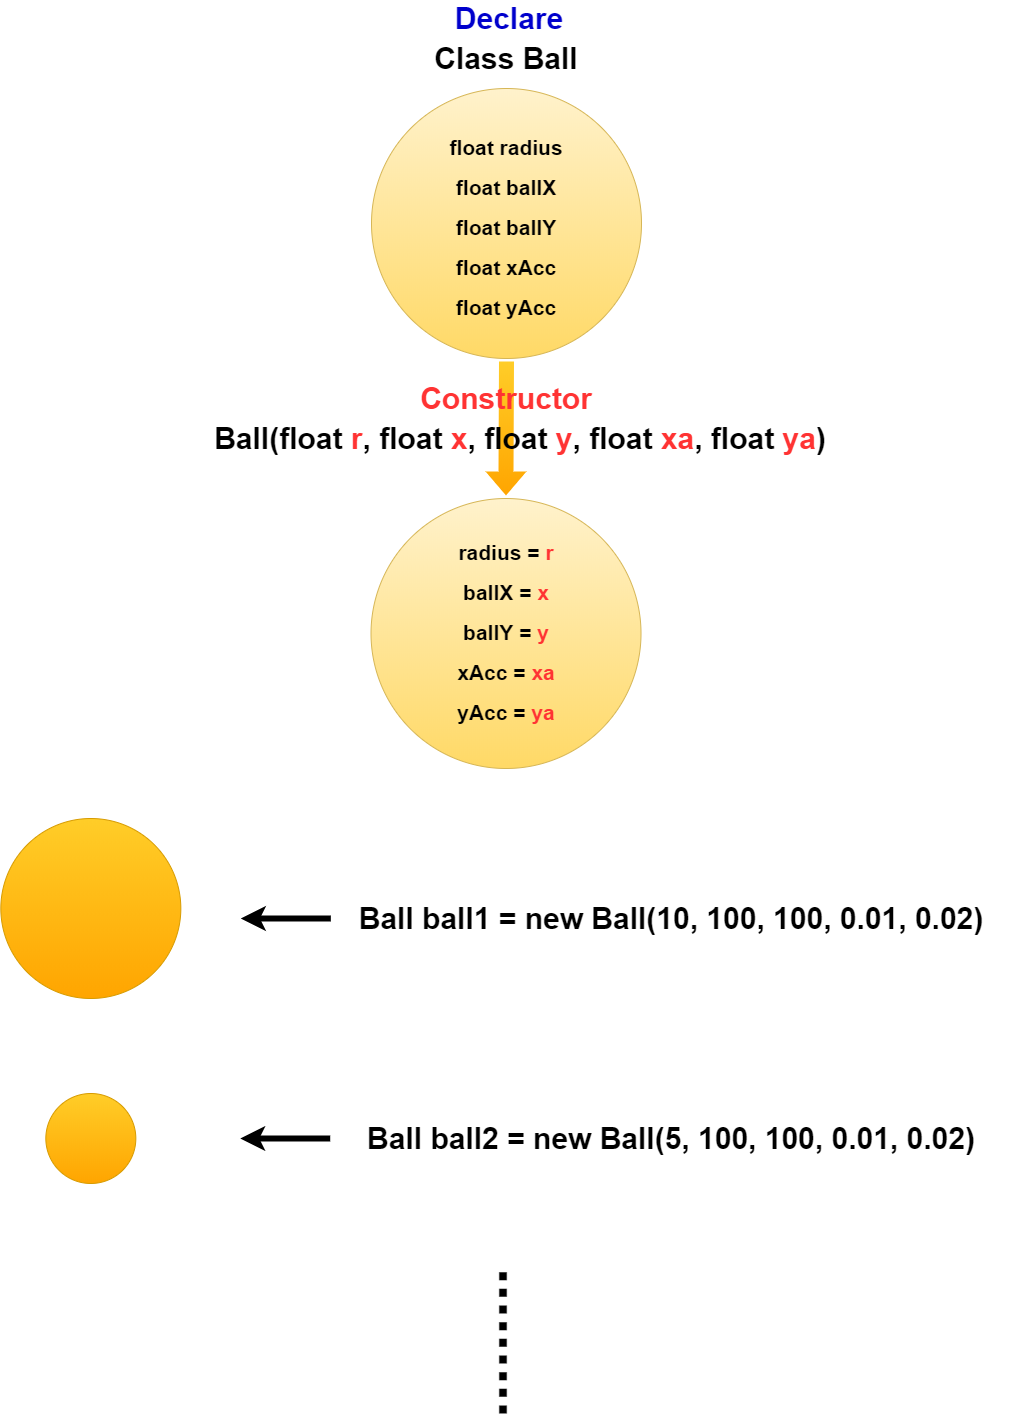
Processingや、他の言語では殆ど共通で、最初にClass名を定義して、 つぎにクラス内で使用する変数の定義をして、 その後変数の値を初期化するコンストラクターと呼ばれる関数を呼び出してClassからインスタンスと呼ばれるオブジェクトを作成します。
Processing, and most other languages, start by defining a Class name. Next, define the variables to be used in the Class. You then create an object called an instance from Class by calling a function called a constructor that initializes the value of the variable.
非常に分かりにくいですね。 Processingでコードを書きながら確かめたほうが理解しやすいです。
It is very difficult to understand. It is easier to understand if you write the code in Processing.
classBall.pde
Ball ball;
color c;

void setup(){
  size(640, 360);
  c = color(random(255),random(255),random(255));
  ball = new Ball(30, 10, 10, 1, 2, c);
}

void draw(){
  background(255);
  ball.update();
  ball.display();
}

class Ball{
  float radius;
  float ballX;
  float ballY;
  float xAcc;
  float yAcc;
  color ballColor;

  Ball(float r, float x, float y, float xa, float ya, color c){
    radius = r;
    ballX = x;
    ballY = y;
    xAcc = xa;
    yAcc = ya;
    ballColor = c;
  }

  void update(){
    if((ballX > width) || (ballX < 0)){
      xAcc = xAcc * -1;
    }
    if((ballY > height) || (ballY < 0)){
      yAcc = yAcc * -1;
    }
    ballX = ballX + xAcc;
    ballY = ballY + yAcc;
  }

  void display(){
    noStroke();
    fill(ballColor);
    ellipse(ballX, ballY, radius, radius);
  }
}
このクラスは3つの関数を持っています。 一つはこのクラスから作られるオブジェクトの変数の値を決めるコンストラクター関数。 これはクラス名と同じにする必要があります。
There are three functions in this Class. The first is a constructor function, which determines the value of the variables of the objects created from this Class. This must be the same as the class name.
2つ目と3つ目はUpdate関数とDisplay関数。 これは各自好きなように名前をつけたり、作ったりしてください。
The second and third are the Update and Display functions. Please name and make this as you like.
上のコードで行っていることは、Update関数でボールの位置を進めています。 そして、画面の端にボールが到達したら、跳ね返るようにxAccとyAccにマイナス1をかけています。 そうすると、最初に進む時はballXとballYの値が増えて行き、跳ね返る時は逆に値が引かれていきます。 それがまた跳ね返る時はマイナスとマイナスが掛けられて、プラスになるので、また値が増えていきます。
What the above code does is use the Update function to advance the position of the ball. When the ball reaches the edge of the screen, xAcc or yAcc are multiplied by minus 1. This way, the values of ballX or ballY increases the ball moves forward and decrease as it bounces. When it bounces back again, the value increases again because the minus is multiplied to make it positive.
そして、Display関数で、実際のボールを画面に描画します。
Then, the display function draws the actual ball on he screen.
さて、これだけだとクラスの良さが分からないので、次のセクションのProcessingの配列を使って、沢山のボールを作成してみましょう。
Creating just one ball doesn't find any advantage of using Class, so the next section uses the Processing array to create many balls.
Processingの配列 - 6:57 ~
Processing's Array - 6:57 ~
Processingの配列の基本的な扱いかたは、まず最初に型と配列名をプログラムcodeの最初で宣言します。
The basic way to work with arrays in Processing is to first declare the type and array name at the beginning of your program code.
その後、配列の要素数を決めたのち、For文等を使用して、配列の要素の値を決めていきます。
Next, you decide how many elements you want to create in the array, and then use the For statement or another method to enter values based on the number of elements in the array.
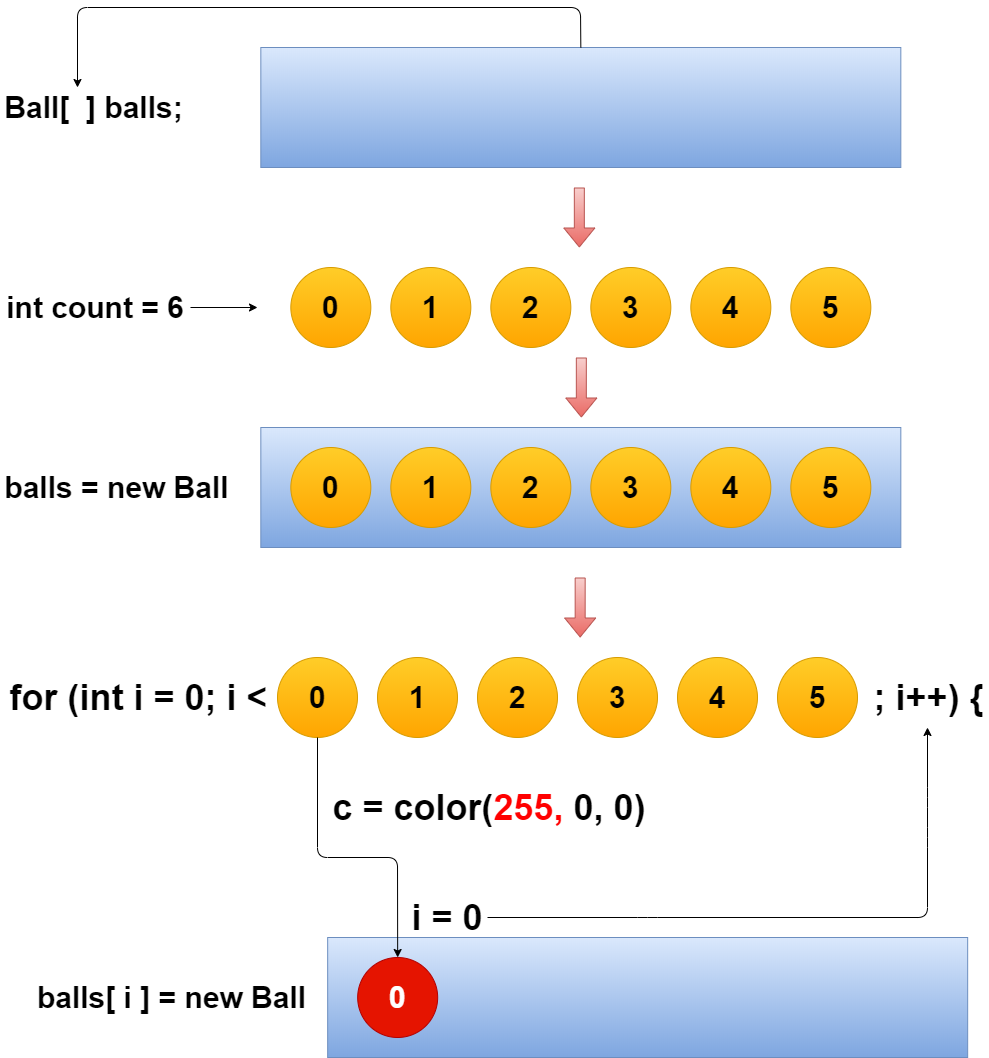
上の図の流れをコードに直し、どのようにプログラムが動くかを確認してみましょう。
To see how the program works. let's create the code shown in the diagram above.
Ball[] balls;

int count;

float r;
float x;
float y;
float xacc;
float yacc;
color c;

void setup(){
  size(640, 360);

  count = 6;
  balls = new Ball[count];
  for (int i = 0; i < count; i++) {
    r = random(10,30);
    x = random(width);
    y = random(height);
    xacc = random(2);
    yacc = random(4);
    c = color(random(255),random(255),random(255));
    balls[i] = new Ball(r, x, y, xacc, yacc, c);
  }

}

void draw(){
  background(255);
  for (int i = 0; i < count; i++) {
    balls[i].update();
    balls[i].display();
  }
}

class Ball{
  float radius;
  float ballX;
  float ballY;
  float xAcc;
  float yAcc;
  color ballColor;

  Ball(float r, float x, float y, float xa, float ya, color c){
    radius = r;
    ballX = x;
    ballY = y;
    xAcc = xa;
    yAcc = ya;
    ballColor = c;
  }

  void update(){
    if((ballX > width) || (ballX < 0)){
      xAcc = xAcc * -1;
    }
    if((ballY > height) || (ballY < 0)){
      yAcc = yAcc * -1;
    }
    ballX = ballX + xAcc;
    ballY = ballY + yAcc;
  }

  void display(){
    noStroke();
    fill(ballColor);
    ellipse(ballX, ballY, radius, radius);
  }
}
行っていることは上で紹介したクラスのコードに配列を作る方法を加えたり、ボールの半径だったり色やその他のプロパティと言われるものをランダムな値になるようにしています。
What we're doing is adding an array to the code in the above class section, and randomizing the radius of the ball, color, and other properties.
様々な形状のボールを100個作成して、色々な動きをさせてみましょう。 ここまできてようやくクラスのありがたみと配列を使うメリットが分かるはずです。
Let's make 100 balls of various shapes and make them move in various ways. At this point, you'll see the value of the class and the benefits of using arrays.
先のコードのcountを100にするだけです。
Just set the count of the previous code to 100.
count = 100;
ではこのボールの動きや色等をインタラクティブに変えたい場合はどうすればいいでしょうか。 Processingなら、keyPressed関数とswitch-case文を使えば簡単に実現できます。
So what should we do if we want to change the movement and color of these balls interactively? Processing is easy to accomplish using the keyPressed function and the switch-case statement.
keyPressedとswitch-case文 - 24:30 ~
keyPressed and switch-case statement - 24:30 ~
keyPressed関数はProcessingが予め用意してくれている関数です。 キーボードのキーが押された時に発動します。 但し、keyPressed関数の処理内容を書かないと何もしてくれません。
The keyPressed function is provided by Processing. Triggered when a key on the keyboard is pressed. However, it does nothing unless you write the contents of the keyPressed function.
簡単な使い方です。
A simple use of the keyPressed function.
void setup(){
  size(640, 360);
}

void draw(){
}

void keyPressed(){
  color randC = color(random(255),random(255),random(255));
  background(randC);
  fill(0);
  textSize(60);
  text(key, width/2, height/2);
}
keyPressedの中で使われている変数(key)には押されたキーの文字が入っています。 他にKeyCode等があり、これには「ENTER」や「TAB」等のキー入力情報が扱えます。
The variable used in keyPressed (key) contains the character of the key that was pressed. There is also a keyCode, which handles keystroke information such as "ENTER" and "TAB" etc.
ではこれらをswitch-case文と組み合わせてみましょう。
Now combine these with a switch-case statement.
void keyPressed(){
  switch (key) {
    case 'r':
      c = color(255, 0, 0);
      break;
    case 'g':
      c = color(0, 255, 0);
      break;
    case 'b':
      c = color(0, 0, 255);
      break;
    case ' ':
      c = color(random(255), random(255), random(255));
      break;
  }

  background(c);
  fill(0);
  textSize(60);
  text(key, width/2, height/2);
}
switch文に判定する変数の値を入れて、 そしてcase文を使ってどの値の時、どんな処理をするかを書きます。
The switch statement must contain the value of the variable to be evaluated. The case statement is then used to specify what values should be entered and what actions should be taken.
ここでの注意点ですが、各Caseの後にBreakを挿入しないと、 その後の処理も全て行われてしまいます。
Note: that if you do not insert a Break statement after each case statement, all subsequent processing continues.
それから先程のKeyCode変数も使いたい、つまり複数の変数を取り扱いたい場合はSwitch-case文は使わないほうがいいです。 普通にIfーElse文等で分岐させましょう。
If you also want to use the previous keyCode variable, that is, if you want multiple variables to be determined, do not use a switch-case statement. Let's make them branch normally with If-Else statements, etc.
color c;
String s;

void setup(){
  size(640, 360);
}

void draw(){
}

void keyPressed(){
  textSize(60);
  textAlign(CENTER);

  if (key == 'r') {
      c = color(255, 0, 0);
      s = "red";
  } else if (key == 'g') {
      c = color(0, 255, 0);
      s = "green";
  } else if (key == 'b') {
      c = color(0, 0, 255);
      s = "blue";
  } else if (keyCode == ENTER) {
      c = color(random(255), random(255), random(255));
      textSize(36);
      s = "ENTER: keyCode -> " + str(keyCode);
  } else {
    c = color(random(255), random(255), random(255));
    s = str(key);
  }

  background(c);
  fill(0);

  text(s, width/2, height/2);
}
これで動画の内容も理解できると思います。 後は各自で色々と試して、Processingで遊んでみてください。
Now you can understand the content of the video. After that, please try various things by yourself and play with Processing.