Published Date : 2019年9月8日19:35
google maps and geolocation
This blog has an English translation
Maps App
前のブログ記事でAndroid Studioの話が出てきたので、せっかくだからAndroidアプリでもつくりませうか。 大したアプリじゃないです。Google Maps APIキーさえあれば幼稚園生でも作れる代物です。
In a previous blog post, I talked about Android Studio, so why don't we make it an Android app? It's not a big application. Anyone with a Google Maps API key can do this.
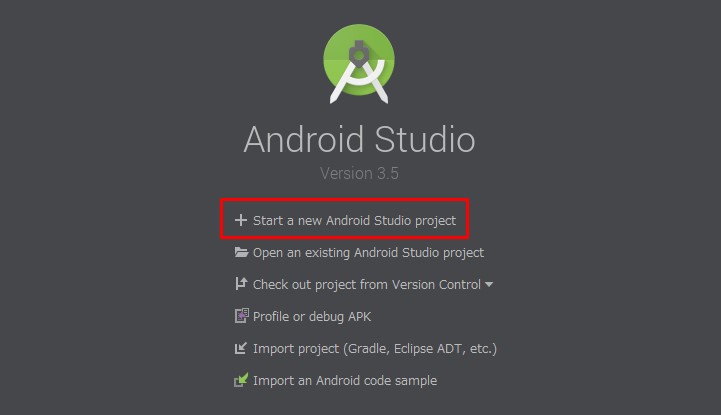
Android Studio
Android Studio のインストール
上のサイトを参考にAndroid Studioをインストールしてくだちぃ。
Install Android Studio using the site above as a guide.
Lets get started
Googleアカウントを作ってくだちぃ。
Create a Google account.
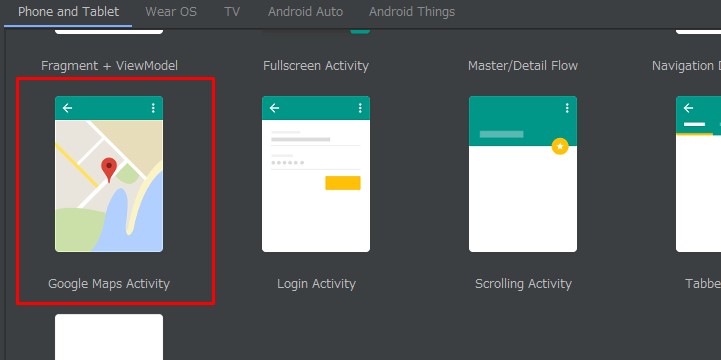
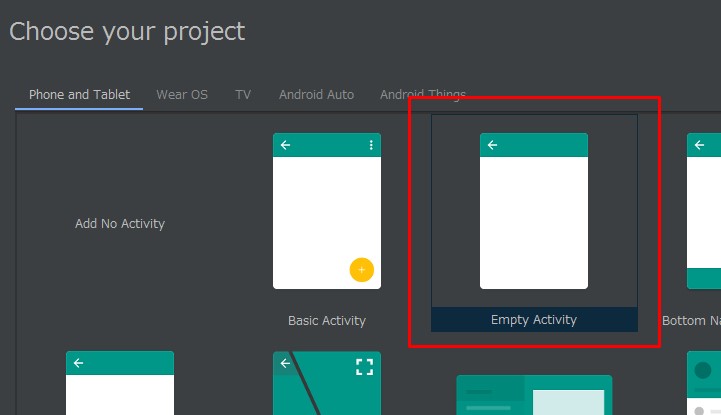
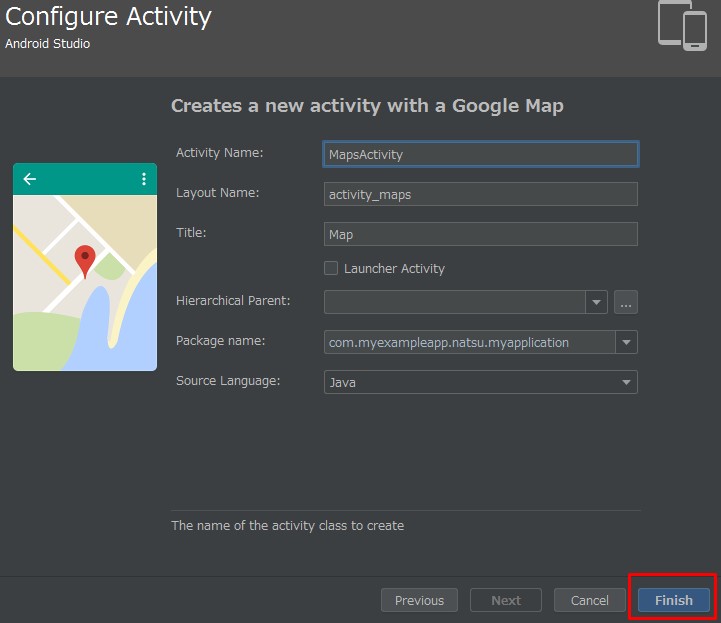
Android Studioを立ち上げ、新しいプロジェクトを作成。Google Maps Activityを選択。
Launch Android Studio and create a new project. Select Google Maps Activity.
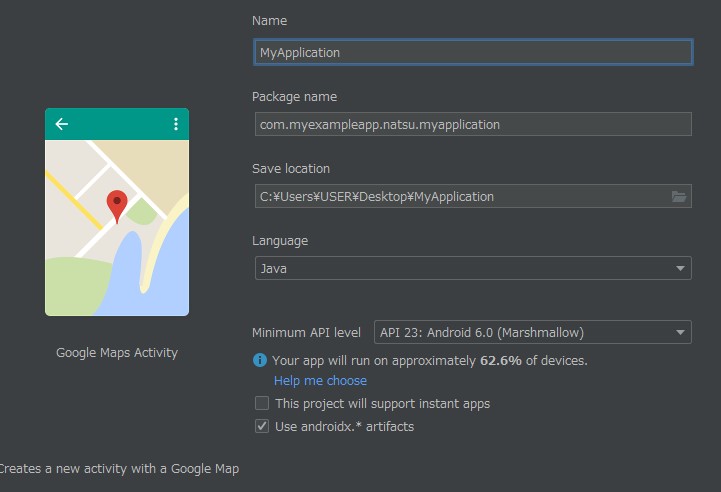
名前等はお好みで。基本的にはデフォルトの設定のままでOK。
Use whatever name you like. Basically, the default settings are fine.
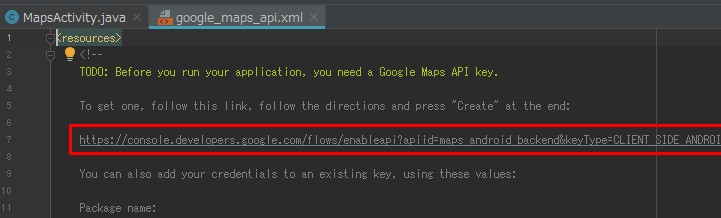
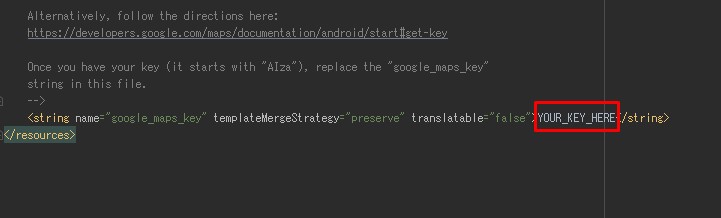
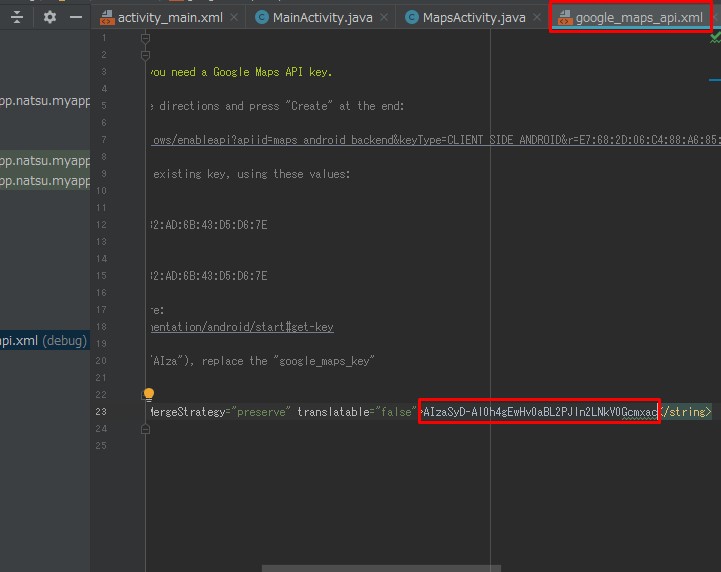
google_maps_api.xmlを開き、赤枠のURLをブラウザに貼り付けAPIキーを取得してくだちぃ。
Open google_maps_api.xml and paste the red-framed URL into your browser to get the API key.
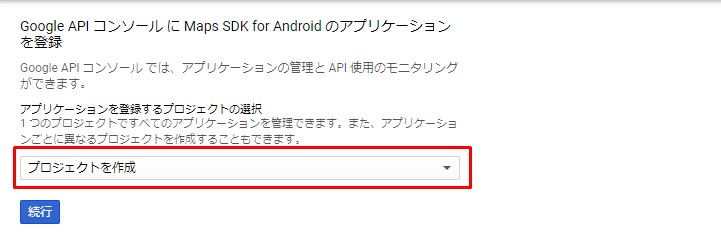
プロジェクトを作成。
Create a project
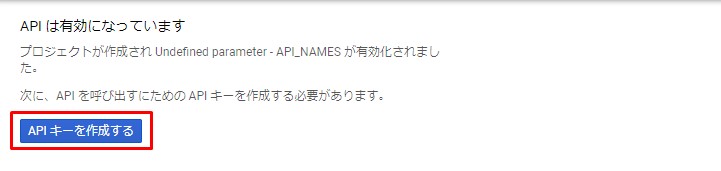
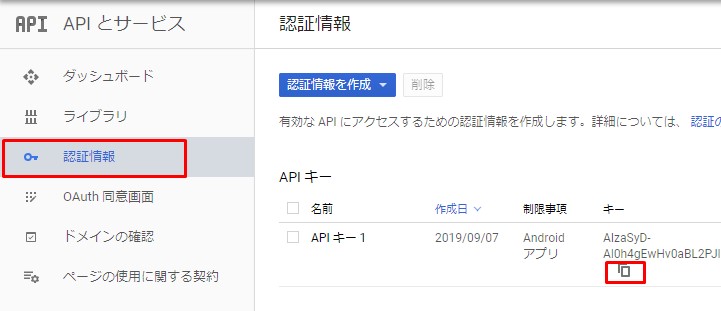
APIキーを作成。
Create a API key
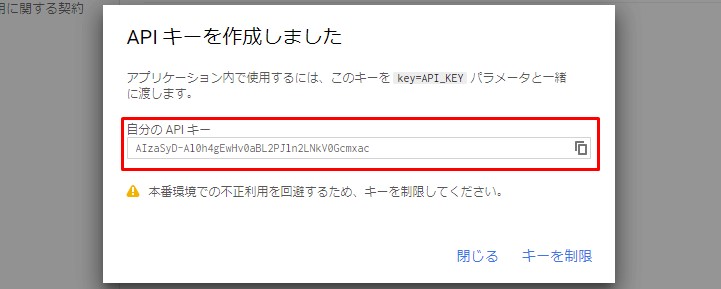
出てきたキーをコピってね。
So, go ahead copy this api key
アンドロイドスタジオに戻って、キーを貼り付けてね。
we go back to android stduio. and we are going to paste that right inside.
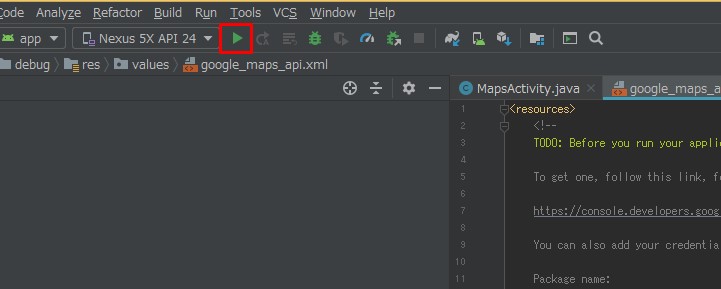
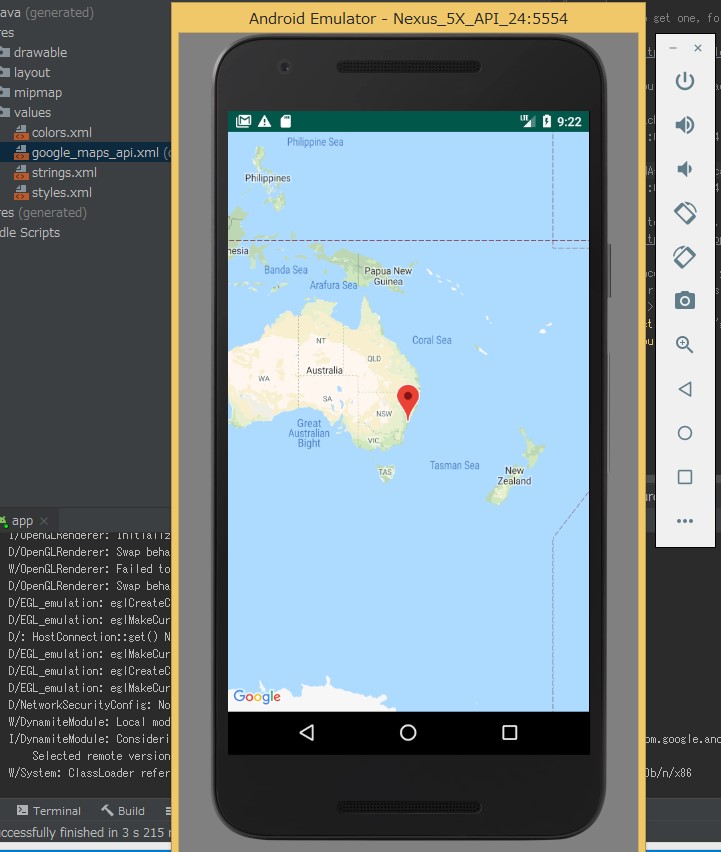
ボタンを押すとエミュレーターが起動して、アプリが確認できる。
When you press the button, the emulator starts and you can check the application.
赤枠の部分の緯度経度や、イベント処理部分を変えてみる。
Change the latitude and longitude.
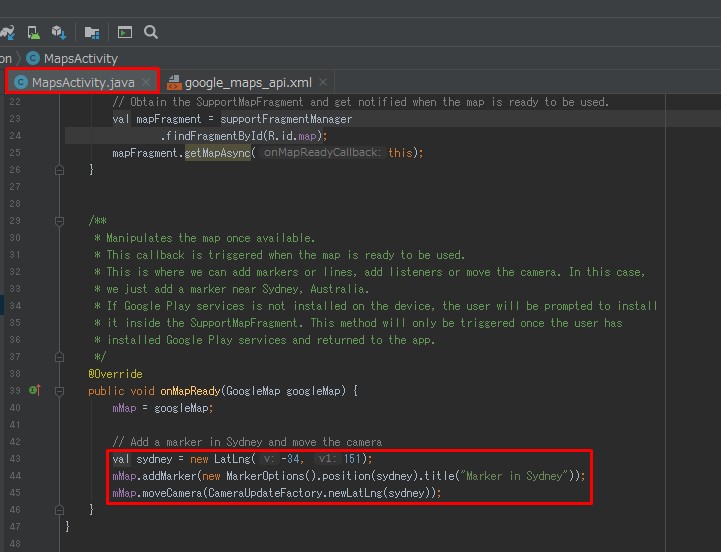
// Add a marker in Sydney and move the camera
LatLng tokyo = new LatLng(35.683890, 139.745645);
mMap.addMarker(new MarkerOptions().position(tokyo).title("Marker in Hanzomon"));
mMap.moveCamera(CameraUpdateFactory.newLatLng(tokyo));
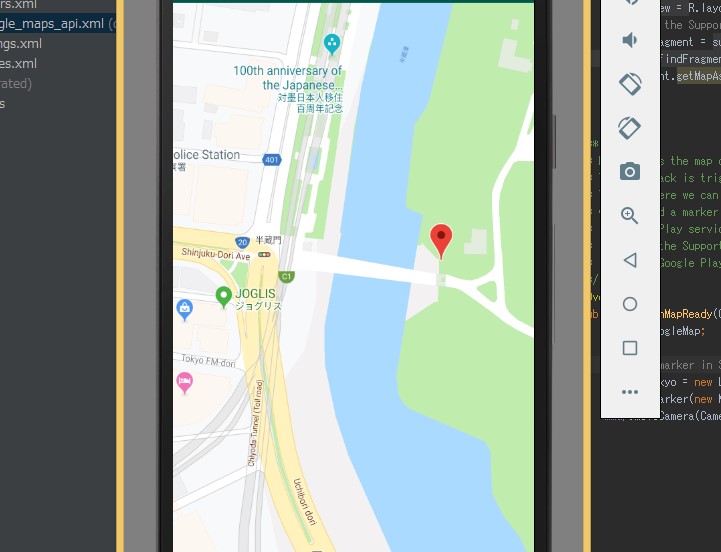
Ctrlボタンを押しながら、マウスをドラッグするとズームできる。
You can change zoom level by holding down the Ctrl button and dragging the mouse.
以下のようにするとズームレベルの初期値を変えられる。
The initial zoom level can be changed as follows.
// zoom level 15
mMap.moveCamera(CameraUpdateFactory.newLatLngZoom(tokyo, 15));
New Project
簡単な応用プロジェクトを作っていきます。
Let's create a simple application project.
Empty Projectを選択。
Select Empty Project.
layout/activity_main.xmlを選択して、中身を編集する。
Select layout/activity _ main.xml and edit its contents.
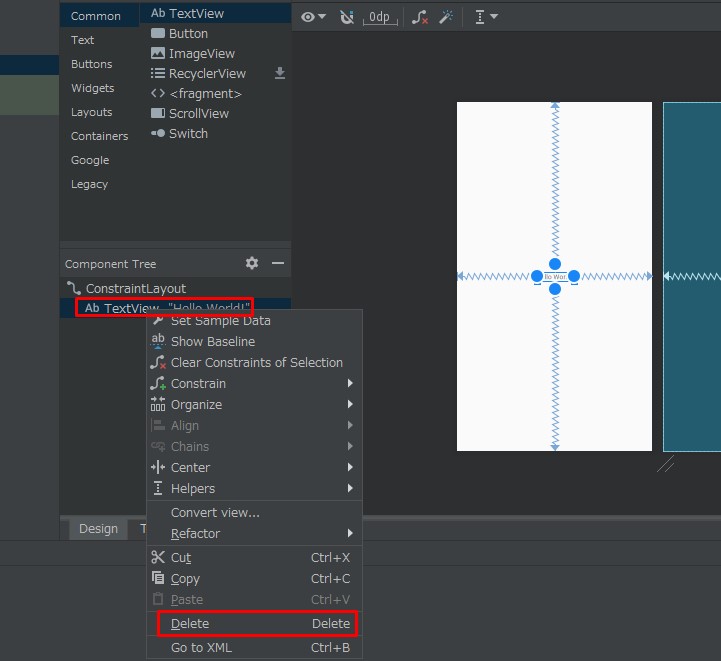
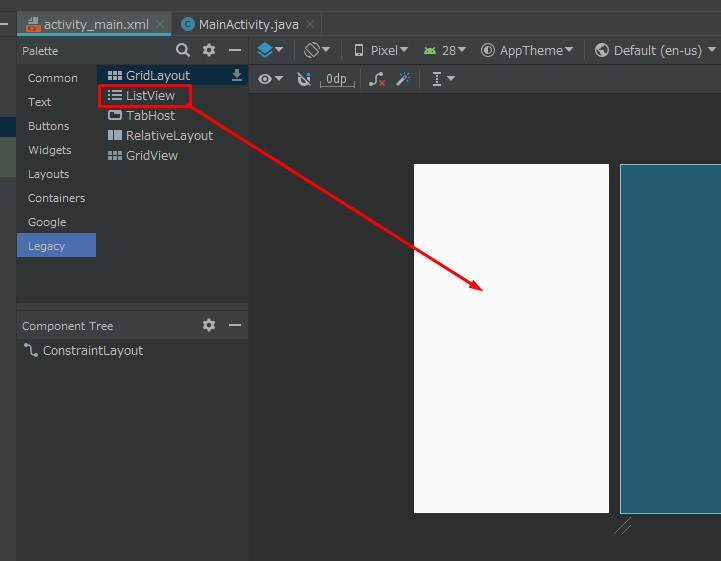
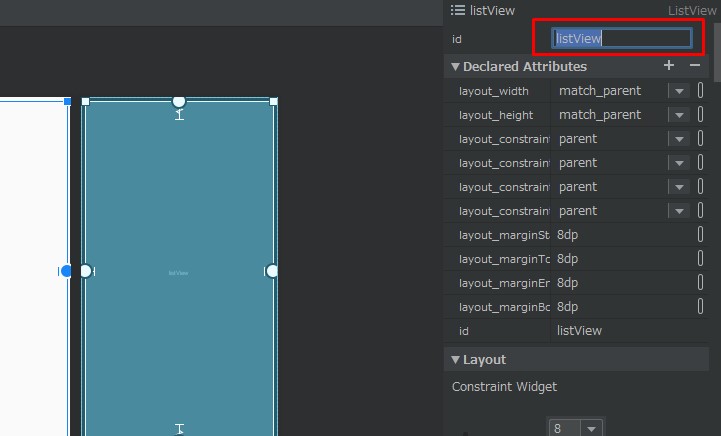
用意されているText Viewを消して、List Viewをドラックアンドドロップする。
Delete the provided Text View and drag and drop the List View.
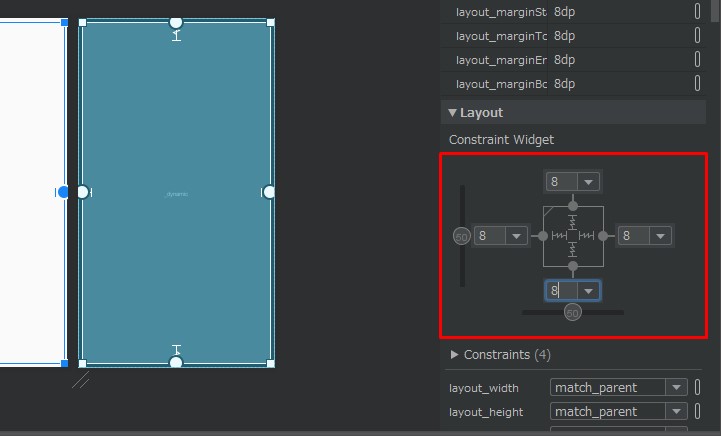
余白を8にして、IDを設定する。
Set the margin to 8 and set the ID.
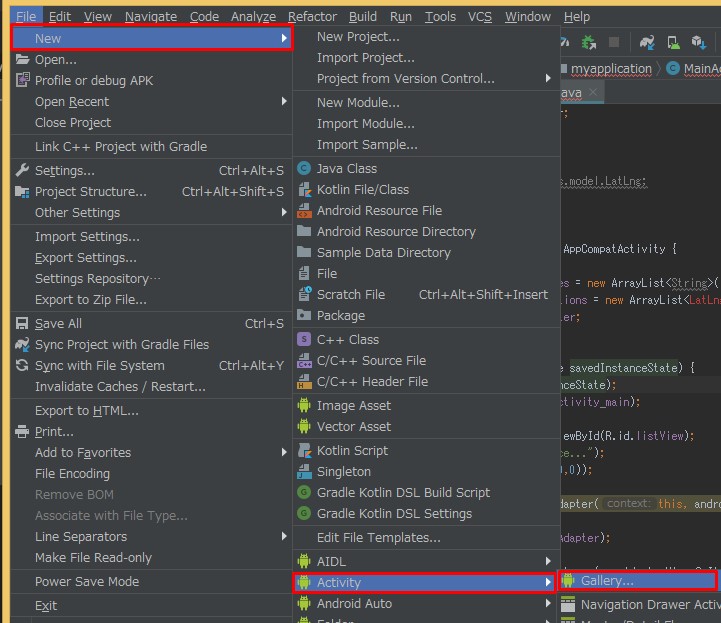
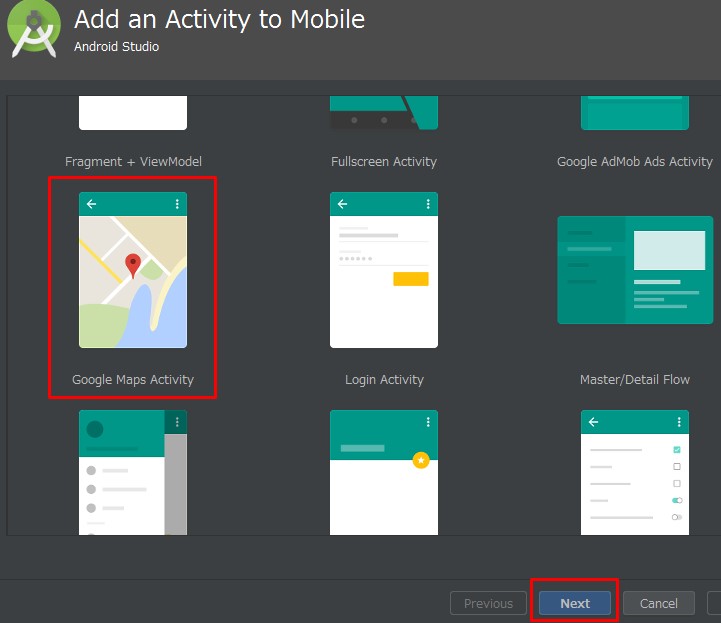
新しい地図用のActivityをGalleryから選択する。
Select an Activity for the new map from the Gallery.
作っておいたAPIキーをgoogle_maps_api.xmlに入力する。
Enter your API key into the google_maps_api.xml.
java/your package name/MainActivity.javaを作ります。
Create java/your package name/MainActivity.java.
MainActivity.java
package com.myexampleapp.your.myapplication;

import androidx.appcompat.app.AppCompatActivity;

import android.content.Intent;
import android.os.Bundle;
import android.view.View;
import android.widget.AdapterView;
import android.widget.ArrayAdapter;
import android.widget.ListView;

import com.google.android.gms.maps.model.LatLng;

import java.util.ArrayList;

public class MainActivity extends AppCompatActivity {

    static ArrayList places = new ArrayList<>();
    static ArrayList locations = new ArrayList<>();
    static ArrayAdapter arrayAdapter;

    @Override
    protected void onCreate(Bundle savedInstanceState) {
        super.onCreate(savedInstanceState);
        setContentView(R.layout.activity_main);

        ListView listView = findViewById(R.id.listView);
        places.add("現在地");
        locations.add(new LatLng(0,0));

        arrayAdapter = new ArrayAdapter(this, android.R.layout.simple_list_item_1, places);

        listView.setAdapter(arrayAdapter);

        listView.setOnItemClickListener(new AdapterView.OnItemClickListener() {
            @Override
            public void onItemClick(AdapterView adapterView, View view, int i, long l) {
                Intent intent = new Intent(getApplicationContext(), MapsActivity.class);
                intent.putExtra("番号",i);

                startActivity(intent);
            }
        });
    }
}
続いてjava/your package name/MapsActivity.javaを作ります。
Next, create java/your package name/MapsActivity.java.
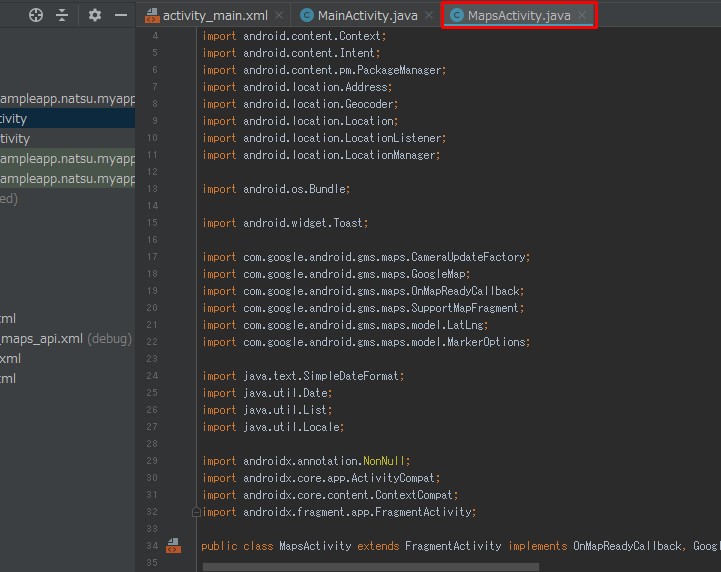
MapsActivity.java
package com.myexampleapp.your.myapplication;

import android.Manifest;
import android.annotation.SuppressLint;
import android.content.Context;
import android.content.Intent;
import android.content.pm.PackageManager;
import android.location.Address;
import android.location.Geocoder;
import android.location.Location;
import android.location.LocationListener;
import android.location.LocationManager;

import android.os.Bundle;

import android.widget.Toast;

import com.google.android.gms.maps.CameraUpdateFactory;
import com.google.android.gms.maps.GoogleMap;
import com.google.android.gms.maps.OnMapReadyCallback;
import com.google.android.gms.maps.SupportMapFragment;
import com.google.android.gms.maps.model.LatLng;
import com.google.android.gms.maps.model.MarkerOptions;

import java.text.SimpleDateFormat;
import java.util.Date;
import java.util.List;
import java.util.Locale;

import androidx.annotation.NonNull;
import androidx.core.app.ActivityCompat;
import androidx.core.content.ContextCompat;
import androidx.fragment.app.FragmentActivity;

public class MapsActivity extends FragmentActivity implements OnMapReadyCallback, GoogleMap.OnMapLongClickListener {

    LocationManager locationManager;
    LocationListener locationListener;
    private GoogleMap mMap;

    public void centerMapOnLocation(Location location, String title) {
        if (location != null) {
            LatLng userLocation = new LatLng(location.getLatitude(), location.getLongitude());
            mMap.clear();
            mMap.addMarker(new MarkerOptions().position(userLocation).title(title));
            mMap.moveCamera(CameraUpdateFactory.newLatLngZoom(userLocation, 15));
        }
    }

    @Override
    public void onRequestPermissionsResult(int requestCode, @NonNull String[] permissions, @NonNull int[] grantResults) {
        super.onRequestPermissionsResult(requestCode, permissions, grantResults);

        if (grantResults.length > 0 && grantResults[0] == PackageManager.PERMISSION_GRANTED) {
            if (ContextCompat.checkSelfPermission(this, Manifest.permission.ACCESS_FINE_LOCATION) == PackageManager.PERMISSION_GRANTED) {
                locationManager.requestLocationUpdates(LocationManager.GPS_PROVIDER,0,0,locationListener);
                Location lastKnownLocation = locationManager.getLastKnownLocation(LocationManager.GPS_PROVIDER);
                centerMapOnLocation(lastKnownLocation, "現在地");
            }
        }
    }

    @Override
    protected void onCreate(Bundle savedInstanceState) {
        super.onCreate(savedInstanceState);
        setContentView(R.layout.activity_maps);
        // Obtain the SupportMapFragment and get notified when the map is ready to be used.
        SupportMapFragment mapFragment = (SupportMapFragment) getSupportFragmentManager()
                .findFragmentById(R.id.map);
        assert mapFragment != null;
        mapFragment.getMapAsync(this);
    }

    @Override
    public void onMapReady(GoogleMap googleMap) {
        mMap = googleMap;

        mMap.setOnMapLongClickListener(this);

        Intent intent = getIntent();
        if (intent.getIntExtra("番号",0) == 0) {
            // Zoom in on user location
            locationManager = (LocationManager) this.getSystemService(Context.LOCATION_SERVICE);
            locationListener = new LocationListener() {
                @Override
                public void onLocationChanged(Location location) {
                    centerMapOnLocation(location, "現在地");
                }

                @Override
                public void onStatusChanged(String s, int i, Bundle bundle) {

                }

                @Override
                public void onProviderEnabled(String s) {

                }

                @Override
                public void onProviderDisabled(String s) {

                }
            };

            if (ContextCompat.checkSelfPermission(this, Manifest.permission.ACCESS_FINE_LOCATION) == PackageManager.PERMISSION_GRANTED) {
                locationManager.requestLocationUpdates(LocationManager.GPS_PROVIDER,0,0,locationListener);
                Location lastKnownLocation = locationManager.getLastKnownLocation(LocationManager.GPS_PROVIDER);
                centerMapOnLocation(lastKnownLocation, "現在地");
            } else {
                ActivityCompat.requestPermissions(this,new String[]{Manifest.permission.ACCESS_FINE_LOCATION},1);
            }
        } else {
            Location placeLocation = new Location(LocationManager.GPS_PROVIDER);
            placeLocation.setLatitude(MainActivity.locations.get(intent.getIntExtra("番号",0)).latitude);
            placeLocation.setLongitude(MainActivity.locations.get(intent.getIntExtra("番号",0)).longitude);

            centerMapOnLocation(placeLocation, MainActivity.places.get(intent.getIntExtra("番号",0)));
        }
    }

    @Override
    public void onMapLongClick(LatLng latLng) {

        Geocoder geocoder = new Geocoder(getApplicationContext(), Locale.getDefault());

        String address = "";

        try {

            List listAdddresses = geocoder.getFromLocation(latLng.latitude,latLng.longitude,1);

            if (listAdddresses != null && listAdddresses.size() > 0) {
                if (listAdddresses.get(0).getThoroughfare() != null) {
                    if (listAdddresses.get(0).getSubThoroughfare() != null) {
                        address += listAdddresses.get(0).getSubThoroughfare() + " ";
                    }
                    address += listAdddresses.get(0).getThoroughfare();
                }
            }

        } catch (Exception e) {
            e.printStackTrace();
        }

        if (address.equals("")) {
            @SuppressLint("SimpleDateFormat") SimpleDateFormat sdf = new SimpleDateFormat("HH:mm yyyy-MM-dd");
            address += sdf.format(new Date());
        }

        mMap.addMarker(new MarkerOptions().position(latLng).title(address));

        MainActivity.places.add(address);
        MainActivity.locations.add(latLng);

        MainActivity.arrayAdapter.notifyDataSetChanged();

        Toast.makeText(this,"保存しました",Toast.LENGTH_SHORT).show();
    }
}
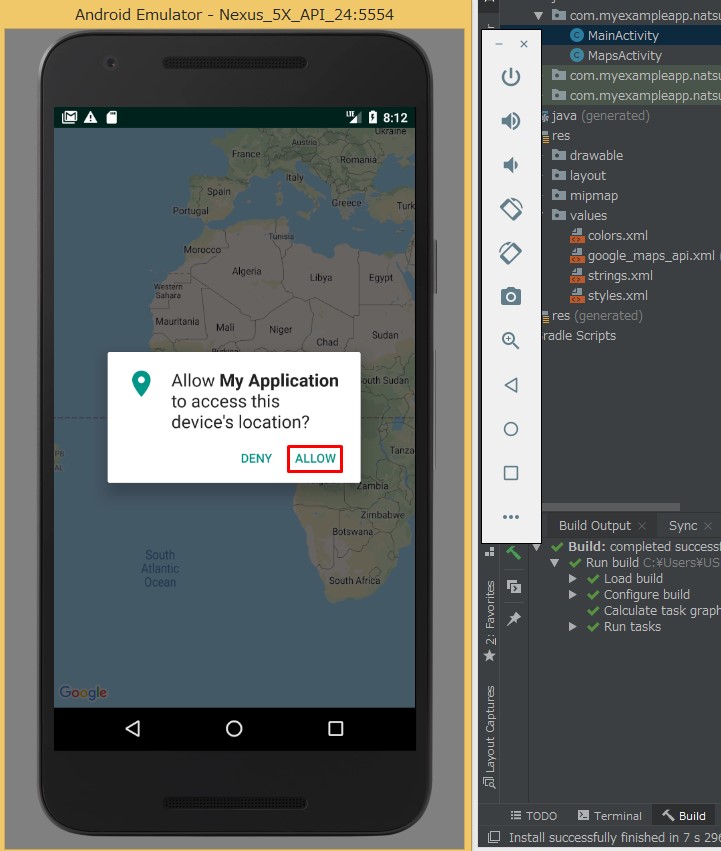
アプリを起動させたら、現在地の取得を許可する。
Start the app and allow it to get your current location.
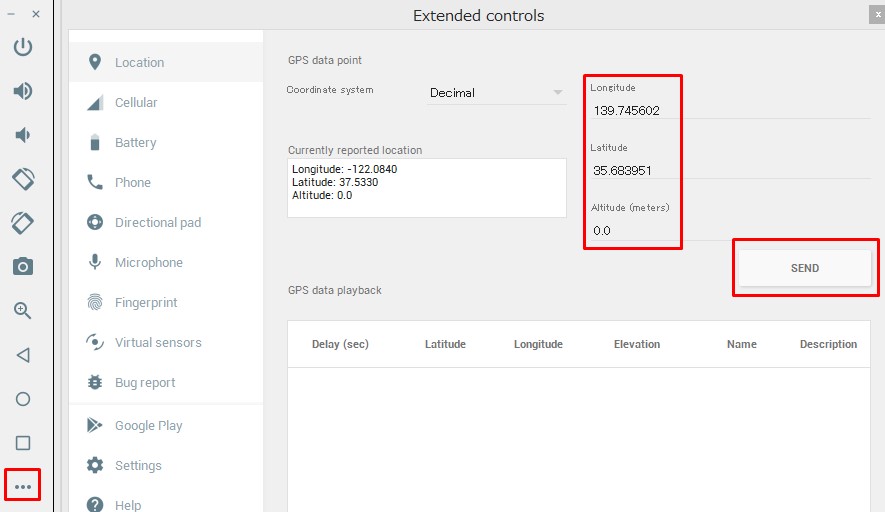
エミュレーターのスリードットマークからExtended controlsから擬似的に現在地の緯度経度を入力してSENDを押す。
Enter the latitude and longitude of the current location from Extended controls and press SEND.
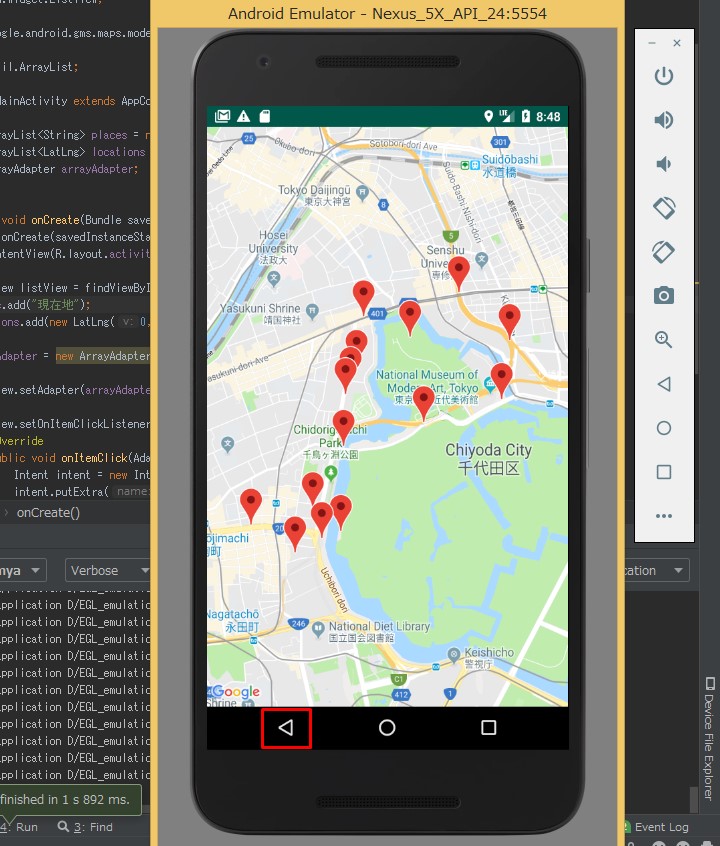
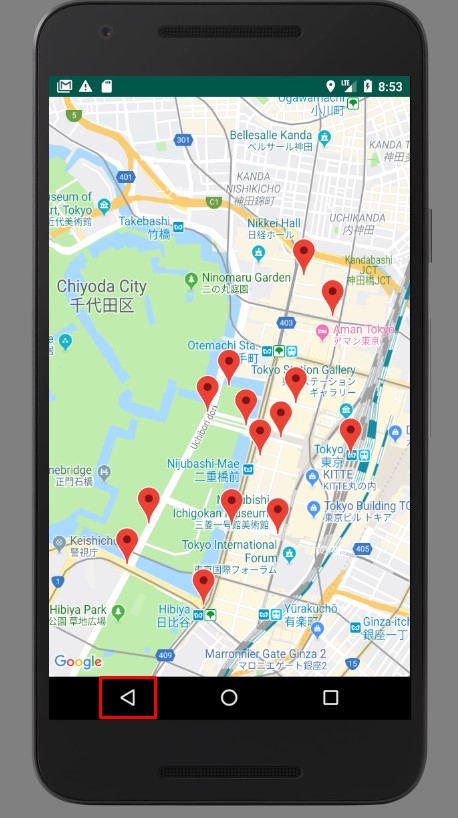
適当に新しい場所を登録して、戻るボタンを押す。
Register a new location and press the Back button.
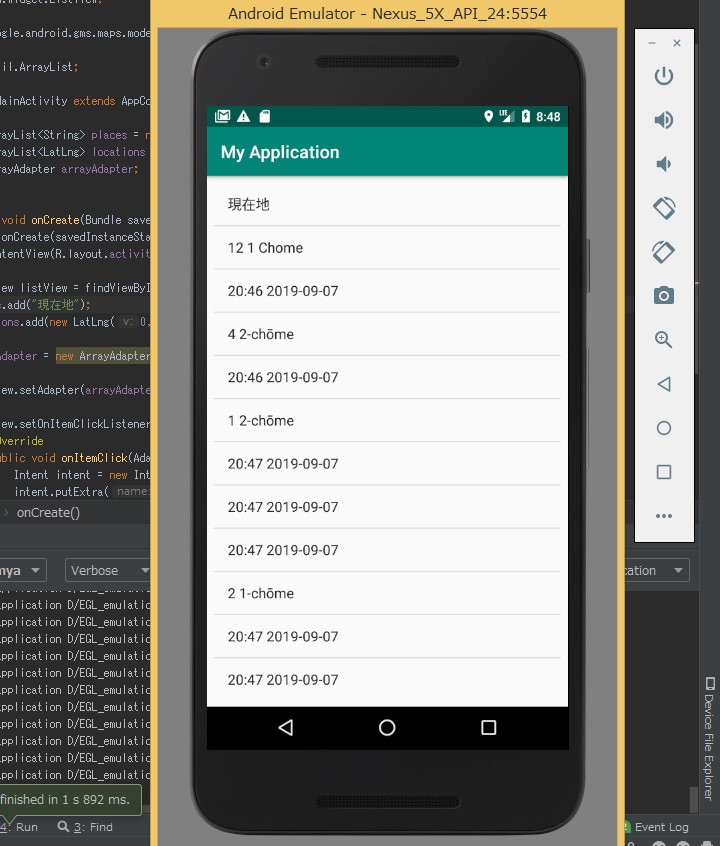
登録された場所がリスト表示されていることを確認する。
Make sure the registered locations are listed.
場所を移動したと過程して、また新しい緯度経度をデバイスに送る。
As it moves from place to place, it also sends a new latitude longitude to the device.

適当に新しい場所を登録して、戻るボタンを押す。
Register a new location and press the Back button.
前に登録した場所と今回登録した場所がリスト表示されていることを確認する。
Make sure the previously registered locations and the currently registered locations are listed.
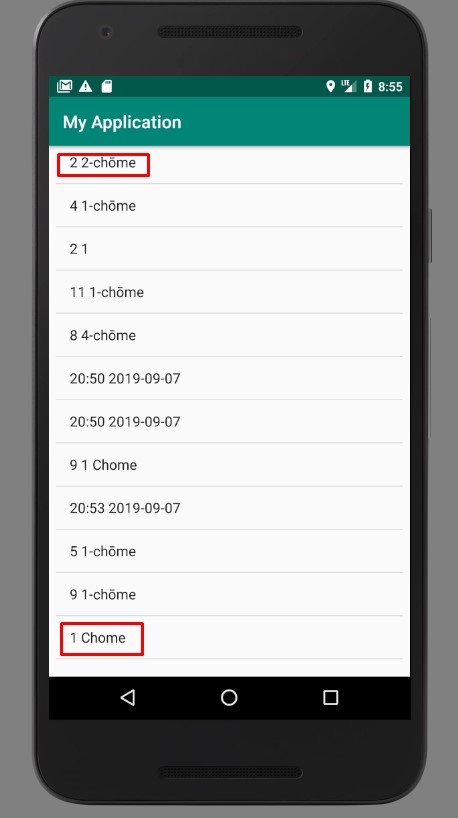
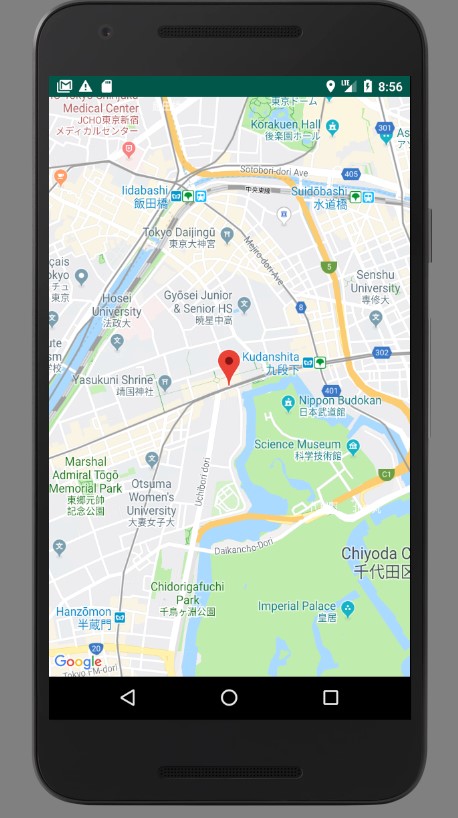
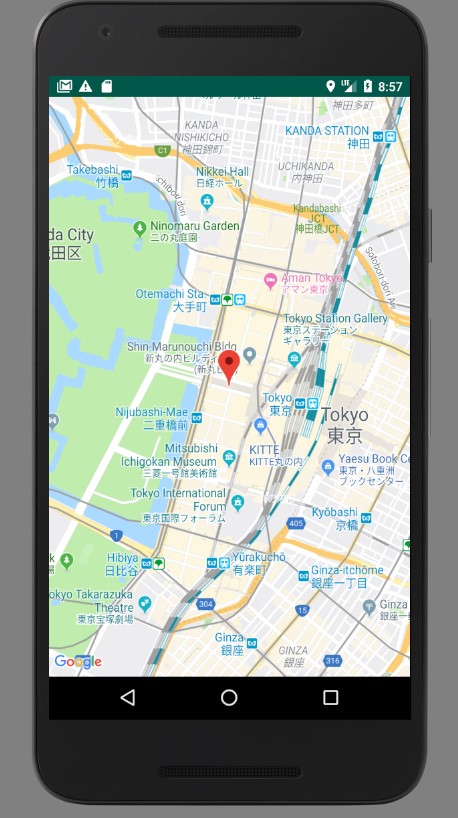
それぞれ押して場所を確認する。
Press each button to check the location.
終わり
このままでは一旦アプリを落とすと全ての記録は消えます。 デバイスに記憶させる機能を実装しなければいけません。
If you leave it like this, once you drop the application, all the records will disappear. You must implement the function to be stored in the device.
編集する際にKMLファイルを生成して、詳細を表示させるなど、応用できることは沢山見つかると思います。
You'll find many applications, such as generating a KML file to show details when editing.
あとはこのページを見れば色々作れます。
You can make various things by looking at this page.
それでは、長々とお付き合い頂きありがとうございます。
Thank you for reading this long blog.
See You Next Page!