Published Date : 2021年2月24日18:16
パート 5: 給与所得者の所得税と住民税を計算するAndroidアプリ
Part 5: Android App Calculates Income and
Resident Taxes for Salaried Workers
This blog has an English translation
ニコニコ動画にアップした動画のまとめ記事です。
This is a summary blog post about a video I uploaded to NicoNico.
細かい部分は動画を参考にしてください。
Please refer to the video for details.
目次
Table of Contents
① 動画の説明
① Video
Description
警告:
今回説明する給与所得者の所得税及び住民税を計算するツールは、あくまで簡易的なお遊び用のツールです。
正確な数値、計算方法は各自で調べて下さい。
このツールは大雑把に大体の見積りを計算して楽しむ為のツールです。
決して従業員の年末調整や個人の確定申告等に使用しないでください。
さらに、税金の計算方法は変更される場合があり、控除についても同様です。
また、控除や税金の計算方法が間違っている可能性もありますので、
あまり信用せずに、各自で調べてから実験してみてください。
このツールを使って何かしらの損害が発生したとしても、私は一切の責任を負いません。
Warning:
The tool I'm going to show you for calculating income and residence taxes for salaried workers is just a simple tool for playing.
Please check the exact number and calculation method by yourself.
This tool is used to calculate rough estimates and enjoy them.
Do not use for year-end adjustment of employees or for individual tax return.
In addition, the method of calculating taxes and deductions may change.
Also, there is a possibility that the deduction and tax calculation methods are incorrect.
Don't trust it too much, and test it yourself.
I will not be liable for any damage caused by using this tool.
前回の続きです。
Continued from last time.
電卓アクティビティを起動するメソッドを作成しましょう。
Let's create a method to launch the calculator activity.
[MainActivity.java]へ戻ります。
Return to [MainActivity.java].
このボタンをクリックするとイベントリスナーに登録されたこのメソッドを起動させます。
Click this button to invoke the method registered with the event listener.
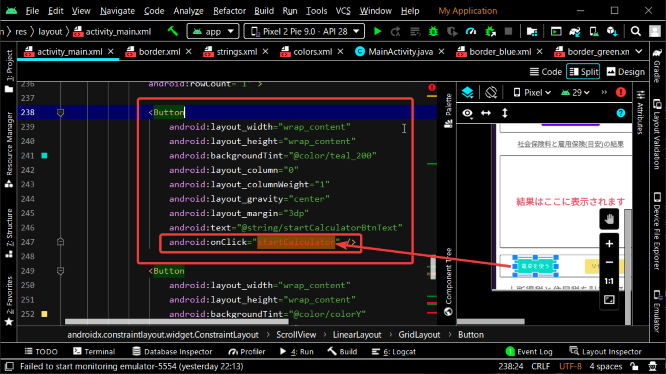
[CalculatorActivity]を指定して、インテントのインスタンスを作成します。
Specify [CalculatorActivity] to create an instance of the intent.
そして[startActivity]を使いアクティビティを起動させます。
Then use [startActivity] to invoke the activity.
public void startCalculator(View view) {
    Intent intent = new Intent(this, CalculatorActivity.class);
    startActivity(intent);
}
画面の指示通りに新しいアクティビティを作成します。
Follow the on-screen instructions to create a new activity.
電卓のボタンがクリックされた時の動作のメソッドを作成します。
Creates a method for the action when the calculator button is clicked.
まず電卓のボタンのレイアウトを作成しましょう。
First, let's create a layout for the calculator buttons.
リニアレイアウトの属性値に垂直を指定して配置します。
Place by specifying vertical to the attribute value of the linear layout.
[HorizontalScrollView]を配置します。
Place [HorizontalScrollView].
その中に計算途中のテキストを表示させる為のテキストビューを配置します。
Place a text view in the scroll view to display the numbers that are being calculated.
文字数が多くなっても見えやすいように右方向に自動でスクロールさせるようにして表示させるようにします。
To make it easier to see even when the number of characters increases, scroll it to the right automatically.
スクロールビューの下に計算結果を表示させるエディットテキストビューを配置します。
Position the edit text view below the scroll view to display the result of the calculation.
エディットテキストなら文字をコピぺすることが可能です。
You can copy and paste characters in edit text.
ヒントに使われている文字を[strings.xml]に登録しましょう。
Register the characters used in the hint in [strings.xml].
そして、電卓で使われるボタンの文字もついでに登録してしまいましょう。
Also, let's register the letters of the buttons used in the calculator.
[activity_calculator.xml]に戻りGridLayoutを配置して、行列数を5行4列に指定しましょう。
Return to [activity_calculator.xml] and position the GridLayout, specifying 5 rows and 4 columns.
[useDefaultMargins]をtrueにすると自動で要素同士の間にスペースを設けてくれます。
If you set [useDefaultMargins] to true, it will automatically add space between elements.
<GridLayout
    android:layout_width="wrap_content"
    android:layout_height="wrap_content"
    android:layout_gravity="center"
    android:layout_marginTop="6dp"
    android:columnCount="4"
    android:rowCount="5"
    android:useDefaultMargins="true" >

</GridLayout>
では電卓のボタンを配置していきましょう。
Now, let's arrange the calculator buttons.
オンクリックイベントには全て同じメソッドを登録します。
All onclick events register the same method.
オールキャンセルボタン。
This is an all cancel button.
キャンセルエントリーボタン。
This is a cancel entry button.
バックスペースボタン。
This is a backspace button.
割り算ボタン。
This is a division button.
これで一行目
This is the first line.
数字の七のボタン。
This is the number seven button.
数字の八のボタン。
This is the number eight button.
数字の九のボタン。
This is the number nine button.
掛け算ボタン。
This is a multiply button.
これで二行目。
This is the second line.
数字の四のボタン。
This is the number four button.
数字の五のボタン。
This is the number five button.
数字の六のボタン。
This is the number six button.
引き算ボタン。
This is a subtract button.
これで三行目。
This is the third line.
数字の一のボタン。
This is the number one button.
数字の二のボタン。
This is the number two button.
数字の三のボタン。
This is the number three button.
足し算ボタン。
This is a add button.
これで四行目。
This is the fourth line.
ドットボタン。
This is a dot button.
数字の零のボタン。
This is the number zero button.
イコールボタン。
This is the equals button.
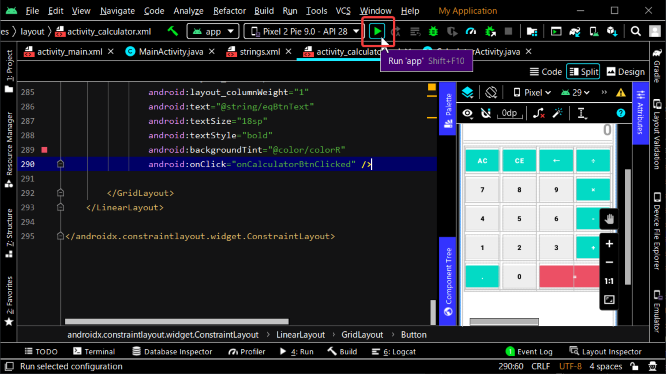
[layout_culumnSpan]を2列にして、[layout_culumnWeight]を1に設定してください。
Make [layout_culumnSpan] two columns and set [layout_culumnWeight] to 1.
アプリを起動して電卓レイアウトを確かめてみましょう。
Let's start the application and check the calculator layout.
パートシックスへ続く。
Continue to Part 6.
以上です。お疲れ様です。
That's all. Thank you for your hard work.