Published Date : 2021年1月25日22:33
Part 4 - Pyhonを使ったドルと円の為替レートを使った簡単な計算アプリ
Part 4 - Simple calculation app using dollar-yen
exchange rate using Python
This blog has an English translation
ニコニコ動画にアップした動画のまとめ記事です。
This is a summary blog post about a video I uploaded to NicoNico.
細かい部分は動画を参考にしてください。
Please refer to the video for details.
目次
Table of Contents
① 動画の説明
① Video
Description
警告:
このアプリは大雑把に大体の見積りを計算して楽しむ為のツールです。
計算の詳細や、端数の処理等は各金融機関等によって異なります。
このアプリを使って何かしらの損害が発生したとしても、私は一切の責任を負いません。
このアプリを使って何かしらの損害が発生したとしても、私は一切の責任を負いません。
Warning:
This application is used to calculate rough estimates and enjoy them.
The details of calculations and the treatment of fractions differ depending on the financial institution.
I will not be liable for any damage caused by using this app.
前回の動画の続きです。最後に電卓のスクリプトを完成させて、いつものようにこのWEBアプリをHEROKUにアップロードしてみましょう。
This is a continuation of the previous video. Finally, let's complete the calculator script and upload the WEB application to HEROKU as usual.
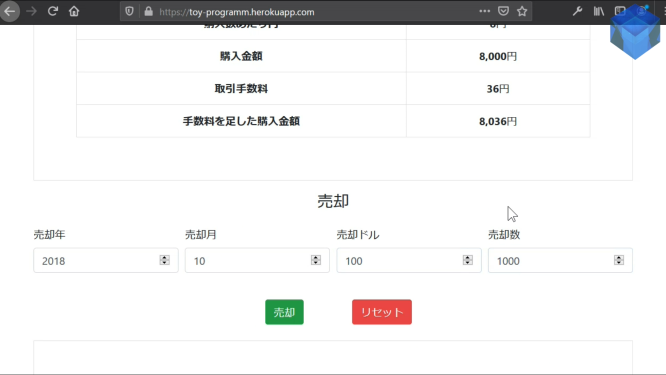
HEROKUにアップした状態のWEBアプリはこのようになります。
This is how the WEB application looks when it is uploaded to HEROKU.
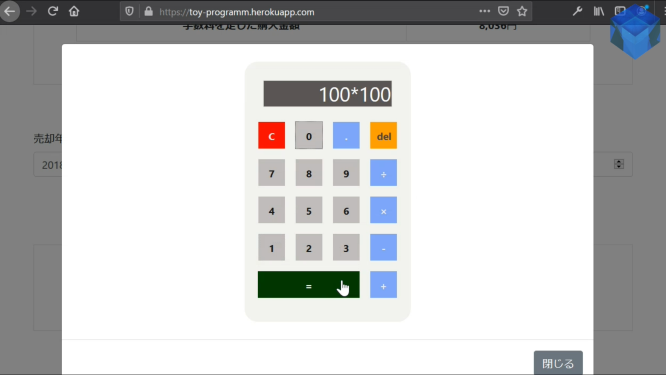
モーダル表示のトリガーとなるボタンを作成し、JSファイルも作成します。
Create a button to trigger the modal display, and also create a JS file.
モーダル表示のHTMLを作成します。前回のトイプログラムの動画シリーズ内でDjangoアプリに使用したBootstrapのモーダルです。
Creates HTML for modal display. This is the Bootstrap modal display used for the Django app in the previous toy program video series.
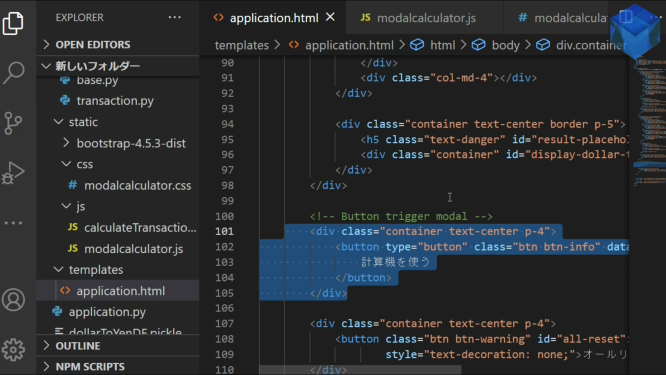
<div class="container text-center p-4">
    <button type="button" class="btn btn-info" data-toggle="modal" data-target="#calculatorModal">
        計算機を使う
    </button>
</div>
電卓のボタンを配置していきます。
Position the calculator buttons.
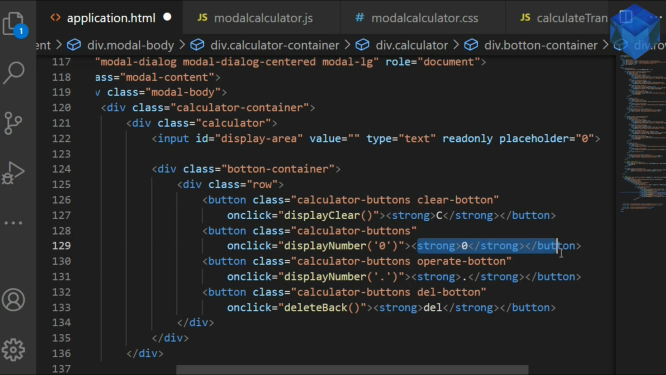
<!-- modal -->
<div class="modal fade" id="calculatorModal" tabindex="-1" role="dialog" aria-labelledby="calculatorModalTitle"
    aria-hidden="true">
    <div class="modal-dialog modal-dialog-centered modal-lg" role="document">
        <div class="modal-content">
            <div class="modal-body">
                <div class="calculator-container">
                    <div class="calculator">
                        <input id="display-area" value="" type="text" readonly placeholder="0">

                        <div class="botton-container">
                            <div class="row">
                                <button class="calculator-buttons clear-botton"
                                    onclick="displayClear()"><strong>C</strong></button>
                                <button class="calculator-buttons"
                                    onclick="displayNumber('0')"><strong>0</strong></button>
                                <button class="calculator-buttons operate-botton"
                                    onclick="displayNumber('.')"><strong>.</strong></button>
                                <button class="calculator-buttons del-botton"
                                    onclick="deleteBack()"><strong>del</strong></button>
                            </div>
今回はボタンタグの中に直接onclickイベントととしてJSの関数を記述していきます。
In this case, you'll write the JS function as an onclick event directly inside the button tag.
後は実際の計算の関数の処理内容をJSファイル内に記述していくだけです。
All you have to do now is write the actual calculation functions in the JS file.
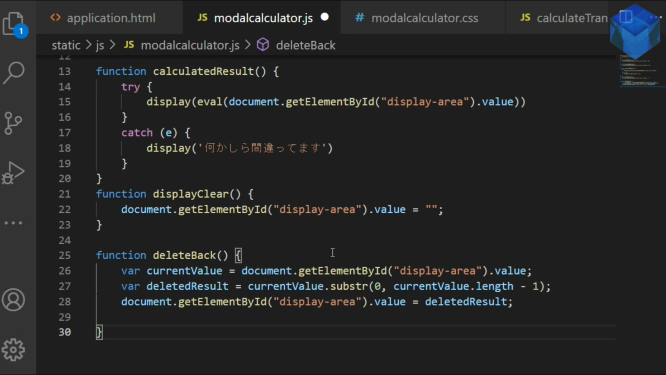
function calculatedResult() {
    try {
        display(eval(document.getElementById("display-area").value))
    }
    catch (e) {
        display('何かしら間違ってます')
    }
}
ここで使われているeval関数はPythonにもあり、文字列の計算式をそのまま計算をしてくれる便利な関数です。
The eval function used here is also available in Python, and is a useful function for calculating strings as they are.
In [1]: eval("10 + 20")
Out[1]: 30

In [2]: eval("10 * 20")
Out[2]: 200

In [3]: eval("10 - 20")
Out[3]: -10

In [4]: eval("10 / 20")
Out[4]: 0.5
いくつか簡単な計算をしてアプリを試してみましょう。
Let's do some simple calculations and try the app.
それではアプリをHEROKUにアップロードする準備をしましょう。
Let's prepare to upload the application to HEROKU.
いつものようにrequirements.txtとProcfileを作成します。
Create the requirements.txt and Procfile as usual.
debugがTrueになっている設定を削除します。
Remove the debug True configuration.
pandasを使用しているので、requirements.txtにnumpyとpandasを記述するのを忘れずに。
Since you are using pandas, remember to write numpy and pandas in requirements.txt.
ここで問題が一つあります。先ほどまで使用していたピックルファイルがプロトコルのバージョンの関係でHEROKUでエラーになり使えません。
There is one problem here. Because of the protocol version, the pickle file I was using until now has an error in HEROKU and cannot be used.
これを解決するために、ピックルファイルを削除して、CSVファイルを使用します。
To resolve this, delete the pickle file and use a CSV file.
前回のデータフレームの日付列をTimestampに直した時の処理内容をそのままクラスファイルにコピペして再利用します。
Copy and paste the contents of the last time you changed the date column of the data frame to Timestamp into the class file and reuse it.
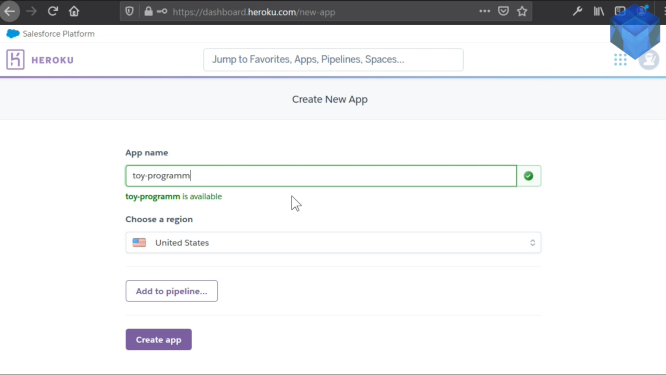
準備ができたら、いつものようにHEROKUにログインして新しいHEROKUのアプリを作成し、HEROKU CLIとGitを使用して作成したWEBアプリをHEROKUにデプロイします。
When you are ready, log in to HEROKU as usual, create a new HEROKU app, and deploy your created WEB app to HEROKU using the HEROKU CLI and Git.
無事に成功したら、アプリを操作して楽しんでみてください。
If you succeed, please enjoy using the application.
お疲れさまでした。アディオス。
Thank you for your hard work. Adios.
以上です。お疲れ様です。
That's all. Thank you for your hard work.