Published Date : 2020年6月7日22:27
Part 6 - Djangoを使って簡単なオンラインショップを作ってみよう
Part 6 - Create a Simple Online Shop with Django
This blog has an English translation
YouTubeにアップした動画、「【Django】Part 6 - Djangoを使って簡単なオンラインショップを作ってみよう」の補足説明の記事です。
Here's a little more about the 「【Django】Part 6 - Create a Simple Online Shop with Django」 video I uploaded to YouTube.
Djangoを使って簡単なログイン機能を持ったオンラインショップのようなサイトを作ってみましょう。 Part6となる今回の動画シリーズでは、一旦アプリの作成を中断して、Herokuにアプリをアップロードしてみます。
Use Django to create a site that looks like an online store with a simple login feature. In this video series, Part 6, We will pause the creation of the app we were working on and see if we can upload the app to Heroku.
無駄な説明を省いて、忙しい時でも短時間で理解できるような動画です。
It's a video that can be understood in a short period of time even when you're busy, without any unnecessary explanation.
目次
Table of Contents
① Herokuの環境を整える
① Prepare the environment for Heroku
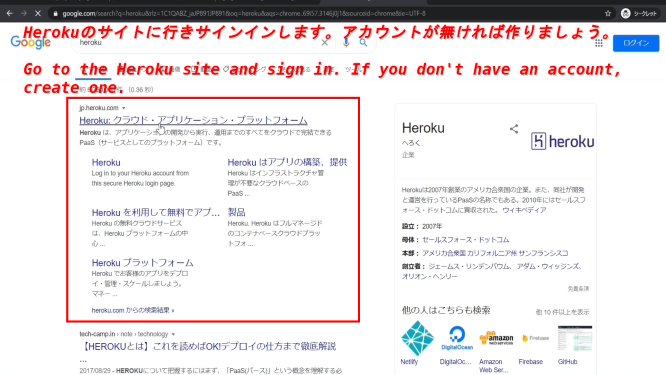
Herokuのサイトに行きサインインします。アカウントが無ければ作りましょう。
Go to the Heroku site and sign in. If you don't have an account, create one.
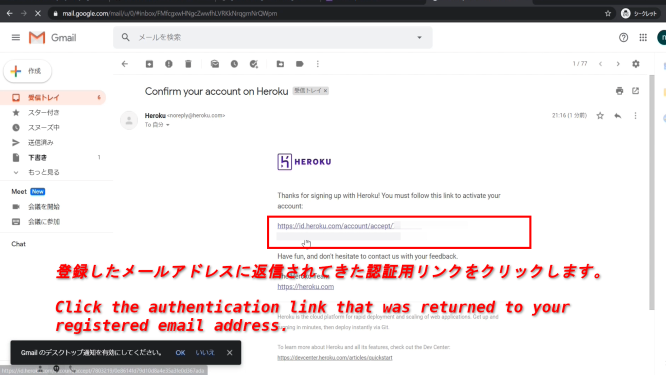
登録したメールアドレスに返信されてきた認証用リンクをクリックします。
Click the authentication link that was returned to your registered email address.
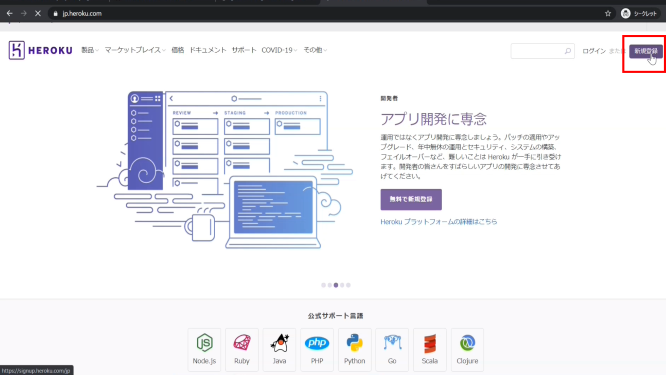
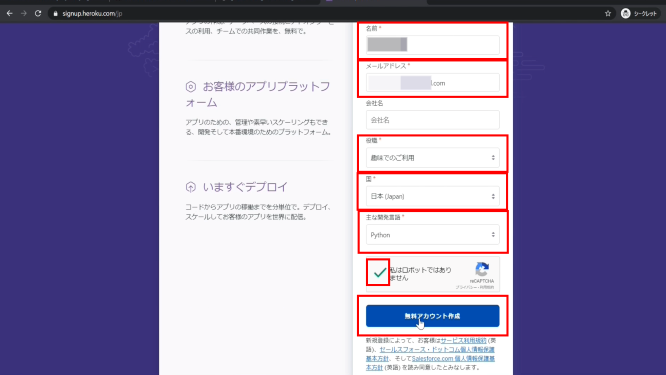
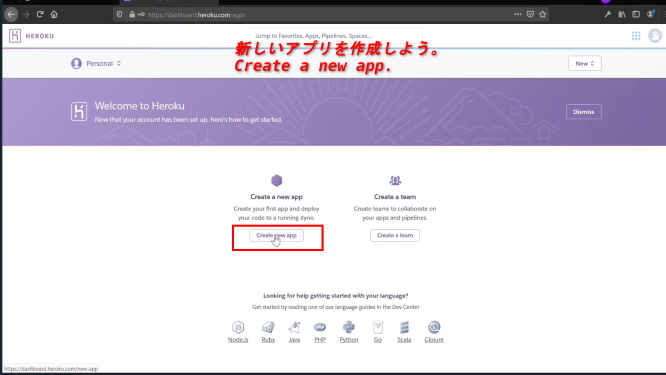
新しいアプリを作成しよう。
Create a new app.
Heroku CLIをインストールして、コマンドラインからHerokuの操作ができるようにしよう。(WindowsのWSLのインストール方法です)
Install the Heroku CLI so that you can work with Heroku from the command line. (Windows WSL installation instructions)
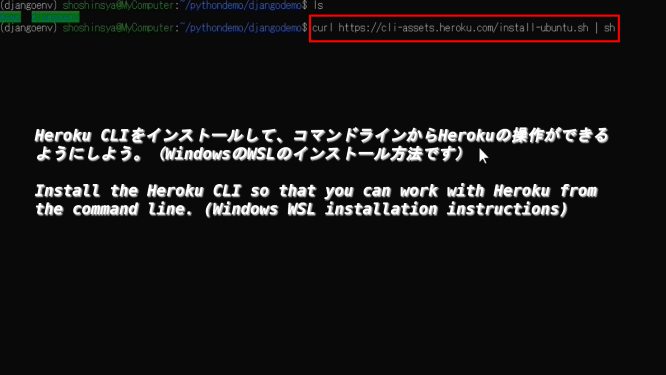
curl https://cli-assets.heroku.com/install.sh | sh
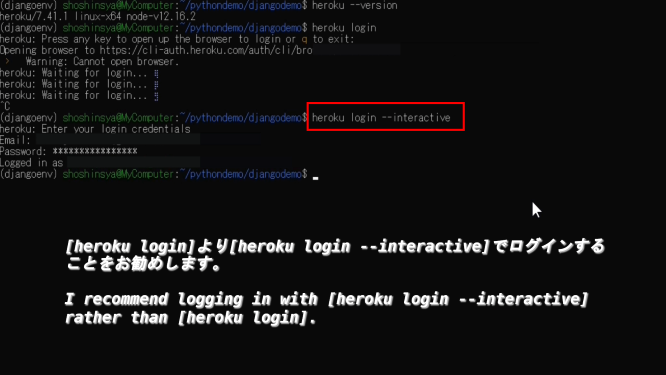
[heroku login]より[heroku login --interactive]でログインすることをお勧めします。
I recommend logging in with [heroku login --interactive] rather than [heroku login].
② GitとHeroku CLIを使ってHerokuにアプリをデプロイする
② Deploy apps to Heroku using Git and Heroku CLI
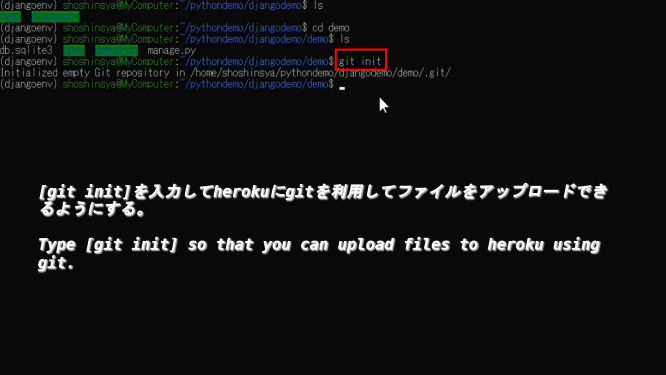
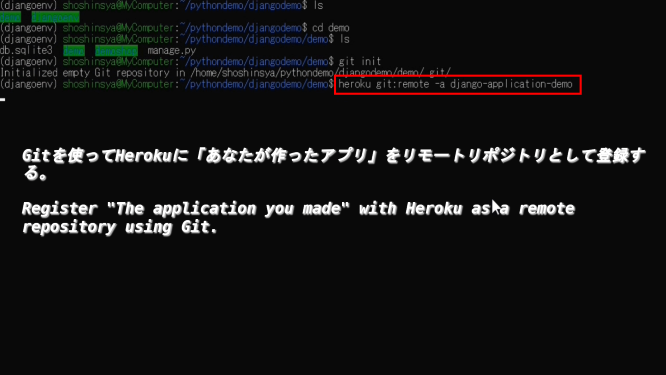
[git init]を入力してherokuにgitを利用してファイルをアップロードできるようにする。
Type [git init] so that you can upload files to heroku using git.
Gitを使ってHerokuに「あなたが作ったアプリ」をリモートリポジトリとして登録する。
Register "The application you made" with Heroku as a remote repository using Git.
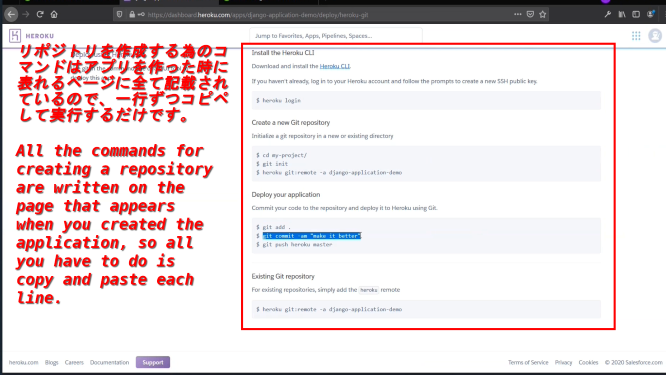
リポジトリを作成する為のコマンドはアプリを作った時に表れるページに全て記載されているので、一行ずつコピペして実行するだけです。
All the commands for creating a repository are written on the page that appears when you created the application, so all you have to do is copy and paste each line.
cd yourapp
git init
heroku git:remote -a "Application name you created in heroku"
git add .
git commit -m "My first commit"
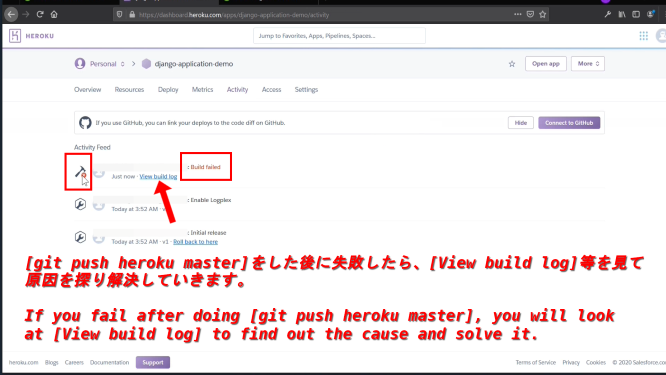
git push heroku master
[git push heroku master]をした後に失敗したら、[View build log]等を見て原因を探り解決していきます。
If you fail after doing [git push heroku master], you will look at [View build log] to find out the cause and solve it.
HerokuにDjangoアプリを正常にアップロードできるように必要なPythonモジュールをインストールしていく。
Install the necessary Python modules so that you can successfully upload Django apps to Heroku.
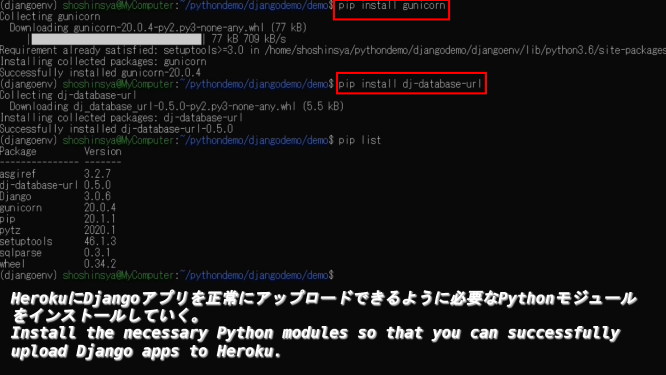
pip install gunicorn
pip install dj_database_url
pip install whitenoise
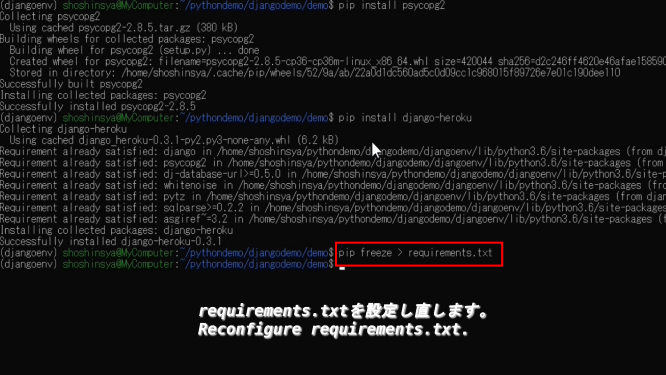
ローカルのPythonモジュールをHeroku側のアプリでもインストールできるようにrequirements.txtを用意します。
Prepare requirements.txt so that local Python modules can be installed in Heroku's apps.
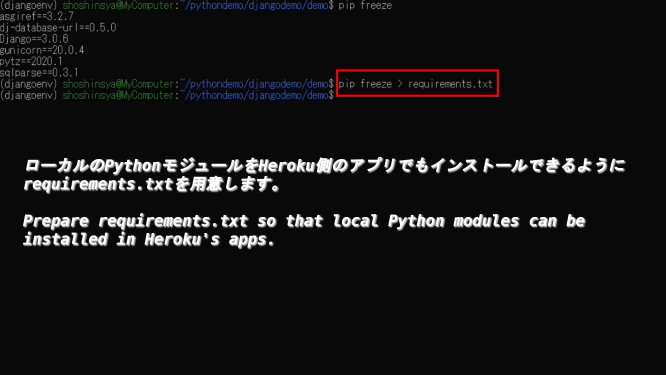
pip freeze > requirements.txt
Gunicorn(APサーバー)を使用してアプリを処理できるようにする為、Procfileを作成して中身を書く。(Djangoの純正のAPサーバーを使うより高速に動くため(動的ファイルの処理に特化して最適化してくれている為))
In order to be able to process apps using Gunicorn (AP server), We create a Procfile and write the contents.
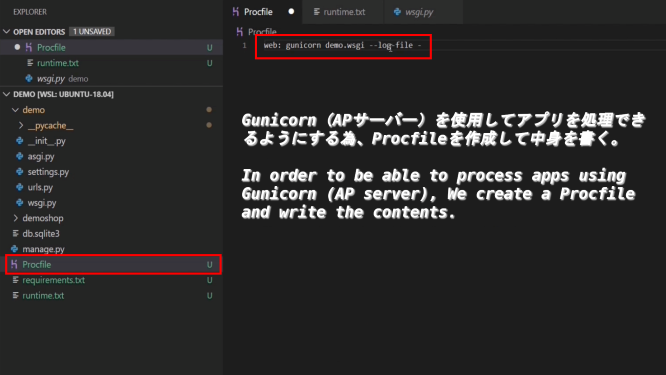
Procfile
web: gunicorn (yourprojectname).wsgi --log-file -
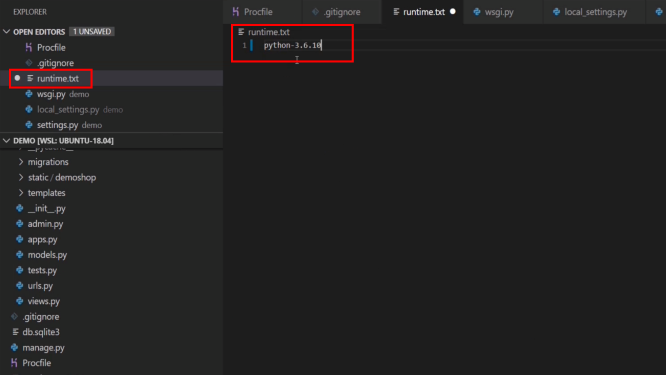
HerokuにどのバージョンのPythonを使用するかを教えるため、runtime.txtを作成する。
Create runtime.txt to tell Heroku which version of Python to use.
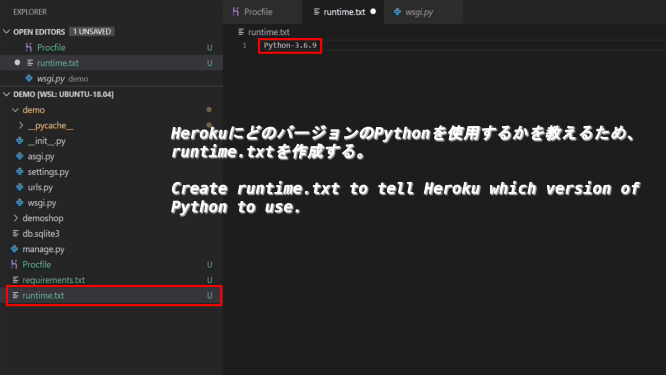
runtime.txt
python-x.x.x
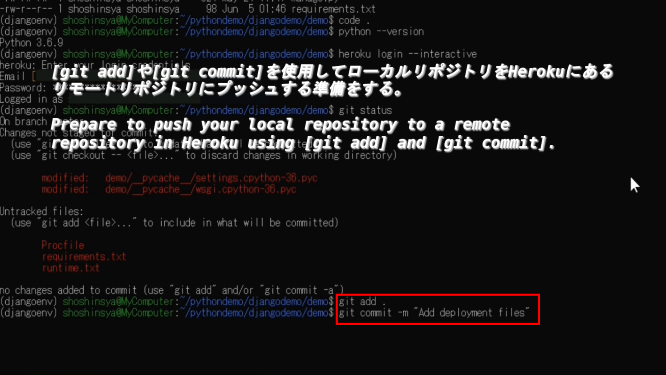
[git add]や[git commit]を使用してローカルリポジトリをHerokuにあるリモートリポジトリにプッシュする準備をする。
Prepare to push your local repository to a remote repository in Heroku using [git add] and [git commit].
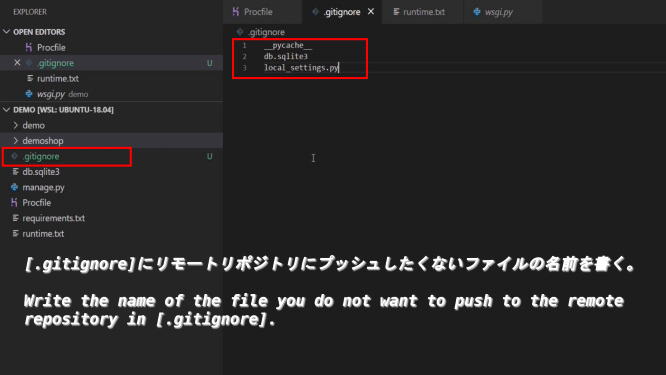
[.gitignore]にリモートリポジトリにプッシュしたくないファイルの名前を書く。
Write the name of the file you do not want to push to the remote repository in [.gitignore].
③ 細かい設定を行っていく
③ make detailed settings
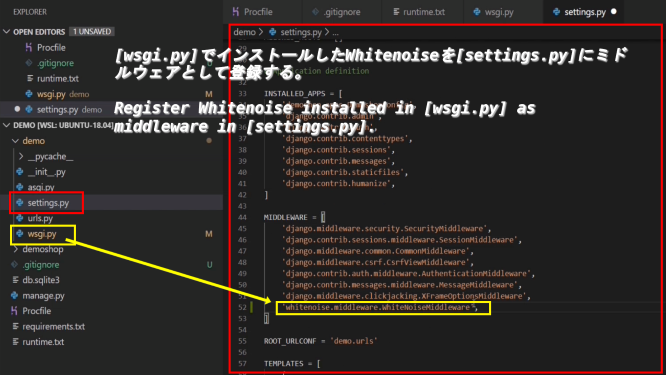
[wsgi.py]でインストールしたWhitenoiseを[settings.py]にミドルウェアとして登録する。
Register Whitenoise installed in [wsgi.py] as middleware in [settings.py].
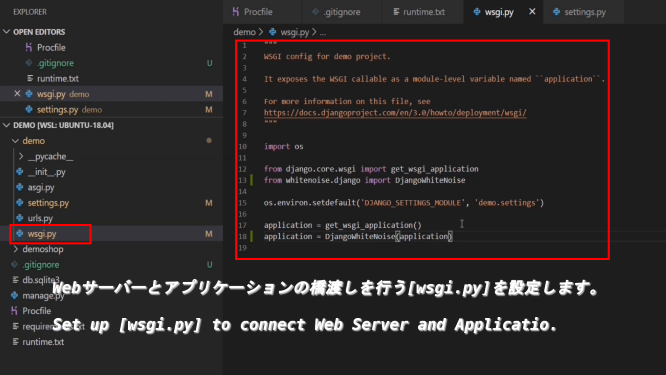
Webサーバーとアプリケーションの橋渡しを行う[wsgi.py]を設定します。
Set up [wsgi.py] to connect Web Server and Application.
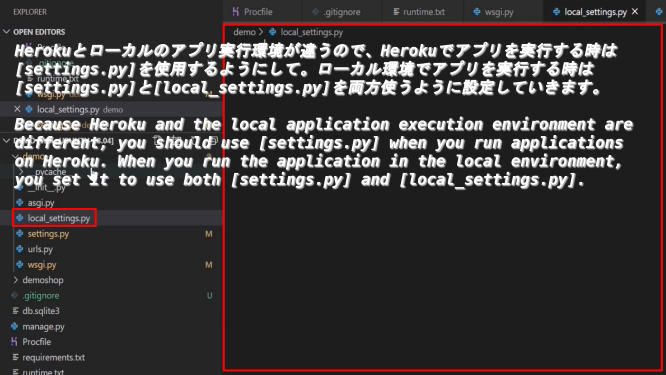
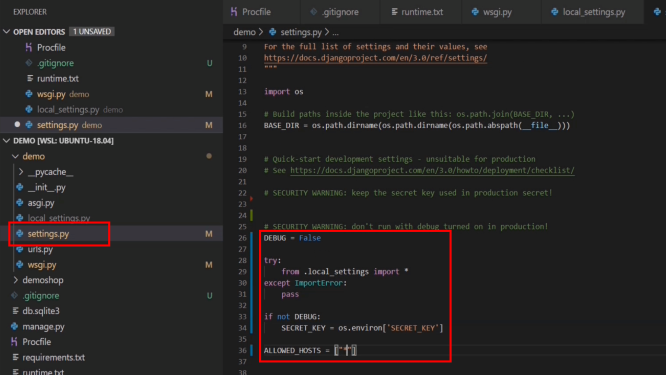
Herokuとローカルのアプリ実行環境が違うので、Herokuでアプリを実行する時は[settings.py]を使用するようにして。ローカル環境でアプリを実行する時は[settings.py]と[local_settings.py]を両方使うように設定していきます。
Because Heroku and the local application execution environment are different, you should use [settings.py] when you run applications on Heroku. When you run the application in the local environment, you set it to use both [settings.py] and [local_settings.py].
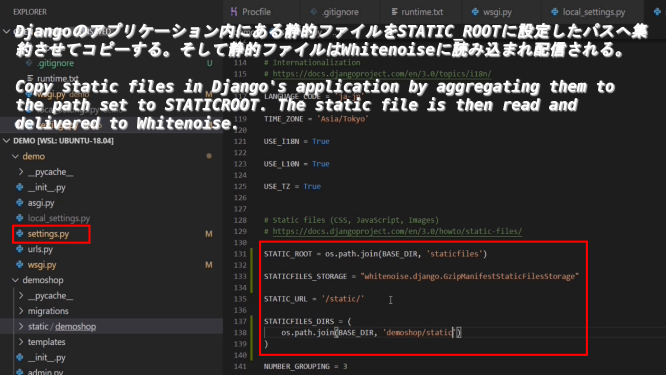
Djangoのアプリケーション内にある静的ファイルをSTATIC_ROOTに設定したパスへ集約させてコピーする。そして静的ファイルはWhitenoiseに読み込まれ配信される。
Copy static files in Django's application by aggregating them to the path set to STATICROOT. The static file is then read and delivered to Whitenoise.
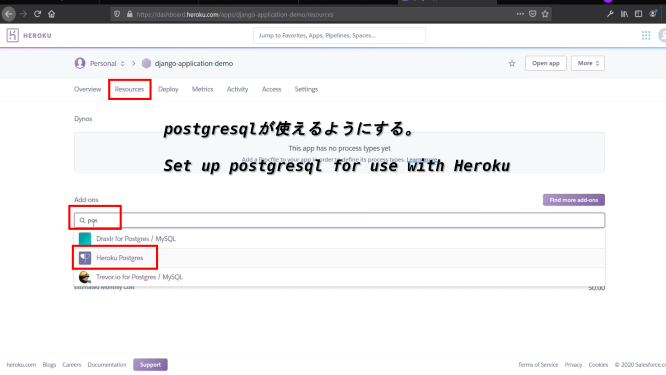
postgresqlが使えるようにする。
Set up postgresql for use with Heroku
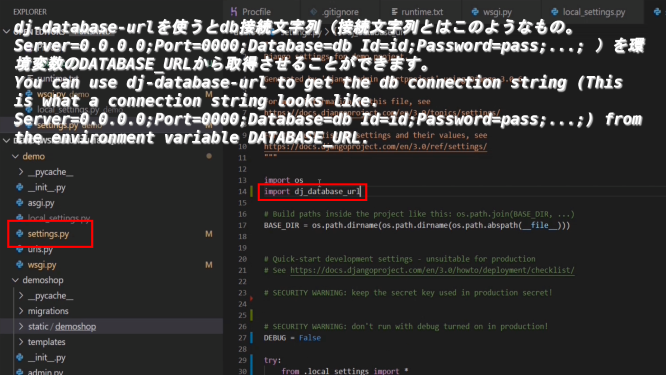
dj-database-urlを使うとdb接続文字列(接続文字列とはこのようなもの。Server=0.0.0.0;Port=0000;Database=db Id=id;Password=pass;...; )を環境変数のDATABASE_URLから取得させることができます。
You can use dj-database-url to get the db connection string (This is what a connection string looks like. Server=0.0.0.0;Port=0000;Database=db Id=id;Password=pass;...;) from the environment variable DATABASE_URL.
Herokuで使えるPythonバージョンが合わないようなので変更します。
It seems that the Python version available in Heroku is different, so I will change it.

環境変数としてSECRETE_KEYを設定してHerokuのConfig Varsに加えましょう。
Set SECRETE_KEY as an environment variable and add it to Heroku's Config Vars.
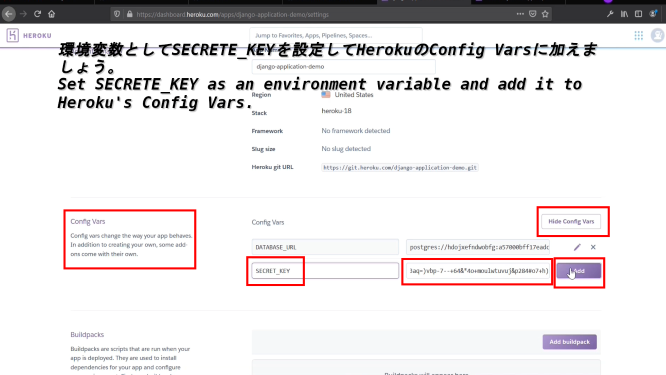
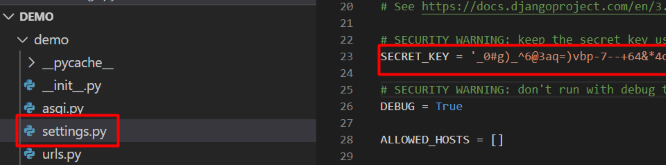
補足:SECRETE_KEYは通常[(project)/settings.py]にあります。
Note: SECRETE_KEY is normally found in [(project)/settings.py].
DATABASE_URL等取得できるように[django-heroku]をインストールするため依存関係のモジュール等もインストールする。
In order to obtain the DATABASE_URL, etc., install the [django-heroku] and the modules of the dependencies.
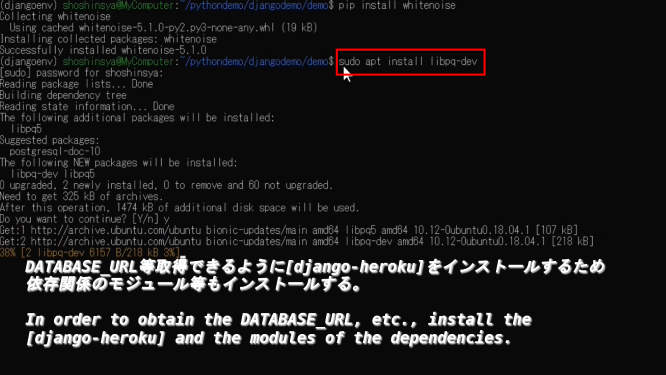
sudo apt install libpq-dev
pip install pyscopg2
pip install django-heroku
requirements.txtを設定し直します。
Reconfigure requirements.txt.
Herokuのデプロイエラーになったら、原因を見つけて修正していきます。
If you get a Heroku deployment error, find the cause and fix it.

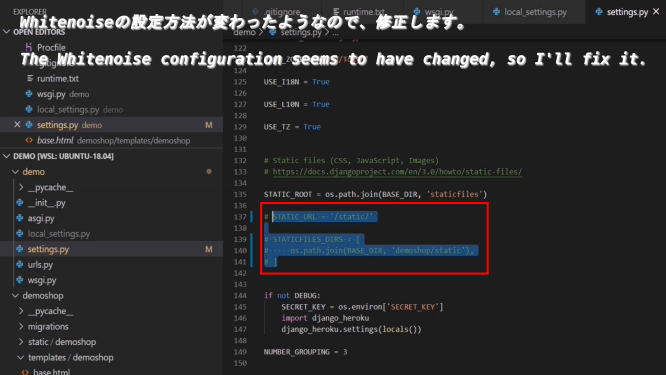
Whitenoiseの設定方法が変わったようなので、修正します。
The Whitenoise configuration seems to have changed, so I'll fix it.
(your project)/wsgi.py
import os

from django.core.wsgi import get_wsgi_application

os.environ.setdefault('DJANGO_SETTINGS_MODULE', 'demo.settings')

application = get_wsgi_application()
(your project)/settings.py
import os
import dj_database_url

BASE_DIR = os.path.dirname(os.path.dirname(os.path.abspath(__file__)))

DEBUG = False

try:
    from .local_settings import *
except ImportError:
    pass

ALLOWED_HOSTS = ["*"]

INSTALLED_APPS = [
    'demoshop.apps.DemoshopConfig',
    'django.contrib.admin',
    'django.contrib.auth',
    'django.contrib.contenttypes',
    'django.contrib.sessions',
    'django.contrib.messages',
    'django.contrib.staticfiles',
    'django.contrib.humanize',
]

MIDDLEWARE = [
    'django.middleware.security.SecurityMiddleware',
    'whitenoise.middleware.WhiteNoiseMiddleware',
    'django.contrib.sessions.middleware.SessionMiddleware',
    'django.middleware.common.CommonMiddleware',
    'django.middleware.csrf.CsrfViewMiddleware',
    'django.contrib.auth.middleware.AuthenticationMiddleware',
    'django.contrib.messages.middleware.MessageMiddleware',
    'django.middleware.clickjacking.XFrameOptionsMiddleware',
]

STATICFILES_STORAGE = 'whitenoise.storage.CompressedManifestStaticFilesStorage'

ROOT_URLCONF = '(your project).urls'

TEMPLATES = [
    {
        'BACKEND': 'django.template.backends.django.DjangoTemplates',
        'DIRS': [os.path.join('(your application)','templates')],
        'APP_DIRS': True,
        'OPTIONS': {
            'context_processors': [
                'django.template.context_processors.debug',
                'django.template.context_processors.request',
                'django.contrib.auth.context_processors.auth',
                'django.contrib.messages.context_processors.messages',
            ],
        },
    },
]

WSGI_APPLICATION = '(your project).wsgi.application'

DATABASES = {'default' : dj_database_url.config()}


AUTH_PASSWORD_VALIDATORS = [
    {
        'NAME': 'django.contrib.auth.password_validation.UserAttributeSimilarityValidator',
    },
    {
        'NAME': 'django.contrib.auth.password_validation.MinimumLengthValidator',
    },
    {
        'NAME': 'django.contrib.auth.password_validation.CommonPasswordValidator',
    },
    {
        'NAME': 'django.contrib.auth.password_validation.NumericPasswordValidator',
    },
]

LANGUAGE_CODE = 'ja-jp'

TIME_ZONE = 'Asia/Tokyo'

USE_I18N = True

USE_L10N = True

USE_TZ = True

STATIC_ROOT = os.path.join(BASE_DIR, 'staticfiles')

if not DEBUG:
    SECRET_KEY = os.environ['SECRET_KEY']
    import django_heroku
    django_heroku.settings(locals())

NUMBER_GROUPING = 3
(your project)/local_settings.py
import os

BASE_DIR = os.path.dirname(os.path.dirname(os.path.abspath(__file__)))

SECRET_KEY = 'your seceret key'

DATABASES = {
    'default': {
        'ENGINE': 'django.db.backends.sqlite3',
        'NAME': os.path.join(BASE_DIR, 'db.sqlite3'),
    }
}

DEBUG = True
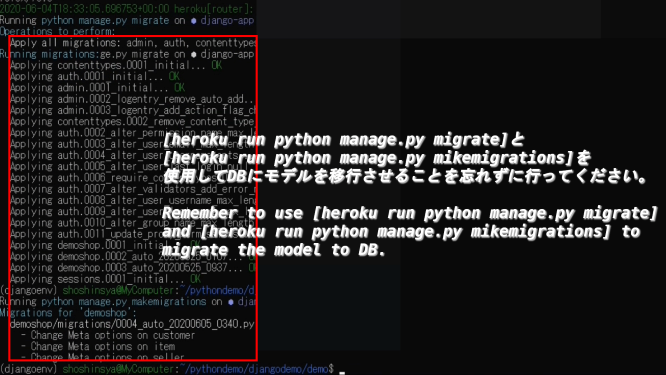
[heroku run python manage.py migrate]と[heroku run python manage.py mikemigrations]を使用してDBにモデルを移行させることを忘れずに行ってください。
Remember to use [heroku run python manage.py migrate] and [heroku run python manage.py mikemigrations] to migrate the model to DB.
無事にアプリは表示できましたが、DBが空なのでローカルにあるSQLiteの情報をコピーしましょう。
I was able to display the application without any problem, but since the DB is empty, let's copy the local SQLite information.

SQLiteが使用できる状態にします。
Make SQLite available.
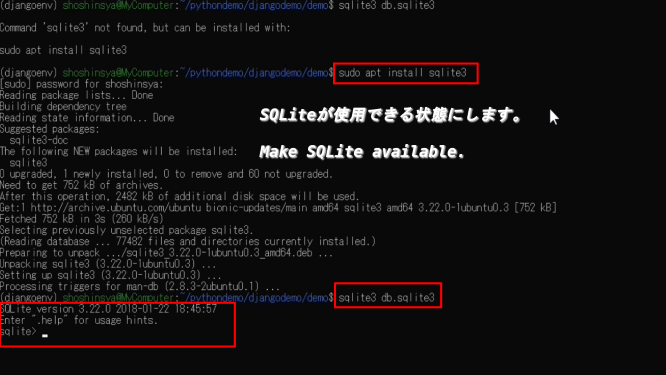
sudo apt install sqlite3
$ python
>>> import sqlite3
>>> con = sqlite3.connect('your sqlite3 database name')
>>> cur = con.cursor()
>>> cur.execute('select * from (your table name)')
>>> import csv
>>> with open('output.csv', 'w') as f:
...     csv_out = csv.writer(f)
...     csv_out.writerow([d[0] for d in cur.description])
...     for result in cur:
...         csv_out.writerow(result)
>>>
>>> con.close()
>>> exit()
Pythonを使ってSQLiteの情報をCSVに出力したら、今度はposgreSQLを使用できるようにします。
After you use Python to output the contents of SQLite data to CSV, you prepare to use posgreSQL next.
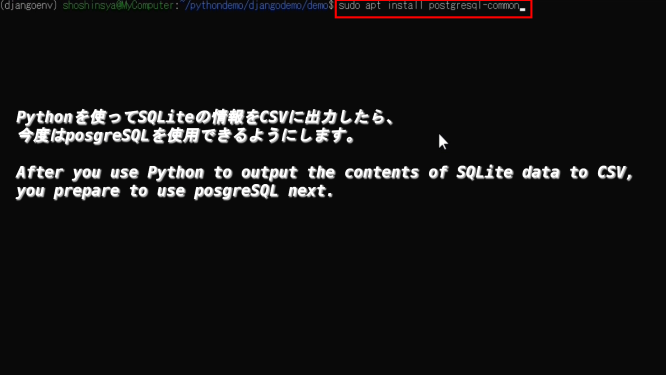
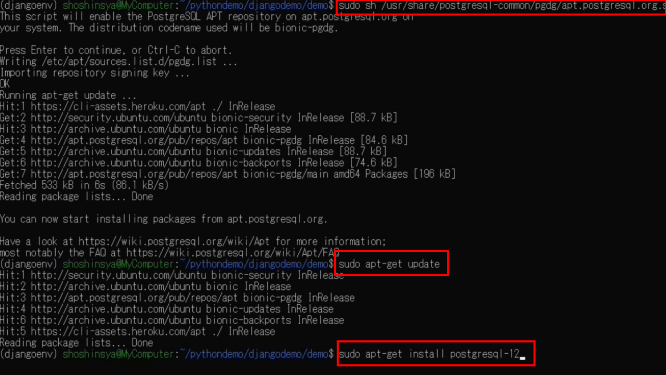
sudo apt install postgresql-common
sudo sh /usr/share/postgresql-common/pgdg/apt.postgresql.org.sh
sudo apt-get update
sudo apt-get install postgresql-12
posgreSQLが使用できていることを確認してください。
Please make sure that you can use posgreSQL.

sudo /etc/init.d/postgresql start
sudo -i -u postgres
postgres@xxxx: ~$ psql
postgres=# \q
postgres@xxxx: ~$ exit
sudo /etc/init.d/postgresql stop
Herokuにログインして、アプリのpostgreSQLにアクセスします。/p>
You log in to Heroku and access the app postgreSQL.
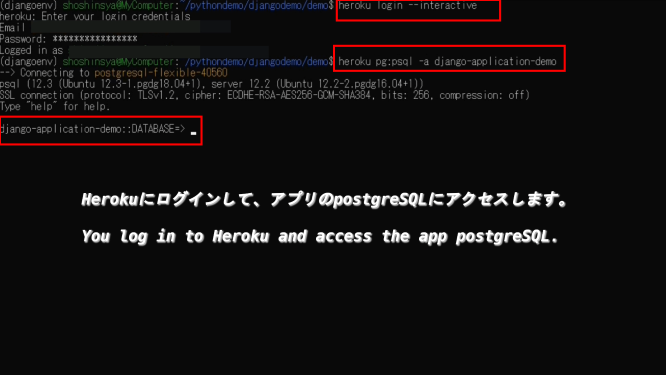
heroku pg:psql -a (your app)
ローカルにあるCSVをHerokuのアプリのPostgreSQLにコピーします。
Copy the local CSV into the PostgreSQL of Heroku's app.
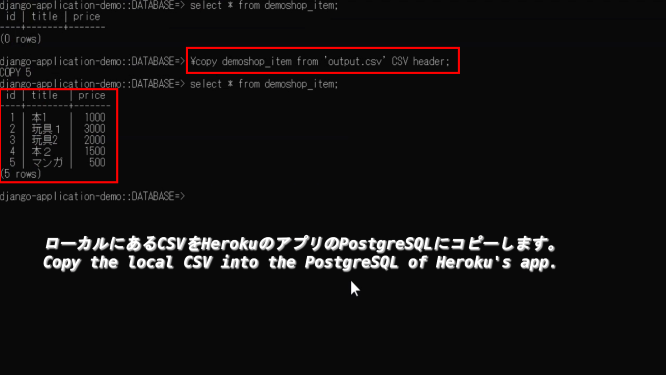
(your app)::DATABASE=> \copy (tablename in heroku postgresql) from 'output.csv' CSV header;
(your app)::DATABASE=> \q
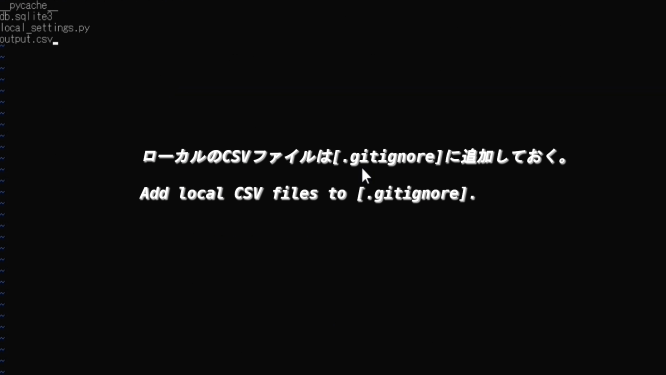
ローカルのCSVファイルは[.gitignore]に追加しておく。
Add local CSV files to [.gitignore].
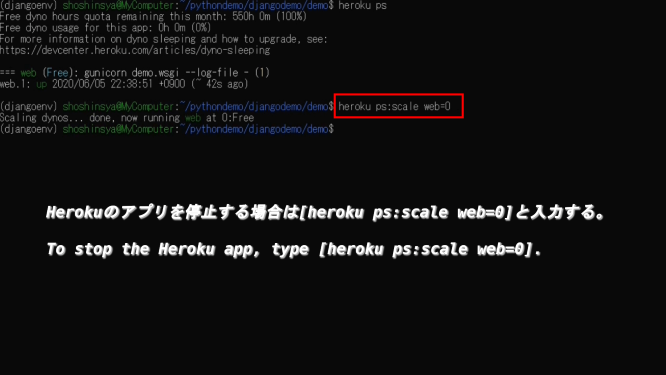
Herokuのアプリを停止する場合は[heroku ps:scale web=0]と入力する。
To stop the Heroku app, type [heroku ps:scale web=0].
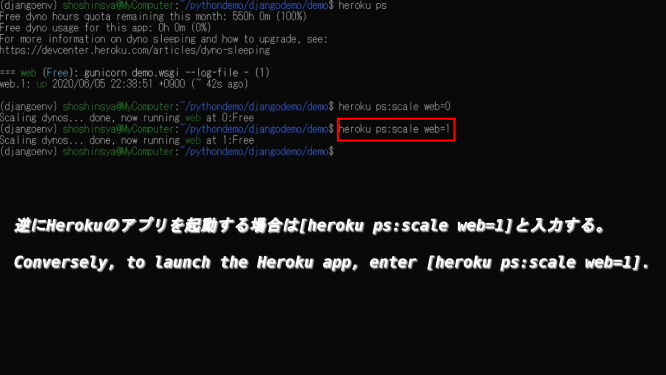
逆にHerokuのアプリを起動する場合は[heroku ps:scale web=1]と入力する。
Conversely, to launch the Heroku app, enter [heroku ps:scale web=1].
以上です。お疲れ様です。
That's all. Thank you for your hard work.