Published Date : 2020年5月29日8:48
Part 4 - Djangoを使って簡単なオンラインショップを作ってみよう
Part 4 - Create a Simple Online Shop with Django
This blog has an English translation
YouTubeにアップした動画、「【Django】Part 4 - Create a Simple Online Shop with Django:Djangoを使って簡単なオンラインショップを作ってみよう」の補足説明の記事です。
Here's a little more about the 「【Django】Part 4 - Create a Simple Online Shop with Django:Djangoを使って簡単なオンラインショップを作ってみよう」 video I uploaded to YouTube.
Djangoを使って簡単なログイン機能を持ったオンラインショップのようなサイトを作ってみましょう。 Part4となる今回の動画シリーズでは、カスタマー用のモデルやログインページ等を作成していきましょう。
Use Django to create a site that looks like an online store with a simple login feature. In this video series, Part 4, let's create a model, login page, etc. for the customer.
無駄な説明を省いて、忙しい時でも短時間で理解できるような動画です。
It's a video that can be understood in a short period of time even when you're busy, without any unnecessary explanation.
目次
Table of Contents
① Signinページを作成、アプリのHTMLとCSSを修正する
① Create a Signin page and modify the app's HTML and CSS
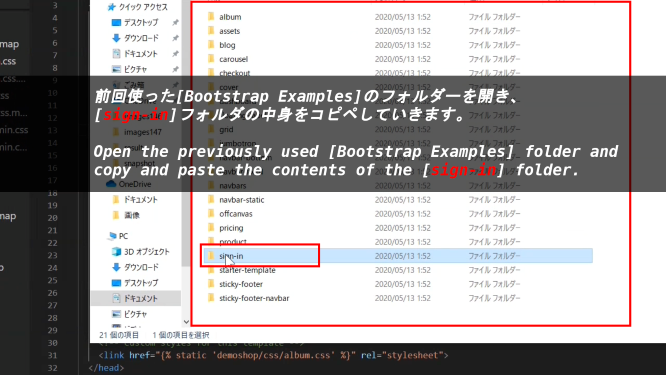
前回使った[Bootstrap Examples]のフォルダーを開き、[sign-in]フォルダの中身をコピペしていきます。
Open the previously used [Bootstrap Examples] folder and copy and paste the contents of the [sign-in] folder.
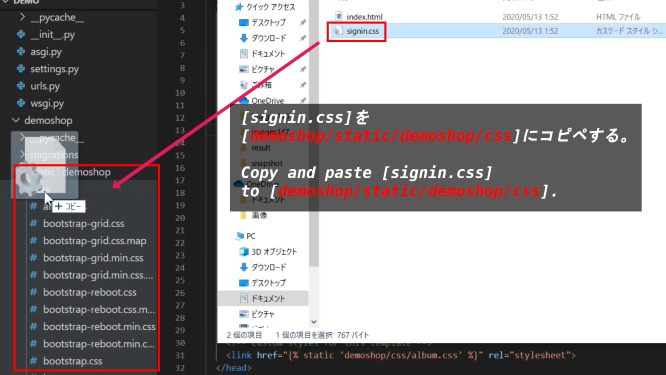
[signin.css]を[demoshop/static/demoshop/css]にコピペする。
Copy and paste [signin.css] to [demoshop/static/demoshop/css].
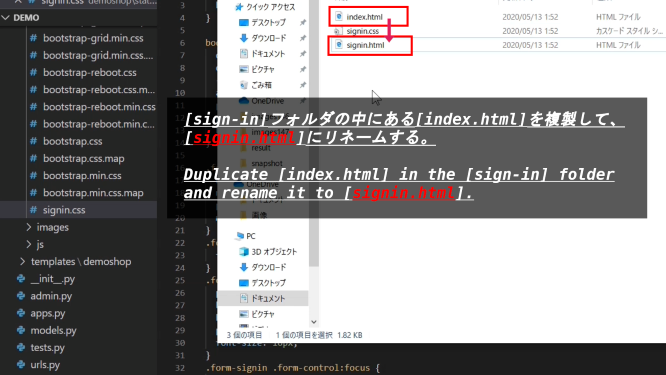
[sign-in]フォルダの中にある[index.html]を複製して、[signin.html]にリネームする。
Duplicate [index.html] in the [sign-in] folder and rename it to [signin.html].
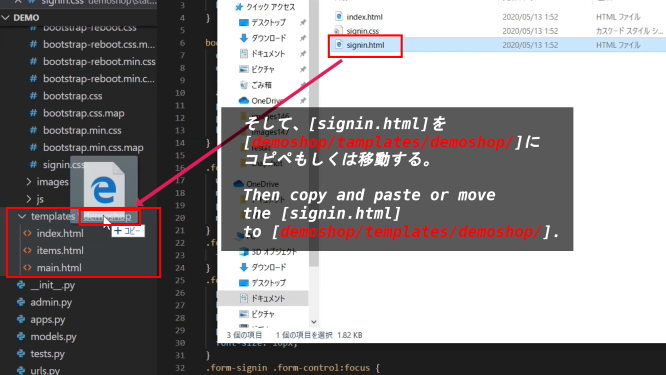
そして、[signin.html]を[demoshop/tamplates/demoshop/]にコピペもしくは移動する。
Then copy and paste or move the [signin.html] to [demoshop/templates/demoshop/].
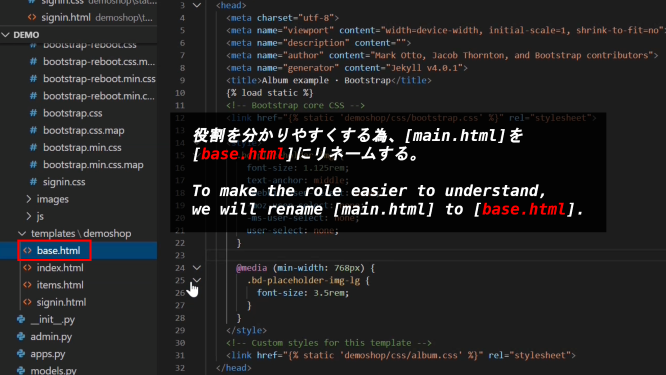
役割を分かりやすくする為、[main.html]を[base.html]にリネームする。
To make the role easier to understand, we will rename [main.html] to [base.html].
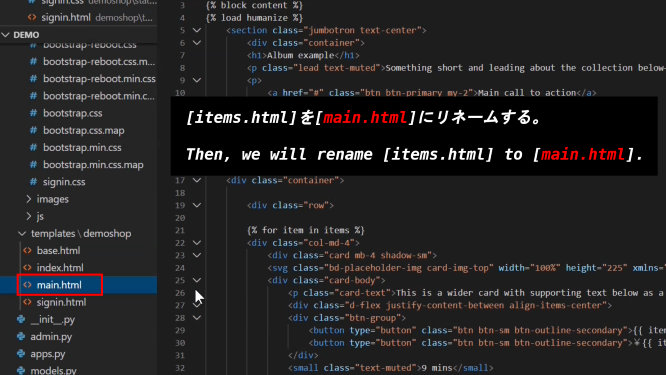
[items.html]を[main.html]にリネームする。
Then, we will rename [items.html] to [main.html].
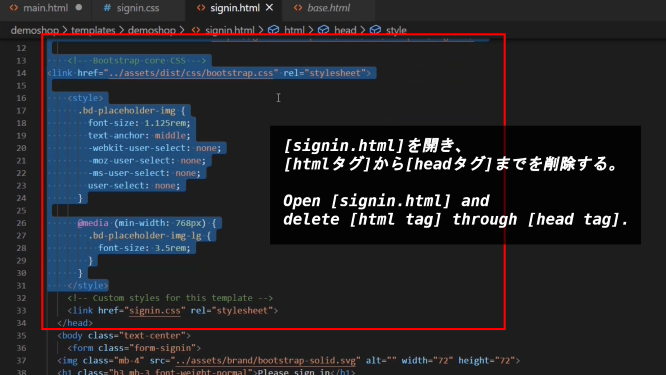
[signin.html]を開き、[htmlタグ]から[headタグ]までを削除する。
Open [signin.html] and delete [html tag] through [head tag].
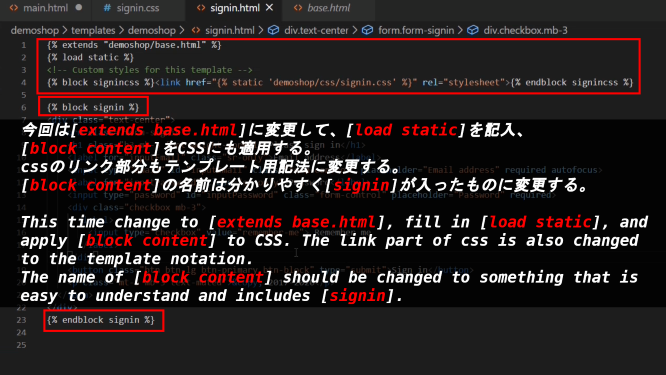
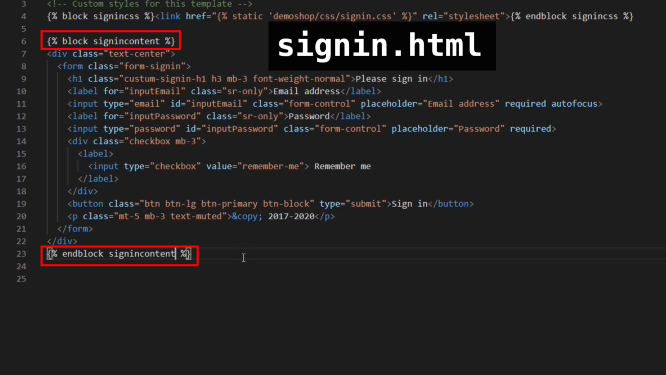
今回は[extends base.html]に変更して、[load static]を記入、[block content]をCSSにも適用する。cssのリンク部分もテンプレート用記法に変更する。[block content]の名前は分かりやすく[signin]が入ったものに変更する。
This time change to [extends base.html], fill in [load static], and apply [block content] to CSS. The link part of css is also changed to the template notation. The name of [block content] should be changed to something that is easy to understand and includes [signin].
補足:前回では[block content]と書いていたが、この[content]の部分は、継承される親のHTML内にある[block xxx]と継承する子のHTML内の[block xxx]が統一されていれば名前は自由に決めることができます。
supplementary explanation: Last time I wrote [block content], but this [content] part is freely named if the [block xxx] in the HTML of the inherited parent and the [block xxx] in the HTML of the inheriting child are unified.
base.html
{% block signincontent %}{% endblock signincontent %}
{% block maincontent %}{% endblock maincontent %}
signin.html
{% extends "demoshop/base.html" %}

{% block signincontent %}{
    .............................................
% endblock signincontent %}
main.html
{% extends "demoshop/base.html" %}

{% block maincontent %}{
    .............................................
% endblock maincontent %}
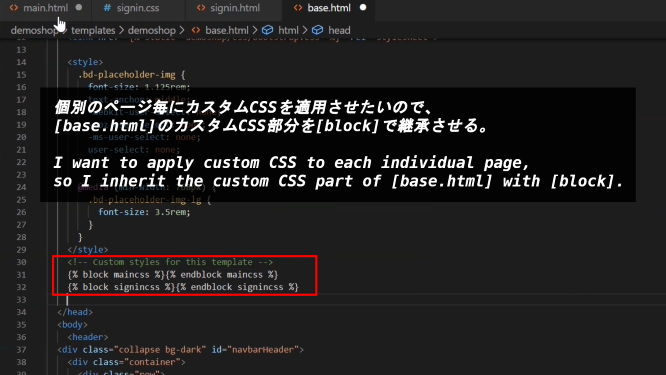
個別のページ毎にカスタムCSSを適用させたいので、[base.html]のカスタムCSS部分を[block]で継承させる。
I want to apply custom CSS to each individual page, so I inherit the custom CSS part of [base.html] with [block].
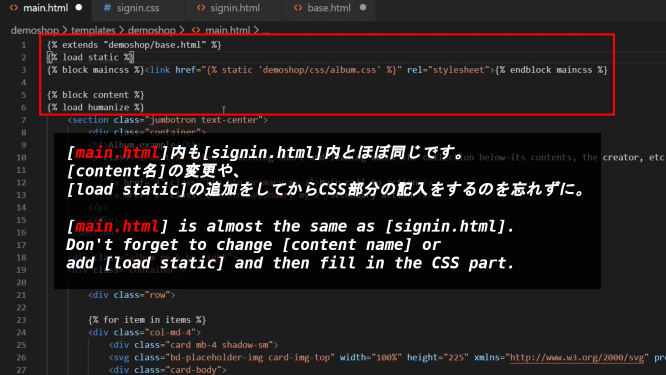
[main.html]内も[signin.html]内とほぼ同じです。[content名]の変更や、[load static]の追加をしてからCSS部分の記入をするのを忘れずに。
[main.html] is almost the same as [signin.html]. Don't forget to change [content name] or add [load static] and then fill in the CSS part.
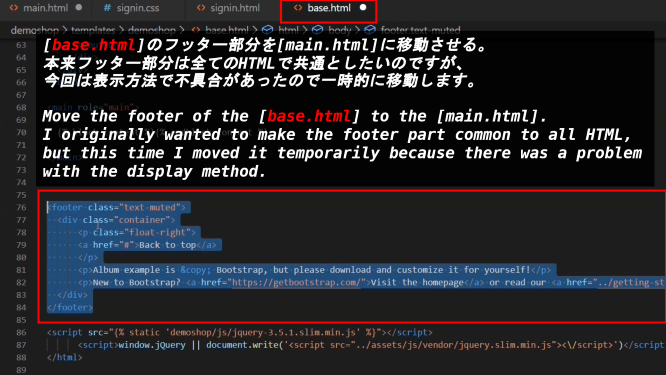
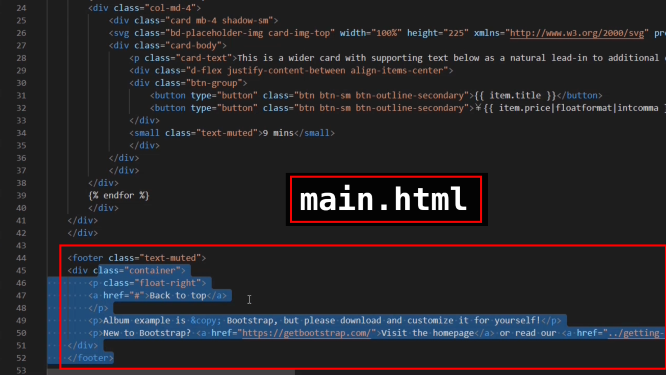
[base.html]のフッター部分を[main.html]に移動させる。本来フッター部分は全てのHTMLで共通としたいのですが、今回は表示方法で不具合があったので一時的に移動します。
Move the footer of the [base.html] to the [main.html]. I originally wanted to make the footer part common to all HTML, but this time I moved it temporarily because there was a problem with the display method.
main.html
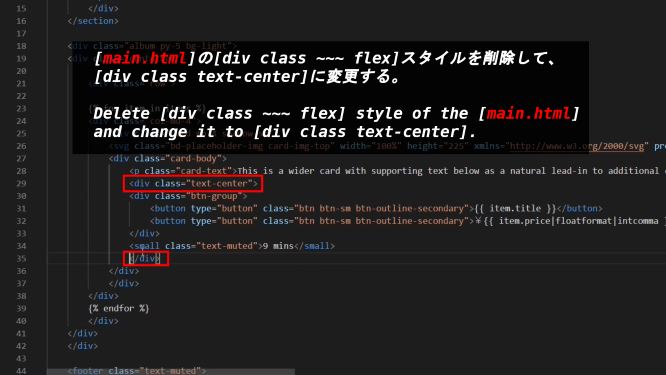
[main.html]の[div class ~~~ flex]スタイルを削除して、[div class text-center]に変更する。
Delete [div class ~~~ flex] style of the [main.html] and change it to [div class text-center].
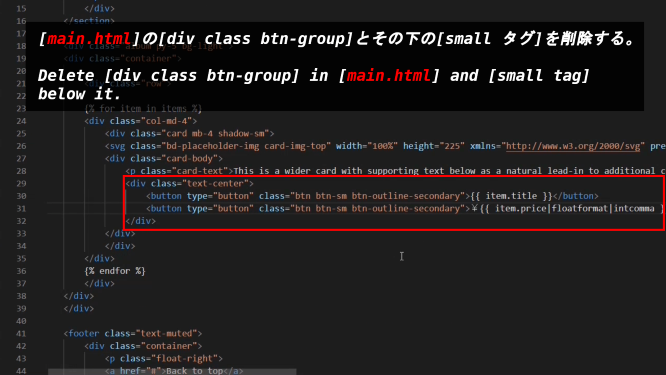
[main.html]の[div class btn-group]とその下の[small タグ]を削除する。
Delete [div class btn-group] in [main.html] and [small tag] below it.
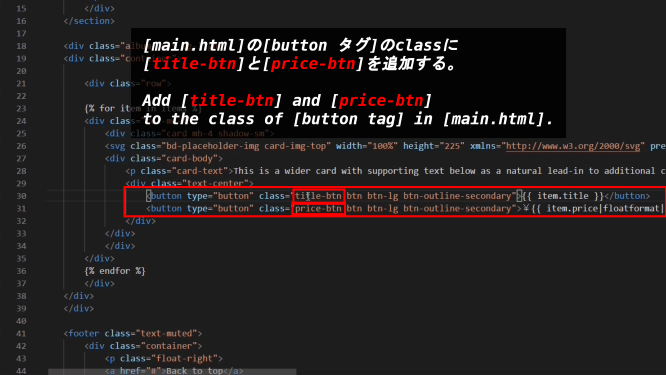
[main.html]の[button タグ]のclassに[title-btn]と[price-btn]を追加する。
Add [title-btn] and [price-btn] to the class of [button tag] in [main.html].
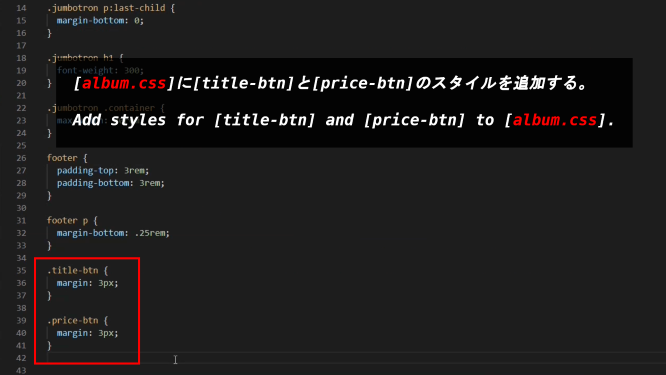
[album.css]に[title-btn]と[price-btn]のスタイルを追加する。
Add styles for [title-btn] and [price-btn] to [album.css].
[signin.css]の[body tag]のスタイルを一部削除して、[custom-signin-h1]のスタイルを追加する。
Next, open [signin.css], delete some of the [body tag] styles, and add the [custom-signin-h 1] styles.
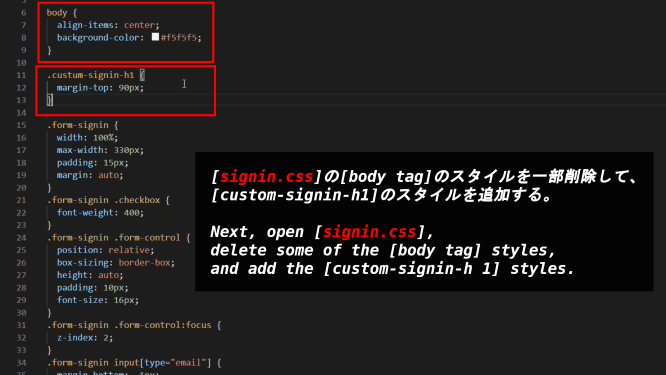
[signin.html]の[form タグのh1タグ]に[class custom-signin-h1]を追加する。
Add [class custom-signin-h1] to [h1 tag of the form tag] in [signin.html].

[base.html]の[naviバー]にある[Contact]を[Menu]に、[liタグ]を[Sign in]に変えて[a href]のリンクを[demoshop:singin]にする。
[Contact] in [navi bar] of [base.html] is changed to [Menu], [li tag] is changed to [Sign In], and the link of [a href] is changed to [demoshop:singin].

[base.html]の[naviバー]にある[ロゴ]のリンクを[demoshop:main_page]に変えます。
Change the link for [logo] in [navi bar] of [base.html] to [demoshop:main_page].

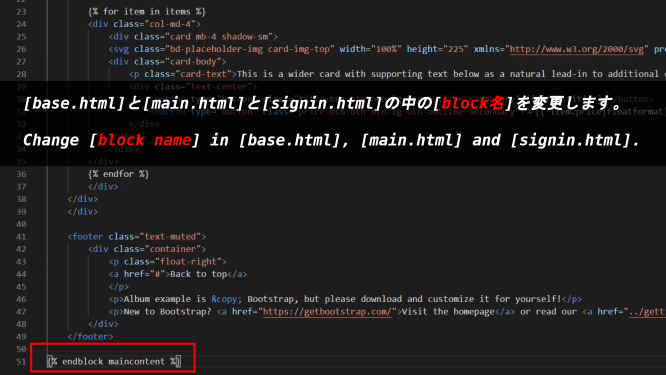
[base.html]と[main.html]と[signin.html]の中の[block名]を変更します。
Change [block name] in [base.html], [main.html] and [signin.html].
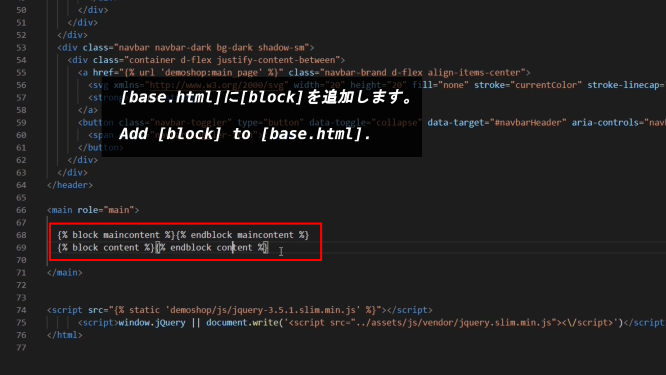
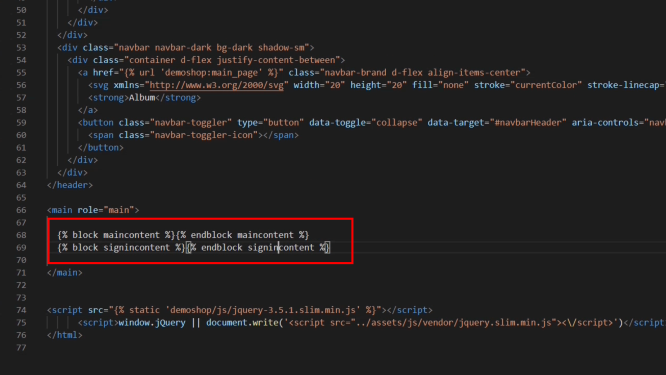
[base.html]に[block]を追加します。
Add [block] to [base.html].
signin.html
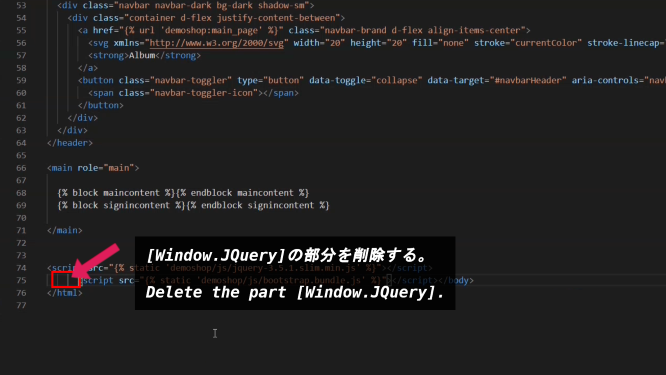
[Window.JQuery]の部分を削除する。
Delete the part [Window.JQuery].
補足説明:[window.jQuery || document.write]とはCDN(Content Delivery Network)が使えなくなった時の対処法です。
CDNとは今回のようにJSファイル等を自分のプロジェクトフォルダに置くのではなく、外部のサーバーから提供してくれるJSを読み込んで使えるサービスです。
つまり、外部のサーバーなので、何かの不具合でアクセス出来なくなる時があるかもしれません。その為の対処方法が上の記法になります。
[A || B]この部分はAが偽ならBを返すという意味です。
CDNでjQueryが正常に読み込めている場合の時、Aは真になります。
そしてAが偽の時、つまりCDNでjQueryが読み込めない時にはBが返される、つまり「document.write」の部分が実行されるわけです。
この「document.write( )」の「( )」の部分にはJSファイルのソースパスが記述されます。
つまりCDNが実行されない、なら別のパスからjQueryを読み込もう。という事になります。
Note: [window.jQuery || document.write] is a way to deal with CDN (Content Delivery Network) when it becomes unavailable.
CDN is a service that you can use by loading JS provided from an external server, instead of putting JS files in your project folder like this time.
In other words, since it is an external server, it may become inaccessible due to some trouble. The way to deal with this is the notation above.
[[A || B] This means that if A is false, B is returned.
A is true if jQuery is successfully loaded on the CDN.
If A is false, meaning that the CDN cannot read jQuery, B is returned, meaning that the [document.write] part is executed.
The [( )] part of [document.write( )] contains the source path of the JS file.
That is, if the CDN is not executed, then try to read jQuery from another path. It means that.
② Django側を設定してページを表示させる
② Set up the Django side to view the page
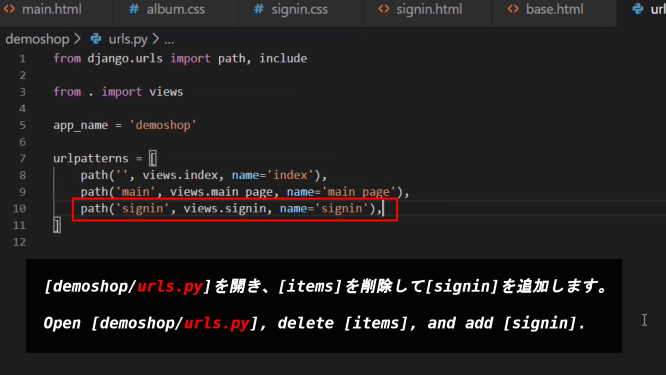
[demoshop/urls.py]を開き、[items]を削除して[signin]を追加します。
Open [demoshop/urls.py], delete [items], and add [signin].
[demoshop/views.py]を開き、[get_items]を削除して、[main_page]に[item = Item.objects.all()]を加えます。さらに[signin]関数を追加します。
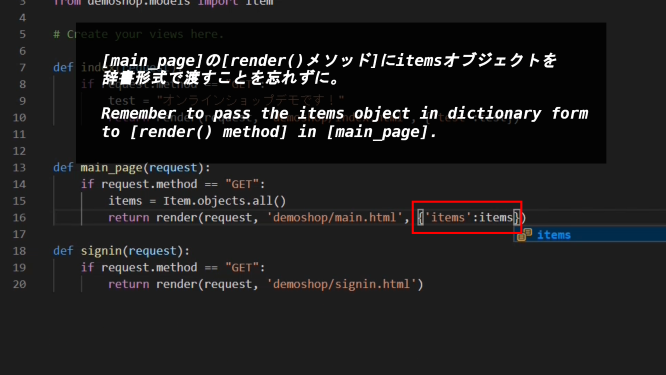
Open [demoshop/views.py], delete [get_items], and add [item = Item.objects.all()] to [main_page]. Then, Add [signin] function.
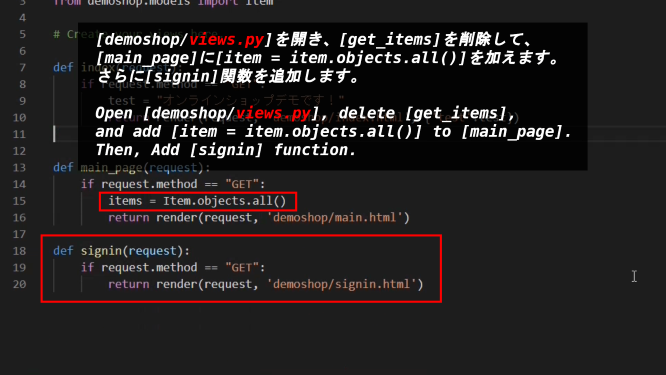
[main_page]の[render()メソッド]にitemsオブジェクトを辞書形式で渡すことを忘れずに。
Remember to pass the items object in dictionary form to [render() method] in [main_page].
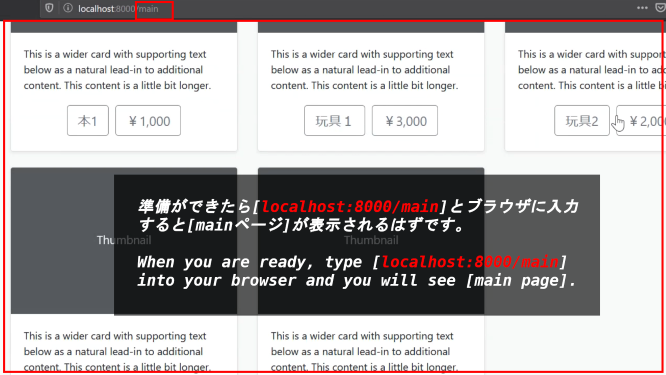
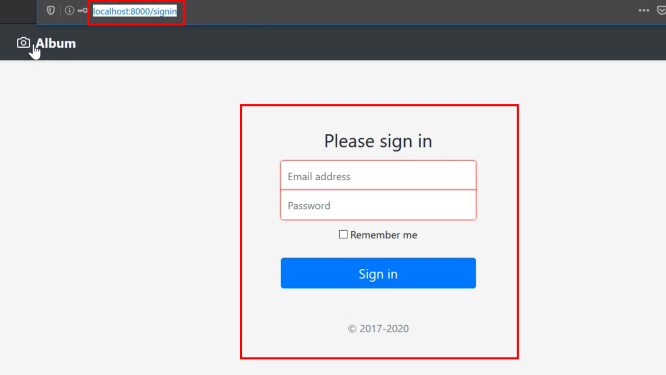
準備ができたら[localhost:8000/main]とブラウザに入力すると[mainページ]が表示されるはずです。
When you are ready, type [localhost:8000/main] into your browser and you will see [main page].
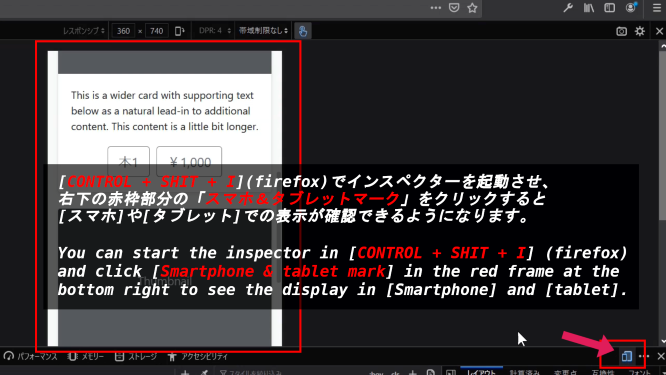
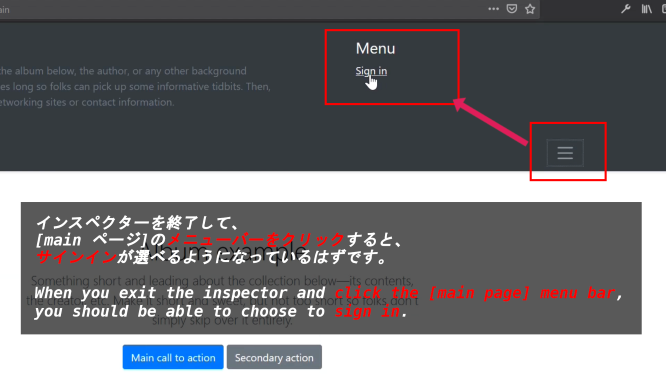
[CONTROL + SHIT + I](firefox)でインスペクターを起動させ、右下の赤枠部分の「スマホ&タブレットマーク」をクリックすると[スマホ]や[タブレット]での表示が確認できるようになります。
You can start the inspector in [CONTROL + SHIT + I] (firefox) and click [Smartphone & tablet mark] in the red frame at the bottom right to see the display in [Smartphone] and [tablet].
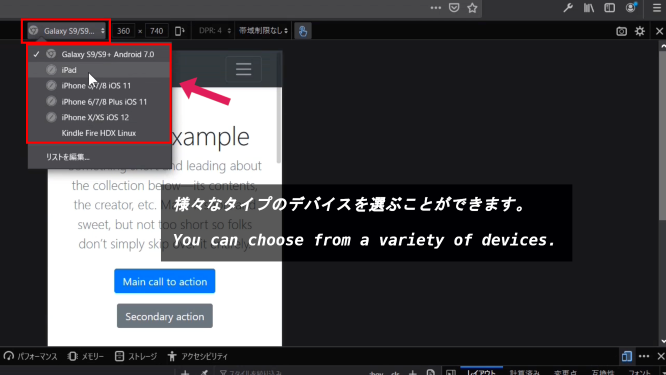
様々なタイプのデバイスを選ぶことができます。
You can choose from a variety of devices.
インスペクターを終了して、[main ページ]のメニューバーをクリックすると、サインインが選べるようになっているはずです。
When you exit the inspector and click the [main page] menu bar, you should be able to choose to sign in.
③ Customerモデルを作成してマイグレーションする
③ Creating and Migrating the Customer Model
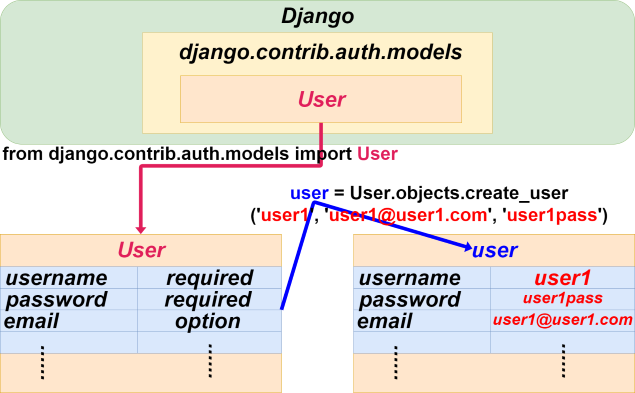
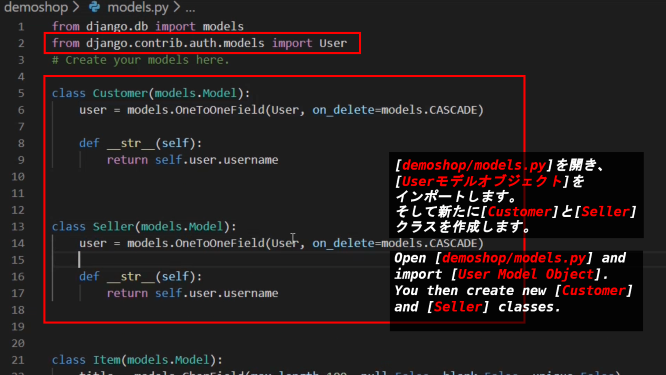
[demoshop/models.py]を開き、[Userモデルオブジェクト]をインポートします。そして新たに[Customer]と[Seller]クラスを作成します。
Open [demoshop/models.py] and import [User Model Object]. You then create new [Customer] and [Seller] classes.
補足説明:supplementary explanation
Userモデルとは、Djangoにデフォルトで用意されているモデルです。
前回までにItemモデルを作成した時、CharField等を設定したと思います。
The User model is the default model provided with Django.
When we created the Item model last time, then we set CharField, etc.
class Item(models.Model):
    title = models.CharField(max_length=100, null=False, blank=False, unique=False)
    price = models.FloatField(null=False, blank=False, unique=False)
つまり、上記のようなスクリプトが最初からDjangoに用意されていて、Userモデルとして読み込むと使えるようになっています。(Userモデルからモデルオブジェクトを作る際には、ユーザーネームやパスワードは必須の入力項目となります。)
This means that a script like the one above is already provided in Django and can be used when loaded as a User model. (When creating a model object from a User model, the user name and password are required.)
Userモデルのスクリプトの一部
Part of the User model script
username = models.CharField(
        _('username'),
        max_length=150,
        unique=True,
        help_text=_('Required. 150 characters or fewer. Letters, digits and @/./+/-/_ only.'),
        validators=[username_validator],
        error_messages={
            'unique': _("A user with that username already exists."),
        },
      )
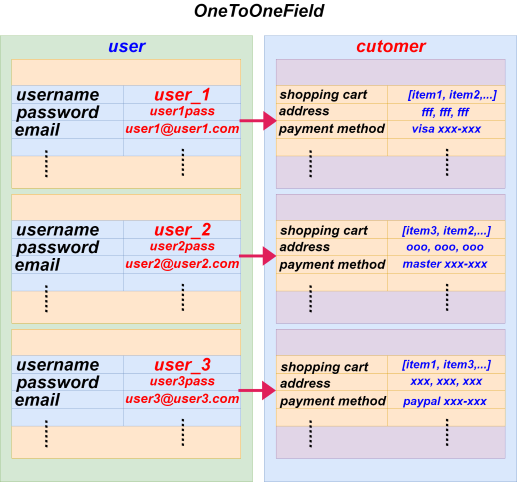
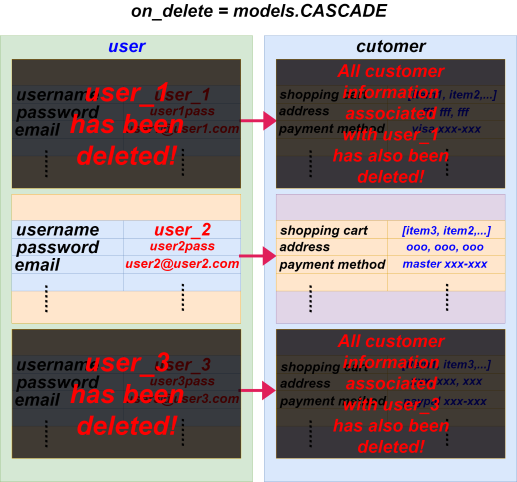
このUserモデル(テーブル)は別のモデル(別のテーブル)に紐づけて使用することもできます。
例えば[User]モデル(テーブル)に複数のユーザーが登録されているとします。
そして、[Customer]モデルには買い物かごの中身や、閲覧履歴、支払い履歴、住所、支払い方法等が登録できるとします。
この[Customer]モデルと[User]モデルを紐づけるとします。
Userモデルから作られたそれぞれのユーザーはそれぞれの[Customer]モデルから作られた情報に紐づいていなければ訳が分からなくなってしまいます。
このようなケースで、各ユーザーに一対一で紐づいた別のモデルを作成したい時に使用するのがOneToOneFieldです。
This User model (Table) can also be tied to another model (another table).
For example, the [User] model (Table) has multiple users.
Then, Assume that the [Customer] model includes items such as shopping cart contents, browsing history, payment history, address, and payment method.
Suppose you want to tie this [Customer] model to a [User] model.
Each user created from a [User] model has to be tied to the information created from each [Customer] model.
In this case, OneToOneField is used when you want to create a separate model tied to each user one-on-one.
from django.db import models
from django.contrib.auth.models import User

class Customer(models.Model):
    user = models.OneToOneField(User, on_delete=models.CASCADE)
[models.OneToOneField(User, on_delete=models.CASCADE)]は第一引数に親となる[User]モデルを渡します。第二引数の[on_delete=models.CASCADE]は[OneToOneFileds]で作成された[user]を削除した時に、それに紐づいているモデルの情報も全て削除するという意味です。
[models.OneToOneField(User, on_delete=models.CASCADE)] passes its parent [User] model as its first argument. The second argument, [on_delete = models.CASCADE], means that if you delete the [user] created in [OneToOneFileds], you will also delete all the model information associated with it.
demoshop/models.py
from django.db import models
from django.contrib.auth.models import User
# Create your models here.

class Customer(models.Model):
    user = models.OneToOneField(User, on_delete=models.CASCADE)

    def __str__(self):
        return self.user.username


class Seller(models.Model):
    user = models.OneToOneField(User, on_delete=models.CASCADE)

    def __str__(self):
        return self.user.username

class Item(models.Model):
    .................................
    .................................
    .................................
    .................................
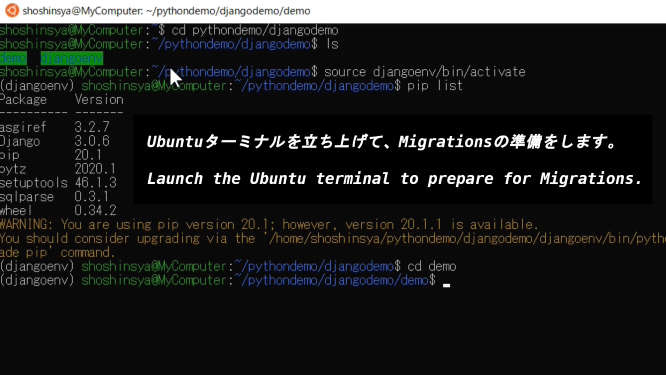
Ubuntuターミナルを立ち上げて、Migrationsの準備をします。
Launch the Ubuntu terminal to prepare for Migrations.
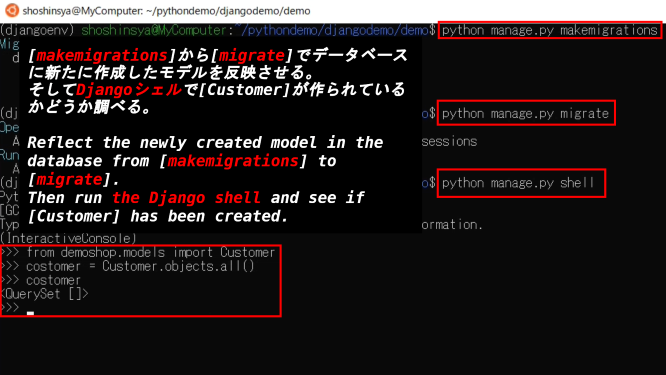
[makemigrations]から[migrate]でデータベースに新たに作成したモデルを反映させる。そしてDjangoシェルで[Customer]が作られているかどうか調べる。
Reflect the newly created model in the database from [makemigrations] to [migrate]. Then run the Django shell and see if [Customer] has been created.
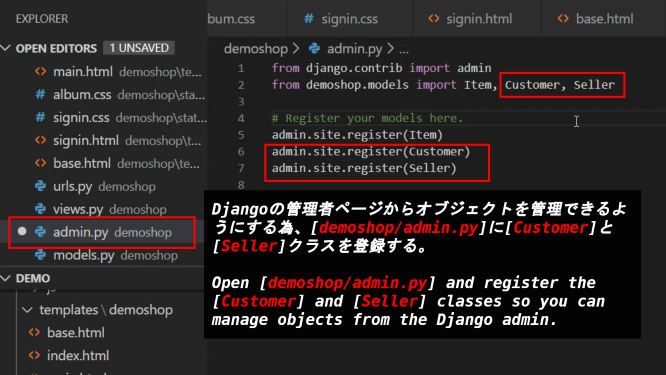
Djangoの管理者ページからオブジェクトを管理できるようにする為、[demoshop/admin.py]に[Customer]と[Seller]クラスを登録する。
Open [demoshop/admin.py] and register the [Customer] and [Seller] classes so you can manage objects from the Django admin.
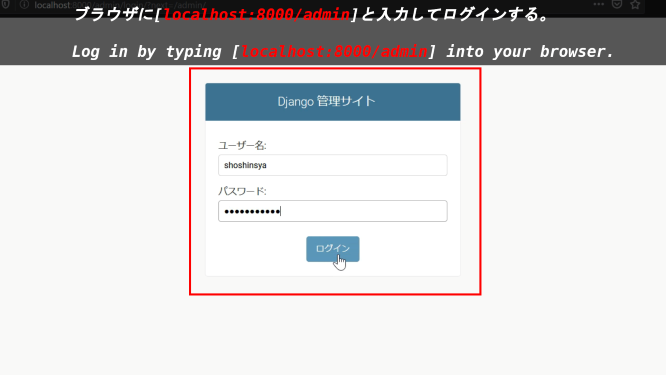
ブラウザに[localhost:8000/admin]と入力してログインする。
Log in by typing [localhost:8000/admin] into your browser.
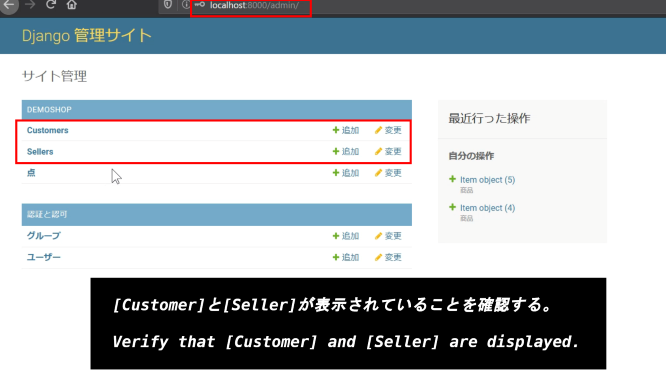
[Customer]と[Seller]が表示されていることを確認する。
Verify that [Customer] and [Seller] are displayed.
以上です。お疲れ様です。次回はSignup, Signin, Signout等の処理を実装していきましょう。
That's all. Thank you for your hard work. Next time we'll implement Signup, Signin, Signout, etc.