Published Date : 2020年5月20日14:26
Android Studioで簡単なProcessingのSketchを作成する方法
How to create a simple Processing Sketch in Android Studio
This blog has an English translation
YouTubeにアップした動画、「How to create a simple Processing Sketch in Android Studio:Android Studioで簡単なProcessingのSketchを作成する方法」の補足説明の記事です。
Here's a little more about the 「How to create a simple Processing Sketch in Android Studio:Android Studioで簡単なProcessingのSketchを作成する方法」 video I uploaded to YouTube.
前回の動画ではProcessingのSketchをAndroid Studioを使ってエミュレーターや実機で動かす方法を紹介しました。 今回の動画では簡単なProcessingのSketchを二つほど作ってAndroid StudioでAndroid端末で動かせるように遊んでみましょう。
In the last video, I showed you how to run Processing Sketch on an emulator or a real machine using Android Studio. In this video, we're going to build a couple of simple Processing Sketches and play with them so they can run on Android devices in Android Studio.
無駄な説明を省いて、忙しい時でも短時間で理解できるような動画です。
It's a video that can be understood in a short period of time even when you're busy, without any unnecessary explanation.
目次
Table of Contents
ProcessingをダウウンロードしてSketchを動かす Downloading Processing and Moving Sketch |
Android StudioでいくつかSketchを作って動かす Creating and Running Some Sketches in Android Studio |
ページの最後へ Go to the end of the page. |
ProcessingをダウウンロードしてSketchを動かす
Downloading Processing and Moving Sketch
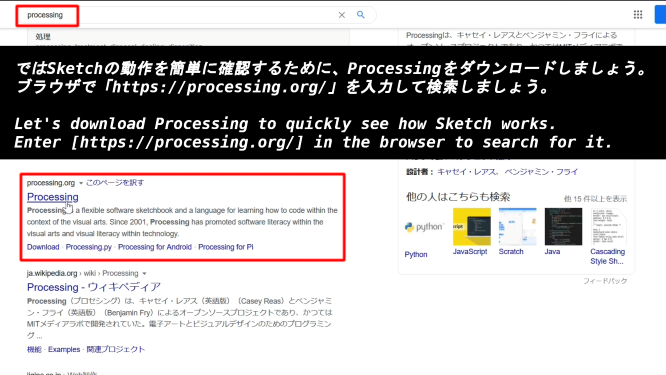
ではSketchの動作を簡単に確認するために、Processingをダウンロードしましょう。ブラウザで「https://processing.org/」を入力して検索しましょう。
Let's download Processing to quickly see how Sketch works. Enter [ https://processing.org/] in the browser to search for it.
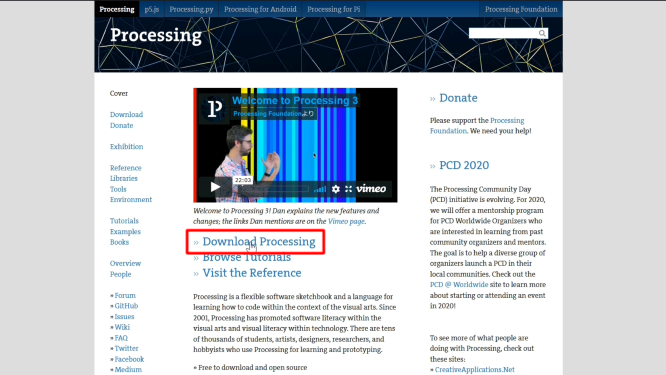
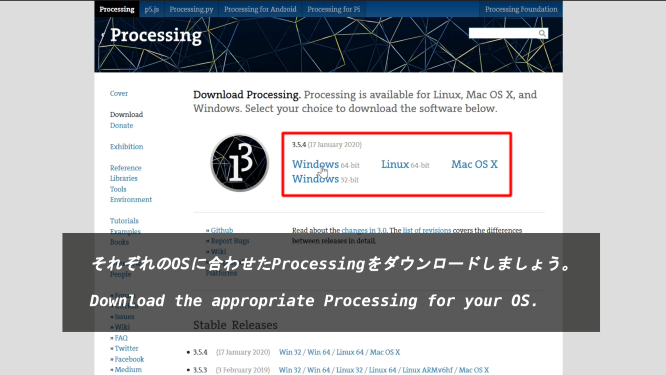
それぞれのOSに合わせたProcessingをダウンロードしましょう。
Download the appropriate Processing for your OS.
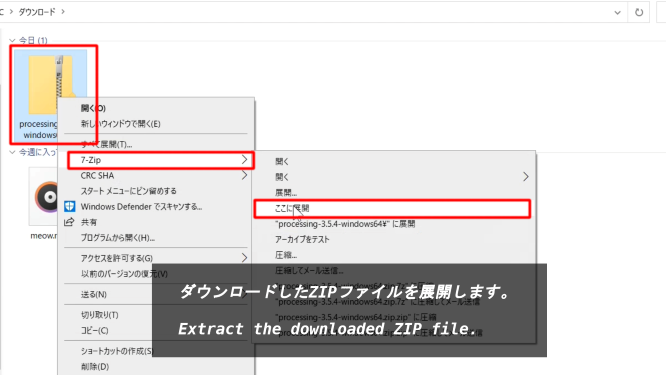
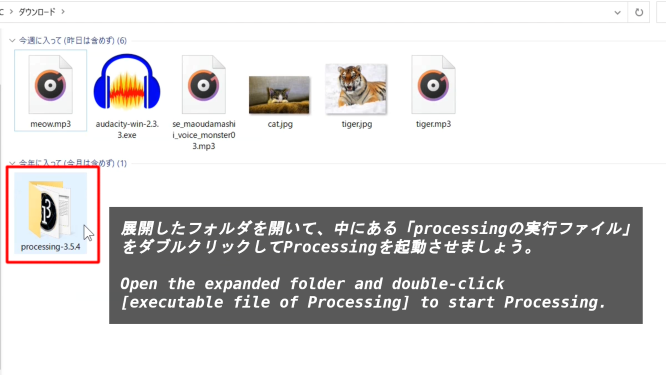
ダウンロードしたZIPファイルを展開します。
Extract the downloaded ZIP file.
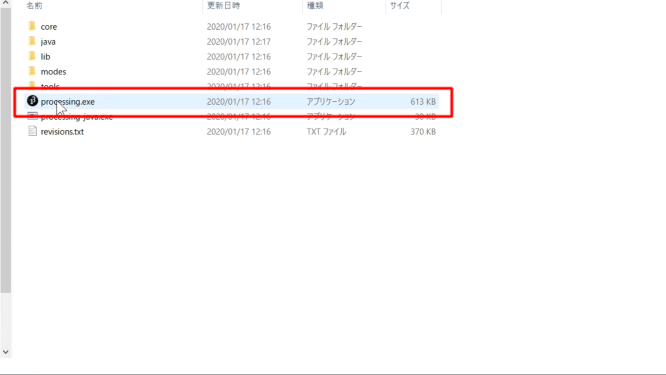
展開したフォルダを開いて、中にある「processingの実行ファイル」をダブルクリックしてProcessingを起動させましょう。
Open the expanded folder and double-click [executable file of Processing] to start Processing.
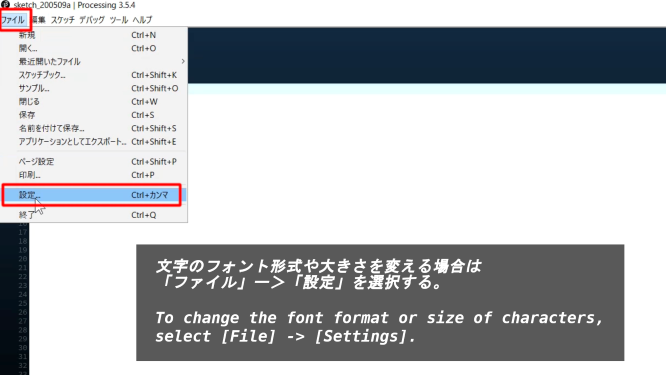
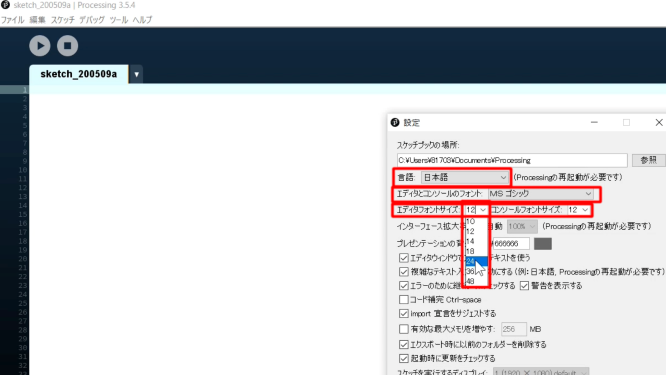
文字のフォント形式や大きさを変える場合は「ファイル」ー>「設定」を選択する。
To change the font format or size of characters, select [File] -> [Settings].
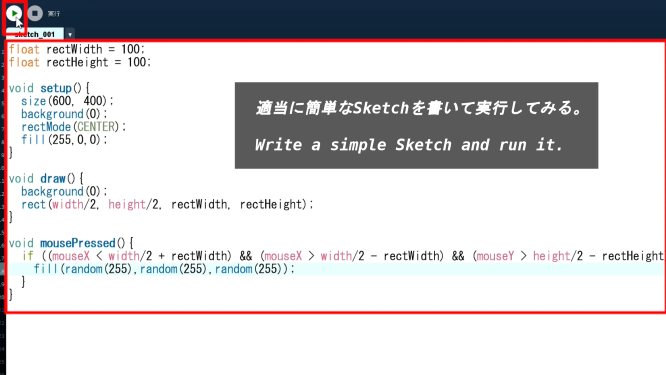
適当に簡単なSketchを書いて実行してみる。
Write a simple Sketch and run it.
Android StudioでいくつかSketchを作って動かす
Creating and Running Some Sketches in Android Studio
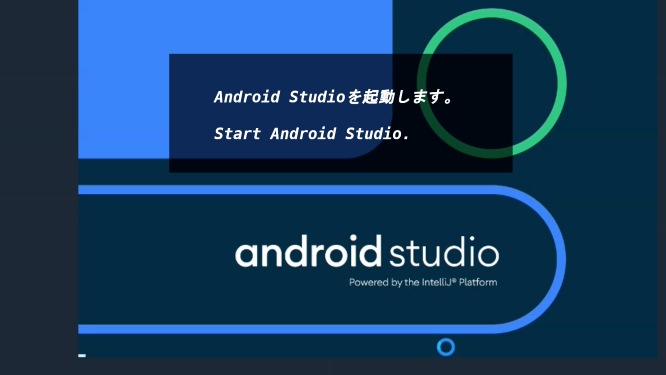
Android Studioを起動します。
Start Android Studio.
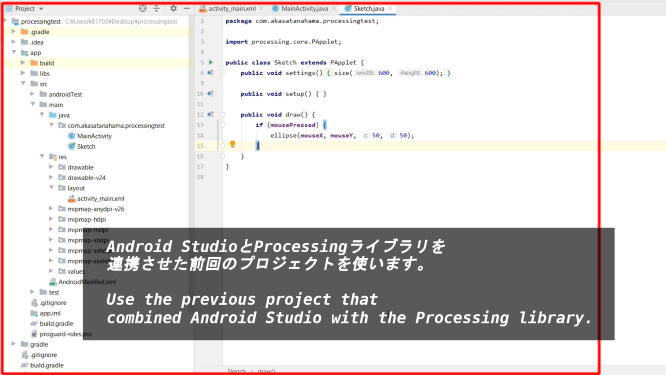
Android StudioとProcessingライブラリを連携させた前回のプロジェクトを使います。
Use the previous project that combined Android Studio with the Processing library.
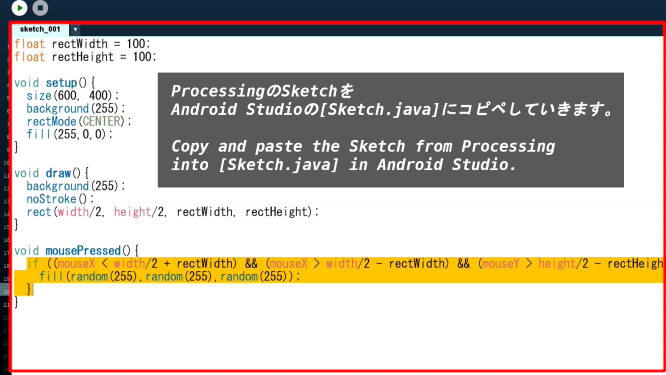
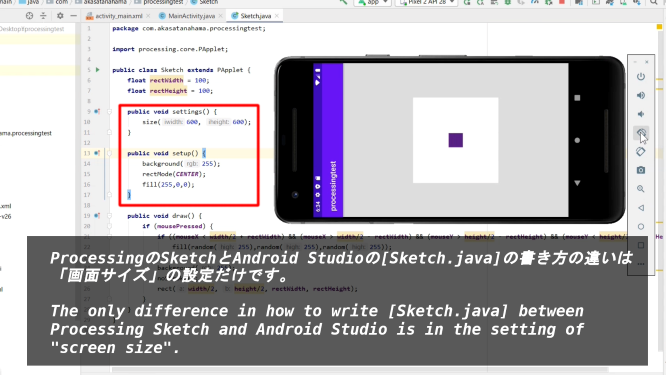
ProcessingのSketchをAndroid Studioの[Sketch.java]にコピペしていきます。
Copy and paste the Sketch from Processing into [Sketch.java] in Android Studio.
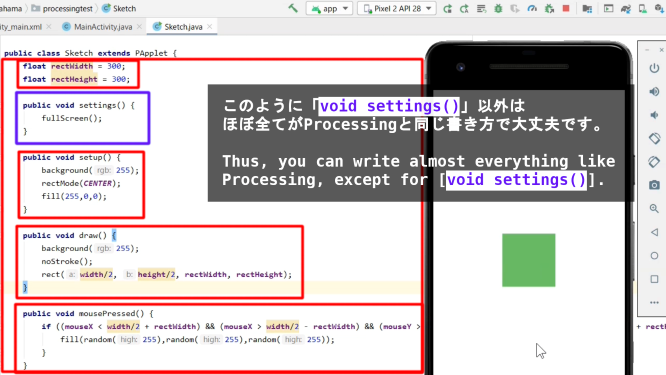
ProcessingのSketchとAndroid Studioの[Sketch.java]の書き方の違いは「画面サイズ」の設定だけです。
The only difference in how to write [Sketch.java] between Processing Sketch and Android Studio is in the setting of "screen size".
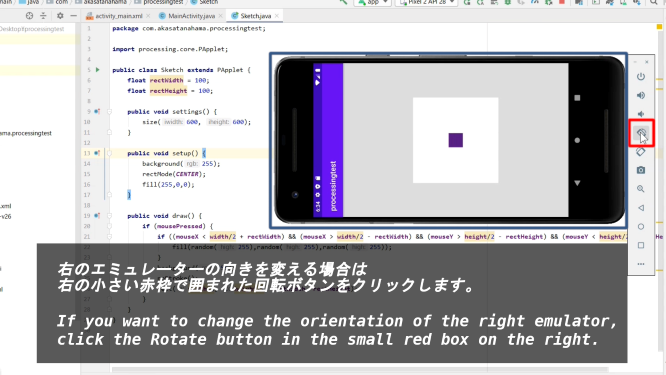
右のエミュレーターの向きを変える場合は右の小さい赤枠で囲まれた回転ボタンをクリックします。
If you want to change the orientation of the right emulator, click the Rotate button in the small red box on the right.
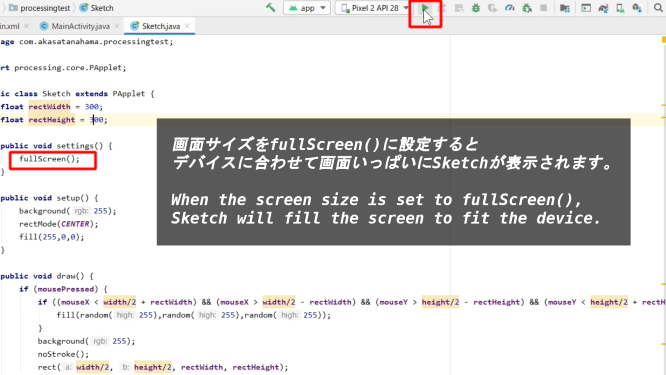
画面サイズをfullScreen()に設定するとデバイスに合わせて画面いっぱいにSketchが表示されます。
When the screen size is set to fullScreen(), Sketch will fill the screen to fit the device.
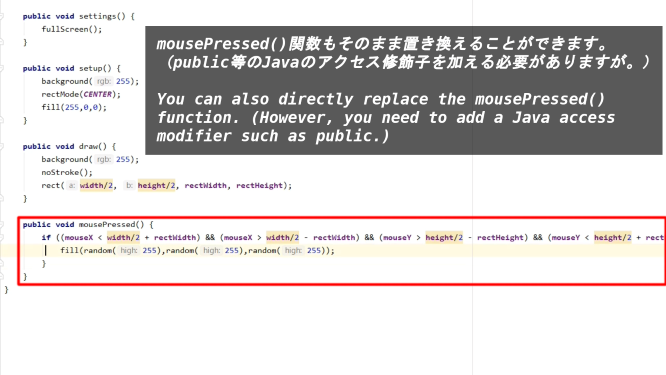
mousePressed()関数もそのまま置き換えることができます。(public等のJavaのアクセス修飾子を加える必要がありますが。)
You can also directly replace the mousePressed() function. (However, you need to add a Java access modifier such as public.)
このように「void settings()」以外はほぼ全てがProcessingと同じ書き方で大丈夫です。
Thus, you can write almost everything like Processing, except for [void settings()].
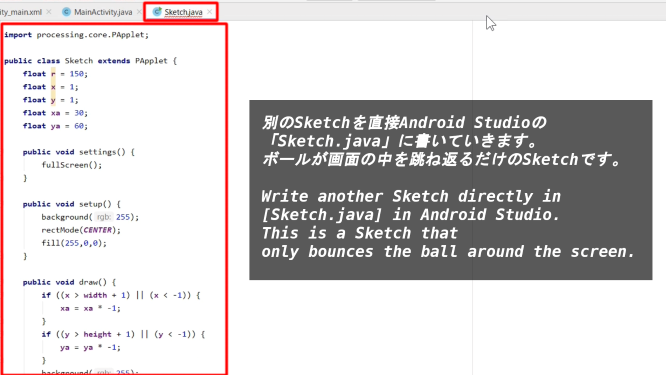
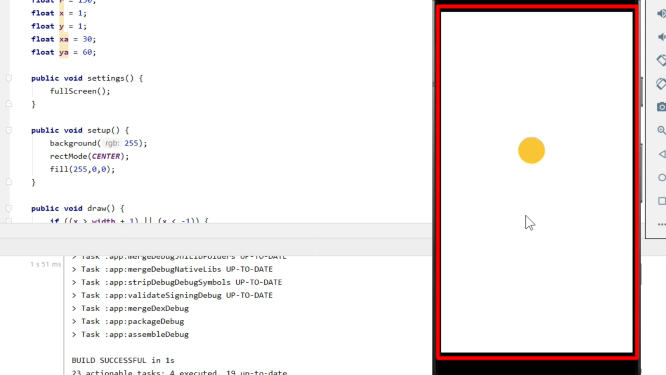
別のSketchを直接Android Studioの「Sketch.java」に書いていきます。ボールが画面の中を跳ね返るだけのSketchです。
Write another Sketch directly in [Sketch.java] in Android Studio. This is a Sketch that only bounces the ball around the screen.
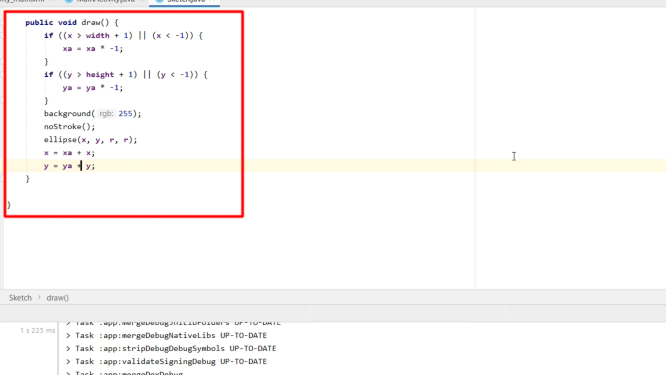
「ボールが跳ね返るとボールの色をランダムに変える」、「マウスをクリックするとボールがランダムに画面に表示され直す」等の変更を加えました。
I added functions such as 「When the ball bounces, it randomly changes its color」 and 「The ball randomly reappears on the screen when you click the mouse」 to Sketch.

Sketch.java
package (your package name);

import processing.core.PApplet;

public class Sketch extends PApplet {
    float r = 150;
    float x = 1;
    float y = 1;
    float xa = 30;
    float ya = 60;

    public void settings() {
        fullScreen();
    }

    public void setup() {
        background(255);
        rectMode(CENTER);
        fill(255,0,0);
    }

    public void draw() {
        if ((x > width + 1) || (x < -1)) {
            xa = xa * -1;
            fill(random(255), random(255), random(255));
        }
        if ((y > height + 1) || (y < -1)) {
            ya = ya * -1;
            fill(random(255), random(255), random(255));
        }
        background(255);
        noStroke();
        ellipse(x, y, r, r);
        x = xa + x;
        y = ya + y;
    }

    public void mousePressed(){
        x = random(width-1);
        y = random(height-1);
    }

}
以上です。お疲れ様です。
That's all. Thank you for your hard work.
後はAndroid端末をパソコンに繋げます。そしてAndroid StudioでSketchをAndroid端末にデプロイすれば実機でも操作できるようになります。
After that, connect your Android phone to your computer. When you deploy Sketch to an Android device in Android Studio, you can work with the sketch on your own machine.