Published Date : 2020年4月13日13:45
【素早く学ぶ】3: SlackとGCPとPythonで作業自動化
【learn quickly】3: Automate your work with Slack, GCP and Python
This blog has an English translation
YouTubeにアップした動画、「【How to】Python : Slack : Google Sheets【Automation : 作業自動化 Part 3】 」の補足説明の記事です。
Here's a little more about the "【How to】Python : Slack : Google Sheets【Automation : 作業自動化 Part 3】 " video I uploaded to YouTube.
リモートワーク、在宅ワーク、テレワーク等で活躍するであろう、チャットツールのSlack、
どこにいてもWEB上で表計算の編集の共有ができるGoogleスプレッドシート、
これらのツールをPythonを使って自動化して作業効率を上げよう。
Slack, the chat tool, and Google Spreadsheets,
the service that lets you edit spreadsheets anywhere on the web.
Automating these tools using Python will improve your efficiency.
全体の説明は動画に任せるとして、補足が必要だろうと思われる部分を説明していきます。
I'll leave the entire explanation to the video, but I'll explain the parts that I think need to be supplemented.
目次
Table of Contents
① SlackAPIを利用した投稿の自動化
① Automating Posts Using the Slack API
IPython
まずIPythonを起動します。ターミナルまたはコマンドプロンプトを立ち上げて、[ipython]と入力してくだちぃ。
Start IPython. Launch a terminal or command prompt and type [ipython].
$ ipython
0:08~0:20
import gspread
from oauth2client.service_account import ServiceAccountCredentials
import pandas as pd
from gspread_formatting import *

scope = ['https://spreadsheets.google.com/feeds',
        'https://www.googleapis.com/auth/drive']

credentials = ServiceAccountCredentials.from_json_keyfile_name('credentials.json', scope)
gc = gspread.authorize(credentials)
wks = gc.open('testSheet').sheet1

wks_records=wks.get_all_records()
columns=list(wks_records[0].keys())
rows=[list(record.values()) for record in wks_records]
df=pd.DataFrame(rows,columns=columns)

not_available = df[(df['ステータス']=='掲載不可') | (df['ステータス']=='掲載済み')].index.values

for na in not_available:
    print(f'A{na+2}:R{na+2}')

for na in not_available:
    format_cell_range(wks, f'A{na+2}:R{na+2}', fmt)
ここまではGoogle Sheetsのステータスによって分けた情報の取得、セルの色を変えることを行ってます。
So far, We've been able to get information based on the status of Google Sheets and change the color of the cells.
0:20~0:53
それではSlack APIを使用して、Pythonから投稿を行います。まずは投稿テストから。
We will now use the Slack API to post from Python. Let's start with the post test.
import json
import requests

url = """あなたがPart1で取得したSlackのWebhookURLをここに張り付ける。
Slack's [web hook url] you got in Part1 is pasted here.
"""

jpn_text = "これはPythonスクリプトによる自動投稿のテストです。"
eng_text = "This is a test of automatic posting with a Python script."

requests.post(url,
            data=json.dumps(
            {"text": jpn_text,
            "username": 'username',
            "icon_emoji": ":python:"}))
requests.post(url,
            data=json.dumps(
            {"text": eng_text,
            "username": 'username',
            "icon_emoji": ":python:"}))
全体のイメージは以下になります。
The overall image is as follows.
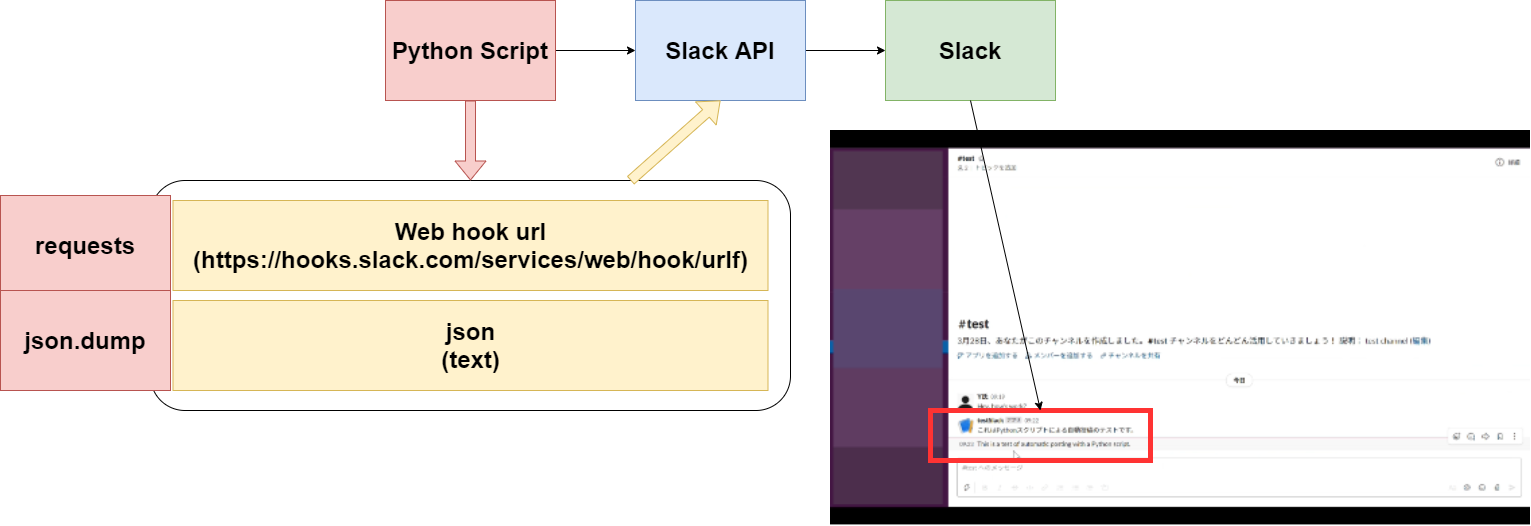
あとはテキストをスプレッドシートの情報から作成して、Slackに投稿するだけです。
Then, all you have to do is create the text from the spreadsheet and post it to Slack.
unpublished = df[df['ステータス']=='未掲載']
todo_columns = ['管理ID','ステータス','終了日','会社名','電話番号','物件名','住所']
unpublished_list = unpublished[todo_columns].to_dict(orient='records')

send_to_slack = '本日のTODOリストどぅえす。\n'
for i,d in enumerate(unpublished_list):
    send_to_slack = send_to_slack + f'\n{i+1}件目\n'
    send_to_slack = send_to_slack + '-'*30 +'\n'
    for k,v in d.items():
        send_to_slack = send_to_slack + f'{k} : {v}\n'
    send_to_slack = send_to_slack + '-'*30+'\n'
send_to_slack = send_to_slack +  f'\n本日の確認物件は計{len(unpublished_list)}件だよ、分かったか!'

requests.post(url,
            data=json.dumps(
            {"text": send_to_slack,
            "username": 'username',
            "icon_emoji": ":python:"}))
② Google Sheetsにワークシートを追加し編集する
② Add and edit worksheets in Google Sheets
次はスプレッドシートに新しいワークシートを追加して、本日のタスクを分かりやすく表示させます。こちらもPythonを使って自動化できるようにしてみましょう。
Next, you add a new worksheet to the spreadsheet to better view today's tasks. Let's try to automate this too using Python.
Google Sheets
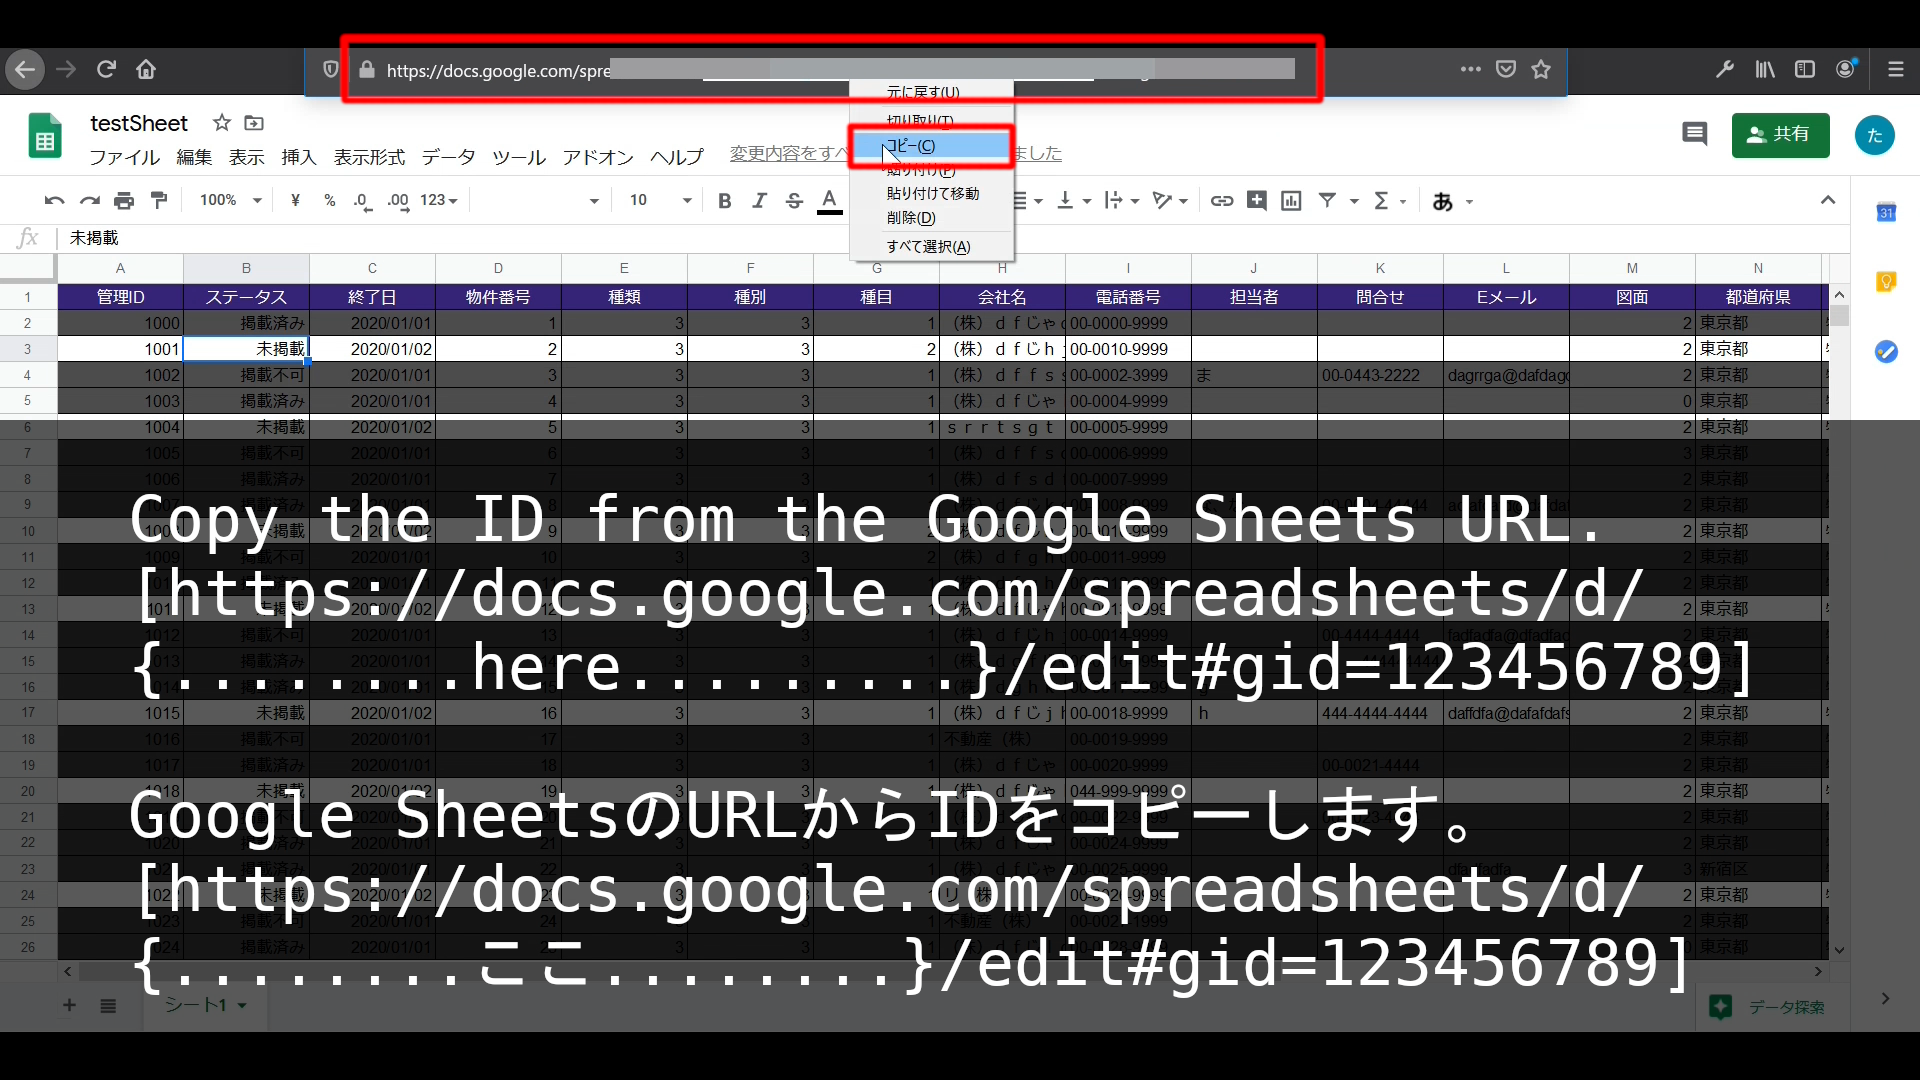
Google SheetsのURLからIDをコピーします。
Copy the ID from the Google Sheets URL.
1:00~1:13
Workbookを取得する際に、コピーしたIDを使用します。
Use the copied ID when retrieving the Workbook.
workbook = gc.open_by_key('your google sheets id')
新しいWorksheetを作成してみましょう。
Let's create a new Worksheet.
# シート名はお好きなように決めてください。
# Please choose the sheet name as you like.
worksheet2 = workbook.add_worksheet(title='シート2', rows=len(unpublished.index), cols=len(unpublished.columns))
シートを削除する。
Delete a sheet.
workbook.del_worksheet(worksheet2)
1:14~1:40
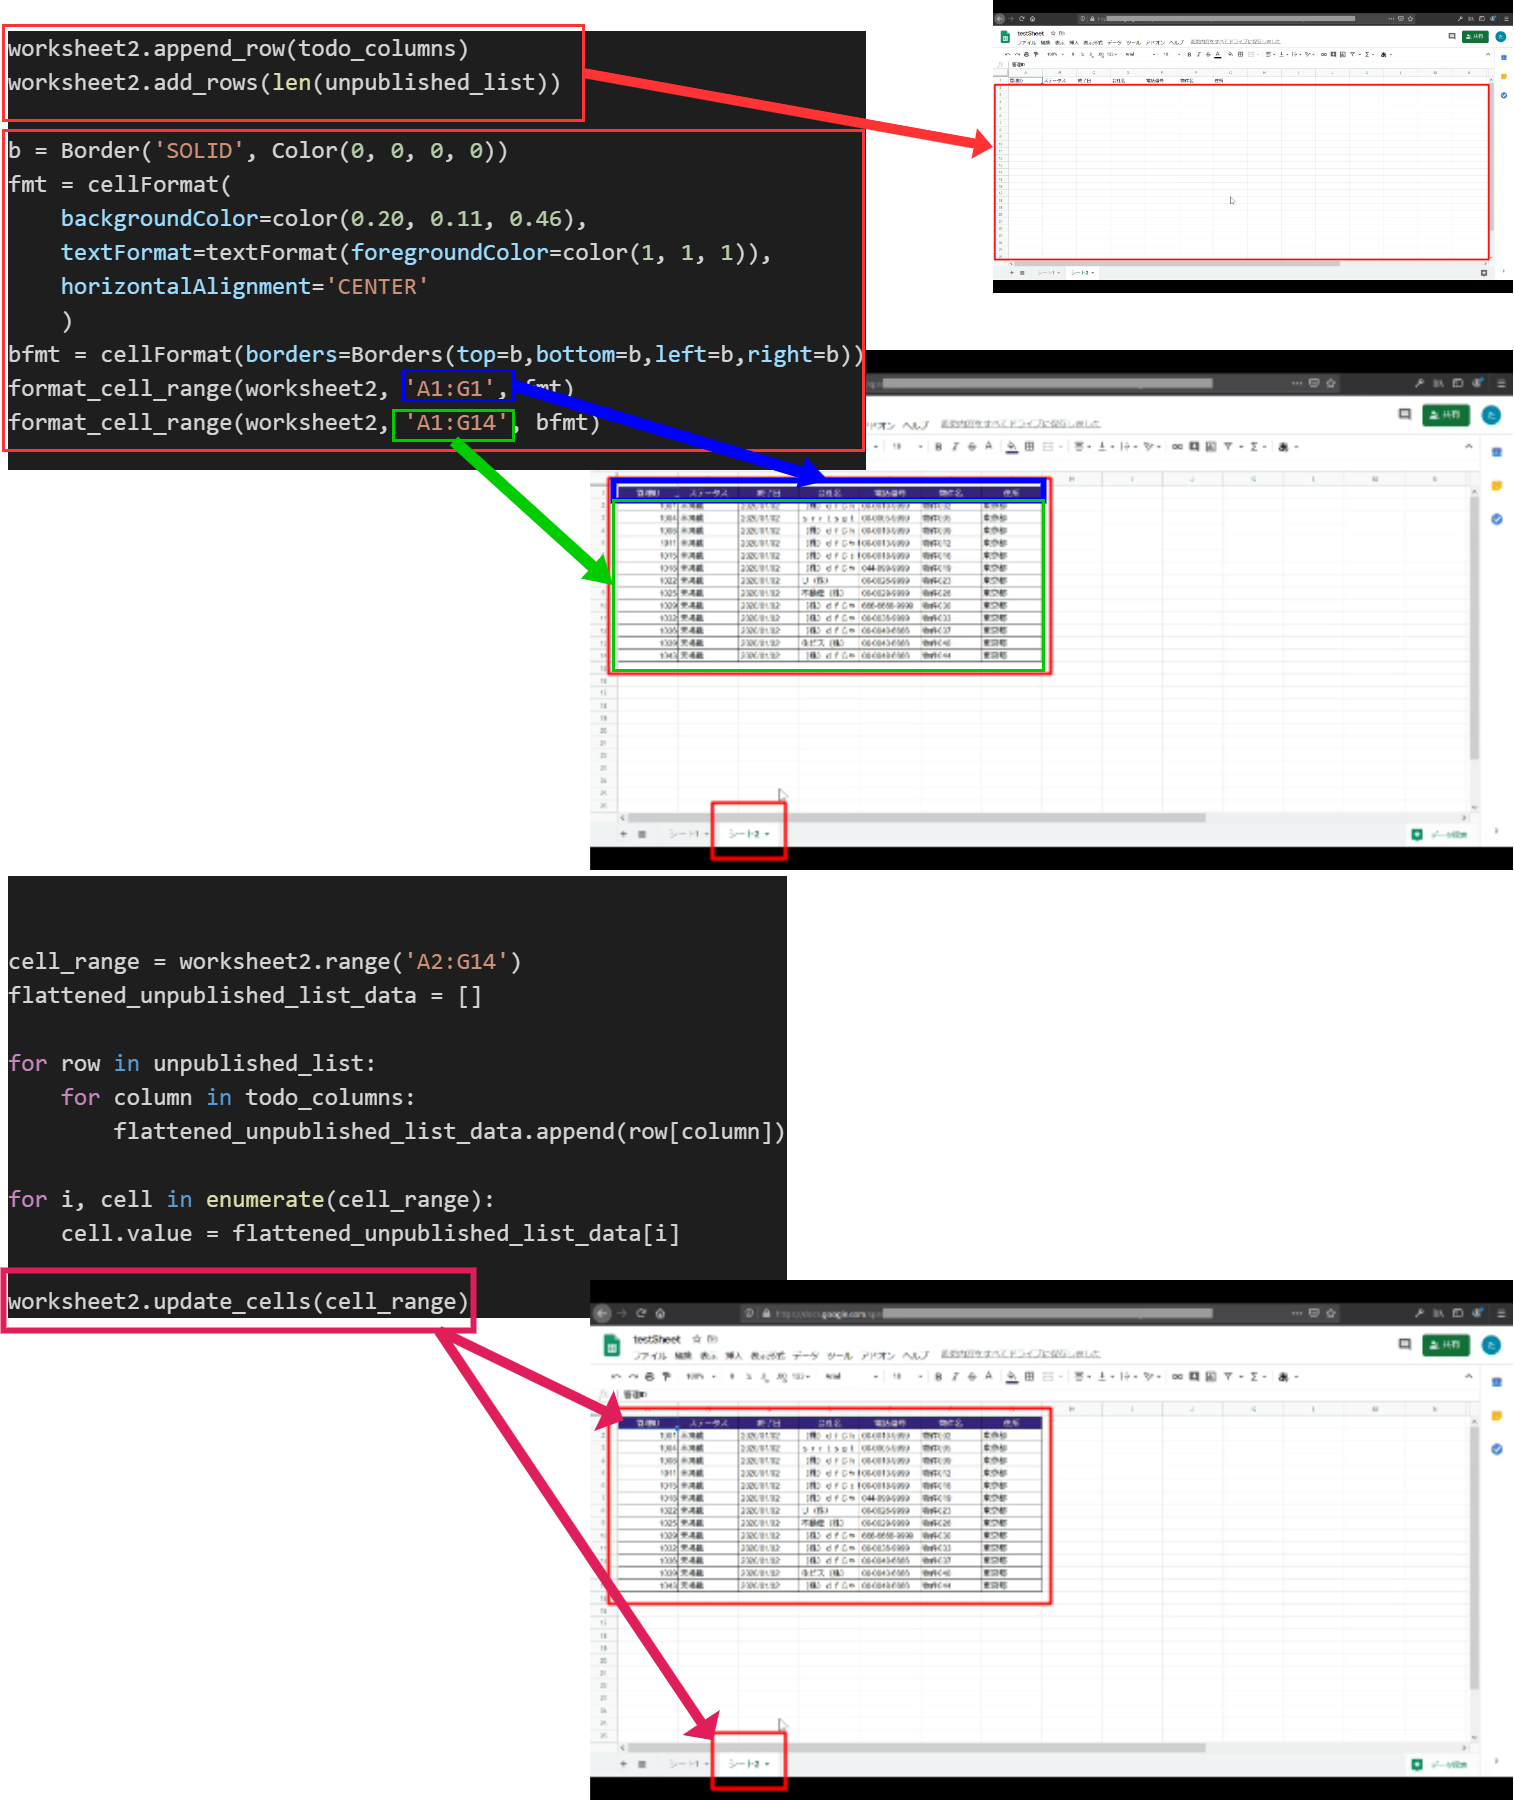
スタイルとテキストをお好みで設定してワークシートを作る。
Create a worksheet with your favorite styles and text.
worksheet2.append_row(todo_columns)
worksheet2.add_rows(len(unpublished_list))

b = Border('SOLID', Color(0, 0, 0, 0))
fmt = cellFormat(
    backgroundColor=color(0.20, 0.11, 0.46),
    textFormat=textFormat(foregroundColor=color(1, 1, 1)),
    horizontalAlignment='CENTER'
    )
bfmt = cellFormat(borders=Borders(top=b,bottom=b,left=b,right=b))
format_cell_range(worksheet2, 'A1:G1', fmt)
format_cell_range(worksheet2, 'A1:G14', bfmt)

cell_range = worksheet2.range('A2:G14')
flattened_unpublished_list_data = []

for row in unpublished_list:
    for column in todo_columns:
        flattened_unpublished_list_data.append(row[column])

for i, cell in enumerate(cell_range):
    cell.value = flattened_unpublished_list_data[i]

worksheet2.update_cells(cell_range)
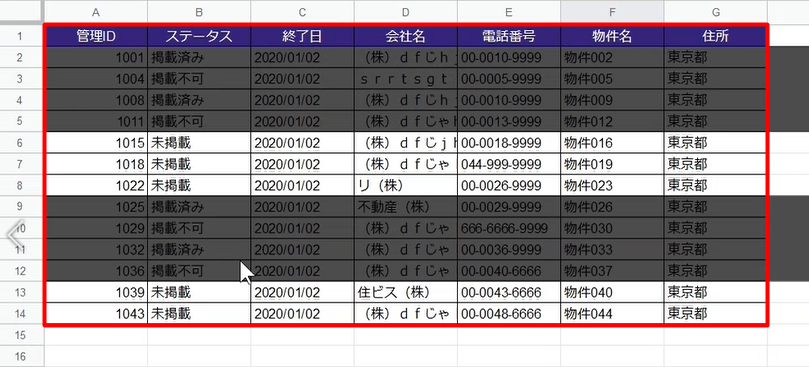
全体のイメージは以下になります。
The overall image is as follows.
1:13~2:00
それでは新たに作成したワークシートを使って本日の作業を行いましょう。
Let's do today's work using the newly created worksheet.
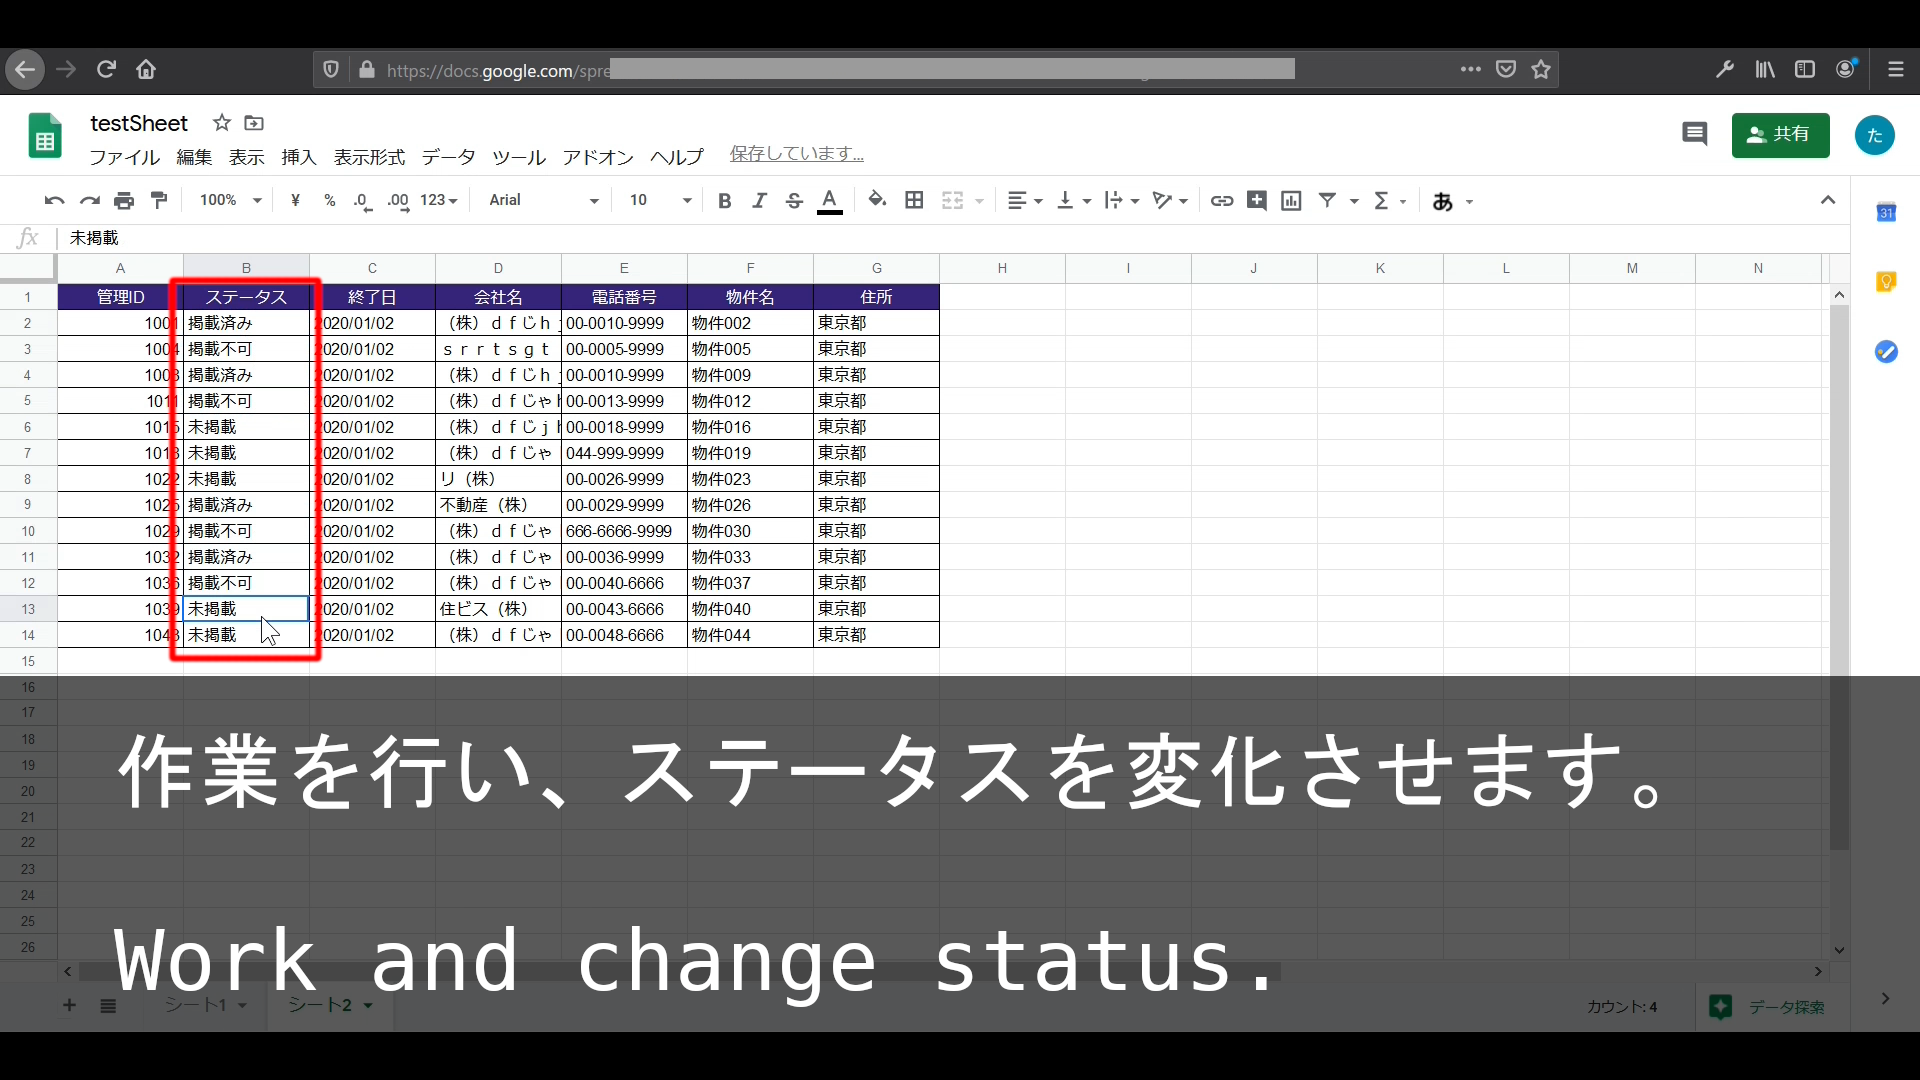
スクリプトを使い設定されたステータスを灰色に塗りつぶしましょう。
Now use the python script to fill the status you set with gray.
worksheet2_records=worksheet2.get_all_records()
fmt = cellFormat(
    backgroundColor=color(.3, .3, .3),
    )

columns2=list(worksheet2_records[0].keys())
rows2=[list(record.values()) for record in worksheet2_records]
df2=pd.DataFrame(rows2,columns=columns2)

not_available2 = df2[(df2['ステータス']=='掲載不可') | (df2['ステータス']=='掲載済み')].index.values

for na2 in not_available2:
    format_cell_range(worksheet2, f'A{na+2}:R{na+2}', fmt)
③ 本日の作業報告を行う
③ Present today's work report
では最後に、本日行ったタスクの進捗状況をSlackに投稿するスクリプトを書いていきましょう。
Finally, let's write a script to post your progress to Slack.Finally, let's write a script to post your today's progress to Slack.
confirmed_list = df2[(df2['ステータス']=='掲載不可') | (df2['ステータス']=='掲載済み')][todo_columns].to_dict(orient='records')

send_to_slack_comp = '本日の成果ですYO。\n'
for i,d in enumerate(confirmed_list):
    send_to_slack_comp = send_to_slack_comp + f'\n{i+1}件目\n'
    send_to_slack_comp = send_to_slack_comp + '-'*30 +'\n'
    for k,v in d.items():
        send_to_slack_comp = send_to_slack_comp + f'{k} : {v}\n'
    send_to_slack_comp = send_to_slack_comp + '-'*30+'\n'
send_to_slack_comp = send_to_slack_comp +  f'\n本日掲載できた, 掲載不可の物件は計{len(confirmed_list)}件だYO! チェケラッチョ!!'

requests.post(url,
            data=json.dumps(
            {"text": send_to_slack_comp,
            "username": 'test',
            "icon_emoji": ":python:"}))
全体の流れ
Overall flow
全体の流れとしては、①まず本日行うタスクをSlackに投稿。
次に、②新たに本日行うタスクのみのワークシートを作成する。
最後に、③本日行ったタスクを整理して、進捗状況をSlackに投稿して報告する。
① First, you post your tasks to Slack.
Next, ② A worksheet for only the task to be newly performed today is created.
Finally, ③ Organize the tasks you did today and post your progress to Slack.