Published Date : 2020年3月9日21:24
【Part1】Djangoで簡単なブログを作ろう
【Part 1】Let's create a simple blog with Django
This blog has an English translation
YouTubeにアップした動画、「【Python】Part 1 - Let's create a simple blog with Django : 【Python】Part 1 - Djangoで簡単なブログを作ろう」の補足説明の記事です。
Here's a little more about the "【Python】Part 1 - Let's create a simple blog with Django : Djangoで簡単なブログを作ろう" video I uploaded to YouTube.
この動画を作った理由は、初期のブログ記事にある「Djangoのシンプルなブログシリーズ」を動画にしてみたらどうなるか試してみたかったからです。
The reason I made this video is because I wanted to see what it would look like if I turned my early blog post "Django's simple blog series" into a video.
同時に、暫くPythonから遠ざかっていたので、Djangoも含めた復習のつもりで動画とこのブログ記事を作成しました。
At the same time, having been away from Python for a while, I wanted to relearn Python, including Django, so I created this video and blog post.
シリーズ第一部の内容は、まずPythonとVS Codeのインストールをします。 そして必要な設定を済ませた後、Djangoのプロジェクトを作り、動作を確認します。 その後、ブログの下準備として、Templatesを利用してHTMLファイルの内容をブラウザに表示させるところまでを行います。
For the first part of the series, install Python and VS Code. Once you've set up the necessary settings, create a Django project and see how it works. Then, as a preliminary step for your blog, use templates to display the contents of the HTML file into the browser.
全体の説明は動画に任せるとして、補足が必要だろうと思われる部分を説明していきマウス。
I'll leave the entire explanation to the video, but I'll explain the parts that I think need to be supplemented.
目次
Table of Contents
PythonとDjangoをインストール Installing Python and Django |
Djangoのプロジェクトを作成 Create Django project |
HTMLファイルでページを表示させる Use an HTML file to display a page |
ページの最後へ Go to the end of the page. |
PythonとDjangoをインストール
Installing Python and Django
Pythonのインストール
Installing Python
まずPythonのインストールから始めます。
Start by installing Python.
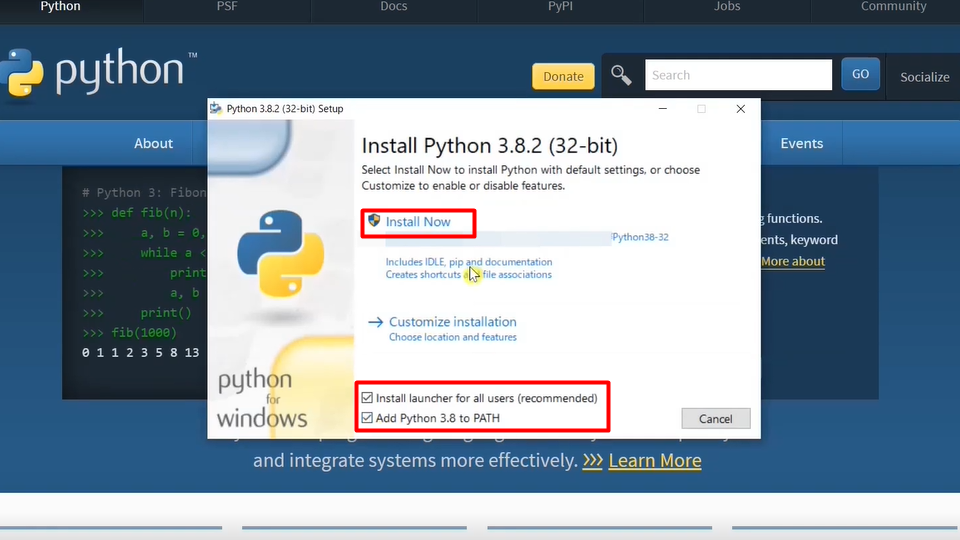
「PythonをPATHに追加する」にチェックを入れると、コマンドプロンプトやターミナルからPythonを実行できるように設定してインストールしてくれる。
To set Python to run from a command prompt or terminal, check and install "Add Python to PATH".
Visual Studio Codeのインストール
Installing Visual Studio Code
動画の手順通りにVSCodeをインストールした実行して立ち上げる。
Follow the instructions in the video to install, run and launch VS Code.
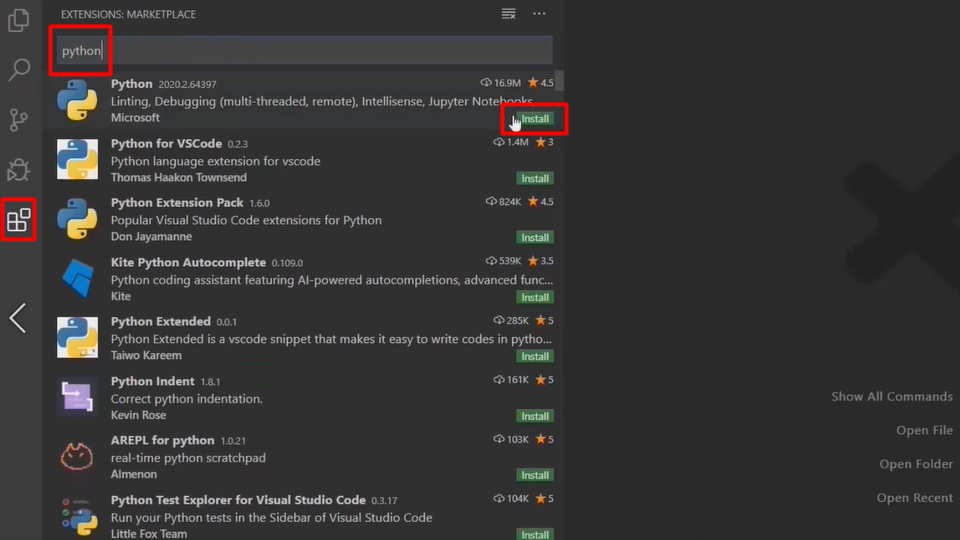
左のエクステンションマークをクリックして検索窓にPythonと入力し、出てきた一覧から好きなエクステンションを選んでInstallボタンをクリックする。 上の画像のコード補完機能をインストールすると、例えば「ret」と打つと「return」に変換される等、Pythonの変数やメソッドなどを予測して表示してくれ、入力の手間が減るなど大変便利です。
Click the extension mark on the left, type Python into the search box, select the "extension" you want from the list, and click the Install button. If you install the code completion functions shown in the image above, it is very useful because it predicts and displays Python variables and methods, for example, when you type "ret" it will be converted to "return", you can reduce script creation time because you don't have to type all the characters.
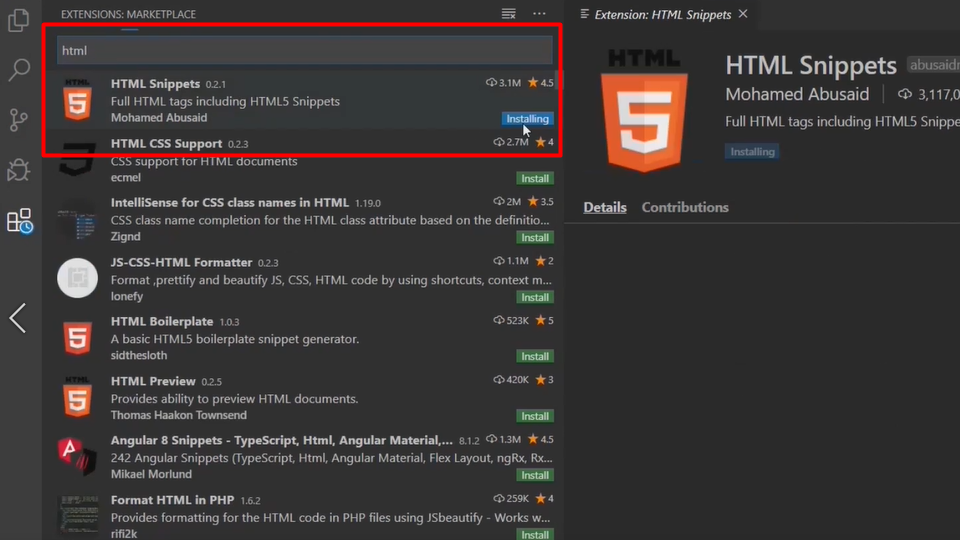
HTML用のコード補完機能もインストールすることをお勧めします。 理由はDjangoはウェブ開発用のフレームワークなので、HTMLやCSSを取り扱うことが多いです。 なので、前述の通り少しの記述で快適にスクリプトを書いていけるようになるので便利だからです。
I recommend to You should also install code completion for HTML. Because Django is a web framework, it often handles HTML and CSS. So, as I said before, it's convenient because you can write scripts comfortably with a little typing.
pipの更新とDjangoのインストール
Update pip and install Django
続いてはPythonのパッケージマネージャーツールであるpipを使用してDjangoのインストールを行います。
Next, We install Django using pip that the package manager tool for Python.
しかし、下の画像の用にPythonのPATHが追加されているのにも関わらず、pipでエラーが生じてしまう時があります。
However, even if Python's PATH is added, pip may fail, as shown in the following image.
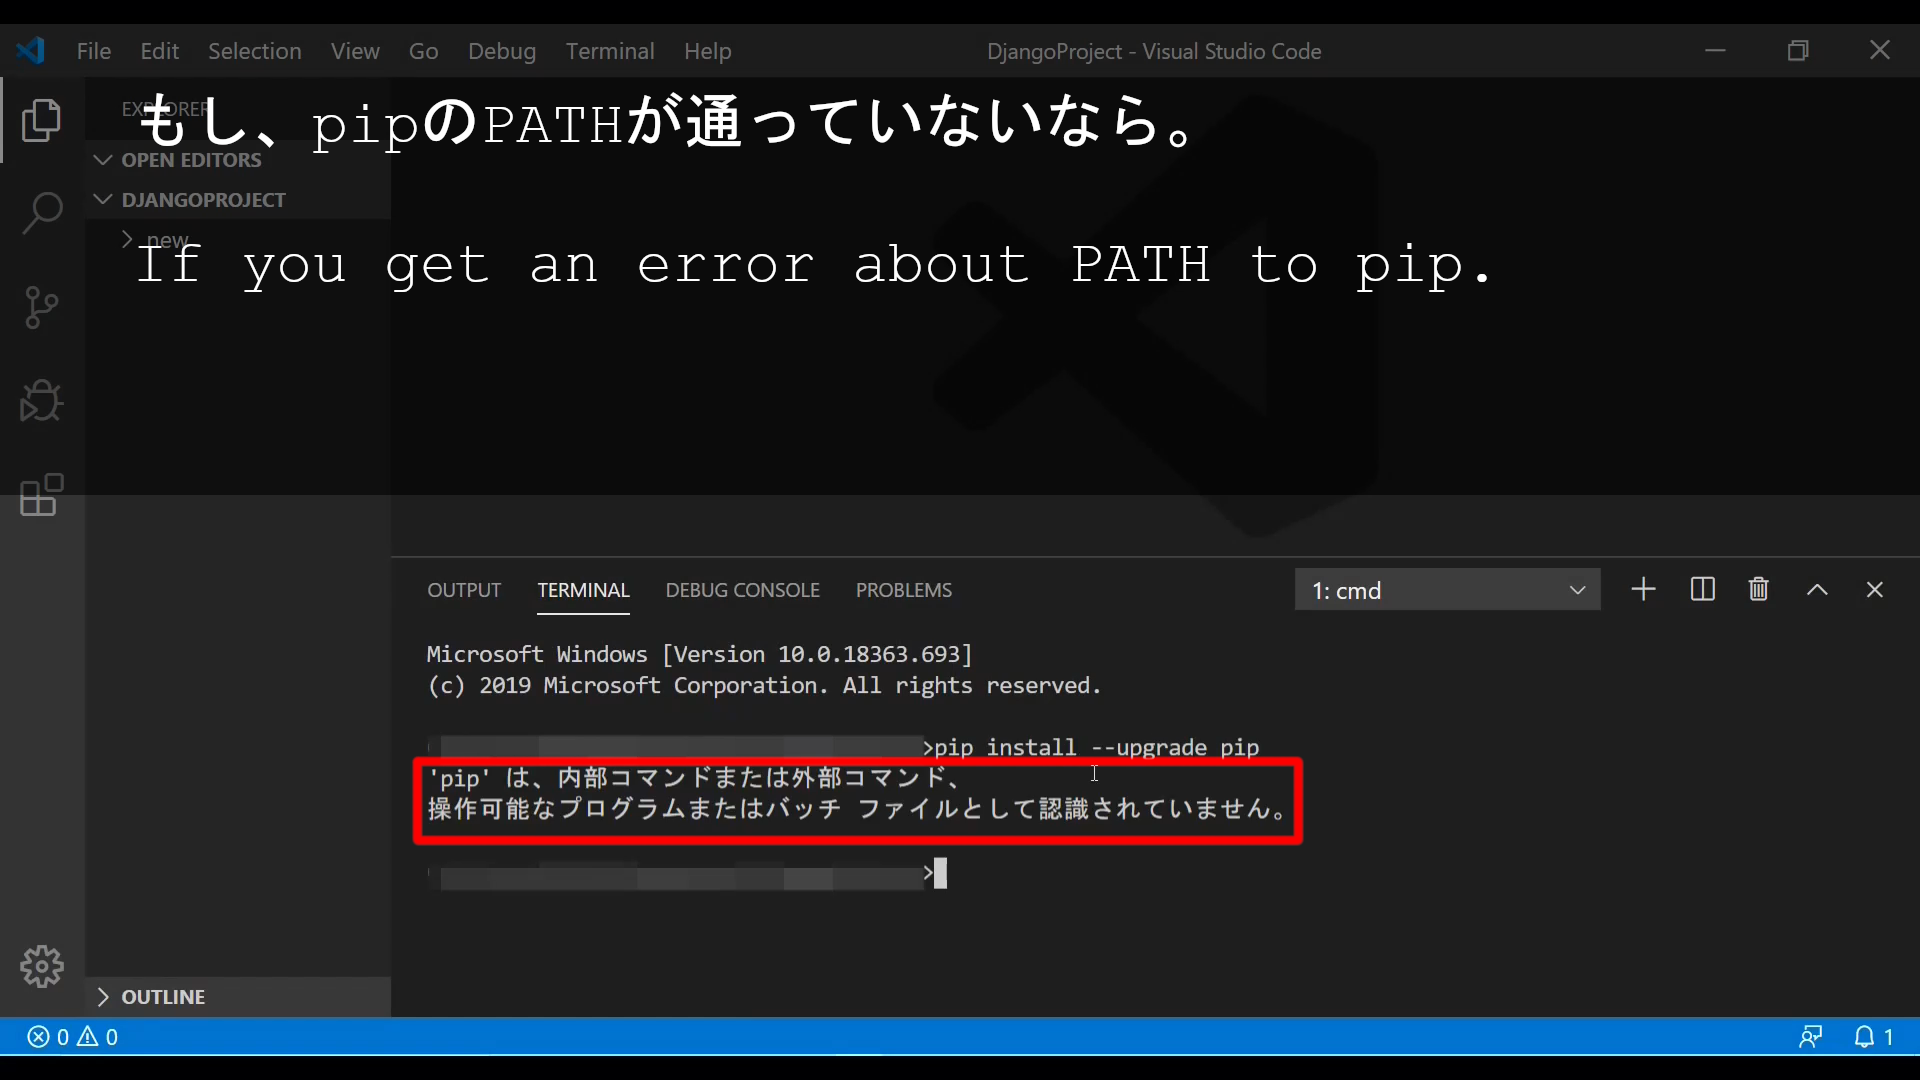
こうなると手動でPATHにpipを加える必要があります。
You will need to manually add pip to your PATH.
動画を見たほうがすぐ分かりますが、簡単に手順だけを伝えます。
It's easier to understand if you watch the video, but I will tell you the procedure easily.
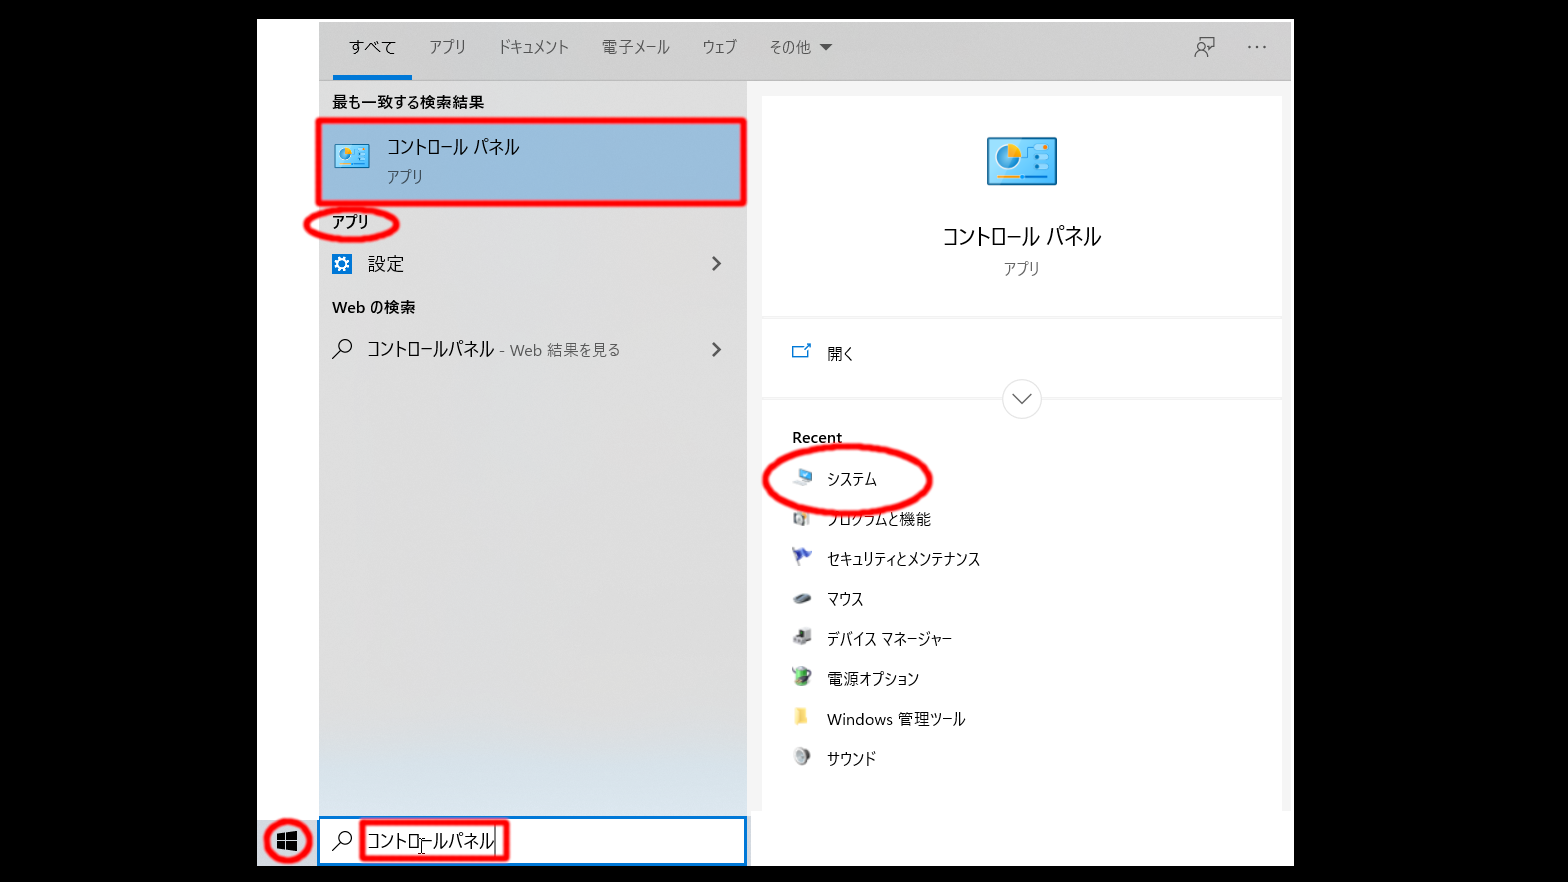
コントロールパネルー>システムー>システムの設定ー>環境変数ー>Pathー>編集の順に開いていきます。
Go to the Control Panel -> System -> System Settings -> Environment Variables -> Path -> Edit.
もし使っているOSがWindows10なら、以下の画像の通りに画面左下のWindowsマークの右横の検索窓に「コントロールパネル」か「システム」と打ち込むみます。
If you're running Windows 10, just type "Control Panel" or "system" into the search box at the bottom left of the screen, to the right of the Windows icon.
もしOSがmacならターミナルを開いて、以下のコマンドを自分のpipがあるフォルダのパスに書き換えて実行した後、ターミナルを再起動してください。
If your operating system is mac, open a terminal, change the following command to the path of the folder where your pip is located, and restart the terminal.
export PYTHONPATH=[path for your pip]
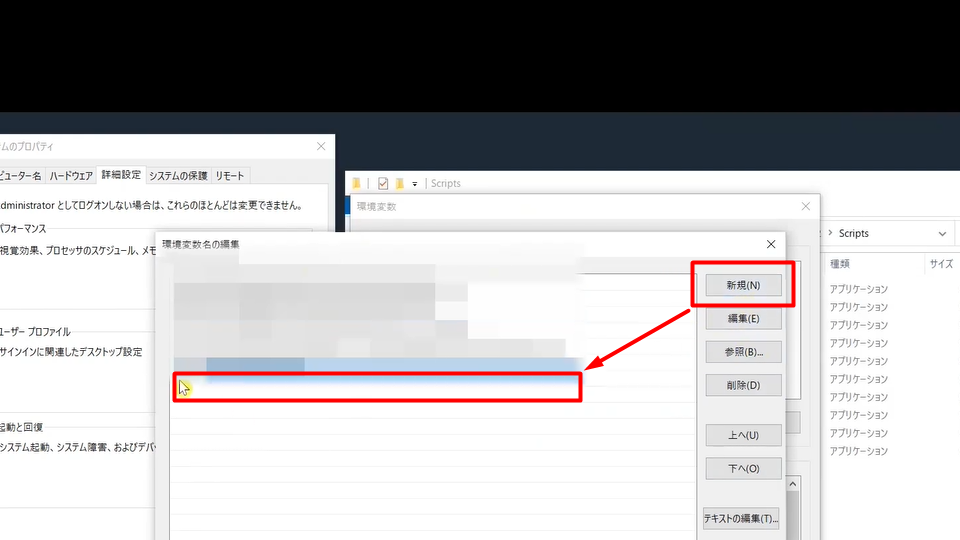
引き続きWindowsのOSの説明のですが、「編集」まで開いたら、後は自分のpipがあるフォルダのパスをコピーして、「新規」をクリックして張り付けて「OK」をクリックするだけです。間違って最初から登録されているパスを消したり編集しないように注意してください。
Let's continue with the Windows OS. Once you've opened it to "Edit", just copy the path to the folder where your pip is located, then click "New" paste it, and click "OK". Be careful not to accidentally delete or edit the original path.
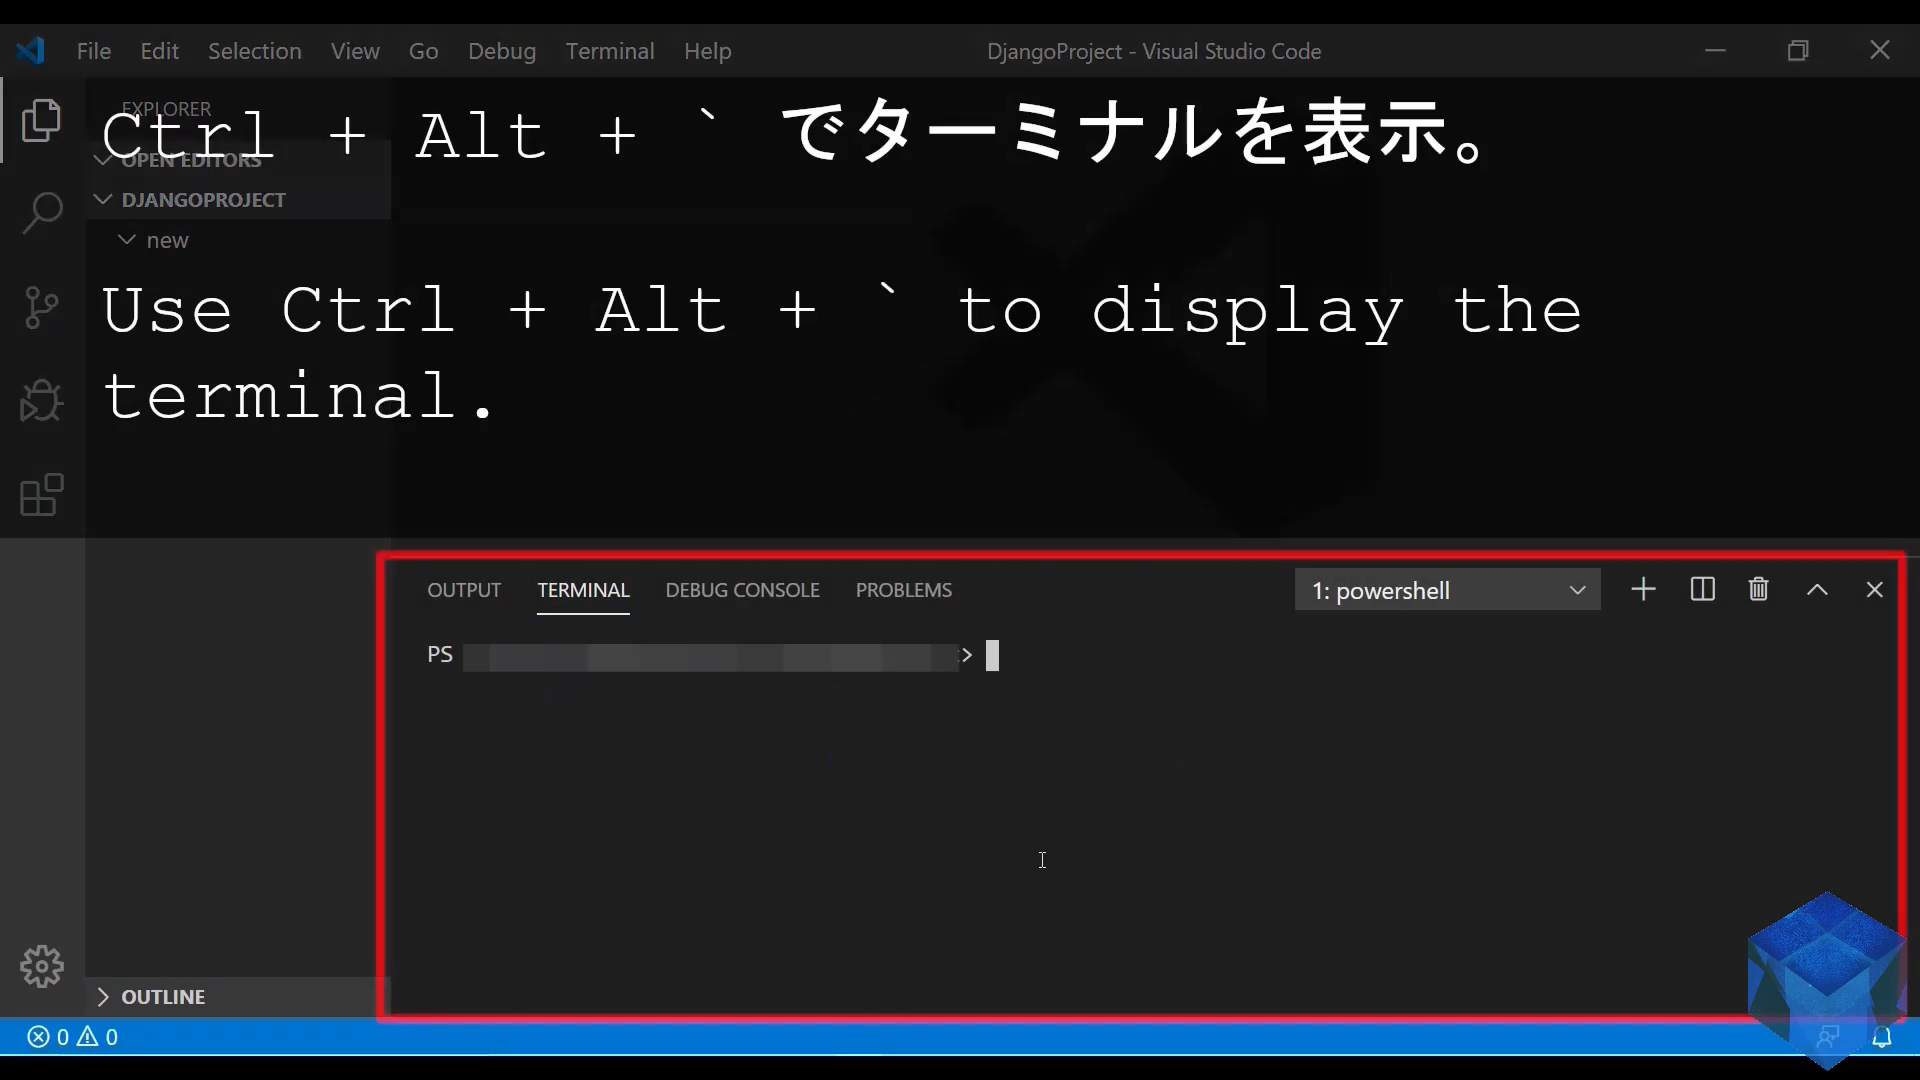
準備ができたら、「CTRL + SHIFT + `」を押してVSCode上でターミナルを開くか、個別にターミナルかコマンドプロンプトでpipを動かします。
When you're ready, press [CTRL + SHIFT + `] to open a terminal on VS Code, or launch a terminal or command prompt by itself, then run pip on the command line.
まずpipを最新版にアップグレードします。
First, upgrade pip to the latest version.
pip install --upgrade pip
そして、Djangoをインストールします。
Next, install Django.
pip install django
Djangoのプロジェクトを作成
Create Django project
プロジェクトの作成
Create Django project
インストールし終わったら、DjangoのProjectファイルを作り、開発用のWEBサーバーを立ち上げ、一度その挙動を確認してみましょう。
Once installed, create a django project file, run the development web server, and teke a look at how it works.
ターミナルかコマンドプロンプトで以下のコマンドを打ってください。プロジェクト名は各個人で好きなように決めてください。
Type the following command at a terminal or command prompt. The project name is up to you.
django-admin startproject [your project name]
開発用のWEBサーバを立ち上げる
Run the development web server
Django project (newsite)
  - newsite
    - __init__.py
    - asgi.py
    - settings.py
    - urls.py
    - views.py
    - wsgi.py
  db.sqlite3
  manage.py
では作ったプロジェクトの中に移動します。
Navigate to the project folder you created.
cd [Django project directory]
同じ階層にmanage.pyがあることを確認してください。
Make sure that [manage.py], the main script for managing projects, is in the same hierarchy.
ls
Mode                LastWriteTime         Length Name
----                -------------         ------ ----
d-----       2020/01/01      0:00                newsite
-a----       2020/01/01      0:00              0 db.sqlite3
-a----       2020/01/01      0:00            648 manage.py
確認できたら以下のコマンドを打ってください。
When you see the [manage.py], enter the following command.
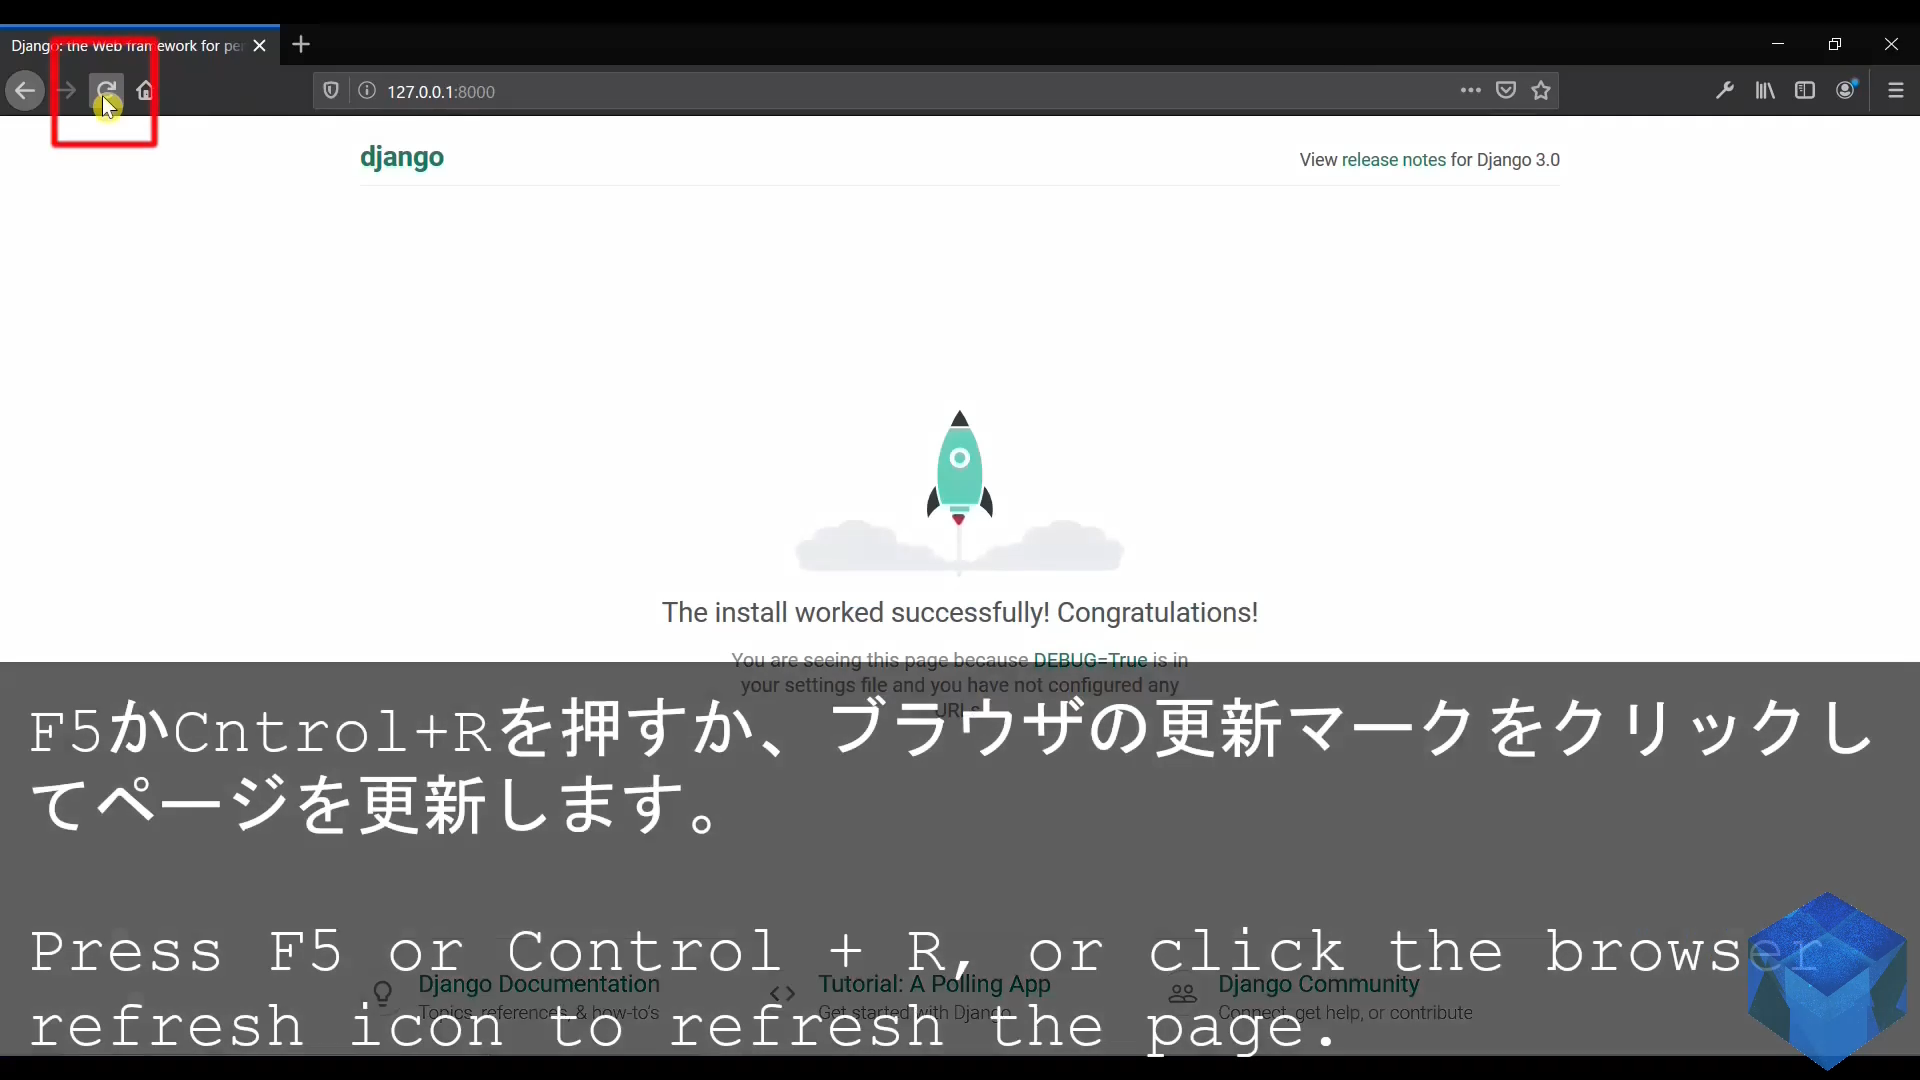
python manage.py runserver

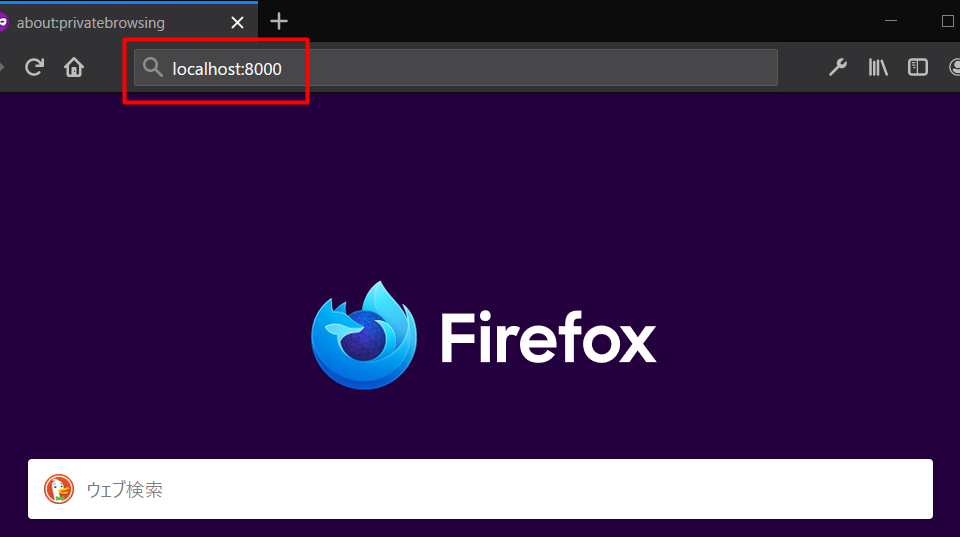
お好きなブラウザを開き、ターミナルに表示されているURLをブラウザの検索窓にコピペするか、[localhost:8000]と入力して実行してくだちぃ。
Open a browser of your choice and copy and paste the URL displayed in the terminal into the browser search window, or type [localhost: 8000] to run it.
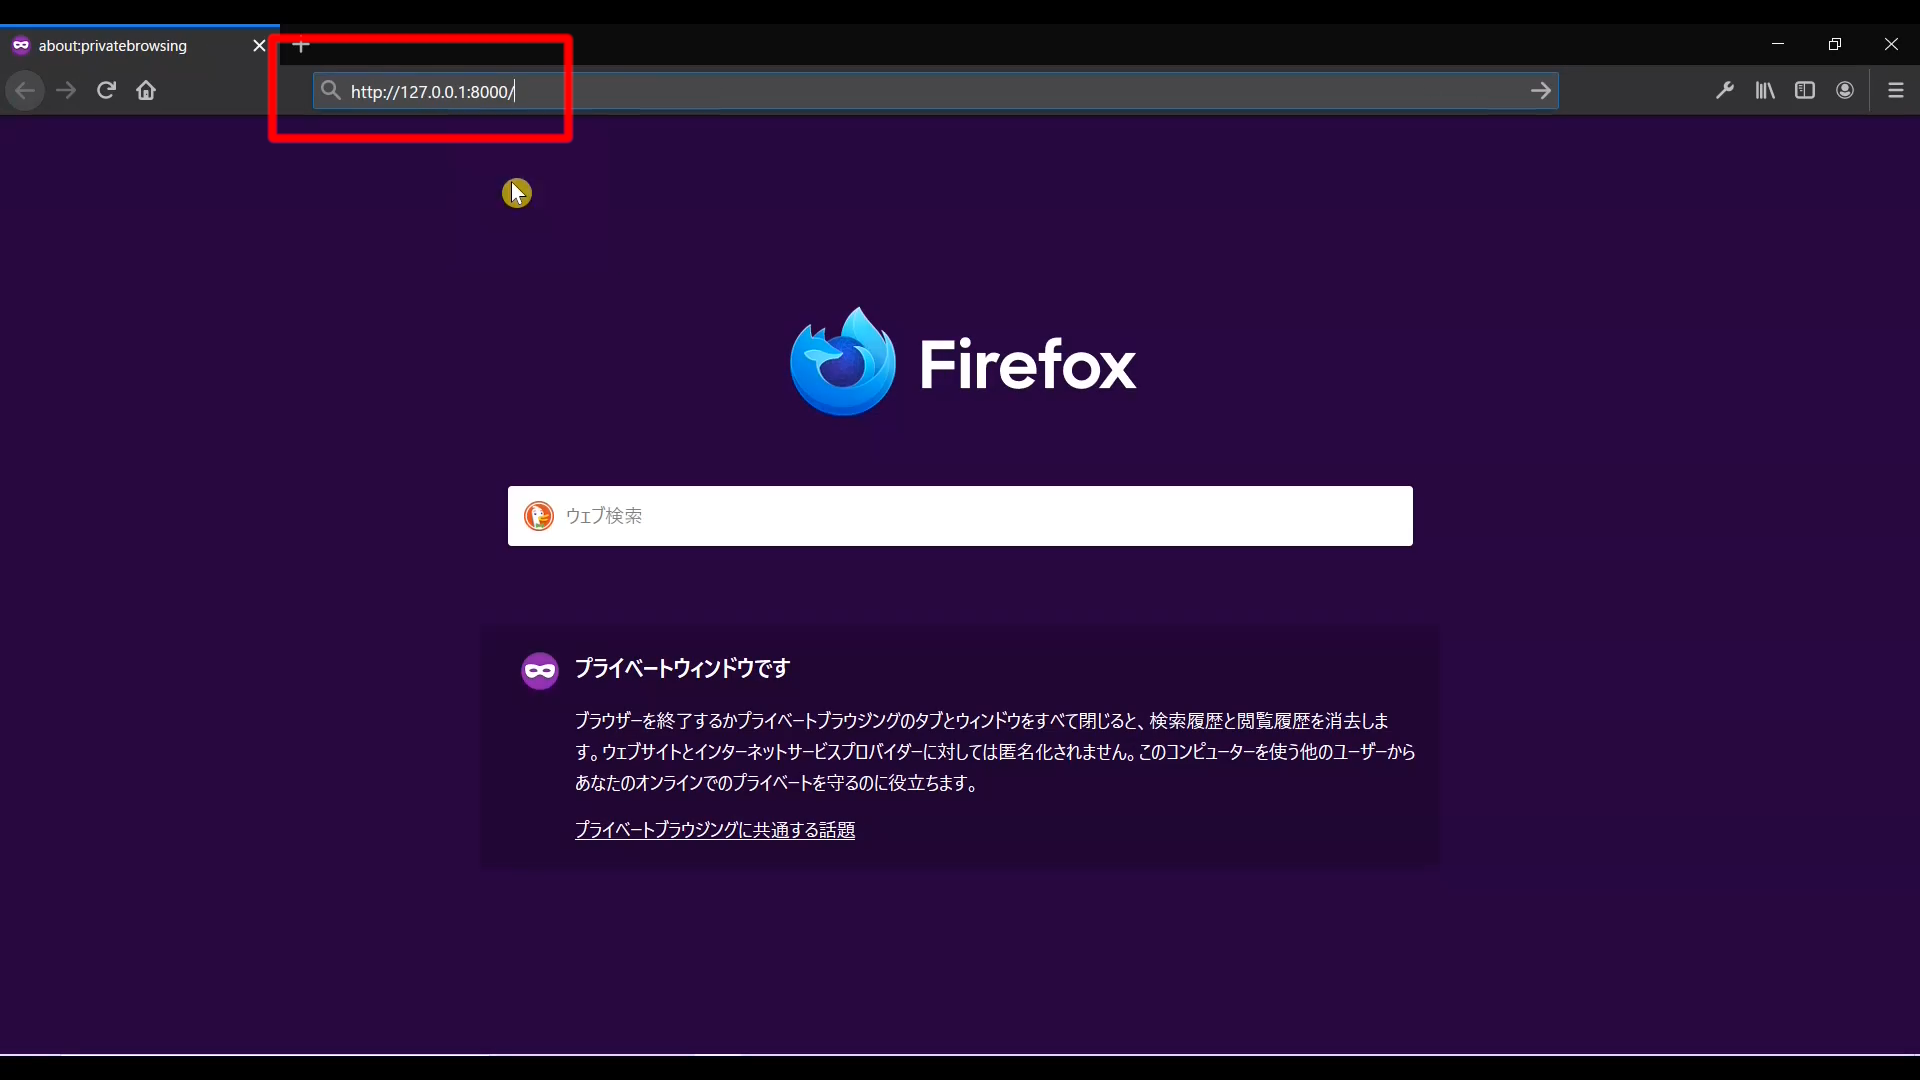
正常に動作していれば、以下の様な画面に切り替わるはずです。
If it works properly, you should see the following screen.

表示言語を変えてみる
Let's display Japanese
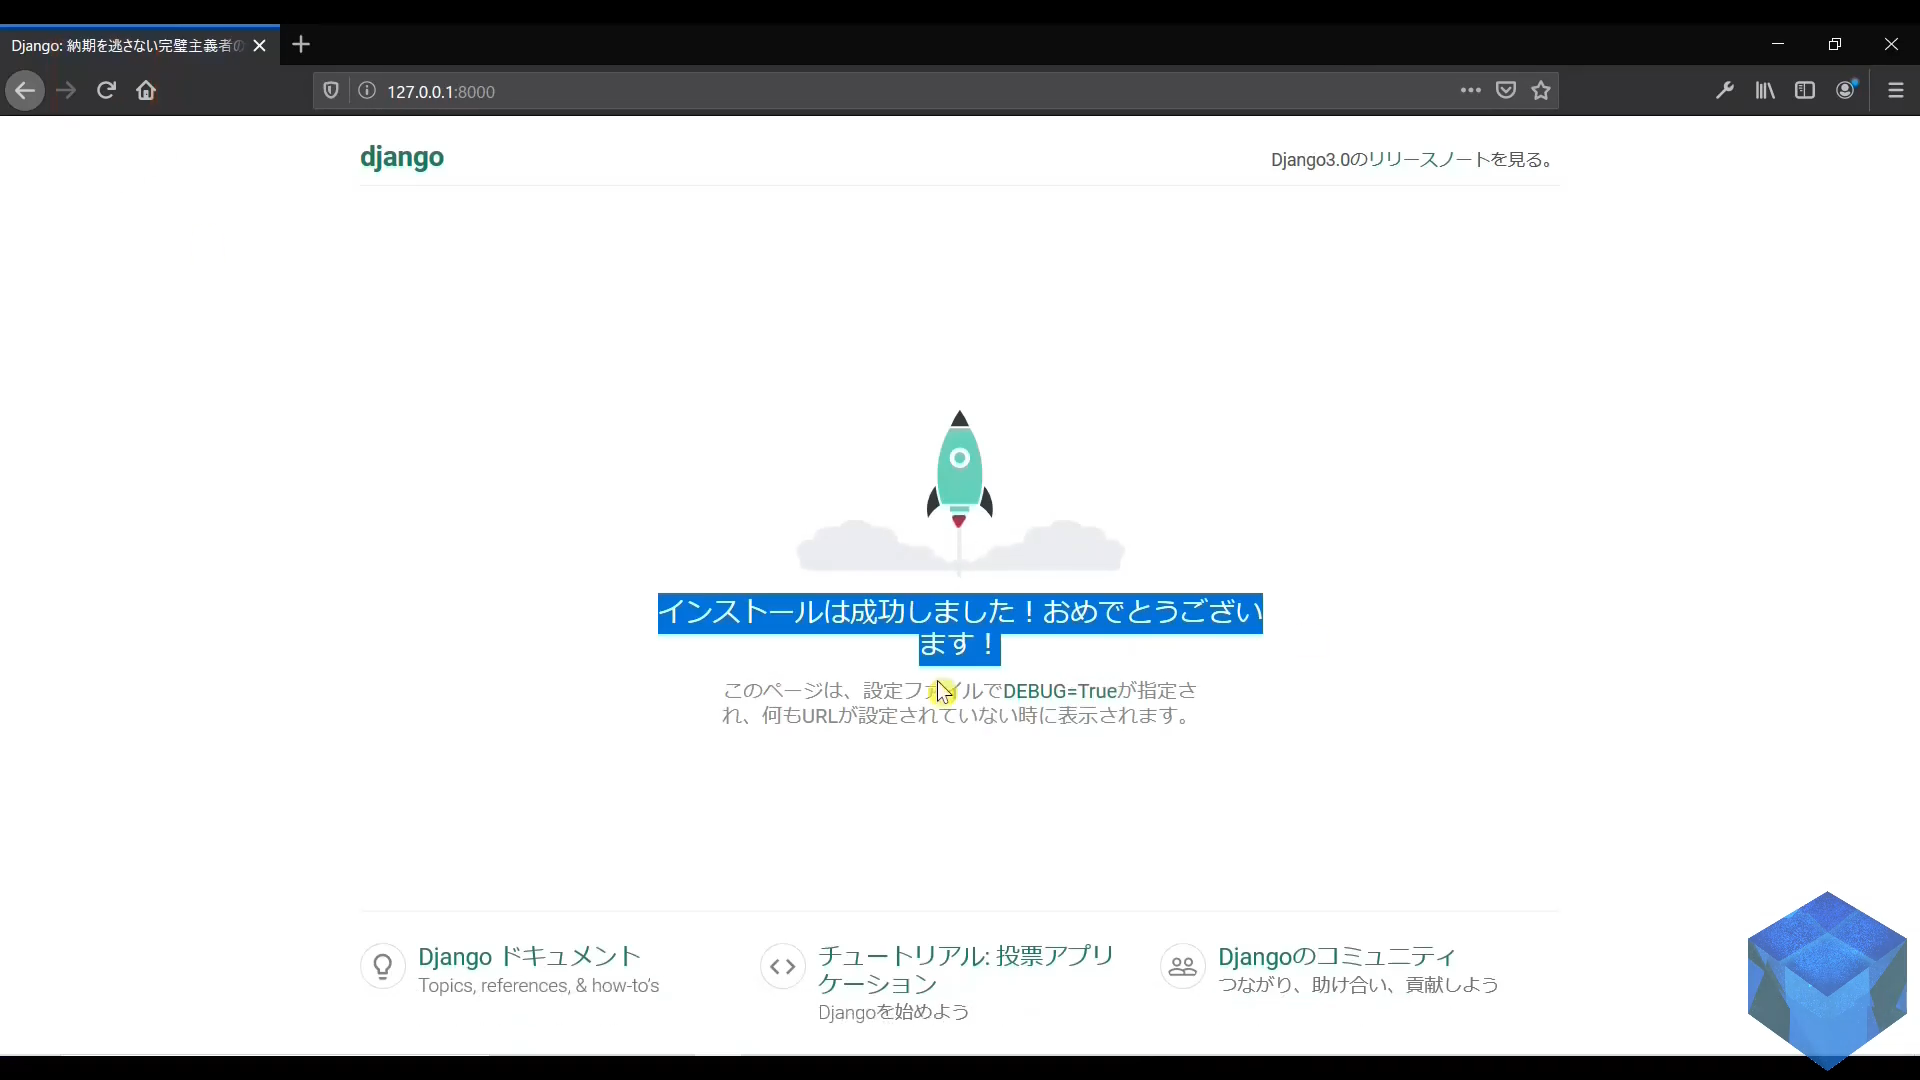
では日本語を表示させてみましょう。
Then, let's display Japanese.
プロジェクトフォルダにある「settings.py」の「LANGUAGE_CODE」と「TIME_ZONE」を変更します。
Change "LANGUAGE_CODE" and "TIME_ZONE" in "settings.py" in the project folder.
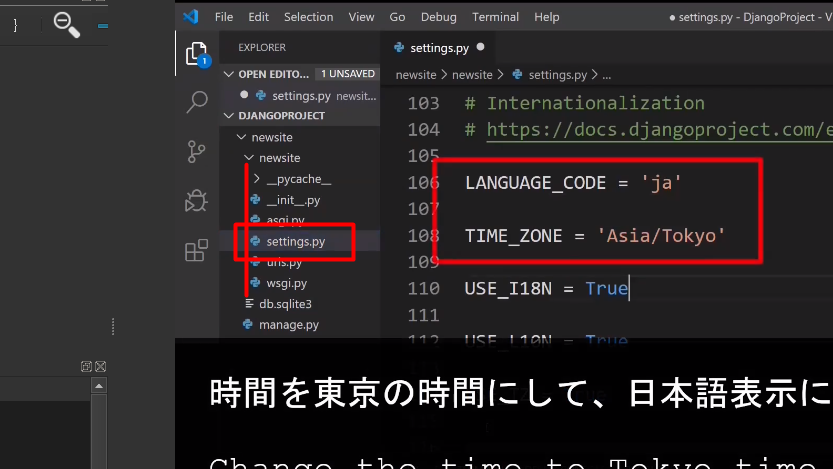
サーバーが起動中であれば、ブラウザの更新をすれば表示が日本語に切り替わります。
If the server is running, refresh your browser will change the display to japanese.
HTMLファイルでページを表示させる
Use an HTML file to display a page
それではブログを作成する下準備として、HTMLで書いた内容をDjangoのTemplatesを介してブラウザに表示させてみましょう。
So, as a preliminary setp to creating a blog, let's show the HTML content in a browser thorgh Django Templates.

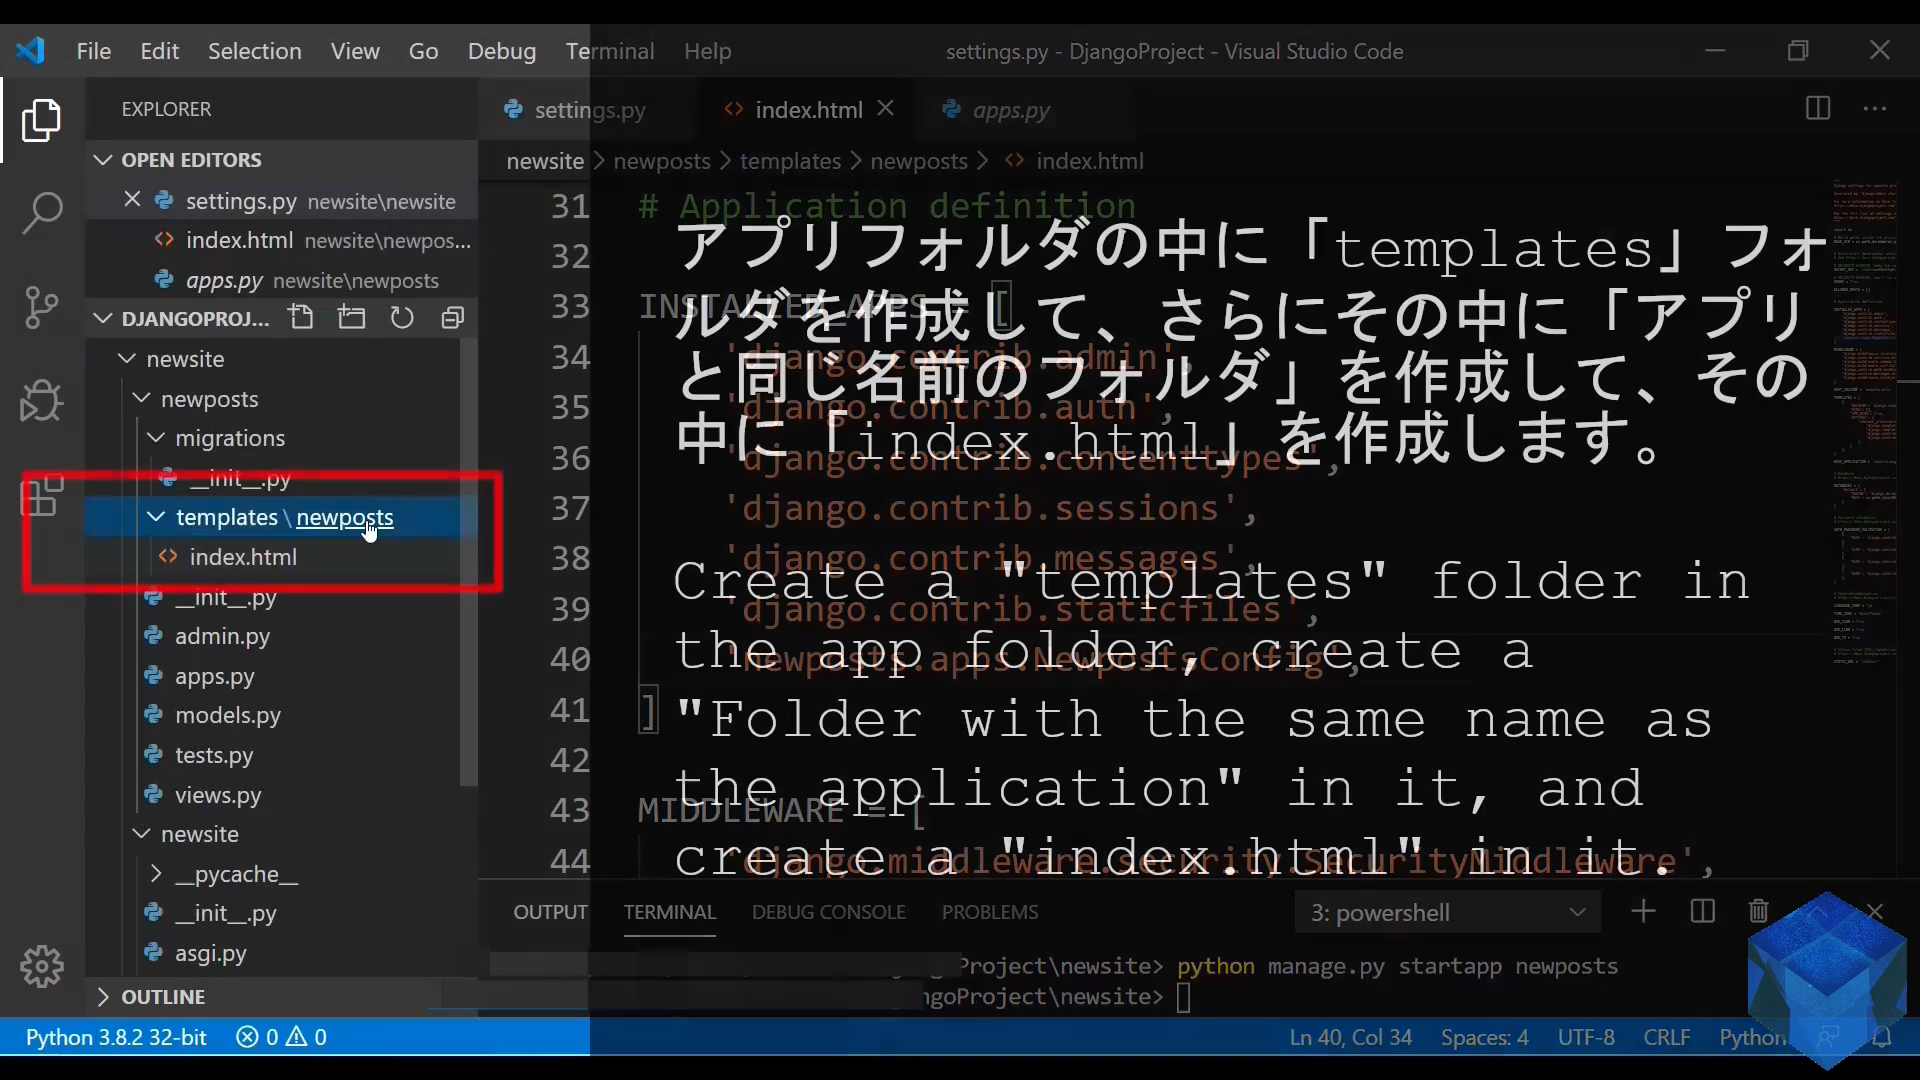
新しいアプリのフォルダが作成されたら、以下のようにしてください。
When the new apps folder is created, do the following.
※補足説明
※supplementary explanation
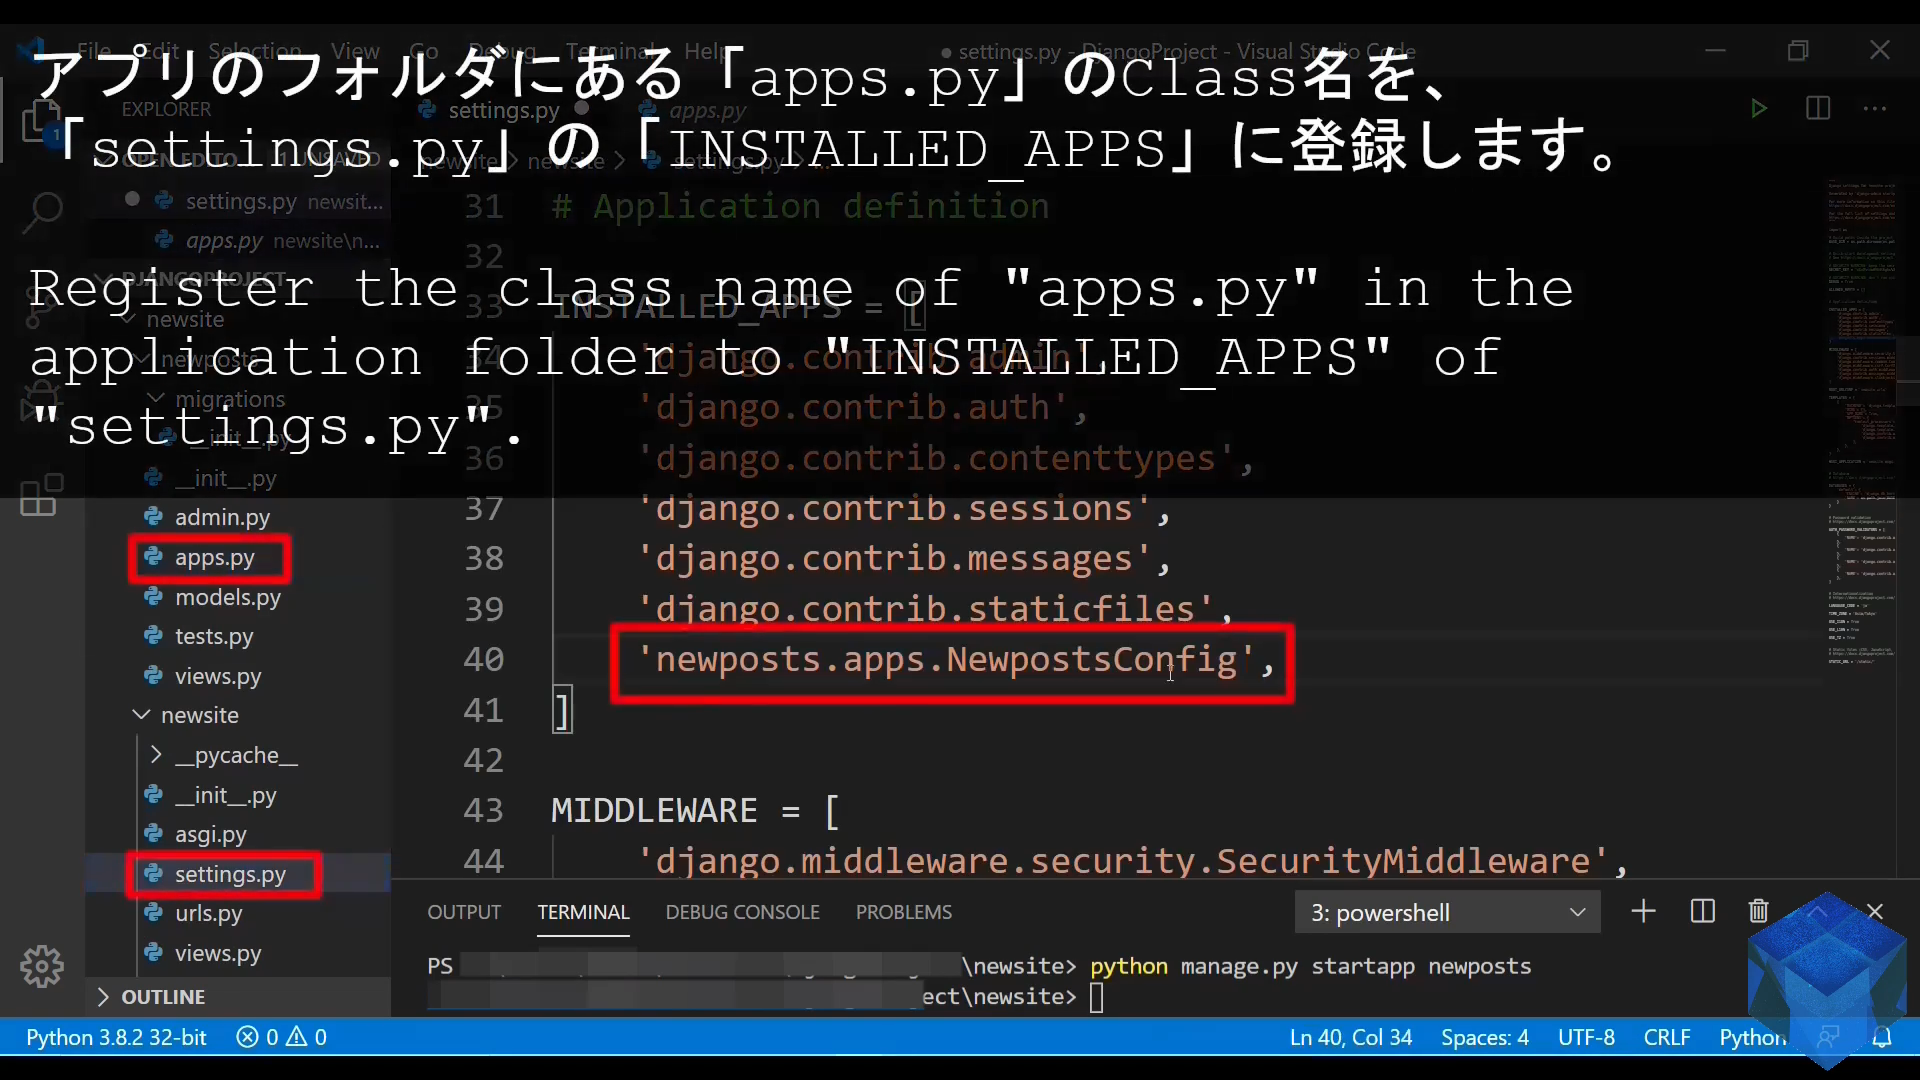
今回作成したアプリの名前は「newposts」そのフォルダの中に「apps.py」があるので、それを開くと以下のような内容になっているので、「クラス名」コピーする。
There is a file called [apps.py] in the folder of the created application. Open it and copy the class name in it.
from django.apps import AppConfig

class NewpostsConfig(AppConfig):
    name = 'newposts'
NewpostsConfig
そして以下の様に「index.html」を作成してね。
Next, create a [index.html] as follows.
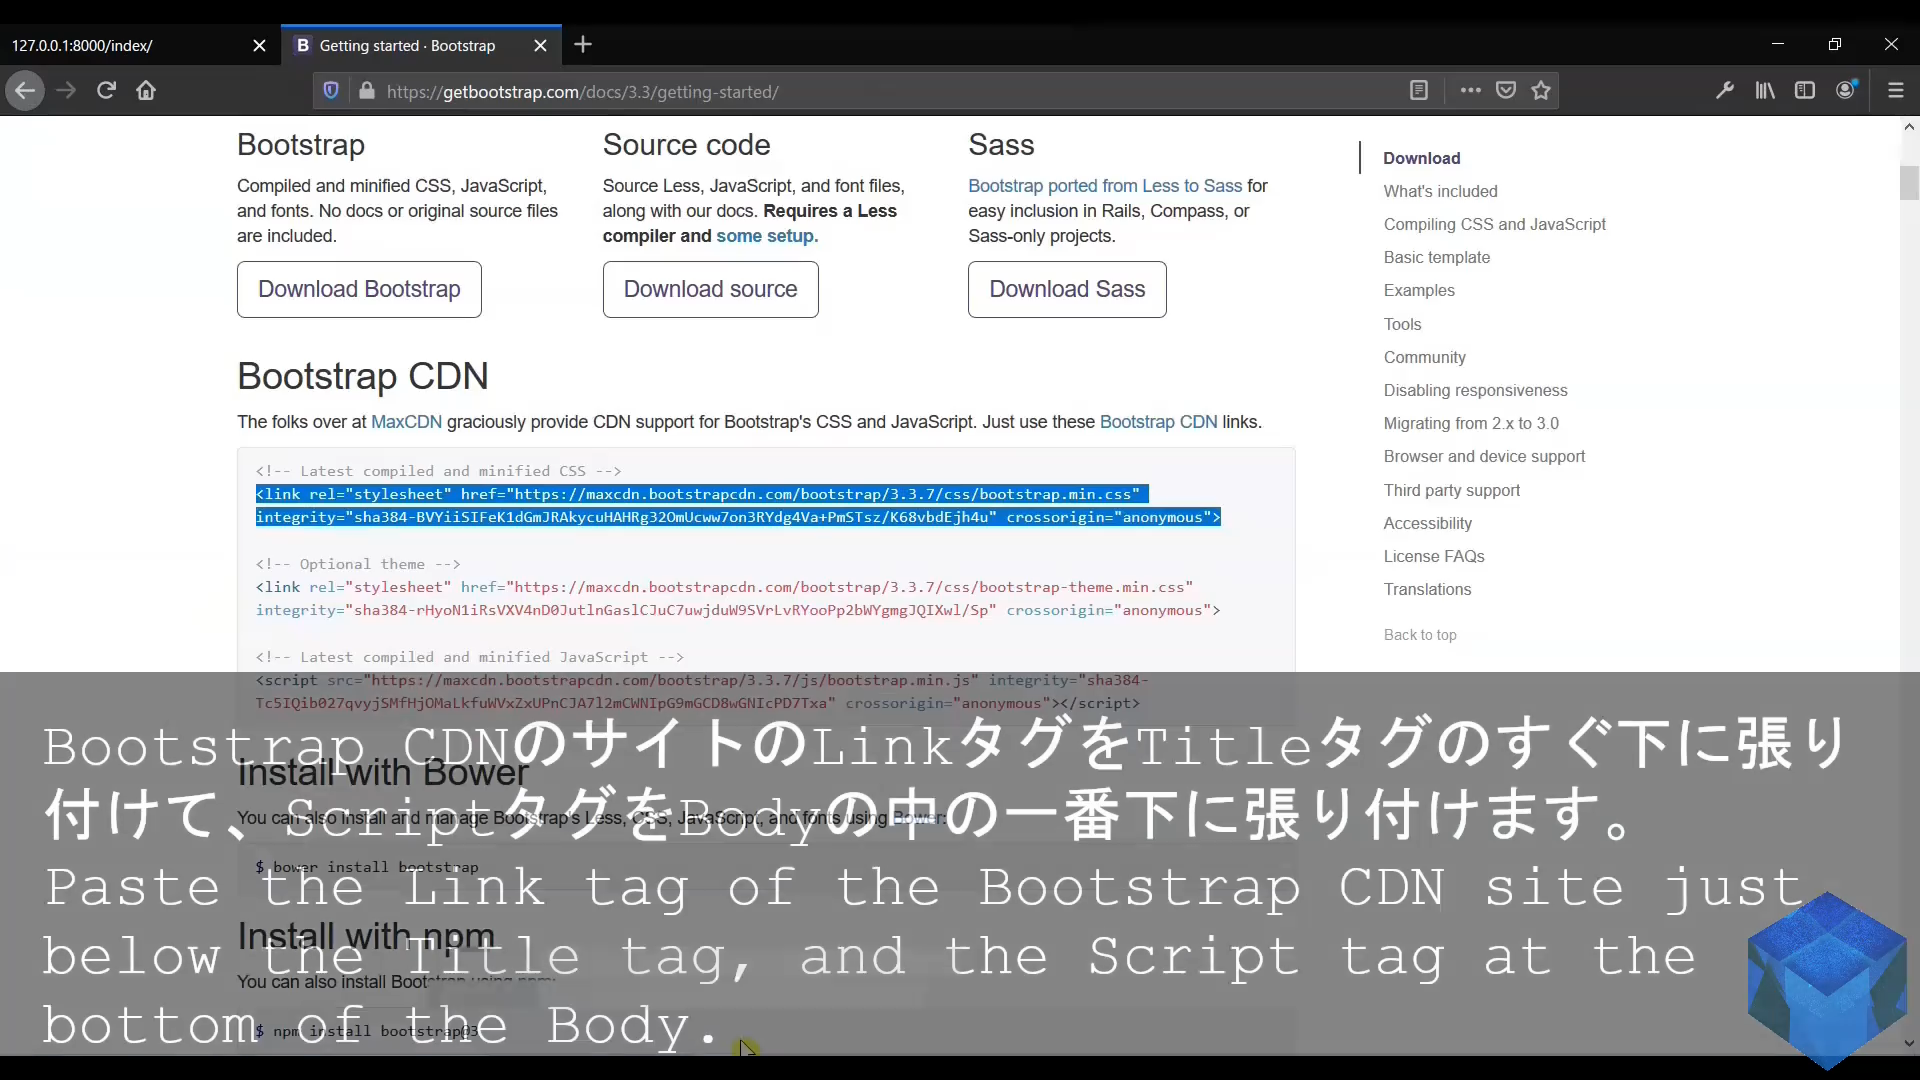
そして試しに以下のようなHTMLを書いて保存してください。
Try writing and save file the following HTML code.
<!DOCTYPE html>
<html lang="jp-ja">
<head>
  <meta charset="UTF-8">
  <meta name="viewport" content="width=device-width, initial-scale=1.0">
  <title>投稿の一覧:List of posts</title>
  <link href="https://stackpath.bootstrapcdn.com/bootstrap/4.4.1/css/bootstrap.min.css" rel="stylesheet" integrity="sha384-Vkoo8x4CGsO3+Hhxv8T/Q5PaXtkKtu6ug5TOeNV6gBiFeWPGFN9MuhOf23Q9Ifjh" crossorigin="anonymous">
</head>
<body>
  <div class="container text-center">
    <h2>投稿の一覧ページです<br>This is the post list page</h2>
  </div>
  <script src="https://stackpath.bootstrapcdn.com/bootstrap/4.4.1/js/bootstrap.min.js" integrity="sha384-wfSDF2E50Y2D1uUdj0O3uMBJnjuUD4Ih7YwaYd1iqfktj0Uod8GCExl3Og8ifwB6" crossorigin="anonymous"></script>
</body>
</html>
そして以下のスクリプトをアプリフォルダの「views.py」に書いて保存します。
Write the following script in the [views.py] of the apps folder and save it.

from django.shortcuts import render

def index(request):
    return render(request, "newposts/index.html")
そして今度は「urls.py」をアプリフォルダに作ります。
Now create a [urls.py] in the apps folder.
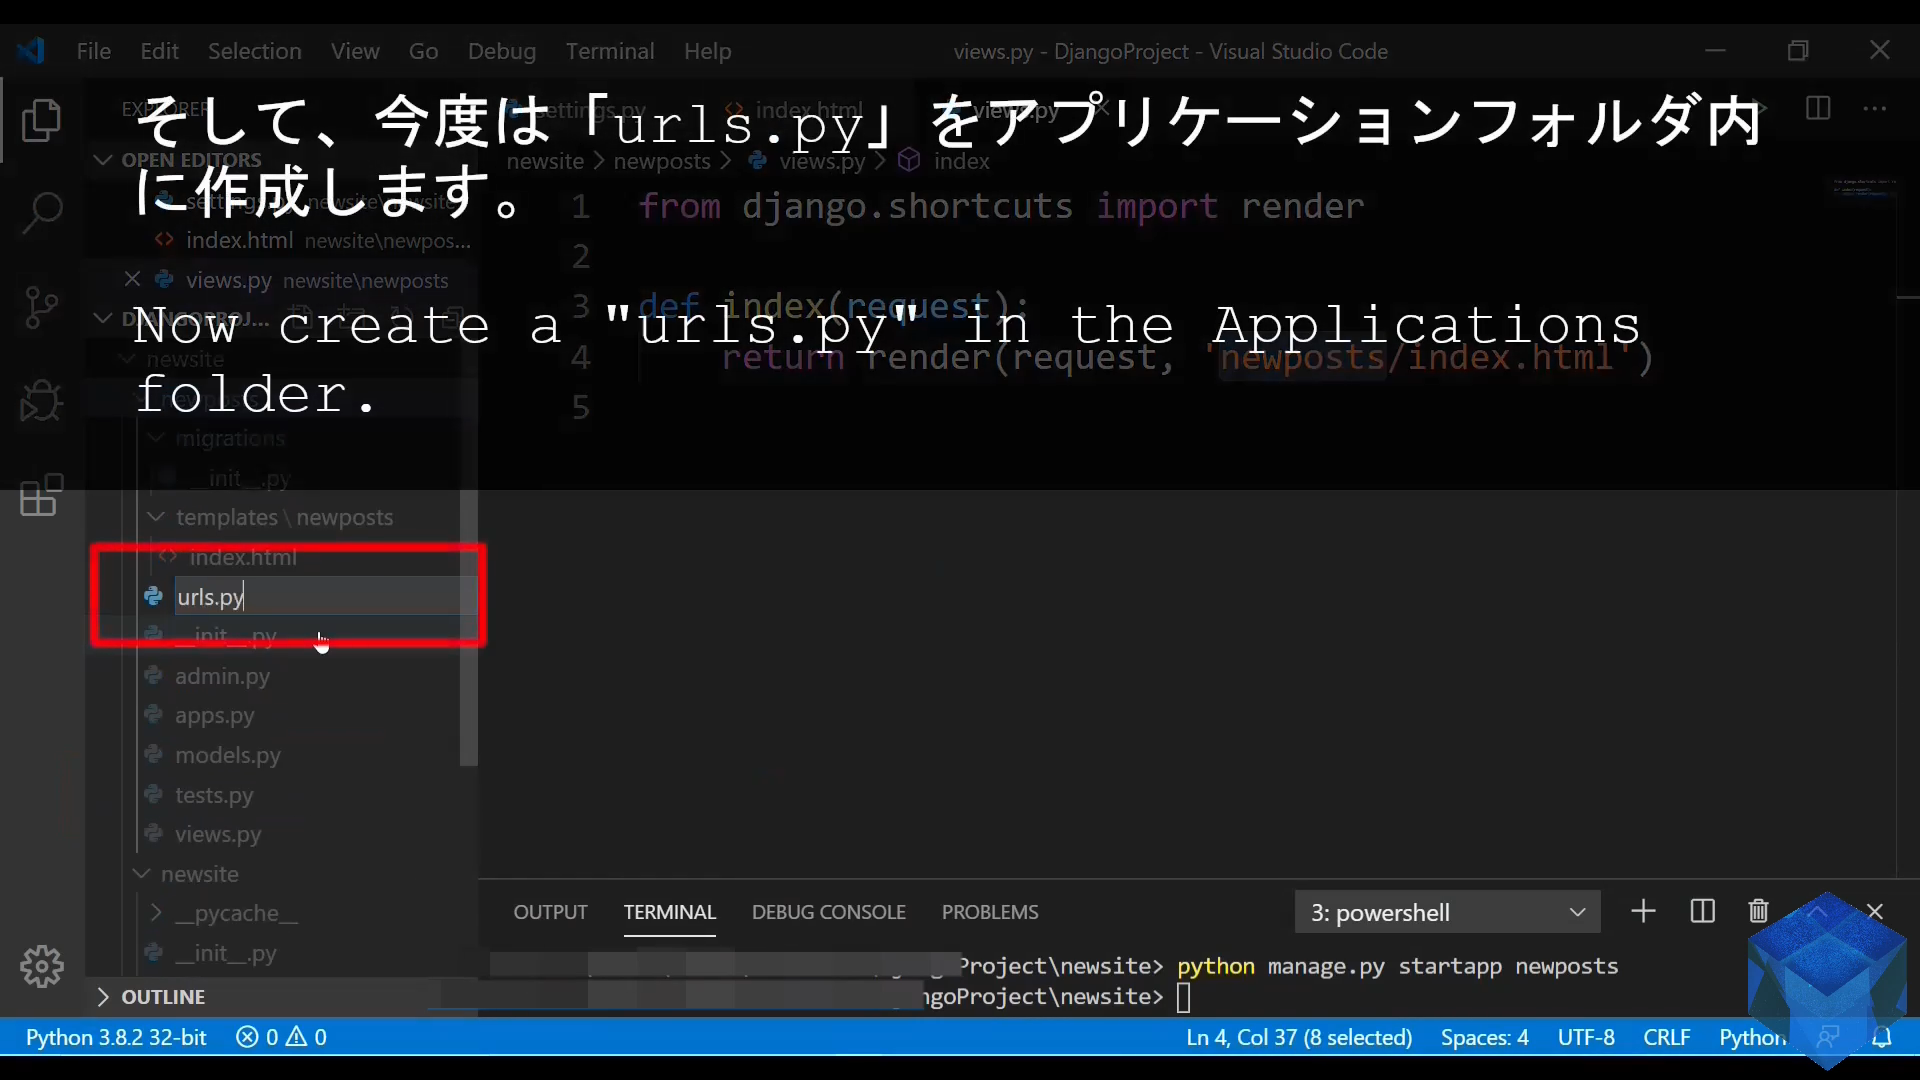
そして以下のスクリプトをアプリフォルダの「urls.py」に書いて保存します。
Write the following script in the [urls.py] of the apps folder and save it.
from django.urls import path
from . import views

urlpatterns = [
    path('', views.index, name="index")
]
今度は「プロジェクトのurls.py」にアクセスさせた後、「includeメソッド」を使用して、「アプリケーションのurls.py」へアクセスさせるようにします。
Now let's go to "urls.py in the project" and use "include method" to get to "urls.py in the application".
Django project (newsite)
    # application folder
    newposts

->  newsite
      __init__.py
      asgi.py
      settings.py
->    urls.py
      views.py
      wsgi.py
    db.sqlite3
    manage.py
from django.contrib import admin
from django.urls import path, include

urlpatterns = [
    path('admin/', admin.site.urls),
    path('newposts/',include('newposts.urls')),
]
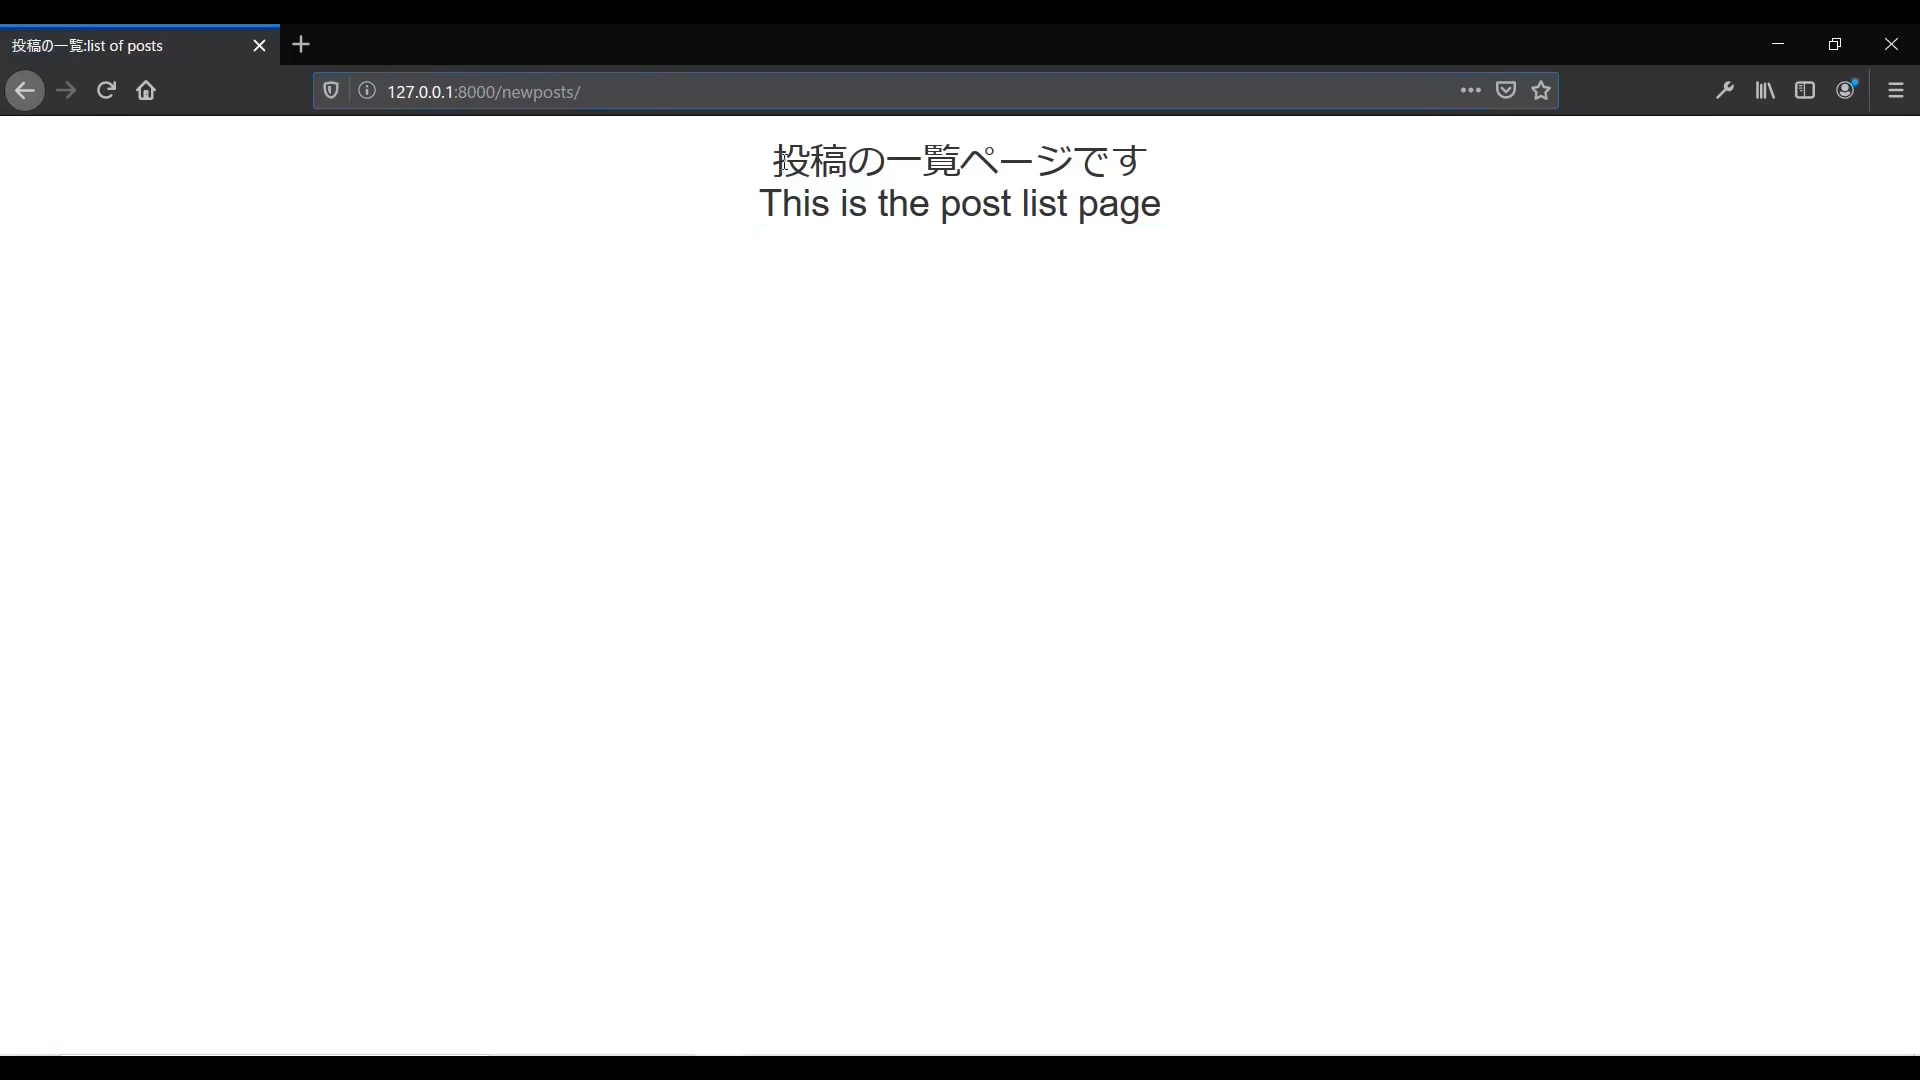
ファイルの変更を保存して、ブラウザに入力する検索URLの末尾を「newposts/」にして実行します。 成功すれば以下のような画面に切り替わるはずです。
Save the file changes and run the search URL you enter in the browser with [newposts/] at the end. If successful, you should see a screen similar to the one bellow.
この記事のさらに詳しい説明及び、CORESERVERでブログをアップする方法は初期のブログ記事を参考にしてください。
For more information on how to upload your blog to CORESERVER and more on the content of this article, see my previous blog posts.
https://akasatanahama.com/posts/1/
https://akasatanahama.com/posts/2/
https://akasatanahama.com/posts/3/
https://akasatanahama.com/posts/4/