Published Date : 2020年3月3日14:04
【Processing】Part 8 - 単純なギターフレットボードのアプリを作ろう
【Processing】Part 8 - Create a simple guitar fretboard app
This blog has an English translation
YouTubeにアップした動画、「【Processing】Part 8 - Create a simple guitar fretboard app : 単純なギターフレットボードのアプリを作ろう」の補足説明の記事です。
Here's a little more about the "【Processing】Part 8 - Create a simple guitar fretboard app : 単純なギターフレットボードのアプリを作ろう" video I uploaded to YouTube.
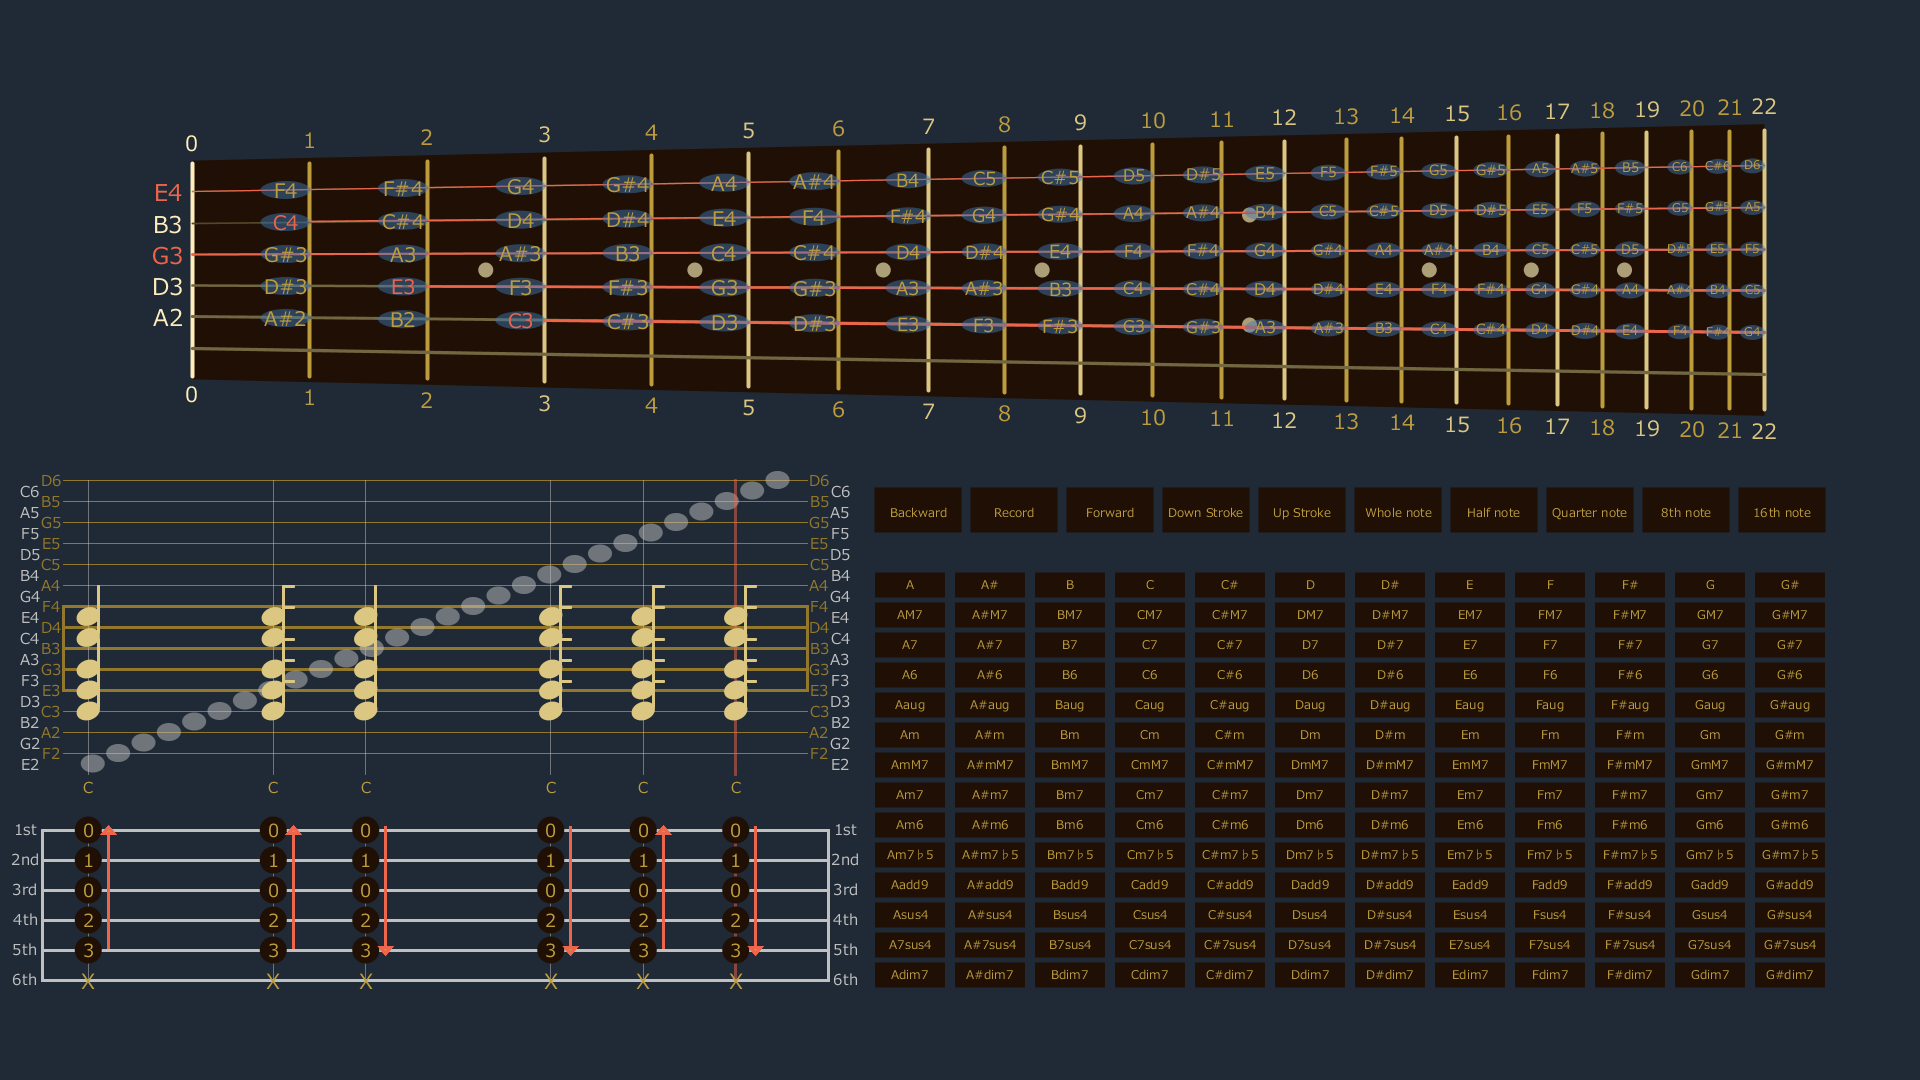
まずは上の動画の趣旨を軽く説明します。 Processingを使用してギターのフレットボードから簡単なTAB譜を描画するアプリケーションを作成します。 このアプリケーションの利点は、ギターの弦と音階の関係をギターフレットボードから直接理解でき、1つずつ画像ファイルとして保存できることです。
First, let me briefly explain the purpose of the video above. Create an application to draw a simple TAB notation from a guitar fretboard with Processing. The advantage of this application is that you can understand the relationship between guitar strings and musical scales directly from the guitar fretboard and save them one by one as image files.
今回はおまけとして、Part6のアプリにPart7で実験した音を出す機能を加えていきます。 ギターの音はSunvoxというロシア製のフリーのDTMソフトを使用しています。 このソフトの簡単な説明は前回のブログまたは動画で確認してください。
This time, as a bonus, we're going to add the ability to make the sounds we tested in Part 7 to the app in Part 6. I use a free Russian DTM software called Sunvox for the guitar sound. Please check the previous blog or video for a brief explanation of this software.
全体の説明は動画に任せるとして、補足が必要だろうと思われる部分を説明していきMASU。
I'll leave the entire explanation to the video, but I'll explain the parts that I think need to be supplemented.
過去に似たアプリをP5.jsとPythonを使ってブラウザに表示させるものを作ったのでこちらの記事も参考にしてみてくだちぃ。
I've created a similar app in the past that uses P5.js and Python to display in the browser, so check out this post.
目次
Table of Contents
今回のコードの追加部分 Additional parts of this code |
このアプリとSunvoxを併用する Using Sunvox and this app together |
ページの最後へ Go to the end of the page. |
今回のコードの追加部分
Additional parts of this code
ではサクッと今回の追加部分の説明をしていきます。
Now, I will briefly explain this time additional part.
まずフォルダの構成です。 前回の音楽フォルダを移動するだけです。
Let's start with the folder structure. All you have to do is move the previously created music data folder.
app folder
+-> data
      - xx.wav
    images
      - xxx.png
    fretBoard.pde
    GStringsGNotes.pde
    guitarCCButtons.pde
    NotesFretNums.pde
    operationButtons.pde
    staffTAB.pde
    main.pde
後は前回のテストコードをmain.pdeに加えていくだけです。
All that's left is to add the previous test code to main.pde.
ProcessingのSoundライブラリをインポートする。
Import the Processing Sound library.
import processing.sound.*;
前回用意した変数を定義していく。
Define the variables you prepared last time.
メインファイル内で重複している変数は削除する。
Delete duplicate variables in the main file.
String[] twtoneChromaticScale = {"e", "f", "fs", "g", "gs", "a", "as", "b", "c", "cs", "d", "ds"};

SoundFile[] sfiles;

float[] durationsRatio;
float currentDuration;
次はsetup関数内にコードを加えていきます。
Next, we add the code in the setup function.
このコードの説明は前回の動画やブログを参照してください。
See the previous video or blog for an explanation of this code.
setup function
void setup(){
  ~~~~~~~~~~~~~~~~~~~~~~~~~~~~~~~~~~~~~~~~~~~~
  //前回の変数の初期化と設定を加える
  //Initialize and set previous variables

  currentDuration = 0;
  sfiles = new SoundFile[47];
  durationsRatio = new float[noteDurations.size()];

  for (int i = 1; i < 5; i++) {
    int offset = 12;
    for (int j = 0; j < twtoneChromaticScale.length; j++) {
      if (i == 1) {
        offset = i * j;
      } else {
        offset = 12 * (i-1) + j;
      }
      if (j <= 7) {
        sfiles[offset] = new SoundFile(this, twtoneChromaticScale[j] + i + ".wav");
      } else {
        if (i==4 && j==11) {
          break;
        } else {
          sfiles[offset] = new SoundFile(this, twtoneChromaticScale[j] + str(i+1) + ".wav");
        }
      }
    }
  }

  for (int k = 0; k < noteDurations.size(); k++) {
    durationsRatio[k] = sfiles[0].duration() * (pow(2, k)-1)/pow(2, k);
  }
  ~~~~~~~~~~~~~~~~~~~~~~~~~~~~~~~~~~~~~~~~~~~~~~~~~~~~~~~~~~~~~~~~~~~~~~~~~~~~~
そして新たにGuitarSound関数をMainファイル内で作り、音を鳴らしていきます。
You then create a new GuitarSound function in the Main file to play the sound.
ここでDraw関数内でGStringsGNotesクラスのオブジェクトと音を鳴らす関数を連動させると音がなり続けたりする不具合に遭遇します。
But, you may encounter a bug if in which an object of the GStringsGNotes class and a sound generating function are linked in the Draw function, and the sound continues to be generated.
また、MousePressed関数やKeyPressed関数内でそのままオブジェクトと連動させると動作が一つ遅れてしまうといった不具合が発生してしまいます。
Also, if you use it in the MousePressed function or KeyPressed function in conjunction with an object, the operation will be delayed by one.
そこで苦肉の策として、ボタンとKey操作によって、一旦音を出す機能をTrueかFalseにしてから、オブジェクトと連動させることにしました。
Therefore, the solution is to use buttons and Key operations to change the sound function to True or False, and then use it in conjunction with the guitar note object.
  cp5.addToggle("toggleSound")
    .setPosition(525, 50)
    .setSize(63,30)
    .setValue(false)
    .setColorBackground(#1F0F04)
    .setColorActive(#3E7AB9)
    .setColorCaptionLabel(#BC9C3D)
    .setCaptionLabel("toggle:sound")
    .setMode(ControlP5.SWITCH);
トグルスイッチを作り、準備ができたら、グローバル変数の用意とトグルスイッチで定義したtoggleSound関数を作ります。 cp5の基本的な使い方は前回のブログを参考にしてくだちぃ。
Create a toggle switch, and when you're ready, create a global variable and a toggleSound function defined by the toggle switch. Please refer to my previous blog for the basic use of cp5.
boolean checkSound = false;
void toggleSound(boolean theFlag){
  if(theFlag==true) {
    checkSound = true;
  } else {
    checkSound = false;
  }
}
それではGuitarSound関数を作成しましょう。
Now, let's create the GuitarSound function.
guitarSound関数はsnapShot関数をコピーして改良します。
The guitarSound function copies and improves on the snapShot function.
guitarSound function
void guitarSound(){
  float x = widthSpacing/2 - 10;
  float ey = heightSpacing/2 + 265;
  float ty = heightSpacing/2 + 295;
  float r = 30;
  pushStyle();
  noStroke();
  textAlign(CENTER,CENTER);
  fill(#C0C0C0);
マウスでボタンを押すか、キーボードの「P」が押されると音が鳴るようにIf文の判定方法を変える。
To change a determination method of an If sentence so as to make a sound when a button is pressed with a mouse or a 'P' of a keyboard is pressed.
  if (((mousePressed) && (x+r/2 > mouseX)&&(ey-r/2 < mouseY)&&(x-r/2 < mouseX)&&(ey+r/2 > mouseY))  || (keyPressed && (key=='p' || key=='P'))) {
    fill(#ED654A);
    r = 36;
checkSoundがTrueになっていると、For文とSwitchCase文を使い、音を鳴らせる処理をします。
If checkSound is True, the For and SwitchCase statements are used to make sounds.
    if (checkSound) {
      for (int i = 0; i < sixStrings; i++) {
        for (int k = 0; k < sns[i].theObjNotesArray.length; k++) {
sns[i].fretClicked[k]のiは、どのギターの弦かを表し、kはどのフレットかを表しています。
"i" in "sns[i].fretClicked[k]" corresponds to the guitar string number and "k" corresponds to the fret number.
if (sns[i].fretClicked[k] && !(sns[i].checkMute)) {
それぞれの弦の開放弦に対応するノート番号をオフセットに設定します。 そして、cueメソッドに現在の音の長さを引数として入れて、再生ヘッドの位置を変えます。 最後にplayメソッドで音を再生させた後、break文でSwitch文を脱出して、次のiの処理を続けます。
Sets the note number corresponding to the open chord of each chord to the offset. It then changes the position of the playhead by passing the current sound length as an argument to the cue method. Finally, after playing the sound with the play method, use the break statement to escape the Switch statement and proceed to the next i.
            switch(i){
              case 0:
                sfiles[24 + k].cue(currentDuration);
                sfiles[24 + k].play(1.0, 1.0);
                break;
              case 1:
                sfiles[19 + k].cue(currentDuration);
                sfiles[19 + k].play(1.0, 1.0);
                break;
              case 2:
                sfiles[15 + k].cue(currentDuration);
                sfiles[15 + k].play(1.0, 1.0);
                break;
              case 3:
                sfiles[10 + k].cue(currentDuration);
                sfiles[10 + k].play(1.0, 1.0);
                break;
              case 4:
                sfiles[5 + k].cue(currentDuration);
                sfiles[5 + k].play(1.0, 1.0);
                break;
              case 5:
                sfiles[k].cue(currentDuration);
                sfiles[k].play(1.0, 1.0);
                break;
            }

          }
        }
      }
    }

  }
  ellipse(x,ey,r,r);
  text("Sound",x,ty);
  popStyle();
}
仕上げに現在のcheckNoteDurationの値に合わせて、currentDurationに対応するサウンドの長さを代入します。
To finish, we assign the length of the sound corresponding to currentDuration to match the current checkNoteDuration value.
mousePressed関数内を少しだけ変更します。
Make minor changes in the mousePressed function.
mousePressed function
void mousePressed(){

  if ((obs.cOperationButtons[0][0] > mouseX)&&(obs.cOperationButtons[0][1] < mouseY)&&(obs.cOperationButtons[0][2] < mouseX)&&(obs.cOperationButtons[0][3] > mouseY)){

~~~~~~~~~~~~~~~~~~~~~~~~~~~~~~~~~~~~~~~~~~~~~~~~~~~~~~~~~~~~~~~~~~~~~~~~~~~~~~~~~~~~~~~~~~~~~~~~~~~~~~~~~~~~~~~~~~~~~~~~~~~~~~~~~~~~~~~~~~~~~~~~~~~~~~~~~~~~~~~~~~~~~~~~~~~~~~~

    if ((obs.cOperationButtons[5][0] > mouseX)&&(obs.cOperationButtons[5][1] < mouseY)&&(obs.cOperationButtons[5][2] < mouseX)&&(obs.cOperationButtons[5][3] > mouseY)){
          checkNoteDuration = 1;
          // add
          currentDuration = durationsRatio[0];
        }
    if ((obs.cOperationButtons[6][0] > mouseX)&&(obs.cOperationButtons[6][1] < mouseY)&&(obs.cOperationButtons[6][2] < mouseX)&&(obs.cOperationButtons[6][3] > mouseY)){
          checkNoteDuration = 2;
          // add
          currentDuration = durationsRatio[1];
        }
    if ((obs.cOperationButtons[7][0] > mouseX)&&(obs.cOperationButtons[7][1] < mouseY)&&(obs.cOperationButtons[7][2] < mouseX)&&(obs.cOperationButtons[7][3] > mouseY)){
          checkNoteDuration = 4;
          // add
          currentDuration = durationsRatio[2];
        }
    if ((obs.cOperationButtons[8][0] > mouseX)&&(obs.cOperationButtons[8][1] < mouseY)&&(obs.cOperationButtons[8][2] < mouseX)&&(obs.cOperationButtons[8][3] > mouseY)){
          checkNoteDuration = 8;
          // add
          currentDuration = durationsRatio[3];
        }
    if ((obs.cOperationButtons[9][0] > mouseX)&&(obs.cOperationButtons[9][1] < mouseY)&&(obs.cOperationButtons[9][2] < mouseX)&&(obs.cOperationButtons[9][3] > mouseY)){
          checkNoteDuration = 16;
          // add
          currentDuration = durationsRatio[4];
        }
Draw関数内にGuitarSound関数を加えることを忘れずに。
Remember to add the guitarSound function inside the Draw function.
draw function
void draw() {
  background(#1F2A36);
~~~~~~~~~~~~~~~~~~~~~~~~~~~~~~~~~~

  snapShot();

  // add
  guitarSound();
}
このアプリとSunvoxを併用する
Using Sunvox and this app together
最後にこのアプリとSunvoxを連携させて使用しましょう。
Finally, use Sunvox in conjunction with this app.
要はこのアプリは、「ギターの弦とフレットの対応関係は知っているが、タブ譜や五線譜が直感的に理解できない人達」がDTMソフトでの曲作りや実際の演奏に役立てるようにするために思いついたものです。
In other words, the reason I created this app is to help "People who know the correspondence between guitar strings and frets but cannot intuitively understand tab notation or staff notation." create songs and perform them in DTM software.
それではまず適当にコード進行やスケールやビートをこのアプリで編集してみます。
First of all, I will edit the guitar chord, scale and beat with this application.
アプリの操作方法の簡単な説明
Brief explanation of how to operate the application
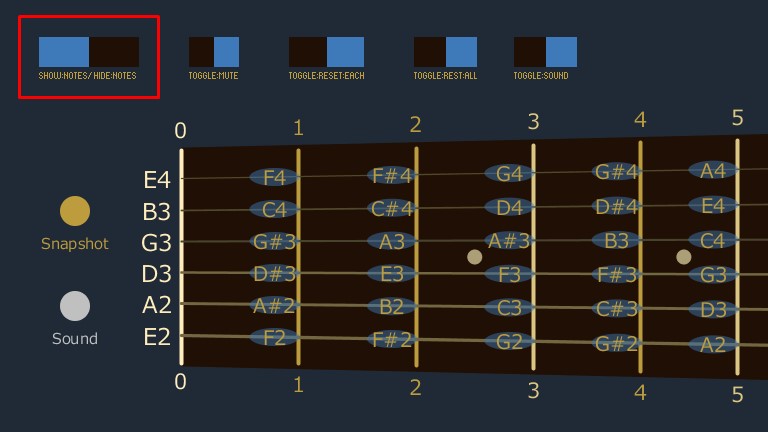
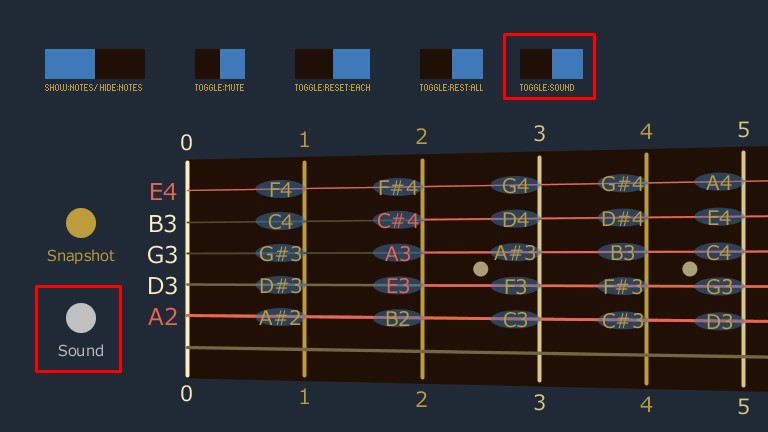
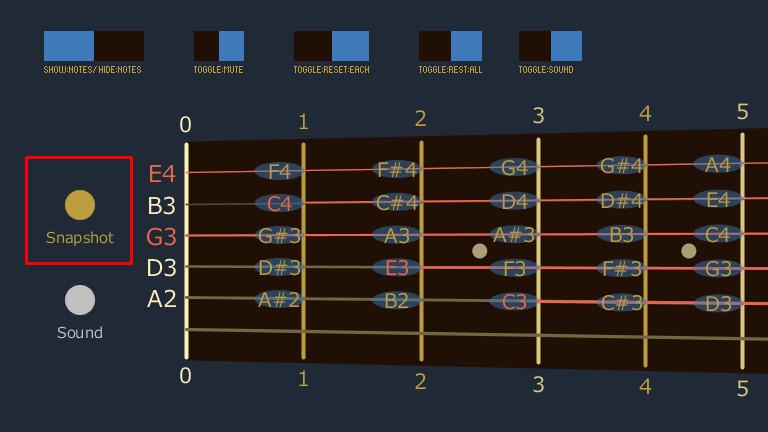
Notesの表示と表示のトグルスイッチ。最初は表示機能がON。
Toggle switch between viewing and viewing Notes. The display function is turned on at first.
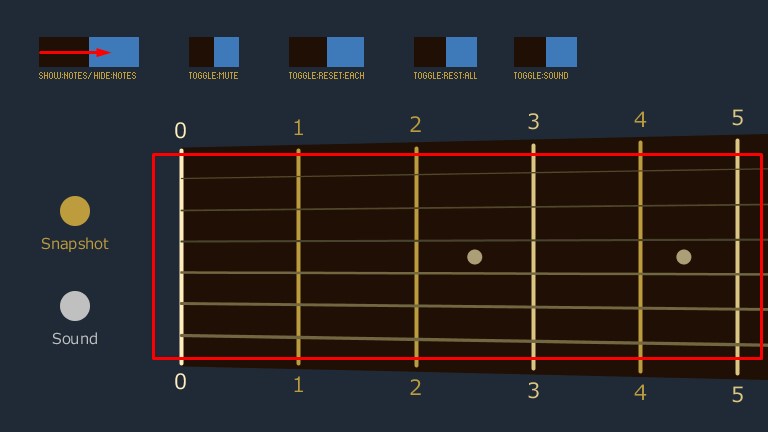
基本的には右に青い部分を切り替えるとFalseでOFF。
Basically, if you switch the blue part to the right, it will be false.
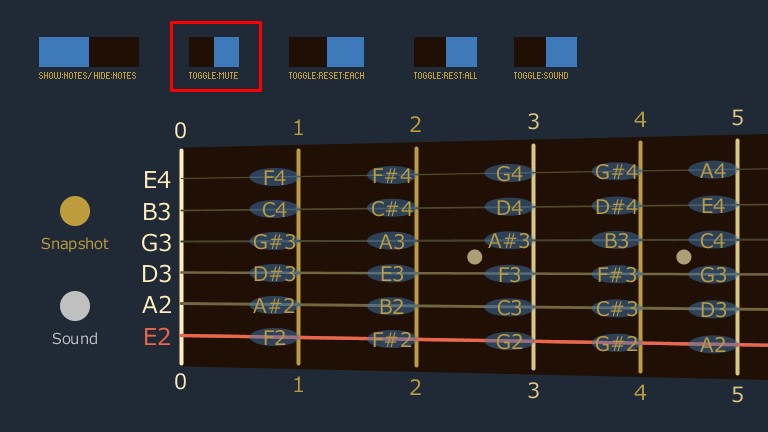
MuteスイッチはONにして開放弦のNotesをクリックするとミュートになる。
Turn on the Mute switch, then click on the open guitar string notes to mute it.
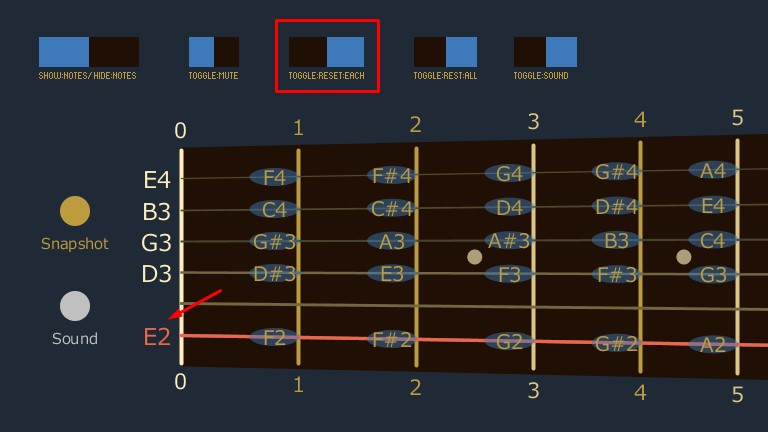
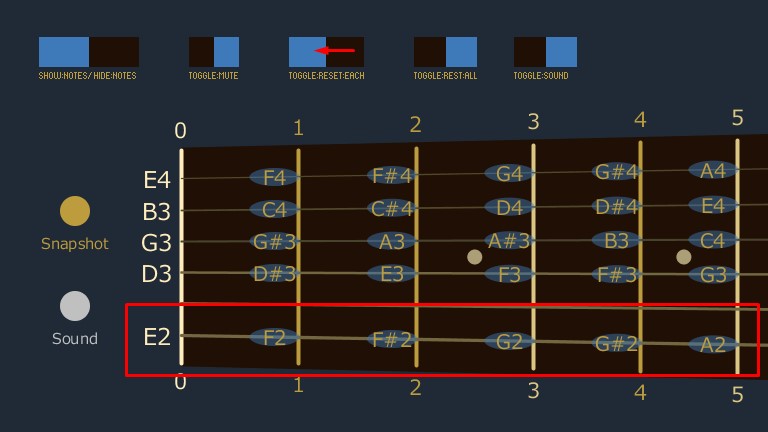
ResetEachは弦一本だけリセットする。これも上に同じくONにして開放弦のNotesをクリックする。
ResetEach restes just one guitar string. Turn this on as well, and click notes on the open guitar string.
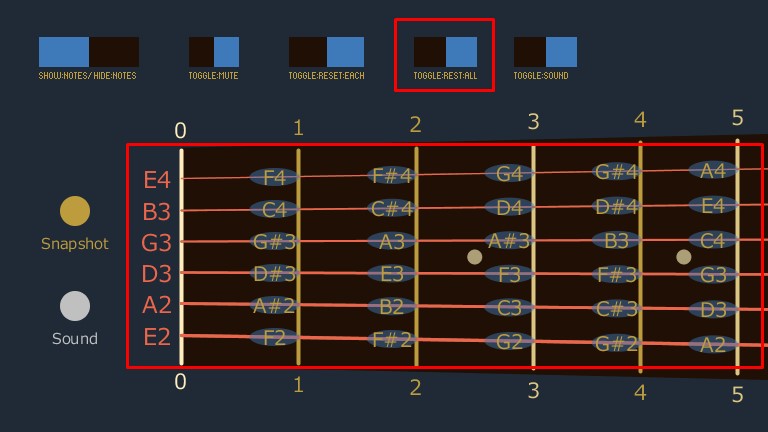
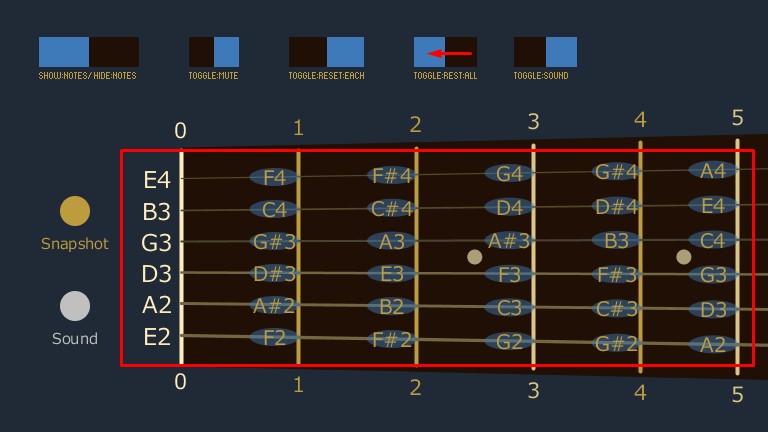
ResetAllはONにすると全てリセットされる。OFFにしないと編集できない。
ResetAll is reset when turned ON. It cannot be edited without turning OFF.
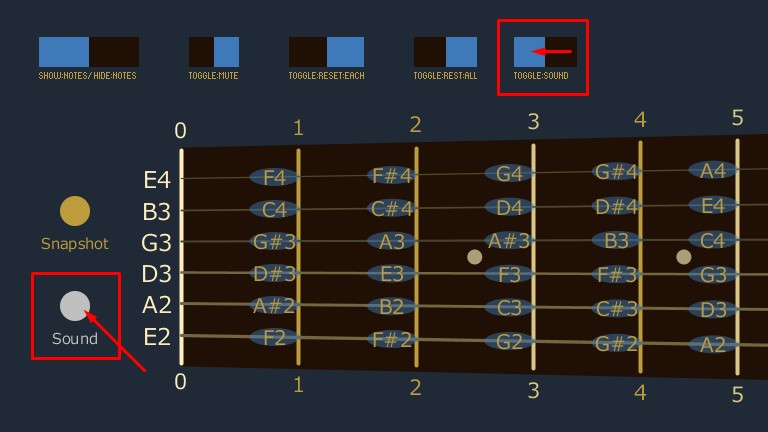
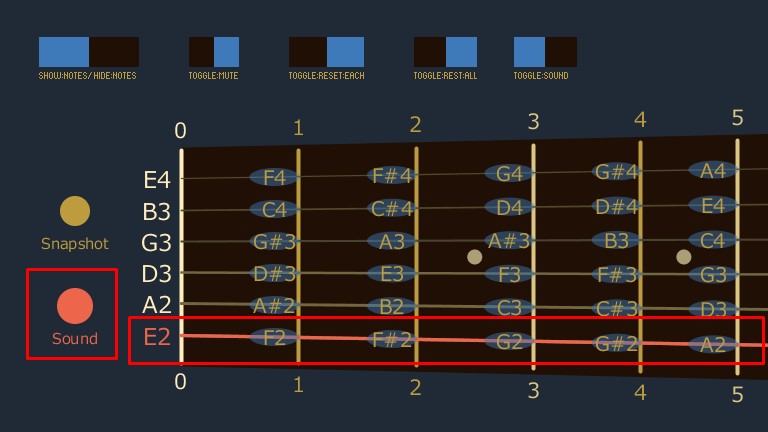
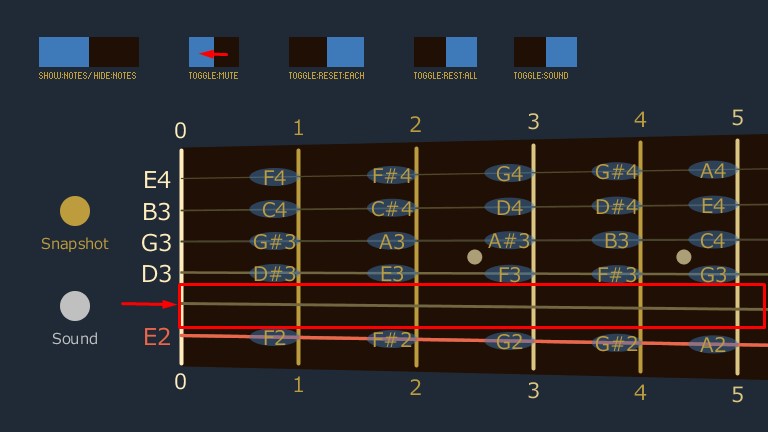
SoundスイッチをONにしてから、左のSoundボタンをクリックするか、キーボードの「P」を押すとアクティブな弦の音が鳴る。
Turn on the Sound switch, then click the left Sound button or press "p" on your keyboard to make the currently active guitar string play.
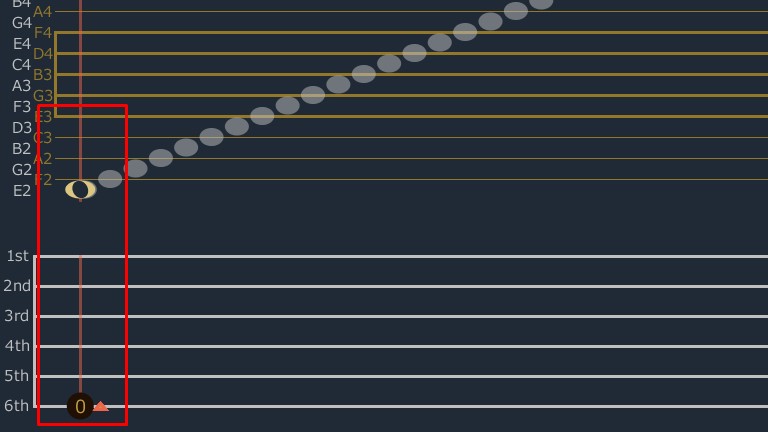
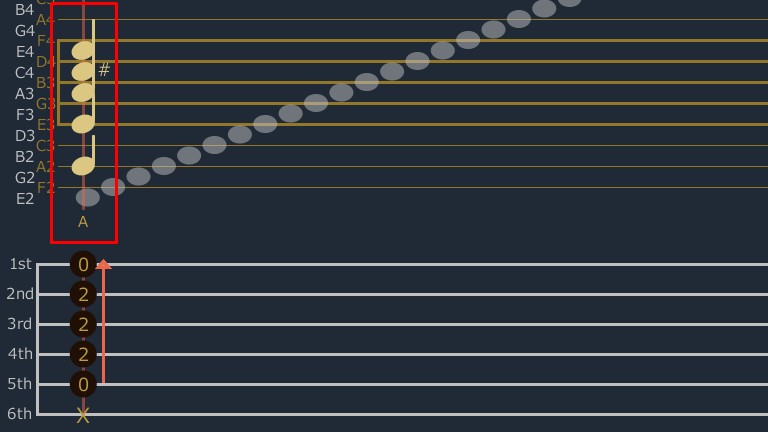
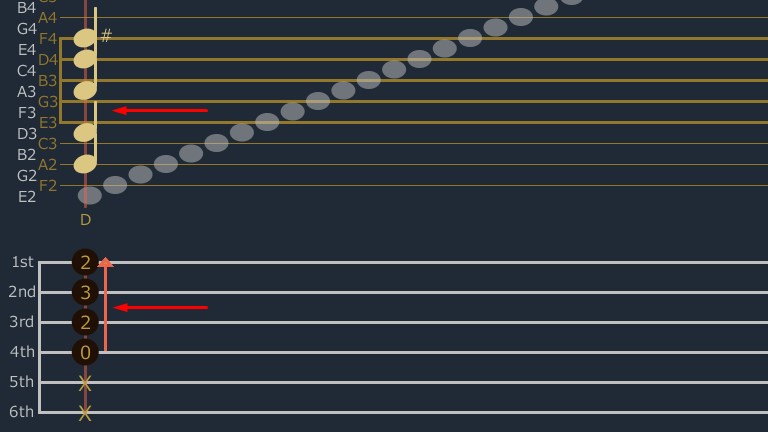
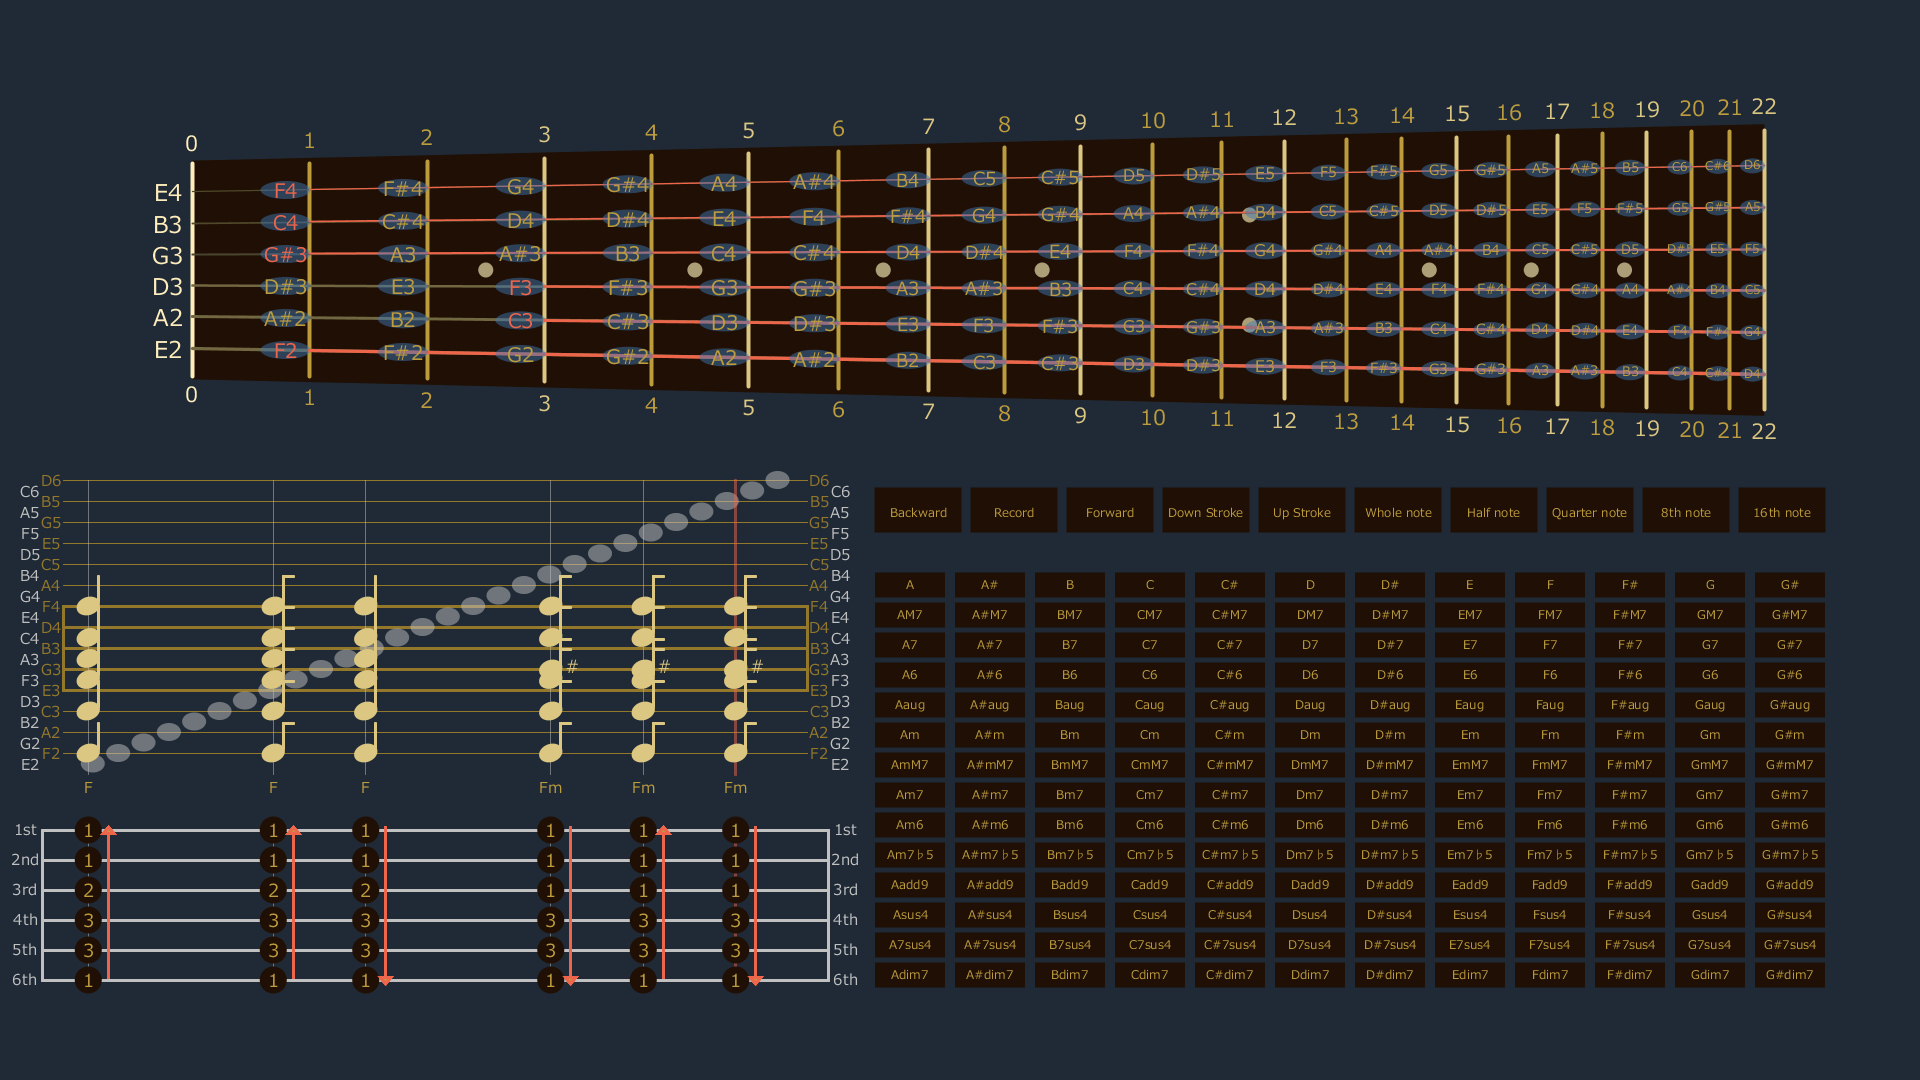
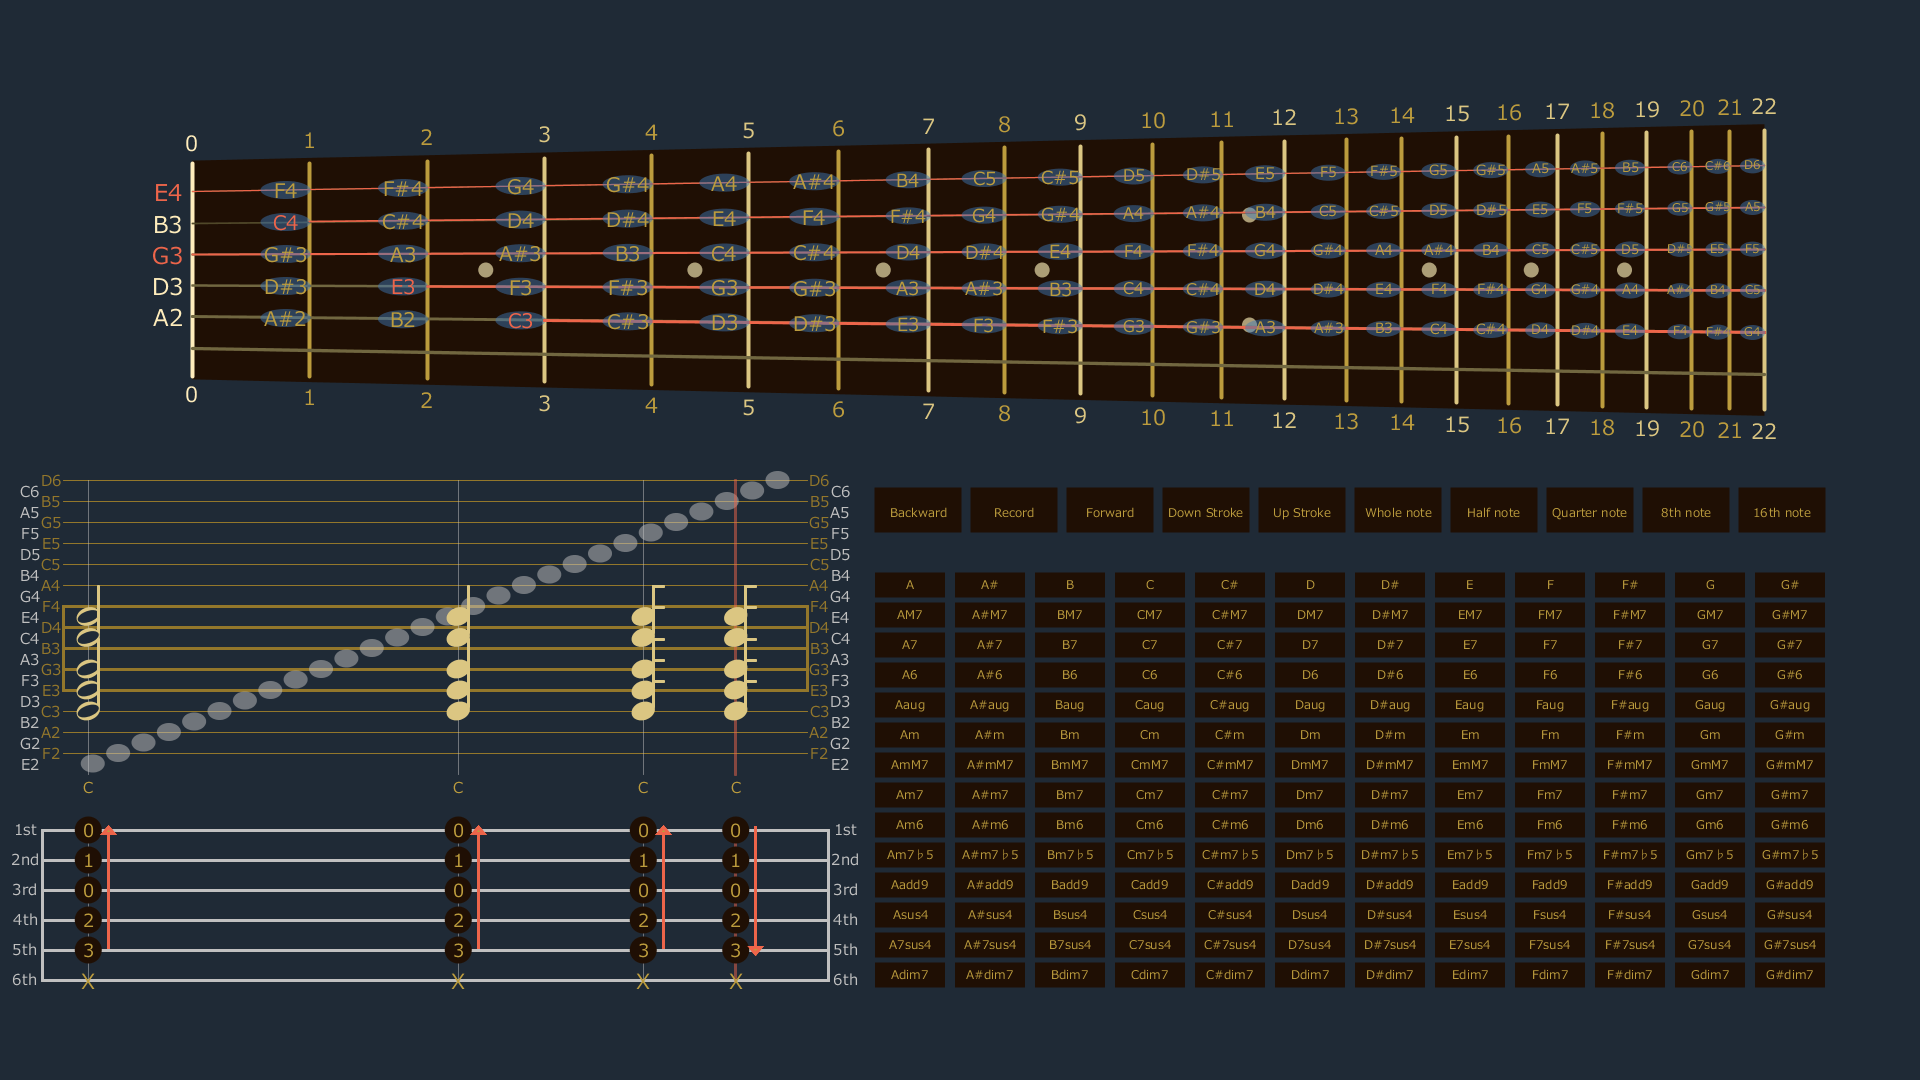
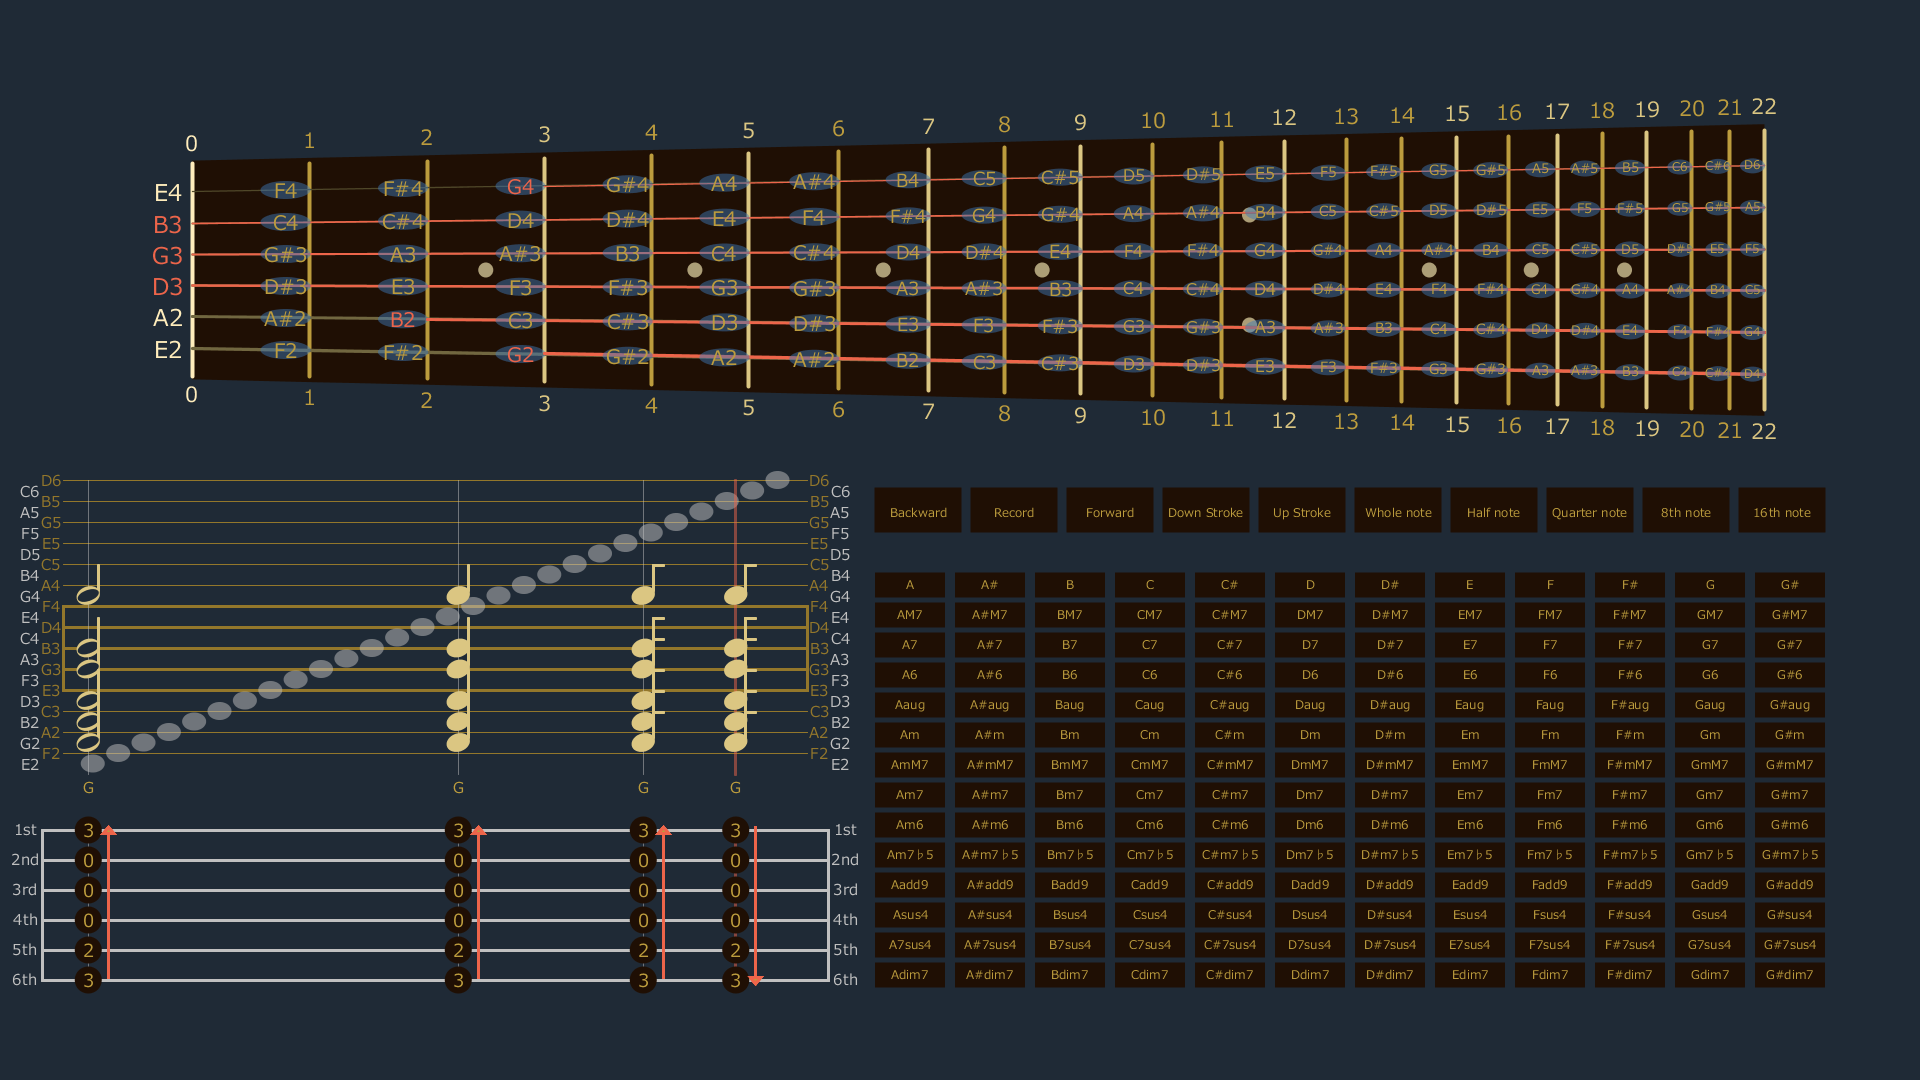
ギターの弦がアクティブなら左下の五線譜とTAB譜に対応するNotesが表示される。
If the guitar string is active, you'll see notes corresponding to the bottom left staff and TAB notes.
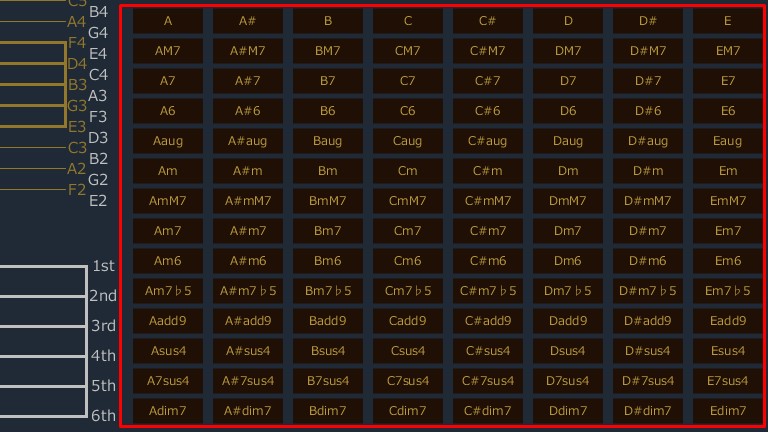
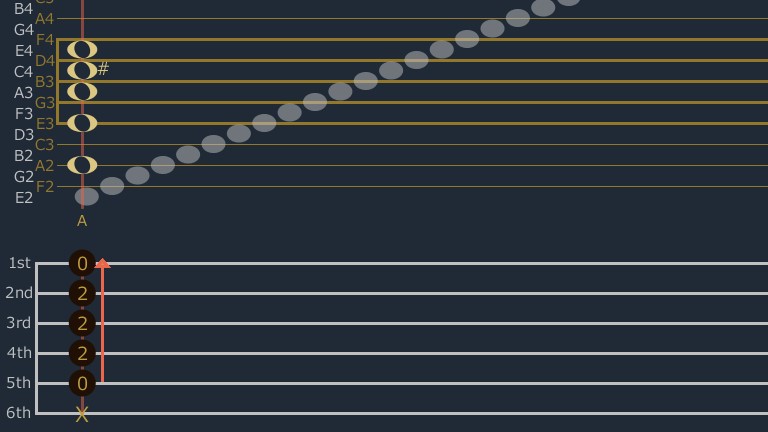
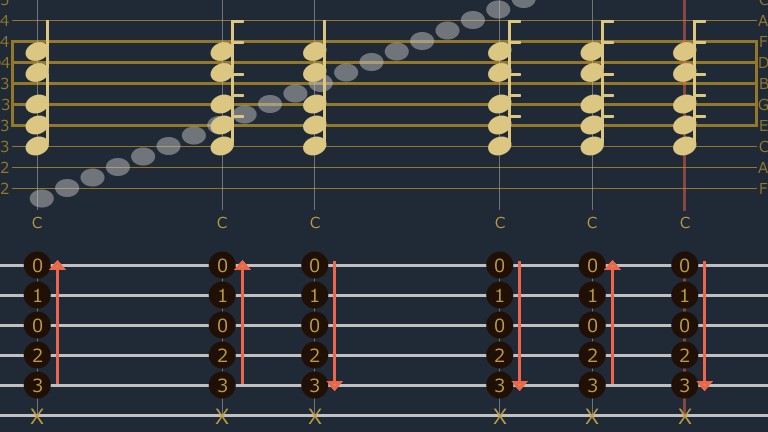
スタンダードなギターコードのボタン。
Standard guitar chord buttons.
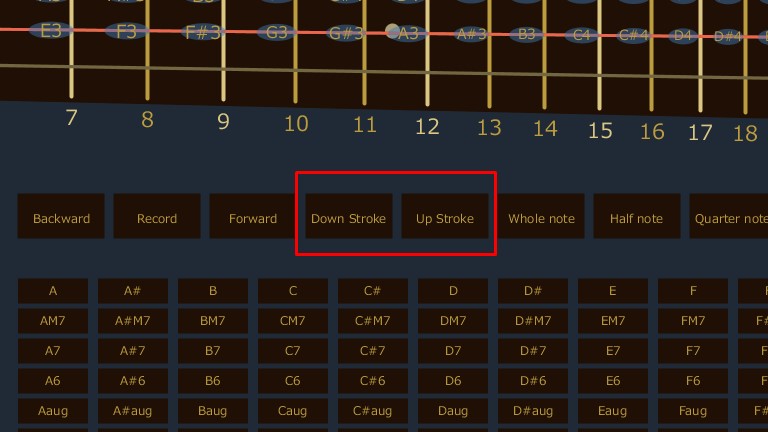
DownStrokeとUpStrokeの切り替えボタン。
Buttons for switching between DownStroke and UpStroke.
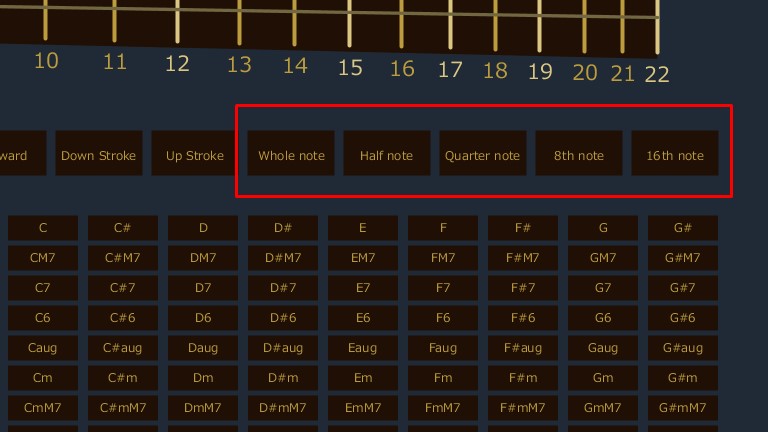
Notesの長さを選択するボタン。
Buttons to select the length of the note.
音の長さも変わっていることを確認してください。
You can see that the sound length has changed.
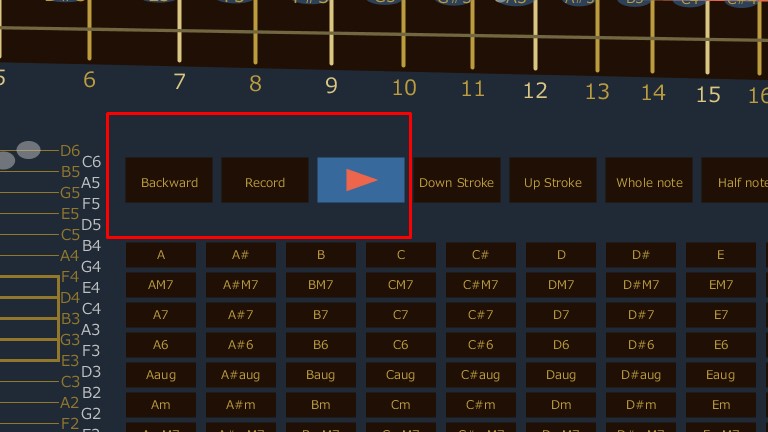
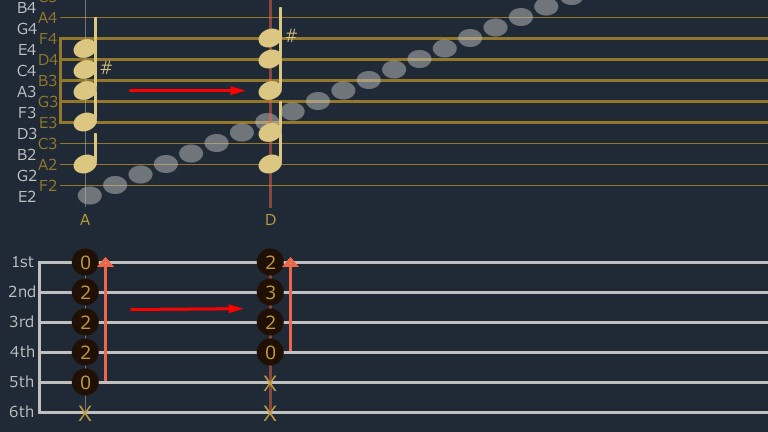
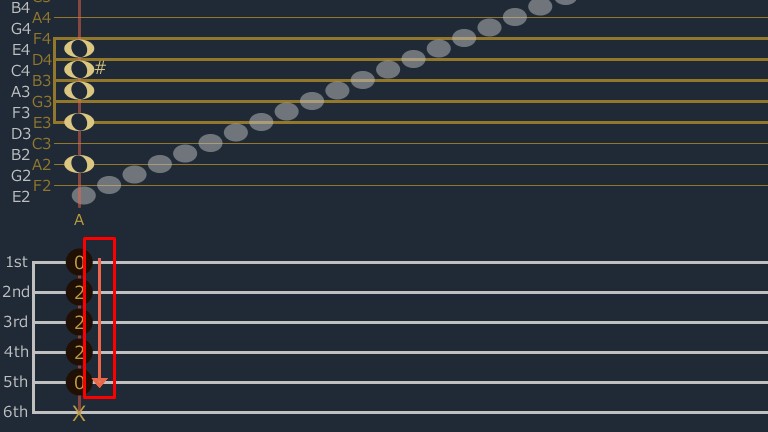
進むボタンを押すと編集ラインを進めることができる。戻る場合は戻るボタンを押す。
Press the forward button to advance the edit line. To retern, press the Backward button
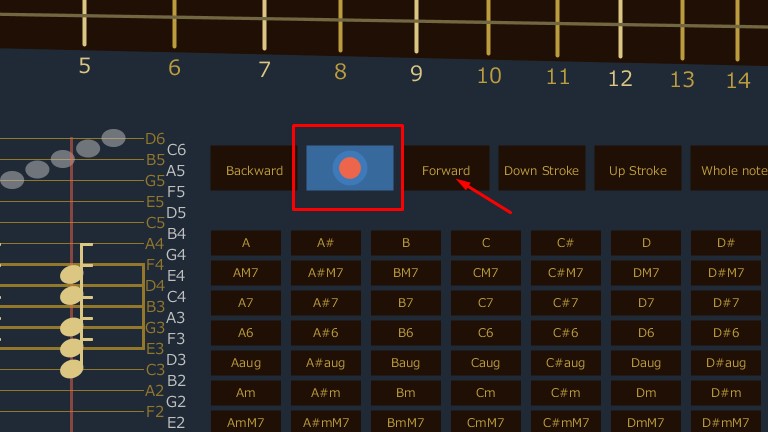
編集し終わったら、レコードボタンを押して、進むボタンを押すか、左上のSnapshotボタンを押せばPNGファイルとして保存できる。
When you're edited, you can save it as a PNG file by pressing the Record button and then the Forward button, or the Snapshot button in the upper left.
Sunvoxで編集する
Edit in Sunvox
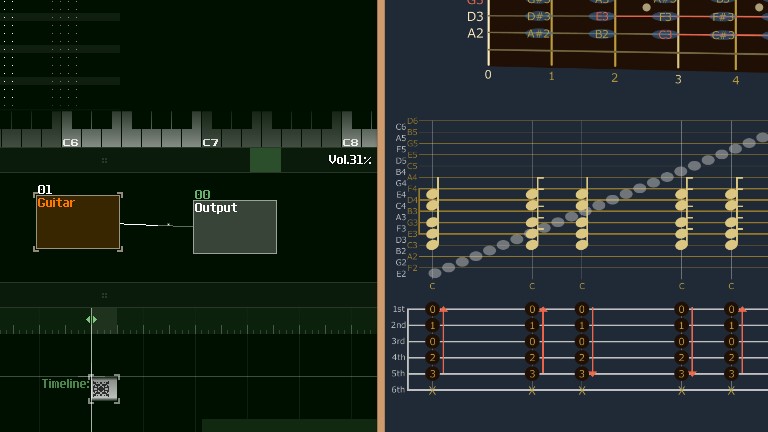
Sunvoxを開いて、画像ファイルかアプリを右か左に配置する。
Open Sunvox and position the image you saved or app right or left.
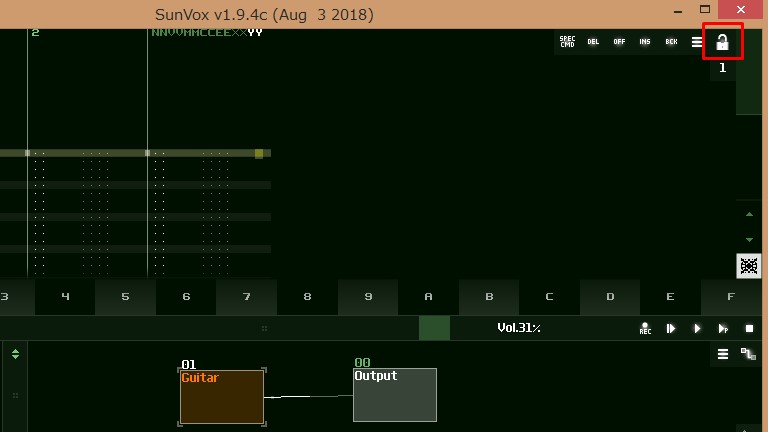
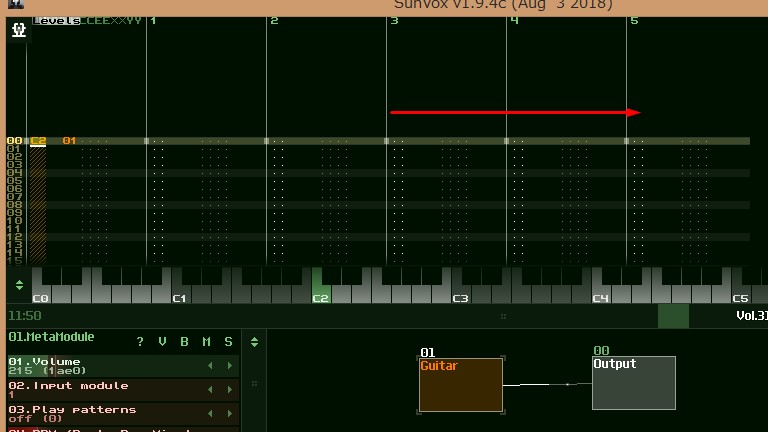
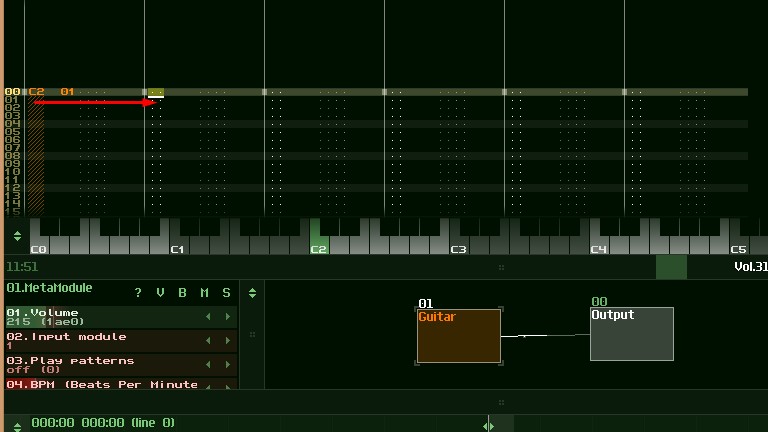
右上の鍵マークをクリックするかキーボードのSpaceキーを押す。
Click the key in the upper right corner or press the Spacebar on the keyboard.
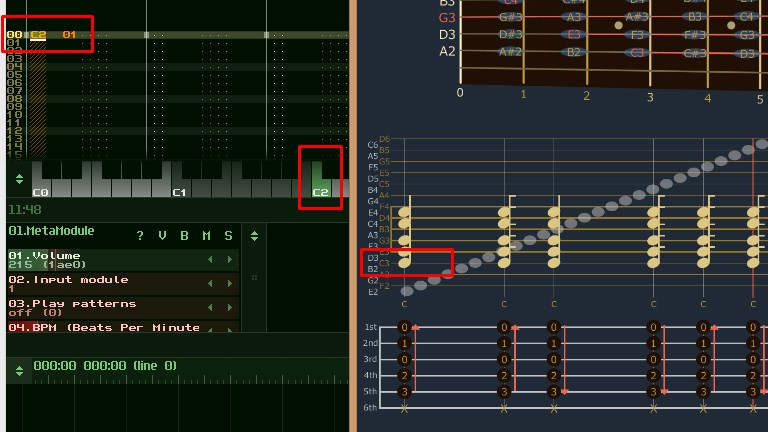
すると編集可能になるので、アプリに表示されているNotesを見ながら編集できる。Sunvoxのギターの音は一オクターブ低い設定になっているので、オクターブを一つ下げて編集してください。
You can then edit it. Please edit while looking at the notes displayed in the application. The sound of Sunvox guitar is set to be one octave lower, so please edit it one octave lower.
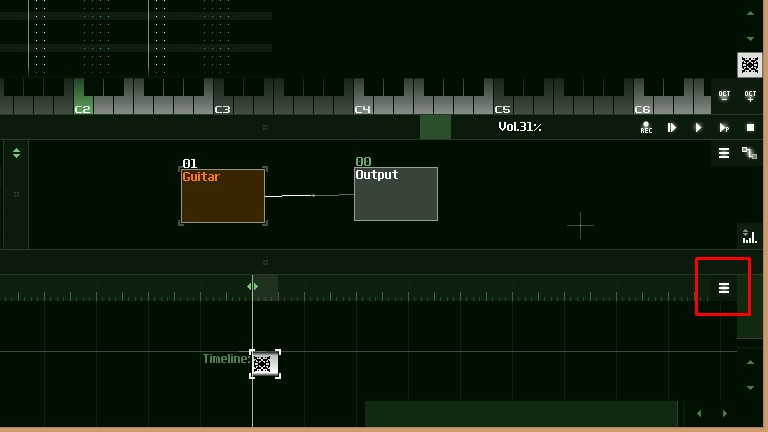
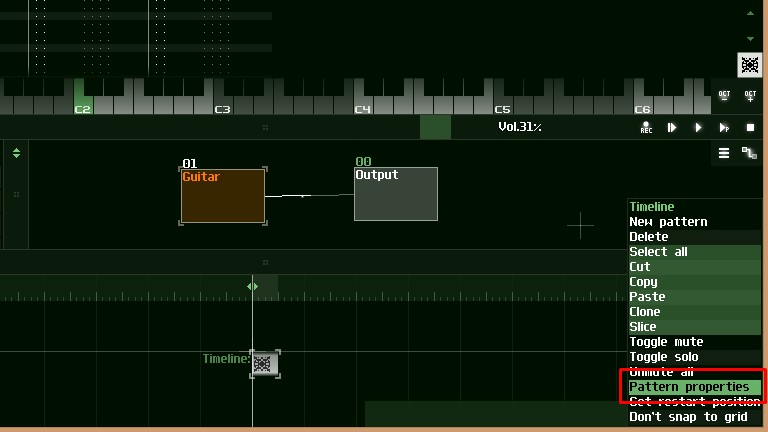
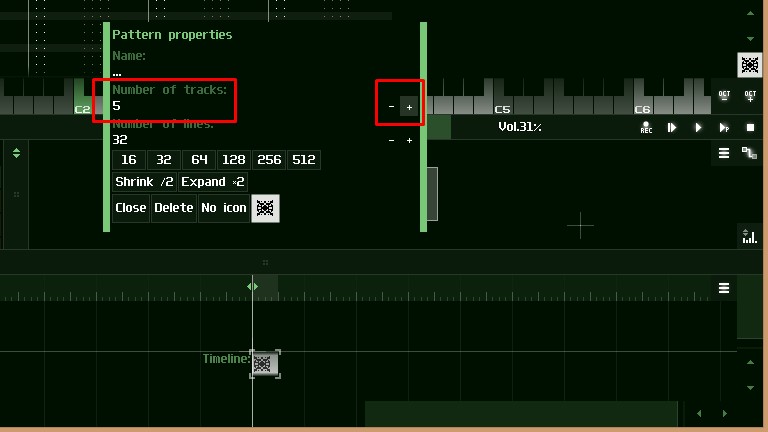
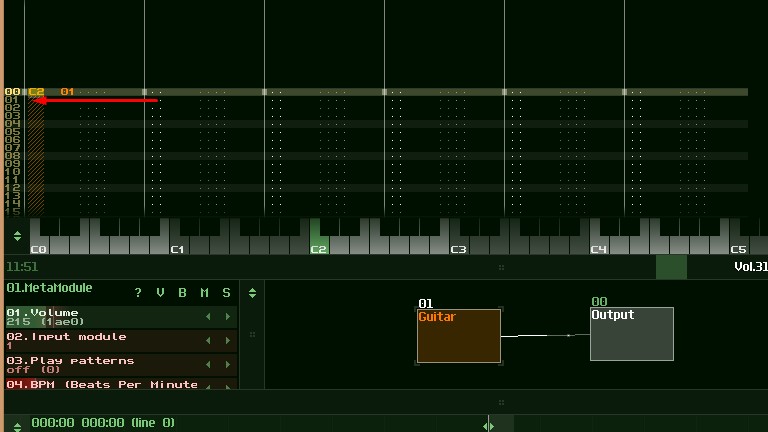
右下のハンバーガーメニューをクリックして「Pattern properties」をクリックして、「Number of tracks」を6つにしてください。
Click the hamburger menu in the lower right, click "Pattern properties", and change "Number of tracks" to 6.
trackを移動するにはTABを押すと快適に移動できます。
To move the track, press TAB for the best results.
逆に戻る場合は「SHIFT+TAB」です。
If you want to go back in reverse, use [SHIFT + TAB].
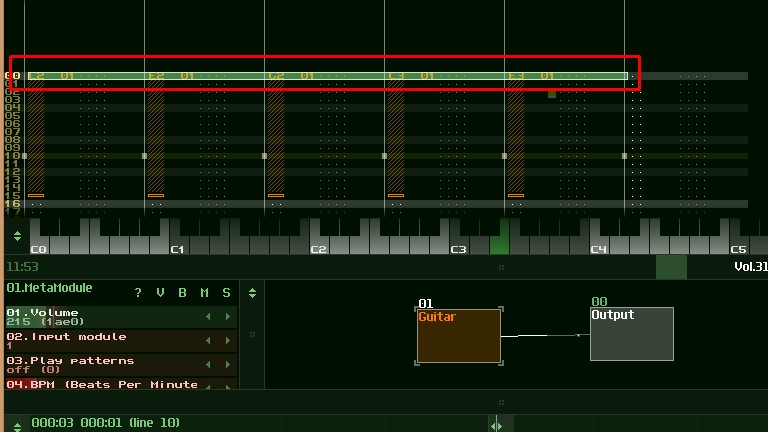
マウスをドラッグして範囲を指定してからコピーをすると、一度編集したコードを再利用できるので便利です。
If you drag the mouse to specify a range and then copy, you can reuse the chord that you edited once.
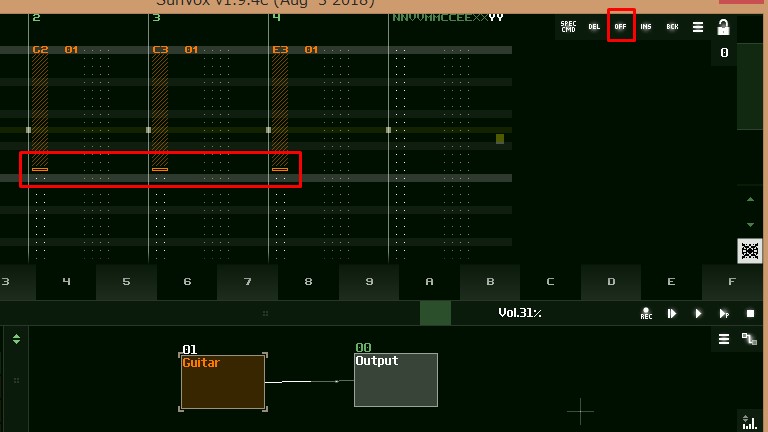
音を切る場合は編集モードにしてから、OFFボタンを押してください。
To turn off the sound, switch to edit mode and then press the OFF button.
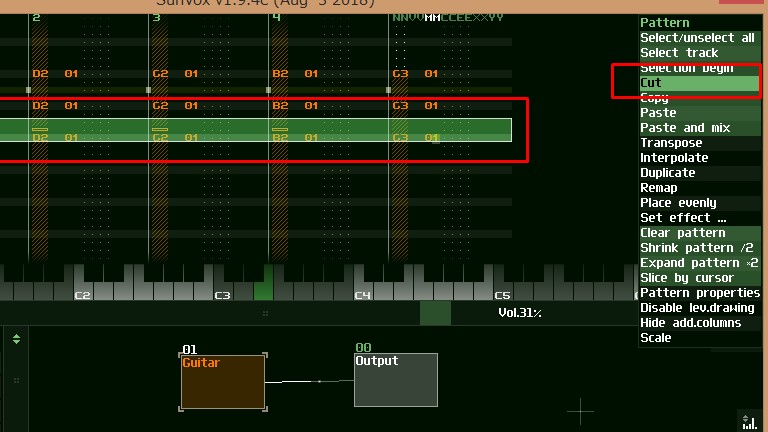
マウスをドラッグして範囲を指定してカットをしてもコピペできます。その範囲を消したい場合にも使えます。
You can also copy and paste by dragging the mouse to specify the range and cut. You can also use it when you want to erase that range.
Sunvoxと共に使っても良いですが、Snapshotを撮った画像を見ながらギターを弾くのも良いです。
You can use it with Sunvox, or you can play the guitar while looking at a snapshot you edited and saved.
今回使用したソフトは素晴らしいことに全て無料で使用できます。 作ってくれた偉大なる先人達に感謝です。 さらにMac、Windows、Linuxどれでも動きます。 まだまだ色々なことがこれらのソフトを組み合わせてできます。 是非各自で創意工夫をして色々と作ってみてください。
The software I used this time can be used for free. I thank my great predecessors. It also supports Mac, Windows and Linux. You can do more with this software. Please try making various things with your own creativity.