Published Date : 2020年2月13日16:02
【Part 6 - 後半】Processingでギターフレットボードから単純なTAB譜を表示するアプリを作ろう
【Part 6 - Second half】Create an app that displays simple TAB notation from guitar fretboard in Processing
This blog has an English translation
まずはこのブログ記事の目的を簡単に説明します。 Processingを使用してギターのフレットボードから簡単なTAB譜を描画するアプリケーションを作成します。 このアプリケーションの利点は、ギターの弦と音階の関係をギターフレットボードから直接理解でき、1つずつ画像ファイルとして保存できることです。
First, I'll briefly explain the purpose of this blog post. Create an application to draw a simple TAB notation from a guitar fretboard with Processing. The advantage of this application is that you can understand the relationship between guitar strings and musical scales directly from the guitar fretboard and save them one by one as image files.
長くなりそうなので、前半と後半に記事を分けます。
It's going to be long, so I'll divide the articles into the first half and the second half.
今回は後半部分の説明です。
This time, I will explain the second part.
このアプリは簡単に誰でもすぐに作れます。 第6回目は、前回の第5回目のアプリの状態から、コードを見やすく、管理しやすいように複数のクラスファイルに分けます。そして、TAB譜や五線譜などの描画の改善等も行い、様々な音符の表記ができるようにします。
This app is easy for anyone to build right away. In Part 6, I split the code into multiple class files, making it easier to see and manage from state of the fifth application. I also improved the drawing of TAB and staff notation again, and I created the code to allow various note notations.
過去に似たアプリをP5.jsとPythonを使ってブラウザに表示させるものを作ったのでこちらの記事も参考にしてみてくだちぃ。
I've created a similar app in the past that uses P5.js and Python to display in the browser, so check out this post.
目次
Table of Contents
音符の切り替えや画面の保存等を操作するボタンを作成するクラスファイル
Class file that creates buttons for switching notes, saving screens, etc
まずは音符の操作をする為のボタンを作成するクラスファイルの説明です。
First, a description of the class file that creates buttons for manipulating notes.
operationButtons.pde
このクラスはfloat型二次元配列変数cOperationButtonsを持ち、これは各ボタンの大きさの情報が格納されます。 これを使って、マウスがどのボタンを押したかどうかを判定させます。 各ボタンをクリックした時に行う処理は、Processingに用意されているmousePressedというコールバック関数を使います。 その説明は後ほどします。
This class has a float two-dimensional array variable cOperationButtons which stores information about the size of each button. Use this to determine which button the mouse has pressed. When you click each button, you use a callback function called mousePressed, It is a function provided by Processing. I'll explain it later.
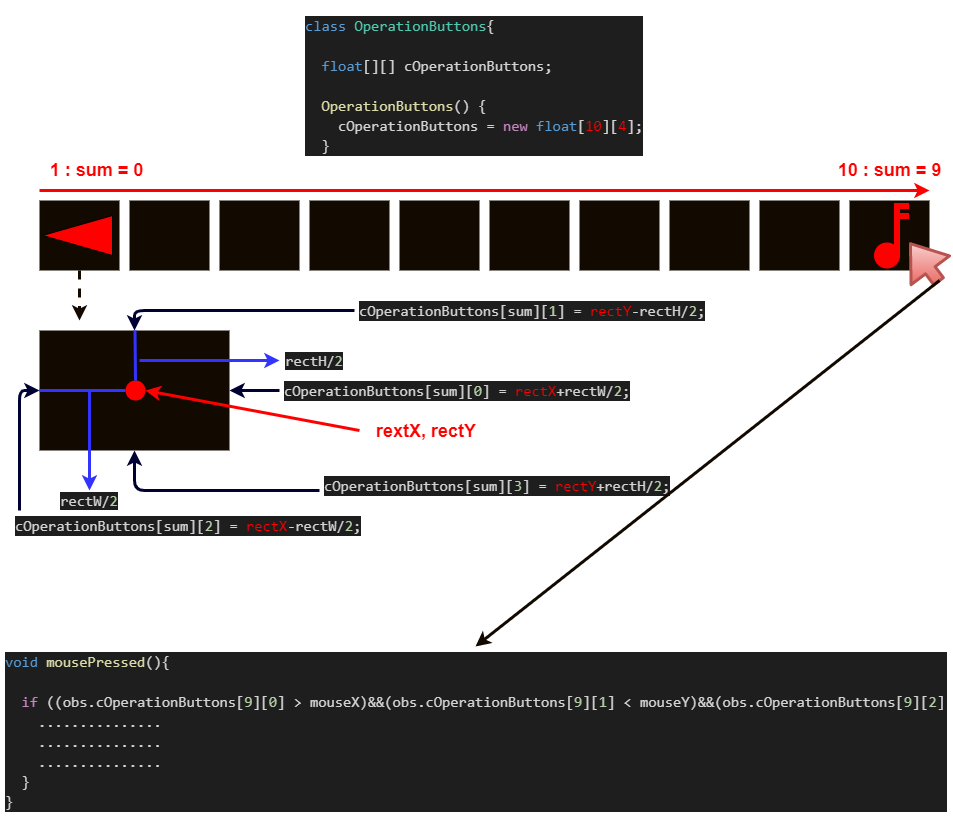
続いてメインのスケッチファイルにグローバル変数として定義したString型controlButtonsを、FORループとSwitch-Case文を使用してボタンの位置とテキストの名前を表示できるようにします。さらにマウスをホバー、クリックした時の動作をどのようにするかを決めます。
We then define controlButtons of type String as a global variable in the main sketch file so that we can use the [For-Loop] and [Switch-Case] statements to display the text and buttons, then move the mouse cursor over them and determine what happens when the mouse is clicked.
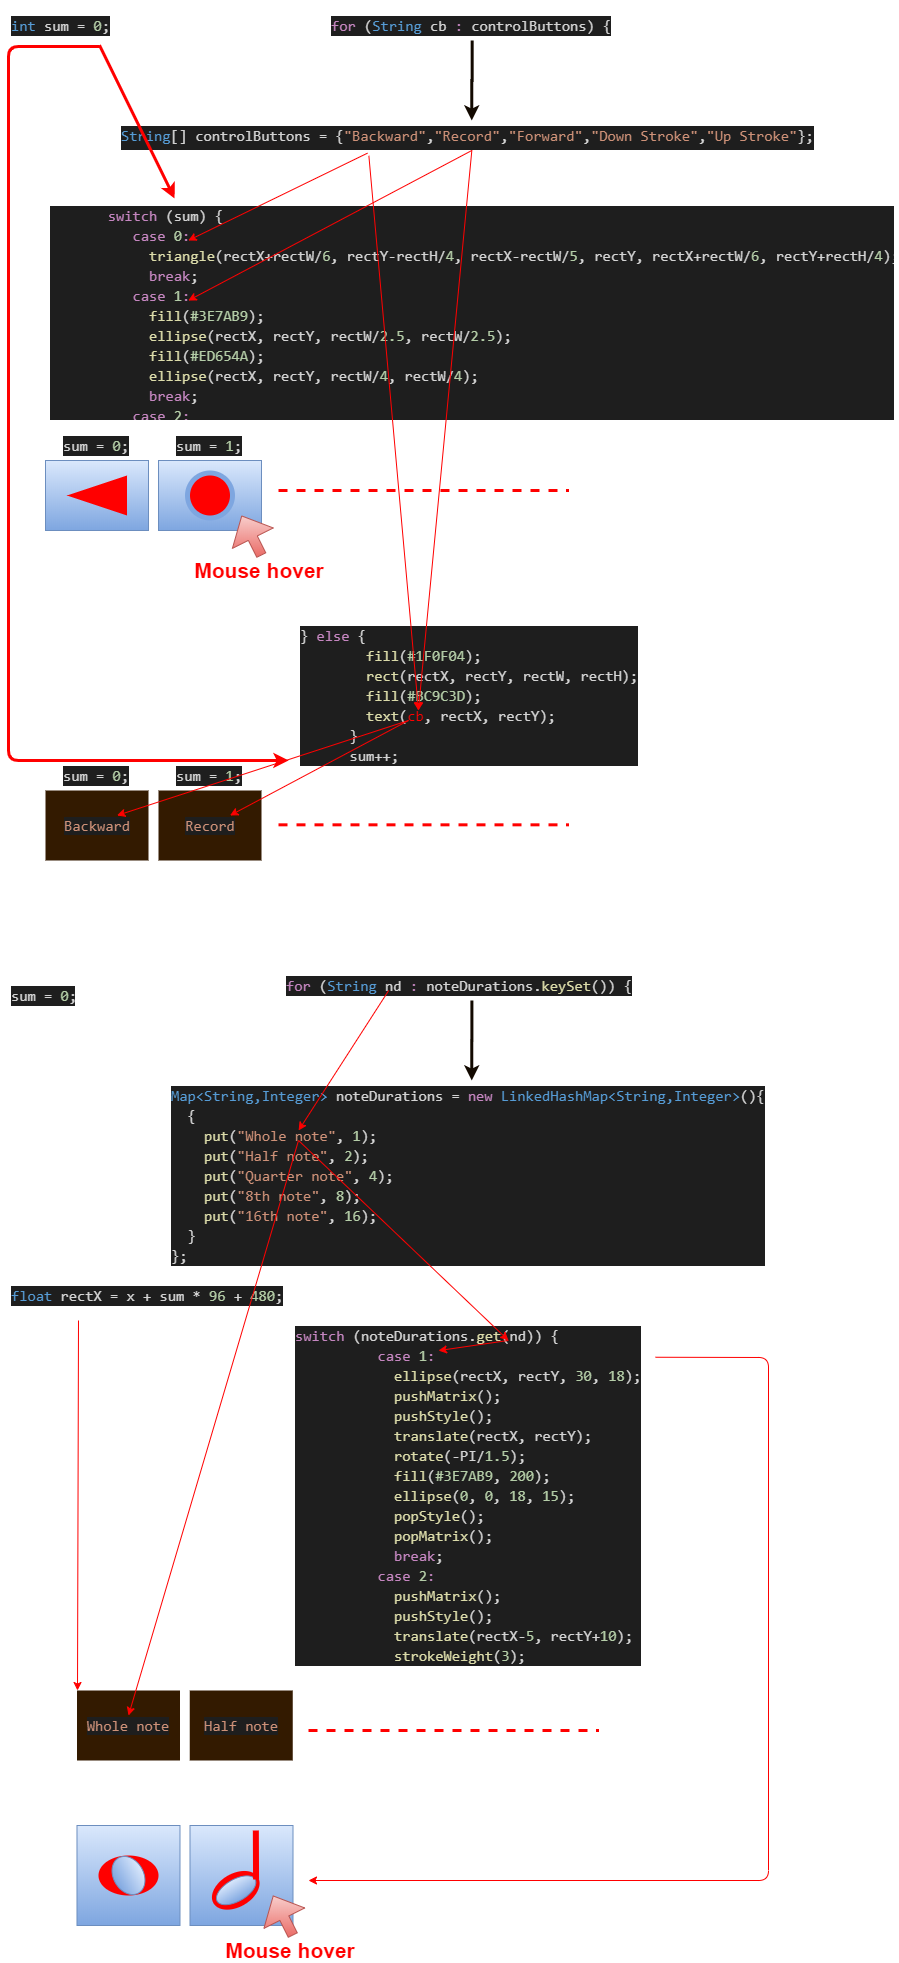
controlButtonsとnoteDurationsの2つの変数を使用するので、Class内でInt型変数Sumを定義して、この変数を各ボタンのオフセットと位置、それから各ボタン毎に処理を分けるための判定に使用します。
Because we use two variables, controlButtons and noteDurations, we define an Int variable sum in the class and use this variable to determine the offset and position of each button, and then separate the processing for each button.
MousePressed関数を使用する理由です。 本来であればクラスファイルですので、ボタン一つ一つをオブジェクトととして、動作させれば問題ないのですが、 今回は私の怠慢で、クラスファイルにしたものの、ただの関数としてしか機能していません。
Reason for using the MousePressed function. This is a class file, so you didn't need to use MousePressed function if you wanted each button to act as an object. But this time, I made it a class file, but it only works as a function.
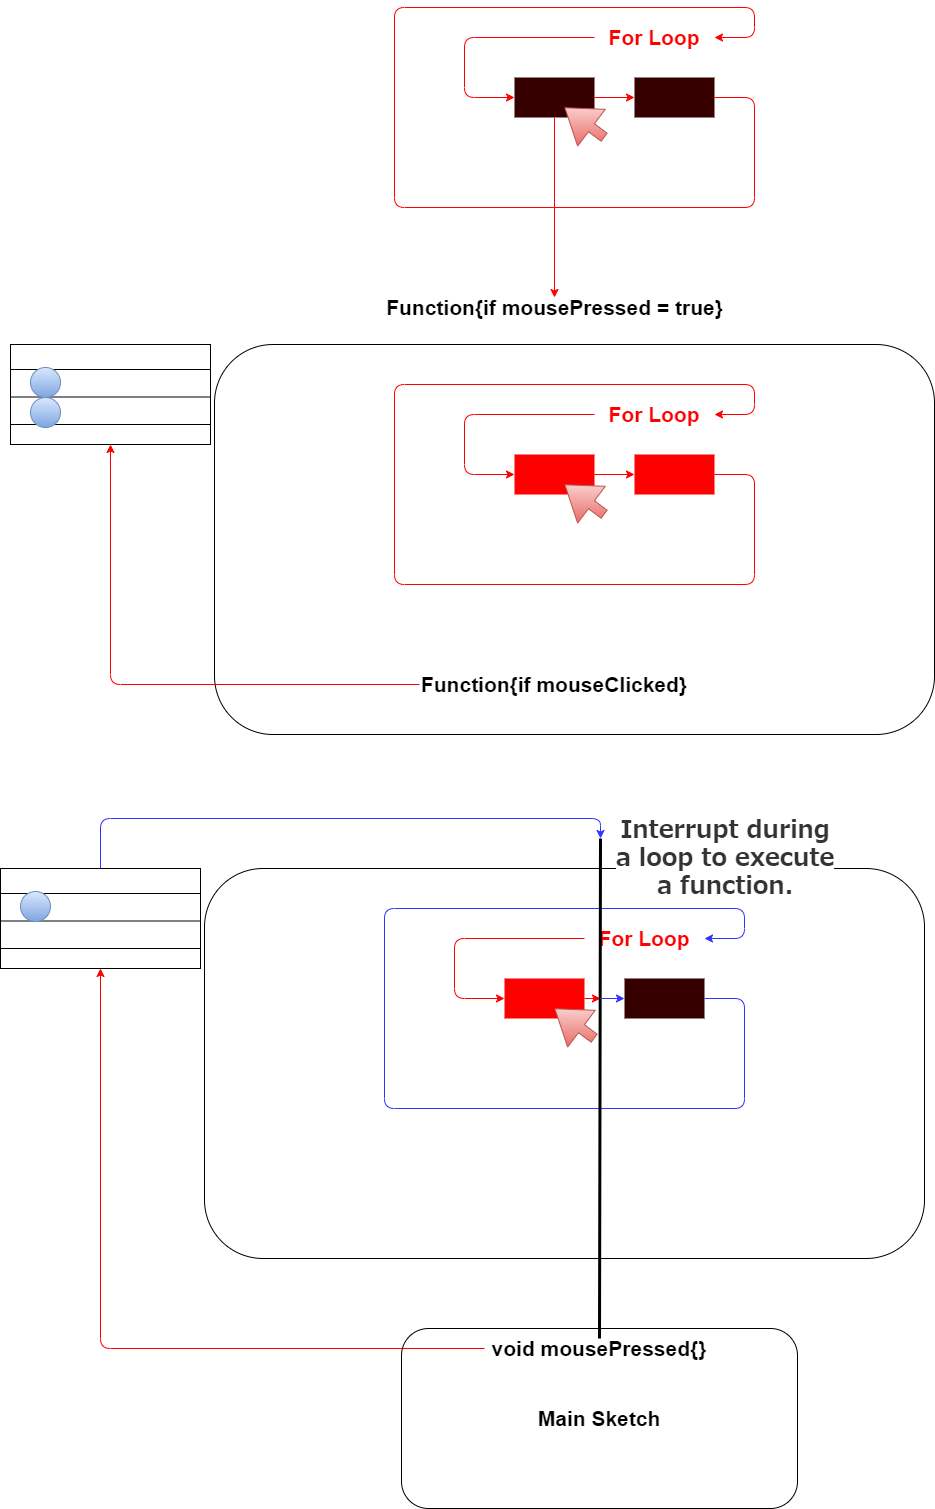
ProcessingはメインファイルにDraw関数というループ関数(While文のような)を使用します。 つまり1フレーム(1ループ)毎に画面をBackground関数で塗りつぶすことによりアニメーションを実現しています。
Processing uses a loop function called Draw function (As in the While statement) in the main file. The animation is achieved by filling the screen background color with the Background function every 1 frame (1 loop).
そしてこの時、ボタンは一度にForループを使用して描画されています。
The buttons are then drawn using a For loop at a time.
しかし、ForLoop内でMouseが押された時の真偽値を利用した関数を使用すると、For-Loopはそのまま流れて、ボタンをクリックしても音符が正しく表示されないことがあります。
However, if you use a function within For-Loop that takes advantage of the boolean value of the mouse being pressed, the ForLoop will continue to flow and the note may not display correctly when you click the button.
別のEditableLine上で音符が表示されたり、複数の音符が表示される等です。
For example, you might see displaying notes from another EditableLine, multiple notes, and so on.
そこで、苦肉の策として、Processingが用意しているコールバック関数のmousePressedを使用しました。
So this time, I used the mousePressed callback function provided by Processing.
これはMouseがクリックされた時に発動する関数で、ForLoopやDraw関数の流れを一旦中断します。 そして処理が実行された後、再びLoopを始めます。
This function is invoked when the Mouse is clicked and temporarily interrupts the flow of the ForLoop and Draw functions. After the processing is done, loop is started again.
音符を譜面に書き起こすためのクラスファイル
Class file for displaying guitar notes in staff notation or TAB notation
次にNotesFretNums Classの説明です。
Next is a description of the NotesFretNums Class.
notesFretNums.pde

まずPVector型の3つの配列変数の説明です。
First, description of the three array variables of type PVector.
これらはそれぞれ五線譜とTAB譜にギターノートを連動させる為に使われます。
These are used for linking guitar notes to staff notation and tab notation respectively.
cStaffNotationで一度五線譜上の座標位置を取得した後、cGNtoStaffNotationで半音も含めたギターノートを表示できるように座標位置を再度計算して格納します。
Once the coordinate positon on the staff is acquired by cStaffNotation, the coordinate position is calculated again and stored so that the guitar note including the semitone can be diaplayed by cGNtoStaffNotation.
同じように、cTABNotationはTAB譜用の座標を記憶させておく配列変数となります。
Similarly, cTABNotation is an array variable that stores the coordinates for the TAB notation.
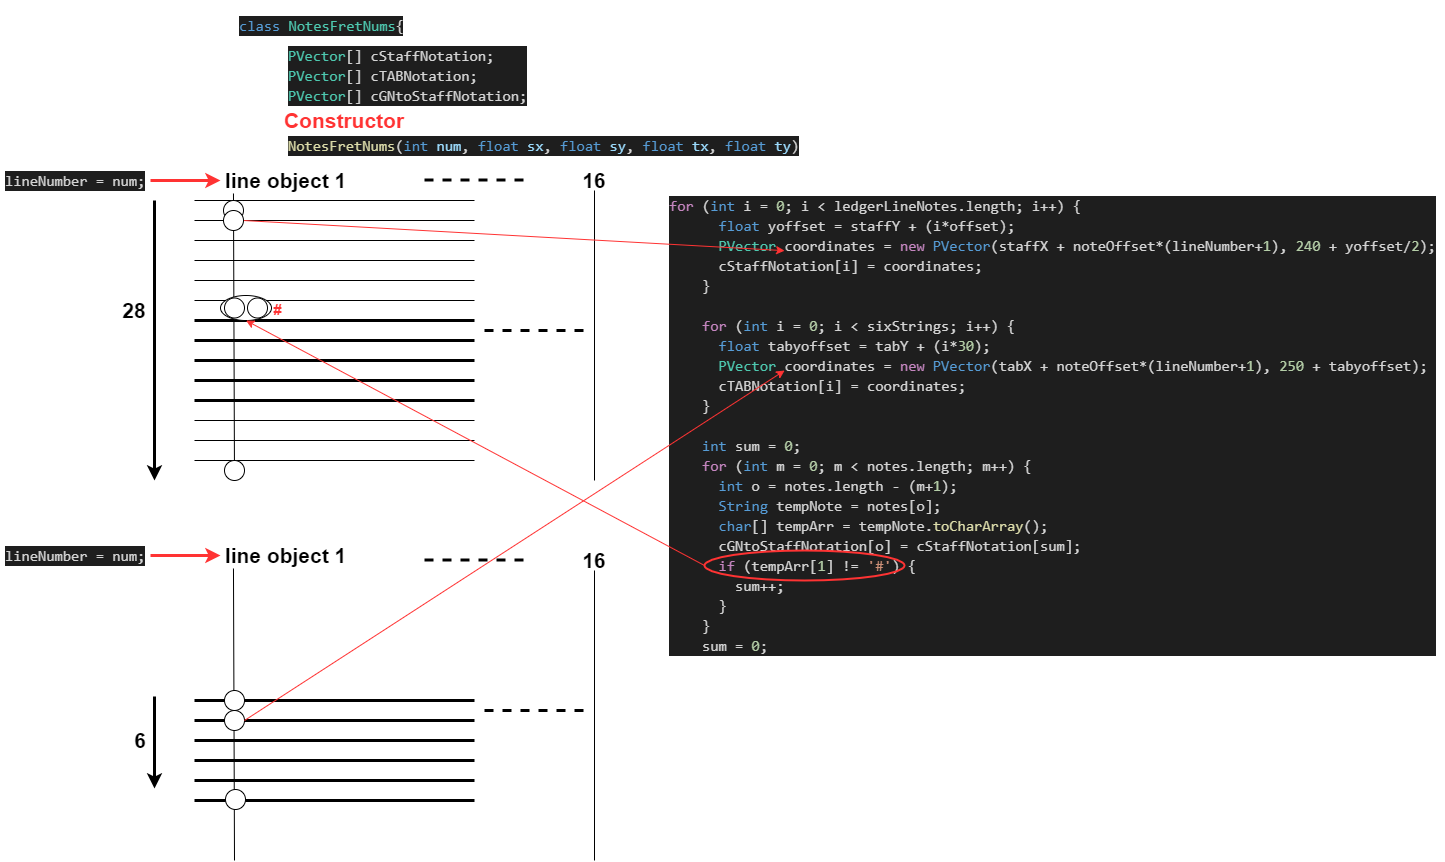
このように、それぞれ16個のオブジェクトは五線譜のledgerLineNotes分の座標位置を記憶した後、notesに含まれる半音の位置の調整を行う。
In this way, each of the 16 objects stores the coordinate positions of the ledgerLineNotes portion of the staff notation, and then adjusts the position of the semitones included in guitar notes.
TABはそれぞれのラインがギター弦に対応するため、GStringsGNotesクラスと同じように対応する座標位置を記憶していく方法をとります。
TAB uses a method similar to the GStringsGNotes class in that each line corresponds to a guitar string.
GStringsGNotesクラスを継承させなかった理由は、計16個のオブジェクトの連携とが必要だったのと、GStringsGNotesクラスのアルゴリズムと違った作りになると予想したので、必要ないと判断しました。
The reason for not extending the GStringsGNotes class was that it needed to work with a total of 16 objects, and I expected it to be different from the algorithm in the GStringsGNotes class, so I decided it wasn't necessary.
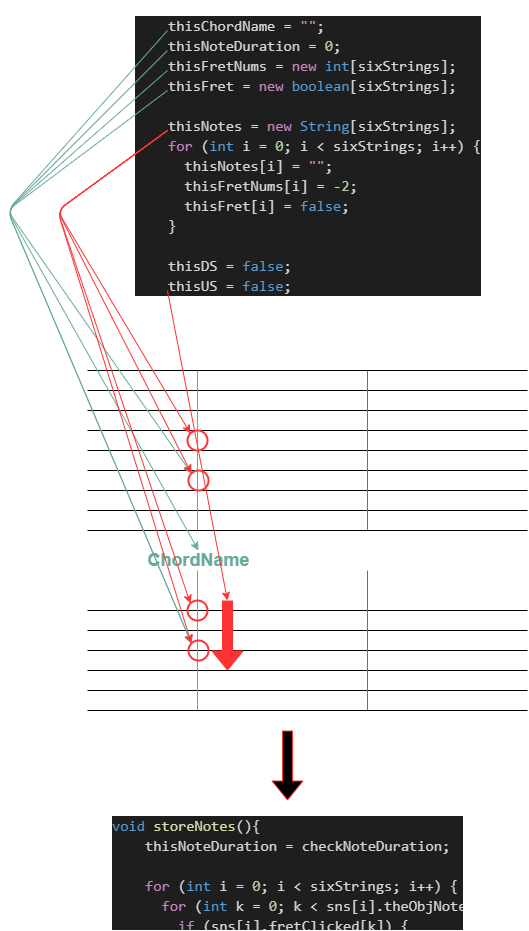
後は、前回説明したOperationButtonsの各ボタンの命令に対応するために、各オブジェクト毎に状態を記録させておくStoreメソッドを追加します。
さらにこのオブジェクトの現在のNotes情報等を把握しておくための属性値も定義して初期化しておきます。
After that, I add [Store Method] to record the state of each object in order to correspond to the instruction of each button of OperationButtons that I described in my previous blog post.
It also defines and initializes attribute values to keep track of the object's current Notes information.
その他は前回の関数の時とあまり変化はありません。
Otherwise, there is little change from the previous function.
大まかな流れ
Overall workflow
全体のファイル構成は以下になります。
The overall file configuration is as follows.
images
main.pde
fretBoard.pde
gStringsGnotes.pde
guitarCCButtons.pde
notesFretNums.pde
operationButtons.pde
staffTAB.pde
このmain.pdeを使い、先程のnotesFretNumsクラスから作られたオブジェクト、operationButtonsクラスから作られたオブジェクトを連携させて、様々な動きを実現させます。
In this main.pde, the objects in the notesFletNums and operationButtons classes, the MousePressed function, and so on, work together to achieve a variety of functionality.
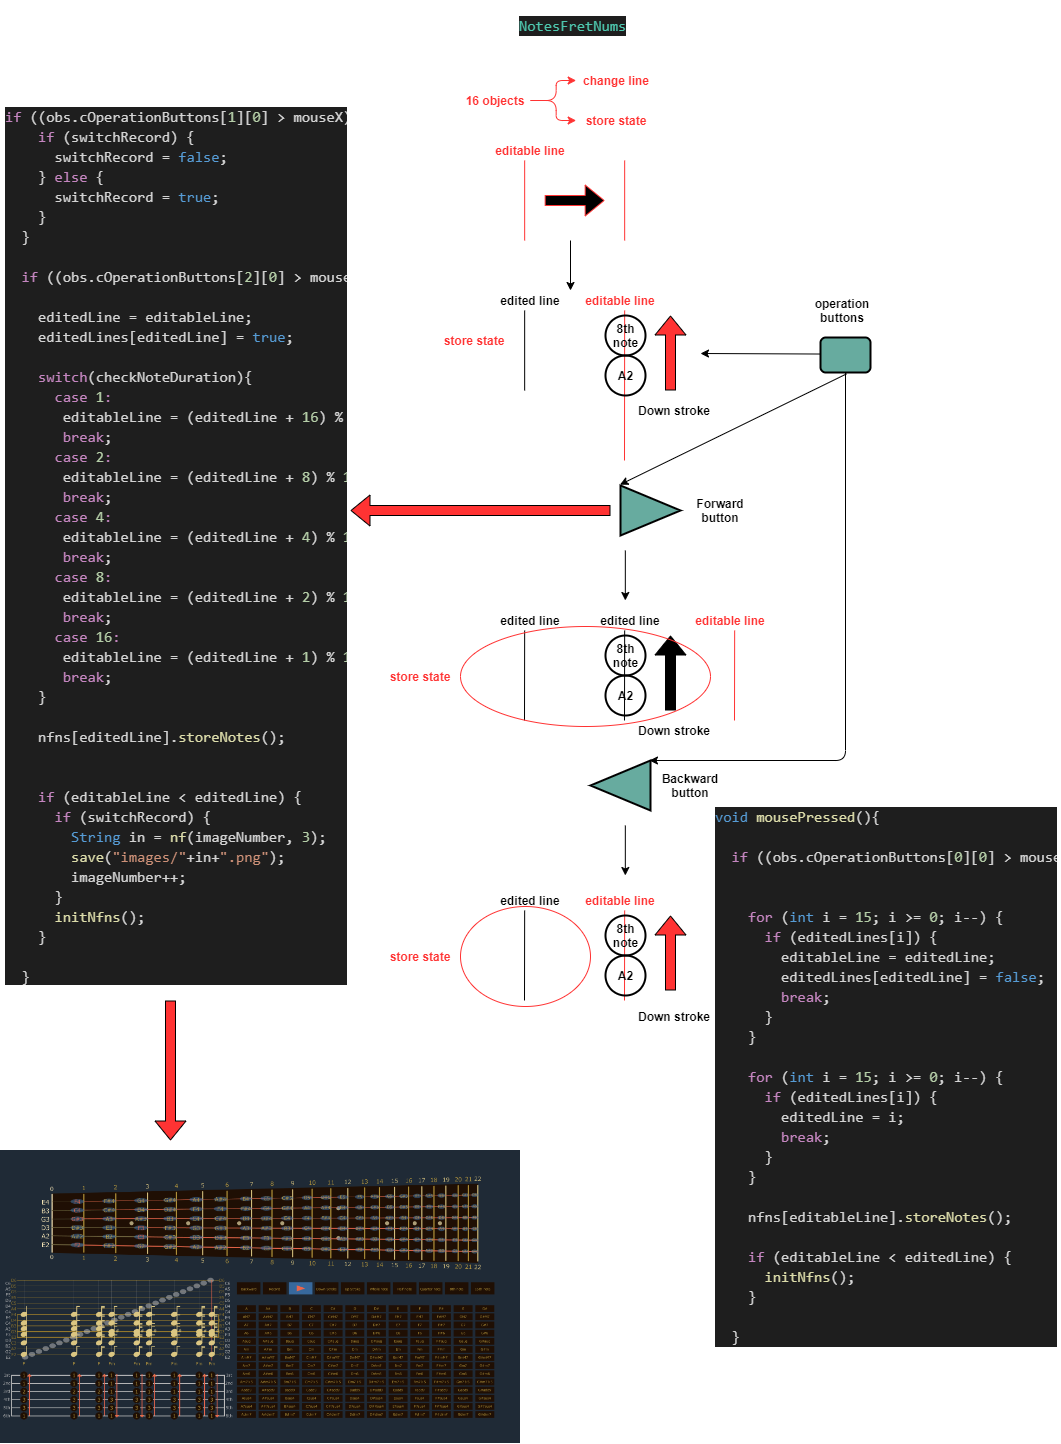
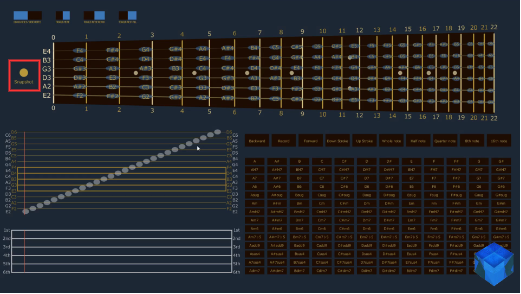
さらに、レコードボタンを押さなくても、スナップショットが取れるように単体で画像が保存できるボタンを作成しました。
I also created a button that allows you to save a single image so that you can take a snapshot without having to press the record button.
void snapShot(){
  float x = widthSpacing/2 - 10;
  float ey = heightSpacing/2 + 215;
  float ty = heightSpacing/2 + 245;
  float r = 30;
  pushStyle();
  noStroke();
  textAlign(CENTER,CENTER);
  fill(#BC9C3D);
  if ((x+r/2 > mouseX)&&(ey-r/2 < mouseY)&&(x-r/2 < mouseX)&&(ey+r/2 > mouseY)) {
    if (mousePressed){
      fill(#ED654A);
      r = 36;
      String in = nf(imageNumber, 3);
      save("images/"+in+".png");
      imageNumber++;
    } else {
      fill(#C0C0C0);
      r = 33;
    }
  }
  ellipse(x,ey,r,r);
  text("Snapshot",x,ty);
  popStyle();
}
音符の表示方法等かなり簡素化してますので、一部正しく表示されていませんが、ご了承ください。 各自カスタマイズして、正しく表示させてください。
Please note that some of the notes are not displayed correctly because the way they are displayed is simplified. Please customize it and make it look correct.
このアプリは現在進行形で作っています。
This application is currently progress.
P5.jsの時より、機能が複雑になっていきそうなので多少時間がかかる可能性があります。
It may take some time since the functions seem to be more complicated than in P5.js.
ま、兎に角長くなってしまったのでPart7へ続きます。
In any case, since the blog post is long, so continues on to Part 7.