Published Date : 2020年1月28日20:01
【Part 4】Processingでギターフレットボードから単純なTAB譜を表示するアプリを作ろう
【Part 4】Create an app that displays simple TAB notation from guitar fretboard in Processing
This blog has an English translation
YouTubeにアップした動画、「Part 4 - Create an app that displays simple TAB notation from guitar fretboard in Processing」の補足説明の記事です。
Here's a little more about the "Part 4 - Create an app that displays simple TAB notation from guitar fretboard in Processing" video I uploaded to YouTube.
まずは上の動画の趣旨を軽く説明します。 Processingを使用してギターのフレットボードから簡単なTAB譜を描画するアプリケーションを作成します。 このアプリケーションの利点は、ギターの弦と音階の関係をギターフレットボードから直接理解でき、1つずつ画像ファイルとして保存できることです。
First, let me briefly explain the purpose of the video above. Create an application to draw a simple TAB notation from a guitar fretboard with Processing. The advantage of this application is that you can understand the relationship between guitar strings and musical scales directly from the guitar fretboard and save them one by one as image files.
簡単に誰でもすぐに作れます。 第4回のビデオでは、画面の左下隅に、ギターノートに連動た単純な五線譜とTAB表記を描くコードを書きます。 また、画面右下にギターのコード名をボタンのリストにして、ボタンを押すとギターコードがフレットボード等に表示されるようにしていきます。
It's very easy to make this. Part 4, In this video, I'll write a code in the lower left corner of the screen that draws a simple staff and TAB notation linked to the note of a guitar. Also, I would like to make a list of guitar code name buttons in the bottom right corner of the screen so that the guitar code can be displayed on the fretboard when the button is pressed.
全体の説明は動画に任せるとして、補足が必要だろうと思われる部分を説明していきMASU。
I'll leave the entire explanation to the video, but I'll explain the parts that I think need to be supplemented.
過去に似たアプリをP5.jsとPythonを使ってブラウザに表示させるものを作ったのでこちらの記事も参考にしてみてくだちぃ。
I've created a similar app in the past that uses P5.js and Python to display in the browser, so check out this post.
目次
Table of Contents
ギターコード一覧と文字化けの回避 - 1:00 ~
Guitar chords charts and avoiding garbled characters - 1:00 ~
ギターのコードの一覧を、ボタンにするために使われる配列変数です。
An array variable used to turn a list of guitar chords into buttons.
動画では「オープンコード一覧」として書かれている箇所がありますが、バレーコード等が含まれています。 まあ、開放弦から6フレット ぐらいまでが使われているコード一覧として認識してもらえれば幸いです。
In the video, there is a part written "Open Chords", but Barre Chords is also included in the guitar chords charts. Well, it would be helpful if you could think of it as a chords charts that uses from open string to 6 fret.
// array of guitar chords charts
String[][] guitarChordChart = {
  {"A","Am","A7","Am7","AM7","Asus4","A7sus4","Aadd9","Am7♭5","Adim7","A6","Aaug","AmM7","Am6"},
  {"A#","A#m","A#7","A#m7","A#M7","A#sus4","A#7sus4","A#add9","A#m7♭5","A#dim7","A#6","A#aug","A#mM7","A#m6"},
  {"B","Bm","B7","Bm7","BM7","Bsus4","B7sus4","Badd9","Bm7♭5","Bdim7","B6","Baug","BmM7","Bm6"},
  {"C","Cm","C7","Cm7","CM7","Csus4","C7sus4","Cadd9","Cm7♭5","Cdim7","C6","Caug","CmM7","Cm6"},
  {"C#","C#m","C#7","C#m7","C#M7","C#sus4","C#7sus4","C#add9","C#m7♭5","C#dim7","C#6","C#aug","C#mM7","C#m6"},
  {"D","Dm","D7","Dm7","DM7","Dsus4","D7sus4","Dadd9","Dm7♭5","Ddim7","D6","Daug","DmM7","Dm6"},
  {"D#","D#m","D#7","D#m7","D#M7","D#sus4","D#7sus4","D#add9","D#m7♭5","D#dim7","D#6","D#aug","D#mM7","D#m6"},
  {"E","Em","E7","Em7","EM7","Esus4","E7sus4","Eadd9","Em7♭5","Edim7","E6","Eaug","EmM7","Em6"},
  {"F","Fm","F7","Fm7","FM7","Fsus4","F7sus4","Fadd9","Fm7♭5","Fdim7","F6","Faug","FmM7","Fm6"},
  {"F#","F#m","F#7","F#m7","F#M7","F#sus4","F#7sus4","F#add9","F#m7♭5","F#dim7","F#6","F#aug","F#mM7","F#m6"},
  {"G","Gm","G7","Gm7","GM7","Gsus4","G7sus4","Gadd9","Gm7♭5","Gdim7","G6","Gaug","GmM7","Gm6"},
  {"G#","G#m","G#7","G#m7","G#M7","G#sus4","G#7sus4","G#add9","G#m7♭5","G#dim7","G#6","G#aug","G#mM7","G#m6"}
  };
この中にフラット記号が含まれています。 これが使用するフォントによって文字化けになってしまうので、次にそれを防ぐために、ProcessingのCreateFontを使って、フォントを「メイリオ」にします。
The above array contains flat symbols. These may cause garbled characters depending on the font you are using in Processing. To prevent this, use createFont in Processing to make the font "Meiryo"
指定するフォントですが、「ユニコード」が扱えれば、「メイリオ」でなくても構いません。
But the specified font does not need to be "Meiryo" as long as it can handle Unicode.
// Use createFont to prevent the flat symbol from garbling
PFont font;
font = createFont("Meiryo", 15, true);
textFont(font);
translate関数とmouse変数 - 2:40 ~
translate function and mouse variable - 2:40 ~
続いては五線譜とTAB譜、それからコードチャートの描画をするための関数を作成します。
Next, you create a function that draws a staff, tab notation and guitar chords charts on the screen.
// Draw staff and Guitar TAB notation.
pushMatrix();
translate(-150,height/2);
drawStaffNotation();
drawTABNotation();
popMatrix();

// With controlP5, there were problems with function names and text display, so it was necessary to create a kind of homemade GUI to create a guitar chord chart.
pushMatrix();
translate(width/2-50, height/2);
drawChordChart();
popMatrix();
フレットボードの長さと座標を利用して五線譜やTAB譜を描画しますので、translate関数を使用してオリジン座標を移動しています。
It uses the length and coordinates of the fretboard to draw staff and TAB notes, so it uses the translate function to move the origin coordinates.
しかし、drawChordChart関数にtranslate関数を使用したことは間違いだったかもしれません。
However, using translate function for drawChordChart function might have been a mistake.
何故なら、マウスの座標を格納しているmouseXとmouseY変数はオリジン座標からの数値が入っています。 そうすると、translate関数で座標を移動しても、コードチャート関数内でのマウスの位置はオリジン座標からの座標のままです。 これではマウスの位置を正しく認識できずに上手く機能しません。
Because the mouseX and mouseY variables, which store the mouse coordinates, contain numeric values from the origin coordinates. Then, when you use the translate function to move the coordinates, the mouse position in the drawChordChart function remains at the coordinates from the origin coordinates. It doesn't recognize the position of the mouse properly and doesn't work well.

そこで、一時的な解決策として、マウスの位置の判定用としてもう一度translate関数で使用した座標をstartXとstartY変数に格納しています。
As a temporary solution, the coordinates used by the translate function are stored again in the startX and startY variables and used to recognize the mouse position.
これだと、汎用性にかけるので、少し工夫してコードを改良してみましょう。
This code is not generic, so let's improve it a bit.
pushMatrix();
// translate(width/2-50, height/2);
// drawChordChart();
drawChordChart(width/2-50, height/2);
popMatrix();
//void drawChordChart(){
void drawChordChart(float x, float y) {
  // float startX = width/2-50;
  float startX = x;
  // float startY = height/2;
  float startY = y;
  pushStyle();
  for (int i = 0; i < 12; i++) {
    for (int j = 0; j < 14; j++) {
      // float rectX = i * 80;
      float rectX = i * 80 + startX;
      // float rectY = 5 + (j*30);
      float rectY = 5 + (j*30) + startY;
      // float textX = i * 80;
      float textX = i * 80 + startX;
      // float textY = 2 + (j*30);
      float textY = 2 + (j*30) + startY;
      float rectW = 75;
      float rectH = 25;
~~~~~~~~~~~~~~~~~~~~~~~~~~~~~~~~~~~~~~~
// if ((startX+rectX+rectW/2 > mouseX)&&(startY+rectY-rectH/2 < mouseY)&&(startX+rectX-rectW/2 < mouseX)&&(startY+rectY+rectH/2 > mouseY)) {
if ((rectX+rectW/2 > mouseX)&&(rectY-rectH/2 < mouseY)&&(rectX-rectW/2 < mouseX)&&(rectY+rectH/2 > mouseY)) {
関数に移動したい座標を、引数として指定します。 変更前のコードは変更後の直前でコメントアウトしました。
Specify the coordinates you want to move to the function as arguments. The previous code was commented out just before the change code.
ボタンのクリックとフレットボードとの連動 - 12:45 ~
Fretboard behavior when clicking a button - 12:45 ~
最後に説明するのは、マウスをクリックした時のフレットボードの動作です。 これはテスト用の関数を使用して、その動作を確かめています。 仕組みはとても単純です。
Finally, the behavior of the fretboard when you click the mouse. It uses a test function to verify its behavior. The mechanism is very simple.
    if (mousePressed){
      fill(#3E7AB9, 200);
      rect(rectX, rectY, rectW+5, rectH+5);
      textSize(15);
      // Test function representing open chord "A" of guitar
      A(guitarChordChart[i][j]);
~~~~~~~~~~~~~~~~~~~~~~~~~~~~~~~~~~~~~~~~~~~~~~~~~~~~~~
上のセクションで説明しましたが、事前にどのボタンの上にマウスがあるかの判定を行っています。 後はマウスをクリックした時にボタンとテキストのサイズと色を変化させ、 テスト関数の「A」を発動させます。
It determines in advance which button the mouse is on. That was explained in the above section. It then changes the size and color of the button and textg when you click the mouse and activates the A test function.
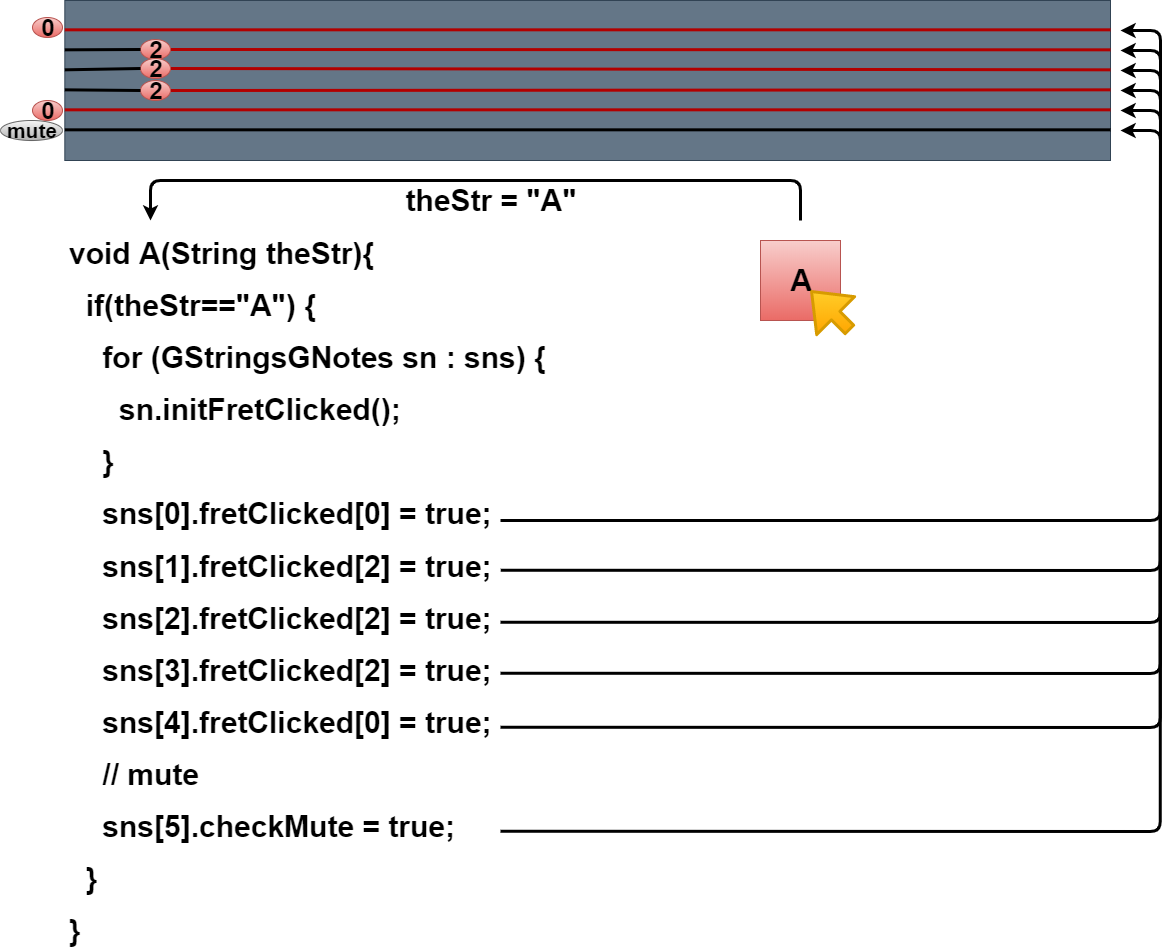
// Test function representing open chord "A" of guitar
void A(String theStr){
  if(theStr=="A") {
    for (GStringsGNotes sn : sns) {
      sn.initFretClicked();
    }
    sns[0].fretClicked[0] = true;
    sns[1].fretClicked[2] = true;
    sns[2].fretClicked[2] = true;
    sns[3].fretClicked[2] = true;
    sns[4].fretClicked[0] = true;

    // mute
    sns[5].checkMute = true;

  }
}
A関数で行っているのは、フレットボードの弦とノートを操るオブジェクトの初期化を行い、後は弦オブジェクト毎に指定したギターコードと同じ動作をするようにfretClickedをtrueにするだけです。
The A function simply initializes the object that handles the strings and notes of the fretboard, and then sets fretClicked to true so that it behaves the same as the guitar chord specified for each string object.
この動画とアプリは現在進行形で作っています。
This video and the app are in progress.
P5.jsの時より、機能が複雑になっていきそうなので多少時間がかかる可能性があります。
It may take some time since the functions seem to be more complicated than in P5.js.
ま、兎に角長くなってしまったのでPart5へ続きます。
In any case, since the blog post is long, so continues on to Part 5.