Published Date : 2020年1月21日7:55
Processingでギターフレットボードから単純なTAB譜を表示するアプリを作ろう - Part 1
Create an app that displays simple TAB notation from guitar fretboard in Processing - Part 1
This blog has an English translation
今回はYouTubeにアップした動画、「Create an app that displays simple TAB notation from guitar fretboard in Processing - Part 1」の補足説明の記事です。
Here's a little more about the "Create an app that displays simple TAB notation from guitar fretboard in Processing - Part 1" video I uploaded to YouTube.
まずは上の動画の趣旨を軽く説明します。 Processingを使用してギターのフレットボードから簡単なTAB譜を描画するアプリケーションを作成します。 このアプリケーションの利点は、ギターの弦と音階の関係をギターフレットボードから直接理解でき、1つずつ画像ファイルとして保存できることです。
First, let me briefly explain the purpose of the video above. Create an application to draw a simple TAB notation from a guitar fretboard with Processing. The advantage of this application is that you can understand the relationship between guitar strings and musical scales directly from the guitar fretboard and save them one by one as image files.
簡単に誰でもすぐに作れます。 パート1ではギターのフレットボード部分を作っていきたいと思います。
It's very easy to make this. This time, I will create the Fret board part of the guitar that is necessary for the application.
全体の説明は動画に任せるとして、補足が必要だろうと思われる部分を説明していきMASU。
I'll leave the entire explanation to the video, but I'll explain the parts that I think need to be supplemented.
過去に似たアプリをP5.jsとPythonを使ってブラウザに表示させるものを作ったのでこちらの記事も参考にしてみてください。
I've created a similar app in the past that uses P5.js and Python to display in the browser, so check out this post.
目次
Table of Contents
フレットボードのフレットの間隔の比率やその他の初期設定の数値の意味 - 1:48 ~
Meaning of the ratio of fret spacing on a fretboard and other default values - 1:48 ~
まず初期設定の変数の中身をざっと説明します。
First, let's take a quick look as the default variables.
float leftX, rightX, topLeftY, bottomLeftY, topRightY, bottomRightY;
これはフレットボードの四隅の座標です。 この4つの変数が基本中の基本です。
These are the coordinates of the four corners of the fretboard. These four variables are the basics of this application.
float widthSpacing, heightSpacing;
フレットボードを画面の端からどれだけ空けるかを決める変数です。
These are variables that determines how far away the fretboard is from the edge of the screen.
float boardLength, headSideLength, bodySideLength;
ボードの長さ、ヘッド側の長さ、所謂ナット部分です。 そしてボディ側の長さの変数です。
These are variables that the length of the board, the head side, the so-called nut part, and the body side length.
float boardRatio, headSideRatio, bodySideRatio;
~~~~~~~~~~~~~~~~~~~~~~~~~~~~~~~~~~~
boardRatio = 0.91;
headSideRatio = 0.45;
bodySideRatio = 0.6;
これらは画面の幅と縦の長さと間隔の値からフレットボード、 ヘッド側、ボディ側の長さを決める為に使われる比率です。 よりギータのフレットボードらしい形になるように手元にあるギターを実際に測ってみて、そのフレットボードの比率を参考にしました。
These are based on the screen width and height and spacing values. The ratio used to determine the length of the head and body sides. I actually measured the guitar I had and referred to the ratio of the fretboard.
float[] spacingRatioOfFrets = {0, 3.4, 3.4, 3.4, 3.1, 2.8, 2.6, 2.6, 2.2, 2.2, 2.1, 2.0, 1.8, 1.8, 1.6, 1.6, 1.5, 1.4, 1.3, 1.3, 1.3, 1.1, 1};
続いてはフレットの並びの間隔の比率です。 これも実際測った結果、この値になってます。
Next is the ratio of fret spacing. This is also this value as a result of actually measuring.
String[][] standardTuning = {{"E4", "F4", "F#4", "G4", "G#4", "A4", "A#4", "B4", "C5", "C#5", "D5", "D#5", "E5", "F5", "F#5", "G5", "G#5", "A5", "A#5", "B5", "C6", "C#6", "D6"},
          {"B3", "C4", "C#4", "D4", "D#4", "E4", "F4", "F#4", "G4", "G#4", "A4", "A#4", "B4", "C5", "C#5", "D5", "D#5", "E5", "F5", "F#5", "G5", "G#5", "A5"},
          {"G3", "G#3", "A3", "A#3", "B3", "C4", "C#4", "D4", "D#4", "E4", "F4", "F#4", "G4", "G#4", "A4", "A#4", "B4", "C5", "C#5", "D5", "D#5", "E5", "F5"},
          {"D3", "D#3", "E3", "F3", "F#3", "G3", "G#3", "A3", "A#3", "B3", "C4", "C#4", "D4", "D#4", "E4", "F4", "F#4", "G4", "G#4", "A4", "A#4", "B4", "C5"},
          {"A2", "A#2", "B2", "C3", "C#3", "D3", "D#3", "E3", "F3", "F#3", "G3", "G#3", "A3", "A#3", "B3", "C4", "C#4", "D4", "D#4", "E4", "F4", "F#4", "G4"},
          {"E2", "F2", "F#2", "G2", "G#2", "A2", "A#2", "B2", "C3", "C#3", "D3", "D#3", "E3", "F3", "F#3", "G3", "G#3", "A3", "A#3", "B3", "C4", "C#4", "D4"}};
次にギターの弦を基本のチューニングにした場合の音階を表す配列です。 チューニングや音階に関しては様々な意見がありますが、基本的に多く使われている音階を選んでます。
Next, it is an array that represents the scale when the guitar strings are tuned as the standard tuning. There are various opinions about tuning and musical scales, but I basically choose the most commonly used musical scales.
int sixStrings;
PVector[][] fretsAndNotes;
ギターの弦の数を表す変数と、後でTAB等に連動させやすい用PVector型の二次元配列としてフレットに触れる弦の位置を記録するための変数です。
These are variables that representing the number of guitar strings and for recording the position of the strings touching the fret as a two-dimentional array of PVector type for which it ts easy to be linked with TAB later.
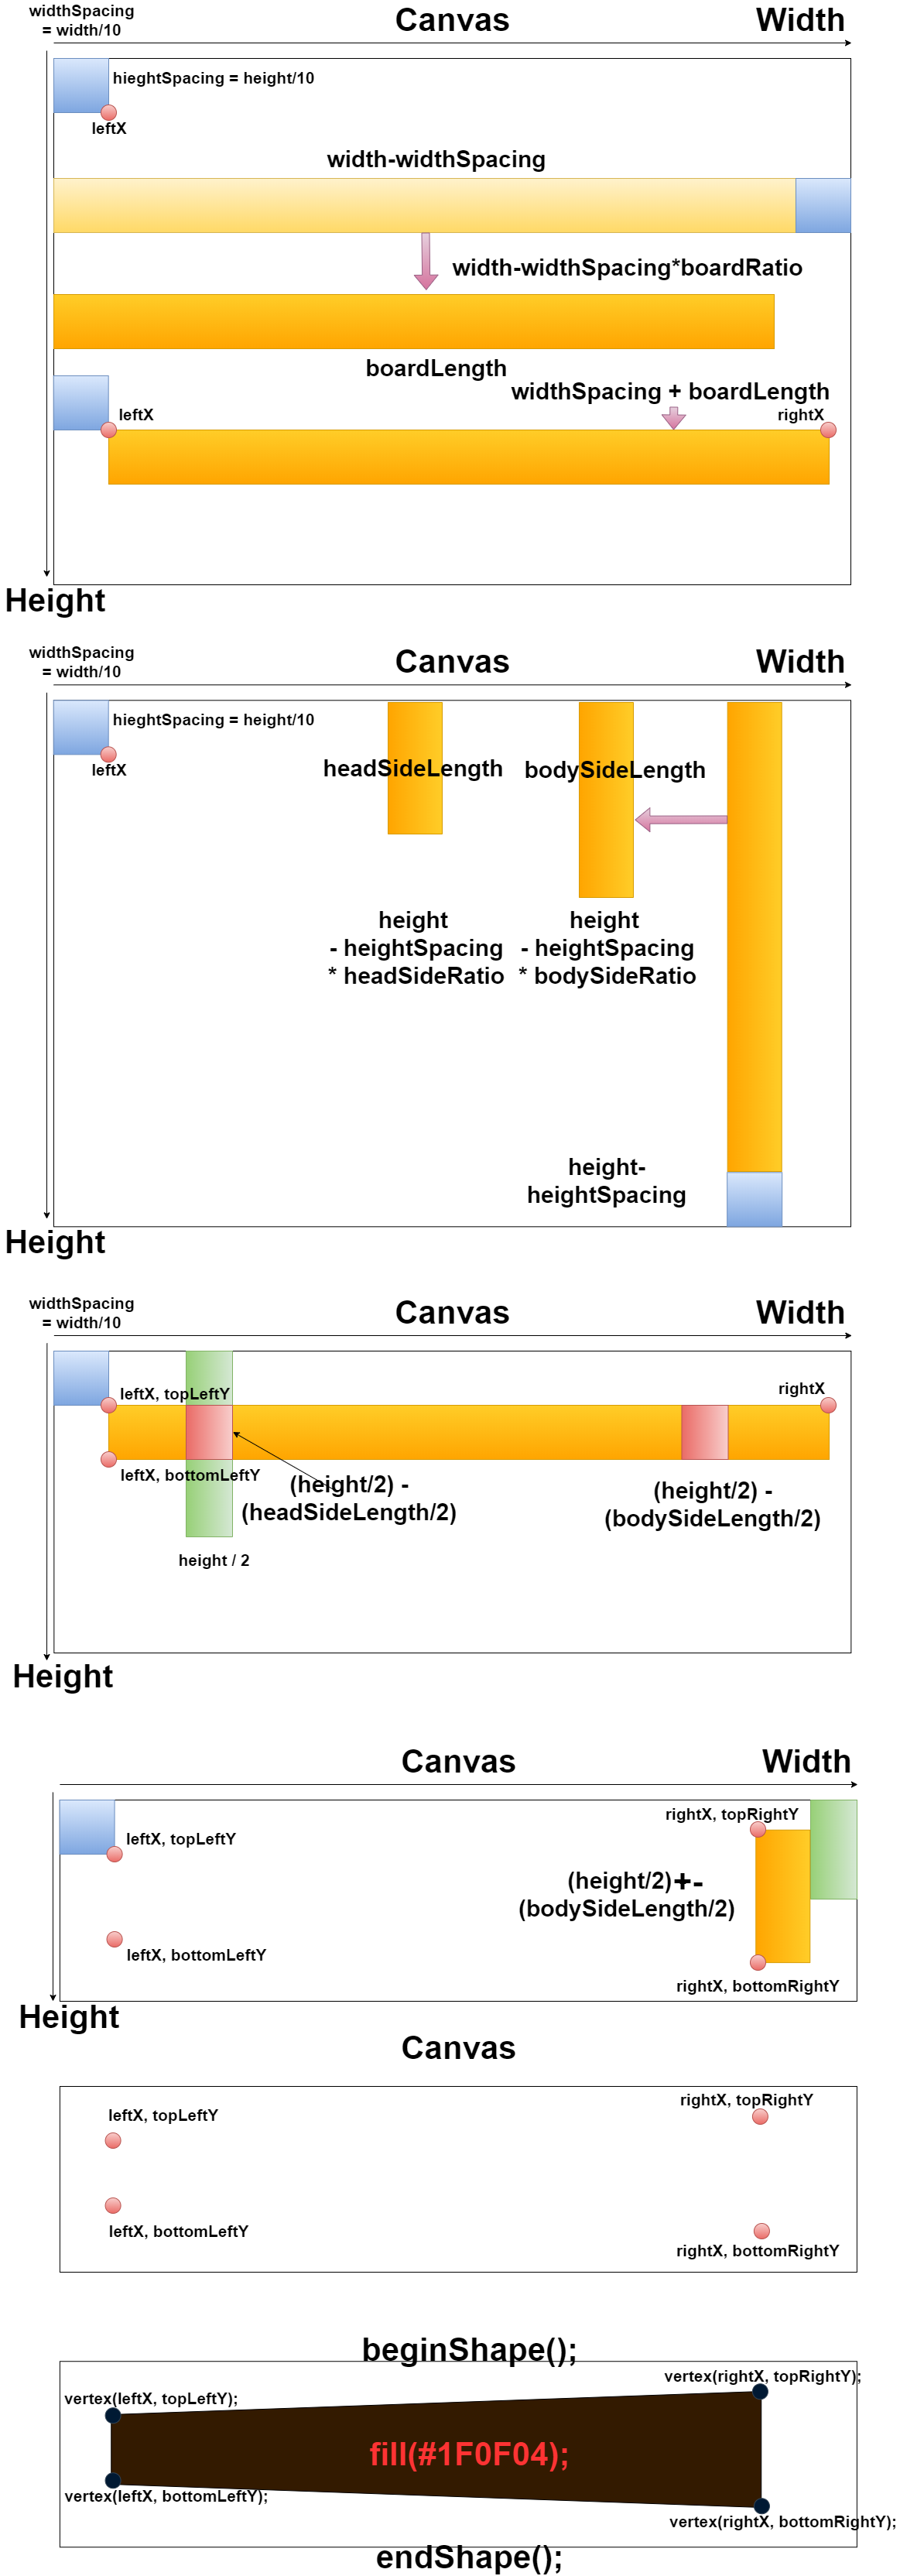
フレットボードをProcessingで描く為の自己流の組み立て方 - 6:00 ~
My own way to make a fretboard using Processing - 6:00 ~
次に、セットアップ関数内で行われているフレットボードを作る為の手順を図にして説明します。
Next, the procedure for creating a fretboard in the setup function is explained with a diagram.
ギターノートを表示してクリックできるようにする仕組み - 14:10 ~
How display and click guitar notes - 14:10 ~
次に、ギターの音の表示と、クリックした時に反応するエリアを、判別するためのフレットと弦が交わる場所の情報を、配列に記憶させる方法、そしてフレットがどのように作られるかを図で説明します。
Next, I'll show you how to store information in an array about where the frets and strings meet to determine the guitar notes display and the area that responds when you click, and how the frets are made.
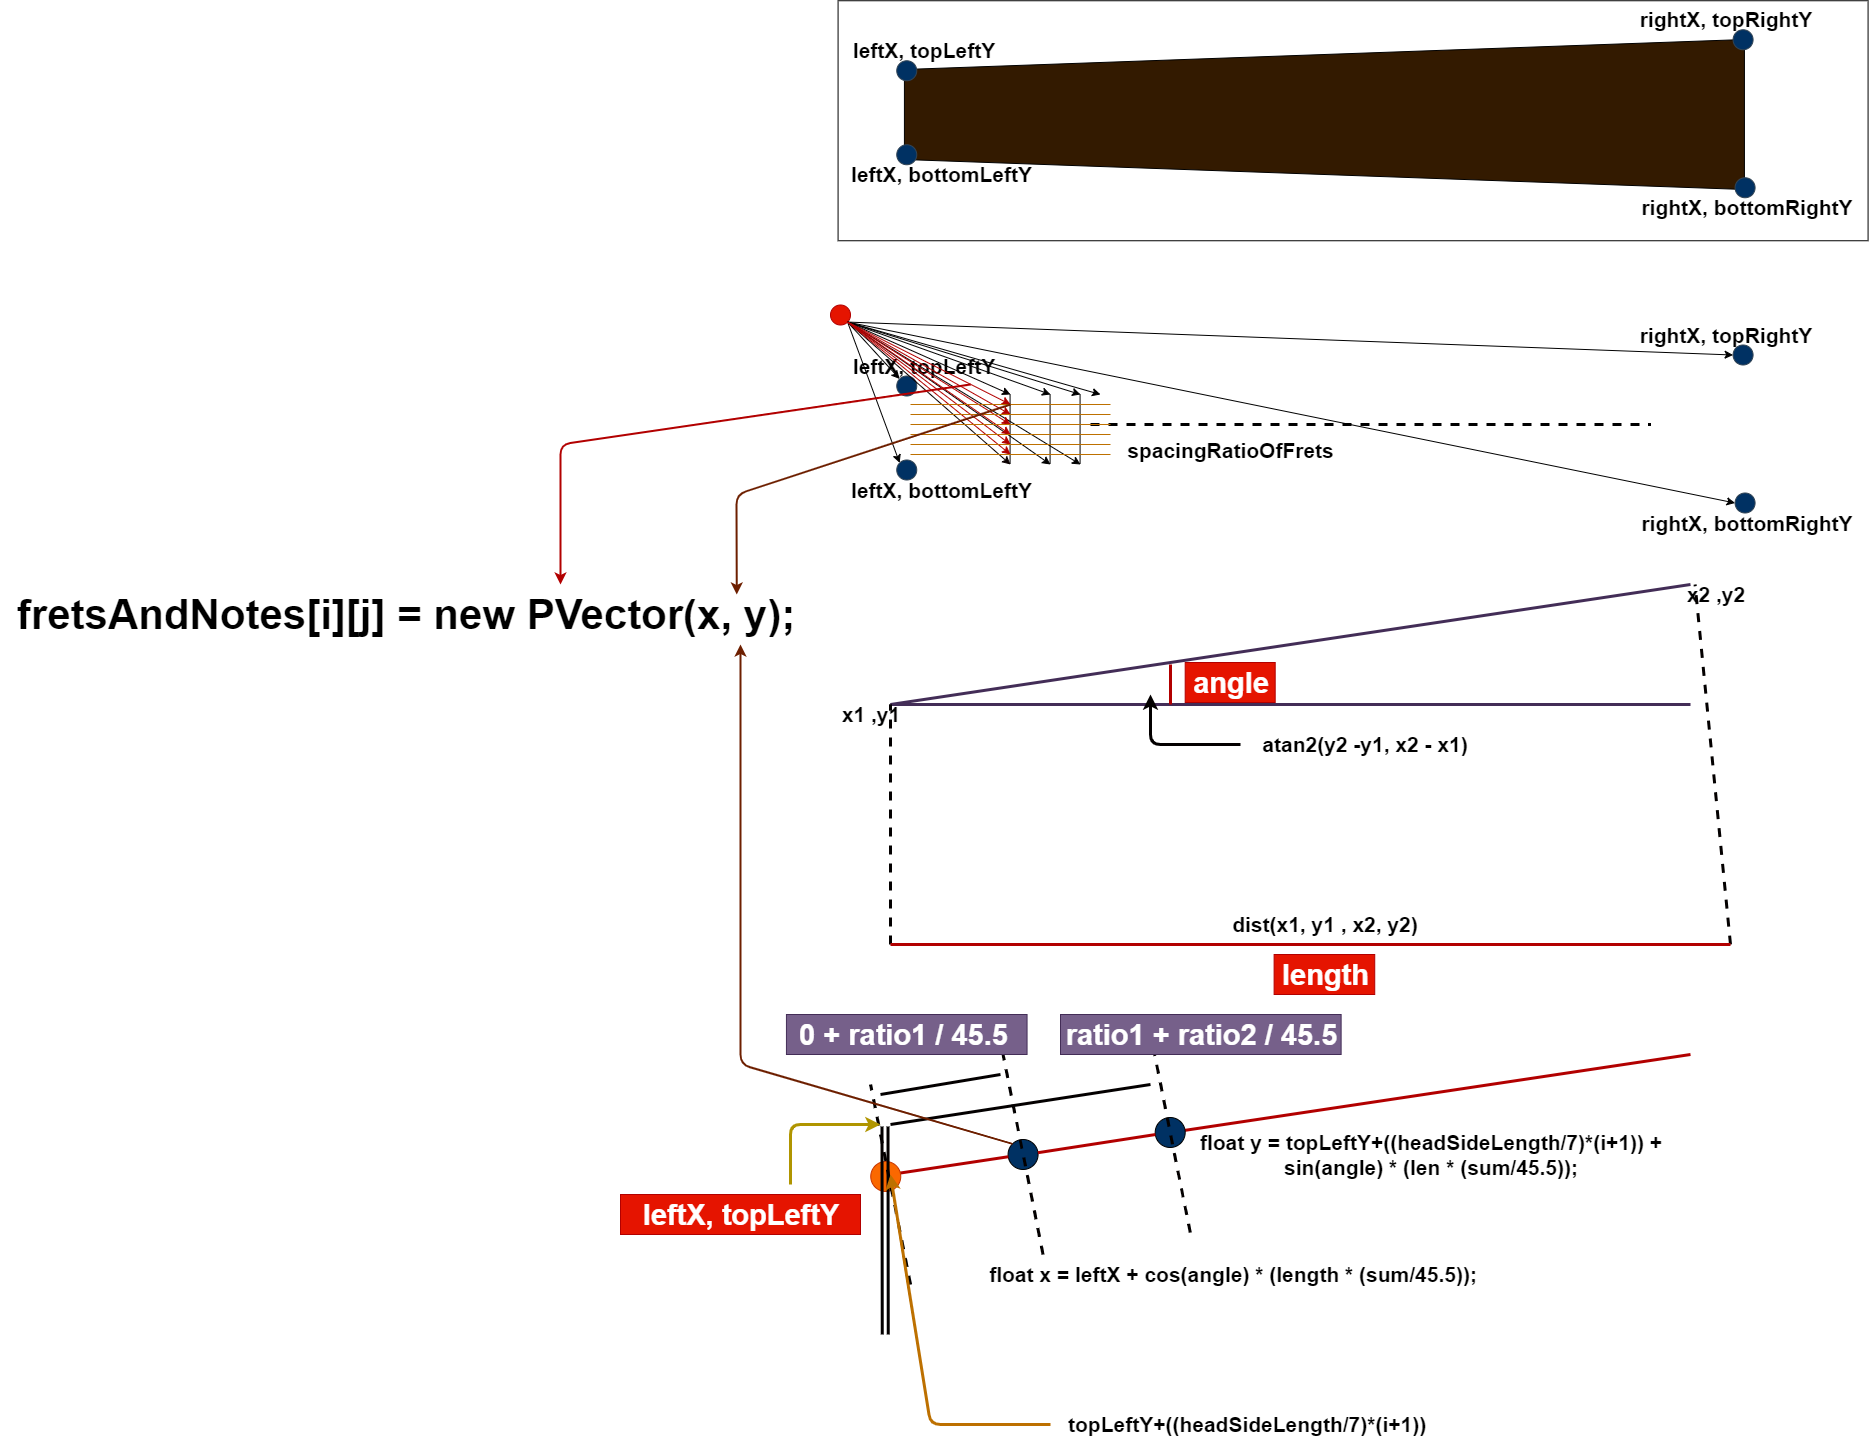
前回の記事で説明したように、座標が簡単に求められない場合は まず最初に起点となるXとYと終点のXとYを決めてしまいます。
As I explained in the previous article, if the coordinates are not easily obtained, First, determine the starting points X and Y and the ending points X and Y.
今回の場合はフレットボードの四隅の座標が決定しているので求めやすいですね。
In this case, the coordinates of the four corners of the fretboard are determined, so it is easy to obtain.
そこからアークタンジェント2関数とディスティネーション関数を利用して アングルと弦の長さを求めます。
Then use the arctangent2 and the destination functions to find the angle and the guitar string length.
そうしたらあとはcosとsinを使い、さらに弦の長さをフレットボードとフレットの比率で割ってやると、フレットに触れる弦の中点の座標を求めることができます。
Then use cos and sin and divide the length of the string by the ratio of the fretboard to the fret to get the coordinates of the midpoint of the string touching the fret.
後はライン関数やエリプス関数、テキスト関数で線や楕円やテキストをその場所に描くだけです。
All you have to do is draw a line, ellipse, or text in place using the line, ellipse, or text functions.
この動画とアプリは現在進行形で作っています。
This video and the app are in progress.
P5.jsの時より、機能が複雑になっていきそうなので多少時間がかかる可能性があります。
It may take some time since the functions seem to be more complicated than in P5.js.
ま、兎に角長くなってしまったのでPart2へ続きます。
In any case, since the blog post is long, so continues on to Part2.